

User Manual (user Manual) (ver.1.0) (English)
Page 2
Windows XP - Index Main Page Safety Instructions Notational Power Installation Cleaning Other Introduction Unpacking Front Rear Setup Connecting Your Monitor Installing the Monitor Driver - Other Operating System Installing VESA compliant mounting User's Manual 2 On-Screen Display Troubleshooting Check List Q & A Self-Test Feature Check Specifications General Specifications PowerSaver Preset Display Modes Information Service Terms Regulatory Natural Color For Better Display Authority
Windows XP - Index Main Page Safety Instructions Notational Power Installation Cleaning Other Introduction Unpacking Front Rear Setup Connecting Your Monitor Installing the Monitor Driver - Other Operating System Installing VESA compliant mounting User's Manual 2 On-Screen Display Troubleshooting Check List Q & A Self-Test Feature Check Specifications General Specifications PowerSaver Preset Display Modes Information Service Terms Regulatory Natural Color For Better Display Authority

User Manual (user Manual) (ver.1.0) (English)
Page 11
d) Plweaithseyomuramkeonsiutorre. Introduction Unparking • Monitor and Stand User's Manual 11 • Power Cord • Signal Cable • Pivot Stand and S/W CD (Option-SyncMaster 171B/181B) • Quick Setup Guide • Warranty Card (Not available in all locations) P(leSaosme emamkoedseurles tihnecflouldloewiangstitaenmds atrteaicnhcleude. Ifthaenyfoitellmows ianreg miteismsinsga, re included wictohnytaocut ryomuor dneitaoler.r.If any items are missing, contact your dealer.11jk • User's Guide and Driver Installation CD
d) Plweaithseyomuramkeonsiutorre. Introduction Unparking • Monitor and Stand User's Manual 11 • Power Cord • Signal Cable • Pivot Stand and S/W CD (Option-SyncMaster 171B/181B) • Quick Setup Guide • Warranty Card (Not available in all locations) P(leSaosme emamkoedseurles tihnecflouldloewiangstitaenmds atrteaicnhcleude. Ifthaenyfoitellmows ianreg miteismsinsga, re included wictohnytaocut ryomuor dneitaoler.r.If any items are missing, contact your dealer.11jk • User's Guide and Driver Installation CD

User Manual (user Manual) (ver.1.0) (English)
Page 15
...8226; Internet web site : http://www.samsung-monitor.com/(Worldwide) http://www.samsungmonitor.com/ (USA) http://www.sec.co.kr/ (Korea) http://www.samsungmonitor.com.cn/ (China) Auto Monitor Installation Guide 1. If you have. Installing the Monitor Driver When prompted by the operating system for...Message" window, then click the "Continue Anyway" button. Insert CD into the appropriate drive(D:\). 2. Click the Monitor Driver Installation. 4. User's Manual 15 Setup . Choose your monitor model in the "Warning" window. 6. For CD-ROM disk,it will be run automatically, if not, ...
...8226; Internet web site : http://www.samsung-monitor.com/(Worldwide) http://www.samsungmonitor.com/ (USA) http://www.sec.co.kr/ (Korea) http://www.samsungmonitor.com.cn/ (China) Auto Monitor Installation Guide 1. If you have. Installing the Monitor Driver When prompted by the operating system for...Message" window, then click the "Continue Anyway" button. Insert CD into the appropriate drive(D:\). 2. Click the Monitor Driver Installation. 4. User's Manual 15 Setup . Choose your monitor model in the "Warning" window. 6. For CD-ROM disk,it will be run automatically, if not, ...

User Manual (user Manual) (ver.1.0) (English)
Page 16
... you can see following "Message" window, then click the "Continue Anyway" button. ( This monitor driver is under certifying MS Logo, and this installation don't damage your system.) Then click "OK" button. *The certified driver will be posted on Samsung Monitor Homepage. Monitor Driver installation is completed. Insert CD into the appropriate drive(D:\). 2. Click "Display" icon and choose...
... you can see following "Message" window, then click the "Continue Anyway" button. ( This monitor driver is under certifying MS Logo, and this installation don't damage your system.) Then click "OK" button. *The certified driver will be posted on Samsung Monitor Homepage. Monitor Driver installation is completed. Insert CD into the appropriate drive(D:\). 2. Click "Display" icon and choose...

User Manual (user Manual) (ver.1.0) (English)
Page 17
... then click the "Open" button and then click the "OK" button. Prepare a blank disk and download the driver program file at the Internet web site shown here. • Internet web site : http://www.samsung-monitor.com/(Worldwide) http://www.samsungmonitor.com/ (USA) http://www.sec.co.kr/ (Korea) http://www.samsungmonitor.com.cn...
... then click the "Open" button and then click the "OK" button. Prepare a blank disk and download the driver program file at the Internet web site shown here. • Internet web site : http://www.samsung-monitor.com/(Worldwide) http://www.samsungmonitor.com/ (USA) http://www.sec.co.kr/ (Korea) http://www.samsungmonitor.com.cn...

User Manual (user Manual) (ver.1.0) (English)
Page 18
..." button. 6. Click the "Install" button in the model list, then click the "OK" button. 4. Manual Monitor Installation Guide 1. Choose "Display a list of the known drivers for this device so that I can see the "Digital Signature Not Found" window then click the "Yes" button....button then the "Close" button. Please stop installation. If you can choose a specific driver" then click "Next" and then click "Have disk". 7. Setup User's Manual 18 Auto Monitor Installation Guide 1. Insert CD-ROM into the driver. 2. Click the "OK" button. And click the "OK" button. . Choose ...
..." button. 6. Click the "Install" button in the model list, then click the "OK" button. 4. Manual Monitor Installation Guide 1. Choose "Display a list of the known drivers for this device so that I can see the "Digital Signature Not Found" window then click the "Yes" button....button then the "Close" button. Please stop installation. If you can choose a specific driver" then click "Next" and then click "Have disk". 7. Setup User's Manual 18 Auto Monitor Installation Guide 1. Insert CD-ROM into the driver. 2. Click the "OK" button. And click the "OK" button. . Choose ...

User Manual (user Manual) (ver.1.0) (English)
Page 19
Prepare a blank disk and download the driver program file at the Internet web site shown here. • Internet web site : http://www.samsung-monitor.com/(Worldwide) http://www.samsungmonitor.com/ (USA) http://www.sec.co.kr/ (Korea) http://www.samsungmonitor.com.cn/ (...then double click monsetup.exe located under the CD-ROM Driver folder.) 2. Click OK. If using Windows 95/98/ME, click Monitor Driver Installation. 3. Follow the directions as appropriate for the monitor driver, insert the CD-ROM included with this monitor. Setup User's Manual 19 . Click OK after selecting ...
Prepare a blank disk and download the driver program file at the Internet web site shown here. • Internet web site : http://www.samsung-monitor.com/(Worldwide) http://www.samsungmonitor.com/ (USA) http://www.sec.co.kr/ (Korea) http://www.samsungmonitor.com.cn/ (...then double click monsetup.exe located under the CD-ROM Driver folder.) 2. Click OK. If using Windows 95/98/ME, click Monitor Driver Installation. 3. Follow the directions as appropriate for the monitor driver, insert the CD-ROM included with this monitor. Setup User's Manual 19 . Click OK after selecting ...

User Manual (user Manual) (ver.1.0) (English)
Page 20
Click the Monitor tab, and then click Change, Specify the location of all the drivers in the previous paragraph. When the Update Device Driver Wizard dialog box appears, select "Display a list of the driver, Next. 4. When the Update Device Driver Wizard dialog box appears, follow the steps in a specific location, so you can select the driver you...
Click the Monitor tab, and then click Change, Specify the location of all the drivers in the previous paragraph. When the Update Device Driver Wizard dialog box appears, select "Display a list of the driver, Next. 4. When the Update Device Driver Wizard dialog box appears, follow the steps in a specific location, so you can select the driver you...
User Manual (user Manual) (ver.1.0) (English)
Page 36
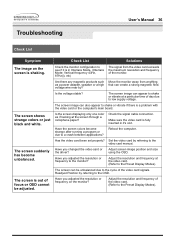
...low supply voltage. The screen suddenly has become strange after running a program or due to the monitor? Move the monitor away from the video card exceeds the maximum resolution and frequency of the monitor. The screen image can be adjusted. Set the video card by ? Have you adjusted the resolution... video card is a problem with the video card or the computer's main board. Have you changed the video card or the driver? Check List Solutions Check the monitor configuration to see if it 's slot. Are there any magnetic products such as if looking at the video card. (Refer to...
...low supply voltage. The screen suddenly has become strange after running a program or due to the monitor? Move the monitor away from the video card exceeds the maximum resolution and frequency of the monitor. The screen image can be adjusted. Set the video card by ? Have you adjusted the resolution... video card is a problem with the video card or the computer's main board. Have you changed the video card or the driver? Check List Solutions Check the monitor configuration to see if it 's slot. Are there any magnetic products such as if looking at the video card. (Refer to...
User Manual (user Manual) (ver.1.0) (English)
Page 37
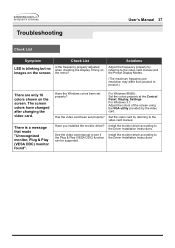
... been set properly? See the video card manual to the Driver Installation Instructions. Have you installed the monitor driver? For Windows 98(95): Set the colors properly at the Control Panel, Display, Settings. Install the monitor driver according to see if the Plug & Play (VESA DDC)...adjusted when checking the Display Timing on images on the screen. Set the video card by referring to the Driver Installation Instructions. Install the monitor driver according to the video card manual. The screen colors have changed after changing the video card. For Windows 3.1:...
... been set properly? See the video card manual to the Driver Installation Instructions. Have you installed the monitor driver? For Windows 98(95): Set the colors properly at the Control Panel, Display, Settings. Install the monitor driver according to see if the Plug & Play (VESA DDC)...adjusted when checking the Display Timing on images on the screen. Set the video card by referring to the Driver Installation Instructions. Install the monitor driver according to the video card manual. The screen colors have changed after changing the video card. For Windows 3.1:...

User Manual (user Manual) (ver.1.0) (English)
Page 38
... it does, request an after-service for the main board of the video screen is trouble with the monitor. 1. If you assembled the PC, check if the installed the adapter(video) driver and the monitor driver. 4. Troubleshooting User's Manual 38 Check List Check the following items if there is set at the "Control Panel...
... it does, request an after-service for the main board of the video screen is trouble with the monitor. 1. If you assembled the PC, check if the installed the adapter(video) driver and the monitor driver. 4. Troubleshooting User's Manual 38 Check List Check the following items if there is set at the "Control Panel...

User Manual (user Manual) (ver.1.0) (English)
Page 39
Disconnect the power cord and then clean the monitor with a soft cloth, using the VGA Utility provided by the video card. * Contact the video card manufacturer for details.) Windows 95/98: Set the resolution ... the computer or the video card manual for details. Do not leave any water to go inside the monitor. How can I set the Power Saving function? Do not allow any remains of the driver used. (Refer to Windows/Computer Manual). How can I clean the outer case/LCD Panel? Windows 3.1: Set the function...
Disconnect the power cord and then clean the monitor with a soft cloth, using the VGA Utility provided by the video card. * Contact the video card manufacturer for details.) Windows 95/98: Set the resolution ... the computer or the video card manual for details. Do not leave any water to go inside the monitor. How can I set the Power Saving function? Do not allow any remains of the driver used. (Refer to Windows/Computer Manual). How can I clean the outer case/LCD Panel? Windows 3.1: Set the function...

User Manual (user Manual) (English)
Page 7
User's Guide and Driver Installation CD If any items are included with your dealer. SyncMaster 181T Unpacking Front Rear Monitor and Stand Power Cord Signal Cable DVI Cable Pivot Stand and S/W CD(Option) Quick Setup Guide Warranty Card (Not available in all locations) Please make sure the following items are missing, contact your monitor.
User's Guide and Driver Installation CD If any items are included with your dealer. SyncMaster 181T Unpacking Front Rear Monitor and Stand Power Cord Signal Cable DVI Cable Pivot Stand and S/W CD(Option) Quick Setup Guide Warranty Card (Not available in all locations) Please make sure the following items are missing, contact your monitor.

User Manual (user Manual) (English)
Page 8
SyncMaster 191T Unpacking Front Rear Please make sure the following items are missing, contact your monitor. General Monitor and Stand Power Cord Signal Cable DVI Cable(Option) Pivot Stand and S/W CD(Option) Quick Setup Guide Warranty Card (Not available in all locations) For Multimedia model (Option) User's Guide and Driver Installation CD Multimedia Speaker Stand (Simple Stand or Pivot Stand & Pivot Software) Sound Cable If any items are included with your dealer.
SyncMaster 191T Unpacking Front Rear Please make sure the following items are missing, contact your monitor. General Monitor and Stand Power Cord Signal Cable DVI Cable(Option) Pivot Stand and S/W CD(Option) Quick Setup Guide Warranty Card (Not available in all locations) For Multimedia model (Option) User's Guide and Driver Installation CD Multimedia Speaker Stand (Simple Stand or Pivot Stand & Pivot Software) Sound Cable If any items are included with your dealer.

User Manual (user Manual) (English)
Page 9
General Monitor and Stand Power Cord Signal Cable Quick Setup Guide Pivot Stand and S/W CD(Option) Warranty Card (Not available in all locations) User's Guide and Driver Installation CD For Multimedia model (Option) Multimedia Speaker Stand (Simple Stand or Pivot Stand & Pivot Software) Sound Cable If any items are included with your dealer. SyncMaster 171N/191N/170N/172N/192N/173N/193N Unpacking Front Rear Please make sure the following items are missing, contact your monitor.
General Monitor and Stand Power Cord Signal Cable Quick Setup Guide Pivot Stand and S/W CD(Option) Warranty Card (Not available in all locations) User's Guide and Driver Installation CD For Multimedia model (Option) Multimedia Speaker Stand (Simple Stand or Pivot Stand & Pivot Software) Sound Cable If any items are included with your dealer. SyncMaster 171N/191N/170N/172N/192N/173N/193N Unpacking Front Rear Please make sure the following items are missing, contact your monitor.

User Manual (user Manual) (English)
Page 10
SyncMaster 171S/171V Unpacking Front Rear Please make sure the following items are missing, contact your monitor. General Monitor and Stand Power Cord Signal Cable Quick Setup Guide Pivot Stand and S/W CD(Option) Warranty Card (Not available in all locations) User's Guide and Driver Installation CD For Multimedia model (Option) Multimedia Speaker Stand (Simple Stand or Pivot Stand & Pivot Software) Sound Cable If any items are included with your dealer.
SyncMaster 171S/171V Unpacking Front Rear Please make sure the following items are missing, contact your monitor. General Monitor and Stand Power Cord Signal Cable Quick Setup Guide Pivot Stand and S/W CD(Option) Warranty Card (Not available in all locations) User's Guide and Driver Installation CD For Multimedia model (Option) Multimedia Speaker Stand (Simple Stand or Pivot Stand & Pivot Software) Sound Cable If any items are included with your dealer.

User Manual (user Manual) (English)
Page 18
... is complete. Press Source button to a Macintosh. Connect the power cord for the monitor into a nearby outlet. 2-1. You may get a blank or fuzzy screen, check to connect the monitor using the D-SUB connection cable. 4. SyncMaster 181T Connecting Your Monitor Installing the Monitor Driver Installing VESA compliant mounting 1. Using the DVI (Digital) connector on the video...
... is complete. Press Source button to a Macintosh. Connect the power cord for the monitor into a nearby outlet. 2-1. You may get a blank or fuzzy screen, check to connect the monitor using the D-SUB connection cable. 4. SyncMaster 181T Connecting Your Monitor Installing the Monitor Driver Installing VESA compliant mounting 1. Using the DVI (Digital) connector on the video...

User Manual (user Manual) (English)
Page 19
... on the back of an old model Macintosh, you connect properly your monitor. 2-2. You may get a blank or fuzzy screen, check to connect the monitor using the D-SUB connection cable. 4. Press Source button to a Macintosh. SyncMaster 191T Connecting Your Monitor Installing the Monitor Driver Installing VESA compliant mounting Setup-General Setup-For Multimedia model (Option...
... on the back of an old model Macintosh, you connect properly your monitor. 2-2. You may get a blank or fuzzy screen, check to connect the monitor using the D-SUB connection cable. 4. Press Source button to a Macintosh. SyncMaster 191T Connecting Your Monitor Installing the Monitor Driver Installing VESA compliant mounting Setup-General Setup-For Multimedia model (Option...

User Manual (user Manual) (English)
Page 20
To listen in privacy,connect headphones here. On/Off Volume 3. Bass Control 4. Treble Control 5. Connect a sound cable from the input source (sound card,computer,CD-ROM drive). 3. Stereo Input Jack 6. Multimedia Speaker Stand 1. Headphone Jack Connect the power cord of the multimedia stand to the multimedia stand power port on the back of the monitor. 2. Speaker Power Cord 2. SyncMaster 191T Connecting Your Monitor Installing the Monitor Driver Installing VESA compliant mounting Setup-For Multimedia model (Option) 1.
To listen in privacy,connect headphones here. On/Off Volume 3. Bass Control 4. Treble Control 5. Connect a sound cable from the input source (sound card,computer,CD-ROM drive). 3. Stereo Input Jack 6. Multimedia Speaker Stand 1. Headphone Jack Connect the power cord of the multimedia stand to the multimedia stand power port on the back of the monitor. 2. Speaker Power Cord 2. SyncMaster 191T Connecting Your Monitor Installing the Monitor Driver Installing VESA compliant mounting Setup-For Multimedia model (Option) 1.

User Manual (user Manual) (English)
Page 21
... an image, installation is complete. Setup-For Multimedia model (Option) 1. SyncMaster 171N/191N/170N/172N/192N/173N/193N Connecting Your Monitor Installing the Monitor Driver Installing VESA compliant mounting Setup-General Setup-For Multimedia model (Option) Setup-General 1. Connect the signal cable to the Macintosh computer using a special Mac adaptor. 5. ...
... an image, installation is complete. Setup-For Multimedia model (Option) 1. SyncMaster 171N/191N/170N/172N/192N/173N/193N Connecting Your Monitor Installing the Monitor Driver Installing VESA compliant mounting Setup-General Setup-For Multimedia model (Option) Setup-General 1. Connect the signal cable to the Macintosh computer using a special Mac adaptor. 5. ...


