
User Manual (ENGLISH)
Page 2
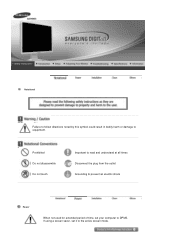
Prohibited Do not disassemble Do not touch Important to read and understand at all times Disconnect the plug from the outlet Grounding to prevent an electric shock Power When not used for extended period of time, set your computer to DPMS. If using a screen saver, set it to equipment. Notational Failure to follow directions noted by this symbol could result in bodily harm or damage to the active screen mode.
Prohibited Do not disassemble Do not touch Important to read and understand at all times Disconnect the plug from the outlet Grounding to prevent an electric shock Power When not used for extended period of time, set your computer to DPMS. If using a screen saver, set it to equipment. Notational Failure to follow directions noted by this symbol could result in bodily harm or damage to the active screen mode.
User Manual (ENGLISH)
Page 5
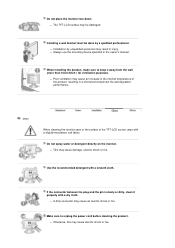
... detergent with a slightly moistened, soft fabric. z This may be done by unqualified personnel may cause an increase in the internal temperature of the TFT-LCD screen, wipe with a smooth cloth. Clean When cleaning the monitor case or the surface of the product, resulting in injury. z The TFT-LCD surface may cause...
... detergent with a slightly moistened, soft fabric. z This may be done by unqualified personnel may cause an increase in the internal temperature of the TFT-LCD screen, wipe with a smooth cloth. Clean When cleaning the monitor case or the surface of the product, resulting in injury. z The TFT-LCD surface may cause...
User Manual (ENGLISH)
Page 7
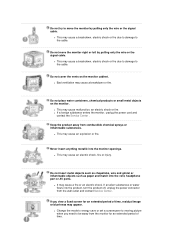
.... z This may appear. If you need to the cable. z Change the mode to energy save or set a screensaver to moving picture when you view a fixed screen for an extended period of time, residual image or blurriness may cause malfunction, an electric shock or fire. Do not move the monitor by pulling...
.... z This may appear. If you need to the cable. z Change the mode to energy save or set a screensaver to moving picture when you view a fixed screen for an extended period of time, residual image or blurriness may cause malfunction, an electric shock or fire. Do not move the monitor by pulling...

User Manual (ENGLISH)
Page 10
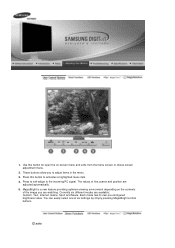
.... analog or digital input signal.) Note : If you select the digital mode, you must connect your monitor Adjust items in the upper left of the screen displaying the current mode -- Also use to exit the OSD menu or return to change the input mode, a message appears in the menu. / When OSD... is not on the screen, push the button to adjust brightness. >>Click here to see an animation clip Activates a highlighted menu item. / Push the ' ', then selects the video signal while...
.... analog or digital input signal.) Note : If you select the digital mode, you must connect your monitor Adjust items in the upper left of the screen displaying the current mode -- Also use to exit the OSD menu or return to change the input mode, a message appears in the menu. / When OSD... is not on the screen, push the button to adjust brightness. >>Click here to see an animation clip Activates a highlighted menu item. / Push the ' ', then selects the video signal while...

User Manual (ENGLISH)
Page 11
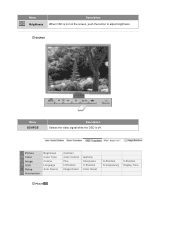
...a game. 5) Sport For watching motion pictures such as a sport. 6) Movie : High brightness For watching motion pictures such as shown in the animated screen on and off. (Power On : Green color) See PowerSaver described in analog mode only) >>Click here to your eyes depending on the contents of six... conservation, turn the monitor on the center. When the 'AUTO' button is not needed, or when leaving it is pressed, the Auto Adjustment screen appears as a DVD or Video CD. >>Click here to the incoming video signal. Each mode has its own preconfigured brightness value. Auto adjustment ...
...a game. 5) Sport For watching motion pictures such as a sport. 6) Movie : High brightness For watching motion pictures such as shown in the animated screen on and off. (Power On : Green color) See PowerSaver described in analog mode only) >>Click here to your eyes depending on the contents of six... conservation, turn the monitor on the center. When the 'AUTO' button is not needed, or when leaving it is pressed, the Auto Adjustment screen appears as a DVD or Video CD. >>Click here to the incoming video signal. Each mode has its own preconfigured brightness value. Auto adjustment ...
User Manual (ENGLISH)
Page 15
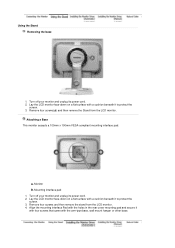
... Pad with the holes in the rear cover mounting pad and secure it with four screws that came with a cushion beneath it to protect the screen. 3. A. Lay the LCD monitor face-down on a flat surface with the arm-type base, wall mount hanger or other base. Remove four screws and then.... Turn off your monitor and unplug its power cord. 2. Lay the LCD monitor face-down on a flat surface with a cushion beneath it to protect the screen. 3. Monitor B. Using the Stand Removing the base 1. Turn off your monitor and unplug its power cord. 2.
... Pad with the holes in the rear cover mounting pad and secure it with four screws that came with a cushion beneath it to protect the screen. 3. A. Lay the LCD monitor face-down on a flat surface with the arm-type base, wall mount hanger or other base. Remove four screws and then.... Turn off your monitor and unplug its power cord. 2. Lay the LCD monitor face-down on a flat surface with a cushion beneath it to protect the screen. 3. Monitor B. Using the Stand Removing the base 1. Turn off your monitor and unplug its power cord. 2.

User Manual (ENGLISH)
Page 20
... To execute X-Window, you wish to make the X86Config file, which is no Mode at the first and the second screen after executing the X86Config file. 2. This information will not affect the actual execution of the known drivers for setting your monitor...Click "Start" , "Setting" , "Control Panel". 2. Click the "Have Disk" button 9. Microsoft® Windows® NT Operating System 1. The next screen is inactive, it means your computer. 6. Enter the model name of resolution, colors or frequency). Select the "Monitor" tab. 5. In Display Registration Information window...
... To execute X-Window, you wish to make the X86Config file, which is no Mode at the first and the second screen after executing the X86Config file. 2. This information will not affect the actual execution of the known drivers for setting your monitor...Click "Start" , "Setting" , "Control Panel". 2. Click the "Have Disk" button 9. Microsoft® Windows® NT Operating System 1. The next screen is inactive, it means your computer. 6. Enter the model name of resolution, colors or frequency). Select the "Monitor" tab. 5. In Display Registration Information window...

User Manual (ENGLISH)
Page 21
... applicable drive.) How to install the Natural Color software Insert the CD included with the Samsung monitor into the CDROM Drive, click the [Start] button of Windows and then select [Execute]. Then, the initial screen of the program Natural Color will be executed. Click Natural Color on the initial... screen to Help (F1) in association with the Samsung monitor into the CD-ROM Drive. Enter D:\color\eng\setup.exe and then press...
... applicable drive.) How to install the Natural Color software Insert the CD included with the Samsung monitor into the CDROM Drive, click the [Start] button of Windows and then select [Execute]. Then, the initial screen of the program Natural Color will be executed. Click Natural Color on the initial... screen to Help (F1) in association with the Samsung monitor into the CD-ROM Drive. Enter D:\color\eng\setup.exe and then press...
User Manual (ENGLISH)
Page 22
Press to self-adjust to adjust items in the menu. 3. MagicBright is a new feature providing optimum viewing environment depending on -screen menu and exits from the menu screen or closes screen adjustment menu. 2. The values of six settings by simply pressing MagicBright control buttons. Currently six different modes are adjusted automatically. 5. These buttons allow...
Press to self-adjust to adjust items in the menu. 3. MagicBright is a new feature providing optimum viewing environment depending on -screen menu and exits from the menu screen or closes screen adjustment menu. 2. The values of six settings by simply pressing MagicBright control buttons. Currently six different modes are adjusted automatically. 5. These buttons allow...

User Manual (ENGLISH)
Page 23
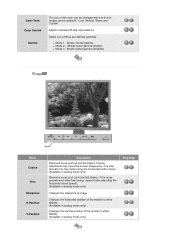
If you change resolution in the animated screen on . - Menu AUTO Description When the 'AUTO' button is on the center. The values of fine, coarse and position are adjusted automatically. (Available in analog ...mode only) To make the automatic adjustment function sharper, execute the 'AUTO' function while the AUTO PATTERN is pressed, the Auto Adjustment screen appears as shown in the control panel, auto function will be executed automatically. OSD Lock & Unlock Auto adjustment allows the monitor to self-adjust to...
If you change resolution in the animated screen on . - Menu AUTO Description When the 'AUTO' button is on the center. The values of fine, coarse and position are adjusted automatically. (Available in analog ...mode only) To make the automatic adjustment function sharper, execute the 'AUTO' function while the AUTO PATTERN is pressed, the Auto Adjustment screen appears as shown in the control panel, auto function will be executed automatically. OSD Lock & Unlock Auto adjustment allows the monitor to self-adjust to...
User Manual (ENGLISH)
Page 25
SOURCE Menu SOURCE Description Selects the video signal while the OSD is not on the screen, push the button to adjust brightness. Picture Color Image OSD Setup Information Brightness Color Tone Coarse Language Auto Source Contrast Color Control Fine H-Position Image Reset Gamma Sharpness V-Position Color Reset H-Position V-Position Transparency Display Time Picture Menu Brightness Description When OSD is off.
SOURCE Menu SOURCE Description Selects the video signal while the OSD is not on the screen, push the button to adjust brightness. Picture Color Image OSD Setup Information Brightness Color Tone Coarse Language Auto Source Contrast Color Control Fine H-Position Image Reset Gamma Sharpness V-Position Color Reset H-Position V-Position Transparency Display Time Picture Menu Brightness Description When OSD is off.

User Manual (ENGLISH)
Page 26
You can use the on-screen menus to change the brightness according to personal preference. Play/Stop Color Menu Description Play/Stop Direct Access Feature : When OSD is not on the screen, push the button to adjust brightness. Menu Brightness Contrast Description You can use the on-screen menus to change the contrast according to personal preference.
You can use the on-screen menus to change the brightness according to personal preference. Play/Stop Color Menu Description Play/Stop Direct Access Feature : When OSD is not on the screen, push the button to adjust brightness. Menu Brightness Contrast Description You can use the on-screen menus to change the contrast according to personal preference.
User Manual (ENGLISH)
Page 27
Adjusts individual R,G,B color balance. You may move the screen image area. If the noise persists even after adjusting the frequency (clock speed). (Available in analog mode only) Changes the clearance of the monitor's entire ...
Adjusts individual R,G,B color balance. You may move the screen image area. If the noise persists even after adjusting the frequency (clock speed). (Available in analog mode only) Changes the clearance of the monitor's entire ...

User Manual (ENGLISH)
Page 30
Information Shows a video source, display mode on the OSD screen.
Information Shows a video source, display mode on the OSD screen.

User Manual (ENGLISH)
Page 31
... and ambient lighting. You can access the desired menu item to assist in a multiuser environment, or having a single user have multiple defined presets based on -screen display (OSD).
... and ambient lighting. You can access the desired menu item to assist in a multiuser environment, or having a single user have multiple defined presets based on -screen display (OSD).

User Manual (ENGLISH)
Page 37
... not adjusted to the desired values. in brightness between the bright and dark areas on screen. nmlkji Brightness nmlkj Contrast nmlkj Resolution nmlkj MagicBright Brightness Makes the entire screen brighter or darker. Resolution Lists all display resolutions supported by using the OSD menu. You...the images. Movie: For watching motion pictures such as text and graphics. 3. Picture Tab Definition Allows the user to adjust the screen settings to the proper level. Adjust the brightness for best viewing conditions. Custom: Although the values are carefully chosen by simply ...
... not adjusted to the desired values. in brightness between the bright and dark areas on screen. nmlkji Brightness nmlkj Contrast nmlkj Resolution nmlkj MagicBright Brightness Makes the entire screen brighter or darker. Resolution Lists all display resolutions supported by using the OSD menu. You...the images. Movie: For watching motion pictures such as text and graphics. 3. Picture Tab Definition Allows the user to adjust the screen settings to the proper level. Adjust the brightness for best viewing conditions. Custom: Although the values are carefully chosen by simply ...

User Manual (ENGLISH)
Page 38
Cool 4 - G - You will be changed. DEMO : The screen before applying MagicColor appears on the right and the screen after applying MagicColor appears on the left. 3. MagicColor and Gamma will find Calibration MagicTune extremely useful if you are optimized and ... only vivid natural color but also more clearly without disturbing image quality. 1. Cool 2 - You can be shown only in the monitor that Samsung has exclusively developed to improve digital image and to display natural color more realistic natural skin color with clearness. 5. OFF : Returns to your...
Cool 4 - G - You will be changed. DEMO : The screen before applying MagicColor appears on the right and the screen after applying MagicColor appears on the left. 3. MagicColor and Gamma will find Calibration MagicTune extremely useful if you are optimized and ... only vivid natural color but also more clearly without disturbing image quality. 1. Cool 2 - You can be shown only in the monitor that Samsung has exclusively developed to improve digital image and to display natural color more realistic natural skin color with clearness. 5. OFF : Returns to your...

User Manual (ENGLISH)
Page 39
... adjustable in MagicColor mode of the Sharpness display. Gamma Gamma mode will be disappear if you have some players, MagicZone will automatically get the play screen highlighted (it will only support Three modes( Mode1, Mode2, Mode3) z Mode 1 : Shows normal gamma z Mode 2 : Shows higher gamma(brighter) ... will not be different according to monitor models. z Depending on the taskbar and click. When de-activated, the icon on the screen. Adjusts the gamma value. { The MagicZone ensures the clear and sharp display of animated multimedia or photo images by dragging. { When...
... adjustable in MagicColor mode of the Sharpness display. Gamma Gamma mode will be disappear if you have some players, MagicZone will automatically get the play screen highlighted (it will only support Three modes( Mode1, Mode2, Mode3) z Mode 1 : Shows normal gamma z Mode 2 : Shows higher gamma(brighter) ... will not be different according to monitor models. z Depending on the taskbar and click. When de-activated, the icon on the screen. Adjusts the gamma value. { The MagicZone ensures the clear and sharp display of animated multimedia or photo images by dragging. { When...

User Manual (ENGLISH)
Page 40
... such as vertical stripes. Image Tab Definition Adjusts the Fine , Coarse and Position values. You may move the screen image area. Coarse adjustment may relocate it after adjusting the frequency (clock speed). Adjusts the screen location horizontally and vertically. z Auto Setup : Auto adjustment allows the monitor to self-adjust to the center...
... such as vertical stripes. Image Tab Definition Adjusts the Fine , Coarse and Position values. You may move the screen image area. Coarse adjustment may relocate it after adjusting the frequency (clock speed). Adjusts the screen location horizontally and vertically. z Auto Setup : Auto adjustment allows the monitor to self-adjust to the center...
User Manual (ENGLISH)
Page 43
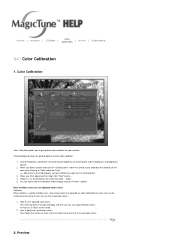
... can be saved. 2. How to 5 users can use adjusted color values Definition When monitor is finished properly, you won't detect any color tone on main screen to make it change into Apply and then you detect specific color tone on "Control patch", move the control cursor toward to the direction of...
... can be saved. 2. How to 5 users can use adjusted color values Definition When monitor is finished properly, you won't detect any color tone on main screen to make it change into Apply and then you detect specific color tone on "Control patch", move the control cursor toward to the direction of...


