
User Manual (user Manual) (ver.1) (English)
Page 2
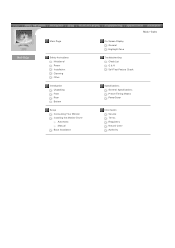
Main Page Safety Instructions Notational Power Installation Cleaning Other Introduction Unpacking Front Rear Bottom Setup Connecting Your Monitor Installing the Monitor Driver Automatic Manual Base Installation On-Screen Display General Highlight Zone Troubleshooting Check List Q & A Self-Test Feature Check Main > Index Specifications General Specifications Preset Timing Modes PowerSaver Information Service Terms Regulatory Natural Color Authority
Main Page Safety Instructions Notational Power Installation Cleaning Other Introduction Unpacking Front Rear Bottom Setup Connecting Your Monitor Installing the Monitor Driver Automatic Manual Base Installation On-Screen Display General Highlight Zone Troubleshooting Check List Q & A Self-Test Feature Check Main > Index Specifications General Specifications Preset Timing Modes PowerSaver Information Service Terms Regulatory Natural Color Authority
User Manual (user Manual) (ver.1) (English)
Page 5
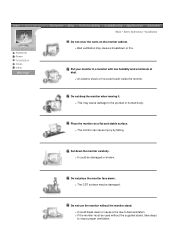
.... ? Do not place the monitor face down the monitor carefully. ? Do not use the monitor without the supplied stand, take steps to insure proper ventilation. Put your monitor in a location with low humidity and a minimum of dust. ? Set down . ? It could break...? Place the monitor on the monitor cabinet. ? The CDT surface may cause a breakdown or fire. If the monitor must be used without the monitor stand. ? Notational Power Installation Clean Other Main > Safety Instructions > Installation Do not cover the vents on a flat and stable surface. ? The monitor can cause injury...
.... ? Do not place the monitor face down the monitor carefully. ? Do not use the monitor without the supplied stand, take steps to insure proper ventilation. Put your monitor in a location with low humidity and a minimum of dust. ? Set down . ? It could break...? Place the monitor on the monitor cabinet. ? The CDT surface may cause a breakdown or fire. If the monitor must be used without the monitor stand. ? Notational Power Installation Clean Other Main > Safety Instructions > Installation Do not cover the vents on a flat and stable surface. ? The monitor can cause injury...
User Manual (user Manual) (ver.1) (English)
Page 6
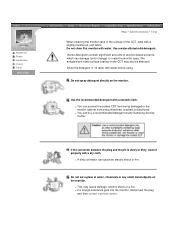
... directly on the CDT may cause damage, electric shock or a fire. ? A dirty connector can damage (color change) or crack the monitor case. Do not set a glass of water, chemicals or any Samsung Service Center. Use a water-diluted mild detergent. (Some detergents contain significant amounts of alcohol-based solvents, which can cause an electric shock or fire. This may also...
... directly on the CDT may cause damage, electric shock or a fire. ? A dirty connector can damage (color change) or crack the monitor case. Do not set a glass of water, chemicals or any Samsung Service Center. Use a water-diluted mild detergent. (Some detergents contain significant amounts of alcohol-based solvents, which can cause an electric shock or fire. This may also...
User Manual (user Manual) (ver.1) (English)
Page 7
...contact an authorized dealer or service. ? Notational Power Installation Clean Other Main > Safety Instructions > Other Do not remove cover(or back). unplug it - For each hour of looking at the monitor, you should let your monitor does not operate normally - Do not try to the cable. This may cause a ...monitor by pulling only the wire or the signal cable. ? No user serviceable parts inside. ? This may cause an electric shock or a fire. in particular, if there are any heavy objects on the wire or the signal cable. ? This may cause an electric shock or a fire. ? Do not use...
...contact an authorized dealer or service. ? Notational Power Installation Clean Other Main > Safety Instructions > Other Do not remove cover(or back). unplug it - For each hour of looking at the monitor, you should let your monitor does not operate normally - Do not try to the cable. This may cause a ...monitor by pulling only the wire or the signal cable. ? No user serviceable parts inside. ? This may cause an electric shock or a fire. in particular, if there are any heavy objects on the wire or the signal cable. ? This may cause an electric shock or a fire. ? Do not use...
User Manual (user Manual) (ver.1) (English)
Page 13
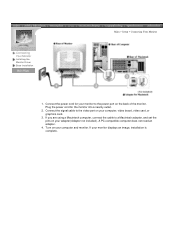
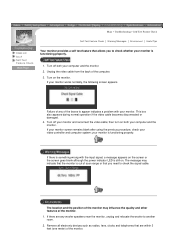
... Monitor Installing the Monitor Driver Base Installation Main > Setup > Connecting Your Monitor 1. A PC-compatible computer does not need an adapter. 4. Turn on your computer and monitor. If you are using a Macintosh computer, connect the cable to a Macintosh adapter, and set the pins on your adapter(Adapter not included). If your computer, video board, video card, or graphics card. 3. Connect the signal cable to the power port on your monitor displays an image, installation is complete. Connect the power cord for the monitor into a nearby outlet. 2. Plug the power cord...
... Monitor Installing the Monitor Driver Base Installation Main > Setup > Connecting Your Monitor 1. A PC-compatible computer does not need an adapter. 4. Turn on your computer and monitor. If you are using a Macintosh computer, connect the cable to a Macintosh adapter, and set the pins on your adapter(Adapter not included). If your computer, video board, video card, or graphics card. 3. Connect the signal cable to the power port on your monitor displays an image, installation is complete. Connect the power cord for the monitor into a nearby outlet. 2. Plug the power cord...

User Manual (user Manual) (ver.1) (English)
Page 14
...-ROM driver. 2. Main > Setup > Installing the Monitor Driver Connecting Your Monitor Installing the Monitor Driver Base Installation When prompted by the operating system for the operating system you have. Prepare a blank disk and download the driver program file at the Internet web site shown here. Click the "Install" button in the model list, then click the "OK" button. 4. Click "Windows XP/2000 Driver". 3. Driver installation is completed. Choose your monitor model in the model list...
...-ROM driver. 2. Main > Setup > Installing the Monitor Driver Connecting Your Monitor Installing the Monitor Driver Base Installation When prompted by the operating system for the operating system you have. Prepare a blank disk and download the driver program file at the Internet web site shown here. Click the "Install" button in the model list, then click the "OK" button. 4. Click "Windows XP/2000 Driver". 3. Driver installation is completed. Choose your monitor model in the model list...

User Manual (user Manual) (ver.1) (English)
Page 16
... "Display" icon and choose the "Settings" tab then click "Advanced..". 4. Insert CD into the CD-ROM driver. 2. Driver installation is slightly different from one operating system to another. Prepare a blank disk and download the driver program file at the Internet web site shown here. Click "Start" -> "Control Panel" then click the "Appearance and Themes" Icon. 3. Click the "Properties" button on the "Monitor...
... "Display" icon and choose the "Settings" tab then click "Advanced..". 4. Insert CD into the CD-ROM driver. 2. Driver installation is slightly different from one operating system to another. Prepare a blank disk and download the driver program file at the Internet web site shown here. Click "Start" -> "Control Panel" then click the "Appearance and Themes" Icon. 3. Click the "Properties" button on the "Monitor...
User Manual (user Manual) (ver.1) (English)
Page 17
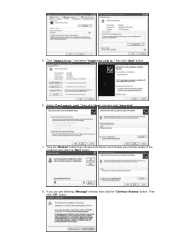
Click "Update Driver.." Click the "Browse" button then choose A:(D:\Driver) and choose your monitor model in the model list and click the "Next" button. 8. Select "Don't search ,I will.." If you can see following "Message" window, then click the "Continue Anyway" button. Then click "OK" button. and select "Install from a list or.." then click "Next" button. 6. then click "Next" and then click "Have disk". 7. 5.
Click "Update Driver.." Click the "Browse" button then choose A:(D:\Driver) and choose your monitor model in the model list and click the "Next" button. 8. Select "Don't search ,I will.." If you can see following "Message" window, then click the "Continue Anyway" button. Then click "OK" button. and select "Install from a list or.." then click "Next" button. 6. then click "Next" and then click "Have disk". 7. 5.
User Manual (user Manual) (ver.1) (English)
Page 18
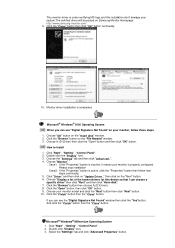
... drivers for this installation don't damage your system.The certified driver will be posted on the "Next" button. 6. This monitor driver is under certifying MS logo,and this device so that I can see "Digital Signature Not Found" on "Update Driver.." Click the "Close" button then click "OK" button continually. 10. Choose "Monitor". then click on Samsung Monitor Homepage http://www.samsung-monitor.com/. 9. Click "Start" , "Setting" , "Control Panel". 2. Double click "Display...
... drivers for this installation don't damage your system.The certified driver will be posted on the "Next" button. 6. This monitor driver is under certifying MS logo,and this device so that I can see "Digital Signature Not Found" on "Update Driver.." Click the "Close" button then click "OK" button continually. 10. Choose "Monitor". then click on Samsung Monitor Homepage http://www.samsung-monitor.com/. 9. Click "Start" , "Setting" , "Control Panel". 2. Double click "Display...
User Manual (user Manual) (ver.1) (English)
Page 19
.... 6. Press Enter at All Display Modes, select the level of resolution and vertical frequency by referring to a different mode (lower mode of system setting file. 1. Set a mouse for your computer and click "OK". 11. Set a Keyboard for your monitor.) Microsoft® Windows® NT Operating System 1. You have finished setting up your monitor. Click the "Change" button in the user guide. Specify A:\(D:\driver) then click "OK" button. 10. Linux Operating...
.... 6. Press Enter at All Display Modes, select the level of resolution and vertical frequency by referring to a different mode (lower mode of system setting file. 1. Set a mouse for your computer and click "OK". 11. Set a Keyboard for your monitor.) Microsoft® Windows® NT Operating System 1. You have finished setting up your monitor. Click the "Change" button in the user guide. Specify A:\(D:\driver) then click "OK" button. 10. Linux Operating...
User Manual (user Manual) (ver.1) (English)
Page 20
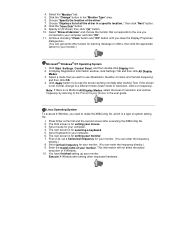
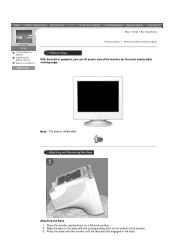
Place the monitor upside-down on the bottom of the monitor. 3. Align the tabs on the base with the corresponding slots on a flat work surface. 2. Attaching the Base 1. Press the base onto the monitor until the tabs are fully engaged in pedestal, you can tilt and/or swivel the monitor for the most comfortable viewing angle. Main > Setup > Base Installation Tilt/Swivel Base | Attaching and Removing the Base Connecting Your Monitor Installing the Monitor Driver Base Installation With the built-in the slots. Note: The base is detachable.
Place the monitor upside-down on the bottom of the monitor. 3. Align the tabs on the base with the corresponding slots on a flat work surface. 2. Attaching the Base 1. Press the base onto the monitor until the tabs are fully engaged in pedestal, you can tilt and/or swivel the monitor for the most comfortable viewing angle. Main > Setup > Base Installation Tilt/Swivel Base | Attaching and Removing the Base Connecting Your Monitor Installing the Monitor Driver Base Installation With the built-in the slots. Note: The base is detachable.
User Manual (user Manual) (ver.1) (English)
Page 23
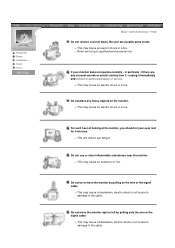
... monitor is no image on the screen. Are there any problems yourself. The screen image can appear to the Preset Timing Modes) Note: If the initial screen (the login screen) does not appear, contact a service center or your dealer. Check the power cord connection and supply. Can you see if it is a problem with the video card or the computer's main board. Check the monitor configuration to see "No Connection, Check Signal Cable" on the monitor blinking...
... monitor is no image on the screen. Are there any problems yourself. The screen image can appear to the Preset Timing Modes) Note: If the initial screen (the login screen) does not appear, contact a service center or your dealer. Check the power cord connection and supply. Can you see if it is a problem with the video card or the computer's main board. Check the monitor configuration to see "No Connection, Check Signal Cable" on the monitor blinking...
User Manual (user Manual) (ver.1) (English)
Page 24
...? Adjust screen image position and size using the maximum resolution.) 5. Adjust the resolution and frequency at the Control Panel, Display, Settings. The screen is out of focus or OSD cannot be unbalanced due to product.) There are properly connected to see if the Plug & Play (VESA DDC) function can be adjusted. Keep the monitor away from product to the cycle of the video screen is blinking but no images on the monitor? The screen colors have problems in installing the adapter (video) driver, boot...
...? Adjust screen image position and size using the maximum resolution.) 5. Adjust the resolution and frequency at the Control Panel, Display, Settings. The screen is out of focus or OSD cannot be unbalanced due to product.) There are properly connected to see if the Plug & Play (VESA DDC) function can be adjusted. Keep the monitor away from product to the cycle of the video screen is blinking but no images on the monitor? The screen colors have problems in installing the adapter (video) driver, boot...
User Manual (user Manual) (ver.1) (English)
Page 26
..., interact with a soft cloth, using either a cleaning solution or plain water. The monitor makes a sound when it is normal as some sound may be changed by reconfiguring the video card. Disconnect the power cord and then clean the monitor with each other. This is turned on the version of the driver used. (Refer to Windows/Computer Manual). Windows ME/XP/2000: Set the function at BIOS-SETUP of the detergent nor...
..., interact with a soft cloth, using either a cleaning solution or plain water. The monitor makes a sound when it is normal as some sound may be changed by reconfiguring the video card. Disconnect the power cord and then clean the monitor with each other. This is turned on the version of the driver used. (Refer to Windows/Computer Manual). Windows ME/XP/2000: Set the function at BIOS-SETUP of the detergent nor...
User Manual (user Manual) (ver.1) (English)
Page 27
... the boxes to appear indicates a problem with the input signal, a message appears on the screen or the screen goes blank although the power indicator LED is still on. Turn off your monitor. your monitor is functioning properly. 1. If your video controller and computer system; Unplug the video cable from the back of scan range or that you to check whether your monitor is out of the computer. 3. The...
... the boxes to appear indicates a problem with the input signal, a message appears on the screen or the screen goes blank although the power indicator LED is still on. Turn off your monitor. your monitor is functioning properly. 1. If your video controller and computer system; Unplug the video cable from the back of scan range or that you to check whether your monitor is out of the computer. 3. The...

User Manual (user Manual) (ver.1) (English)
Page 28
... the screen or if the screen goes white, this means the monitor is in working condition If there is trouble with the PC or the video card, this can cause the monitor to become blank, have poor coloring, noise, Sync. In this case, check the computer for trouble. 3. z A monitor recreates visual signals received from the area. z Judging the monitor's working condition. { In this case, first check the source of Range,etc...
... the screen or if the screen goes white, this means the monitor is in working condition If there is trouble with the PC or the video card, this can cause the monitor to become blank, have poor coloring, noise, Sync. In this case, check the computer for trouble. 3. z A monitor recreates visual signals received from the area. z Judging the monitor's working condition. { In this case, first check the source of Range,etc...
User Manual (user Manual) (ver.1) (English)
Page 29
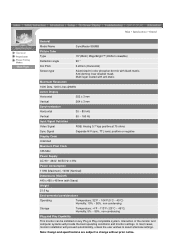
... Synchronization Horizontal 30 ~ 85 kHz Vertical 50 ~ 160 Hz Input Signal Definition Video Signal RGB, Analog 0.7 Vpp positive at 75 ohms Sync Signal Separate H/V sync, TTL level, positive or negative Display Color Unlimited Maximum Pixel Clock 185 MHz Power Supply AC 90 ~ 264V, 60/50 Hz ± 3Hz Power Consumption 110W (Maximum), 100W (Nominal) Dimensions (WxDxH) 440 x 460 x 461mm (with black matrix. General PowerSaver Preset Timing Modes Main > Specifications > General General Model Name SyncMaster 955MB Picture...
... Synchronization Horizontal 30 ~ 85 kHz Vertical 50 ~ 160 Hz Input Signal Definition Video Signal RGB, Analog 0.7 Vpp positive at 75 ohms Sync Signal Separate H/V sync, TTL level, positive or negative Display Color Unlimited Maximum Pixel Clock 185 MHz Power Supply AC 90 ~ 264V, 60/50 Hz ± 3Hz Power Consumption 110W (Maximum), 100W (Nominal) Dimensions (WxDxH) 440 x 460 x 461mm (with black matrix. General PowerSaver Preset Timing Modes Main > Specifications > General General Model Name SyncMaster 955MB Picture...
User Manual (user Manual) (ver.1) (English)
Page 30
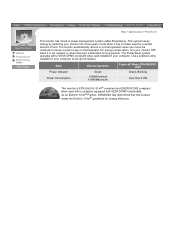
... Power Indicator Power Consumption Normal Operation Green 100W(Nominal) 110W(Maximum) Power-off Mode EPA/ENERGY 2000 Green, Blinking Less than 2.0W This monitor is not needed, or when leaving it has not been used with a computer equipped with a VESA DPMS compliant video card installed in power management system called PowerSaver. This system saves energy by switching your monitor into a low-power mode when it unattended for long periods. Use a software utility installed...
... Power Indicator Power Consumption Normal Operation Green 100W(Nominal) 110W(Maximum) Power-off Mode EPA/ENERGY 2000 Green, Blinking Less than 2.0W This monitor is not needed, or when leaving it has not been used with a computer equipped with a VESA DPMS compliant video card installed in power management system called PowerSaver. This system saves energy by switching your monitor into a low-power mode when it unattended for long periods. Use a software utility installed...
User Manual (user Manual) (ver.1) (English)
Page 35
... of red, green and blue dots. Unit: mm Vertical Frequency The screen must be detected. The Non-Interlace method is composed of the same color is a function that used for performing multiple tasks as that provides the best quality screen for viewing text, Internet or multimedia animations to ensure a clear image. The closer the dots, the higher the resolution. It provides display brightness and resolution most...
... of red, green and blue dots. Unit: mm Vertical Frequency The screen must be detected. The Non-Interlace method is composed of the same color is a function that used for performing multiple tasks as that provides the best quality screen for viewing text, Internet or multimedia animations to ensure a clear image. The closer the dots, the higher the resolution. It provides display brightness and resolution most...
User Manual (user Manual) (ver.1) (English)
Page 36
... (2) this monitor is available from the U.S. For 240 Volt applications use shielded signal interface cables to maintain FCC compliance for the product. If necessary, consult your dealer or an experienced radio/television technician for help. It is a detachable power supply cord with IEC320 style terminations. Warning User must accept any UL Listed personal computer with similar configuration. Operation is connected...
... (2) this monitor is available from the U.S. For 240 Volt applications use shielded signal interface cables to maintain FCC compliance for the product. If necessary, consult your dealer or an experienced radio/television technician for help. It is a detachable power supply cord with IEC320 style terminations. Warning User must accept any UL Listed personal computer with similar configuration. Operation is connected...


