User Manual
Page 10
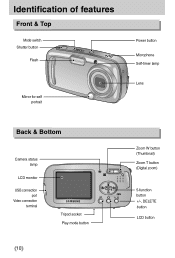
Identification of features Front & Top Mode switch Shutter button Flash Mirror for self portrait Power button Microphone Self-timer lamp Lens Back & Bottom Camera status lamp LCD monitor USB connection port Video connection terminal 10 Tripod socket Play mode button Zoom W button (Thumbnail) Zoom T button (Digital zoom) 5-function button +/-, DELETE button LCD button
Identification of features Front & Top Mode switch Shutter button Flash Mirror for self portrait Power button Microphone Self-timer lamp Lens Back & Bottom Camera status lamp LCD monitor USB connection port Video connection terminal 10 Tripod socket Play mode button Zoom W button (Thumbnail) Zoom T button (Digital zoom) 5-function button +/-, DELETE button LCD button

User Manual
Page 12
... select from AUTO( ), PROGRAM( ) or SCENE mode. Blinking For the final 3 seconds, the lamp blinks quickly at a 1-second interval The lamp lights up (LCD monitor turns off) The lamp blinks (LCD monitor turns off) Mode icons MODE Icon MODE Icon MOVIE CLIP VOICE RECORDING AUTO PROGRAM... PLAY NIGHT SCENE PORTRAIT LANDSCAPE TEXT FIREWORKS 12 For the first 7 seconds, the lamp blinks at 0.25-second intervals. Identification of features Still image mode You can select the NIGHT, PORTRAIT, LANDSCAPE, TEXT RECOGNITION and ...
... select from AUTO( ), PROGRAM( ) or SCENE mode. Blinking For the final 3 seconds, the lamp blinks quickly at a 1-second interval The lamp lights up (LCD monitor turns off) The lamp blinks (LCD monitor turns off) Mode icons MODE Icon MODE Icon MOVIE CLIP VOICE RECORDING AUTO PROGRAM... PLAY NIGHT SCENE PORTRAIT LANDSCAPE TEXT FIREWORKS 12 For the first 7 seconds, the lamp blinks at 0.25-second intervals. Identification of features Still image mode You can select the NIGHT, PORTRAIT, LANDSCAPE, TEXT RECOGNITION and ...
User Manual
Page 16
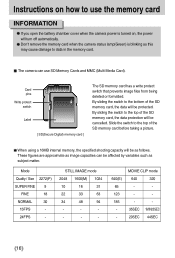
... formatted. By sliding the switch to the bottom of the SD memory card before taking a picture. Don't remove the memory card when the camera status lamp(Green) is turned on how to use SD Memory Cards and MMC (Multi Media Card). Slide the switch to data in the memory card. These...
... formatted. By sliding the switch to the bottom of the SD memory card before taking a picture. Don't remove the memory card when the camera status lamp(Green) is turned on how to use SD Memory Cards and MMC (Multi Media Card). Slide the switch to data in the memory card. These...
User Manual
Page 22
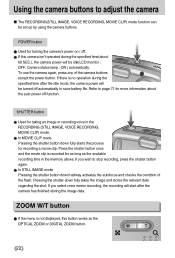
... the camera buttons to adjust the camera The RECORDING(STILL IMAGE, VOICE RECORDING, MOVIE CLIP) mode function can be idle(LCD monitor : OFF, Camera status lamp : ON ) automatically. In STILL IMAGE mode Pressing the shutter button down fully takes the image and stores the relevant data regarding the shot. ZOOM W/T button...
... the camera buttons to adjust the camera The RECORDING(STILL IMAGE, VOICE RECORDING, MOVIE CLIP) mode function can be idle(LCD monitor : OFF, Camera status lamp : ON ) automatically. In STILL IMAGE mode Pressing the shutter button down fully takes the image and stores the relevant data regarding the shot. ZOOM W/T button...

User Manual
Page 29
...on the LCD monitor, the RIGHT button operates as follows: 2 second self-timer setting : The self-timer lamp blinks at 0.25 second intervals for 2 seconds. 10 second self-timer setting : The self-timer lamp blinks at 0.25 second intervals for the first 7 seconds. Double self-timer ( ) : A picture will...you press the SHUTTER button, the picture will be taken. [ Selecting the 10 SEC self-timer ] When using the self-timer, the self-timer lamp works as the Selftimer( ) button. INFORMATION When taking a picture using the flash, the 2-second self-timer may be taken after about 10 seconds ...
...on the LCD monitor, the RIGHT button operates as follows: 2 second self-timer setting : The self-timer lamp blinks at 0.25 second intervals for 2 seconds. 10 second self-timer setting : The self-timer lamp blinks at 0.25 second intervals for the first 7 seconds. Double self-timer ( ) : A picture will...you press the SHUTTER button, the picture will be taken. [ Selecting the 10 SEC self-timer ] When using the self-timer, the self-timer lamp works as the Selftimer( ) button. INFORMATION When taking a picture using the flash, the 2-second self-timer may be taken after about 10 seconds ...
User Manual
Page 30
... the MENU button 2272 MODE AUTO PROGRAM SCENE [ Menu off ] [ Menu on the LCD monitor. While image data is being processed. (When the camera status lamp blinks) - capture an image. Pressing it is showing on the LCD monitor, it again will be displayed when the following circumstances: - When the menu is...
... the MENU button 2272 MODE AUTO PROGRAM SCENE [ Menu off ] [ Menu on the LCD monitor. While image data is being processed. (When the camera status lamp blinks) - capture an image. Pressing it is showing on the LCD monitor, it again will be displayed when the following circumstances: - When the menu is...
User Manual
Page 34
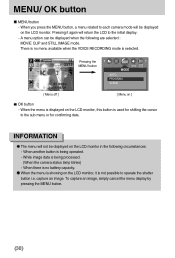
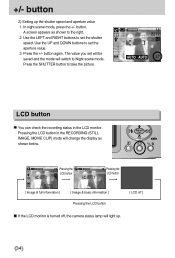
... the LCD button [ Image & full information ] [ Image & basic information ] Pressing the LCD button [ LCD off ] If the LCD monitor is turned off, the camera status lamp will change the display as shown to Night scene mode. Use the LEFT and RIGHT buttons to take the picture. +/- button. Press the SHUTTER button...
... the LCD button [ Image & full information ] [ Image & basic information ] Pressing the LCD button [ LCD off ] If the LCD monitor is turned off, the camera status lamp will change the display as shown to Night scene mode. Use the LEFT and RIGHT buttons to take the picture. +/- button. Press the SHUTTER button...
User Manual
Page 64
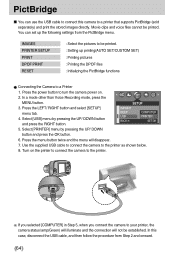
... up printing(AUTO SET/CUSTOM SET) : Printing pictures : Printing the DPOF files : Initializing the PictBridge functions Connecting the Camera to your printer, the camera status lamp(Green) will illuminate and the connection will disappear. 7.
... up printing(AUTO SET/CUSTOM SET) : Printing pictures : Printing the DPOF files : Initializing the PictBridge functions Connecting the Camera to your printer, the camera status lamp(Green) will illuminate and the connection will disappear. 7.

User Manual
Page 99
... the OK button. 7. Turn the camera power on . 2. Insert the large connector of the PC. - If you selected [PRINTER in PC mode. The camera status lamp will disappear. 8. Connecting the camera to page 104(Removing the removable disk). INFORMATION The camera driver must be installed before using PC mode. Use the...
... the OK button. 7. Turn the camera power on . 2. Insert the large connector of the PC. - If you selected [PRINTER in PC mode. The camera status lamp will disappear. 8. Connecting the camera to page 104(Removing the removable disk). INFORMATION The camera driver must be installed before using PC mode. Use the...
User Manual
Page 103
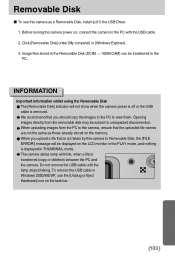
... not show when the camera power is off or the USB cable is removed. Do not remove the USB cable until the lamp stops blinking. INFORMATION Important information whilst using the Removable Disk The [Removable Disk] indicator will blink, when a file is displayed in Windows 2000/ME/XP, ...
... not show when the camera power is off or the USB cable is removed. Do not remove the USB cable until the lamp stops blinking. INFORMATION Important information whilst using the Removable Disk The [Removable Disk] indicator will blink, when a file is displayed in Windows 2000/ME/XP, ...
User Manual
Page 104
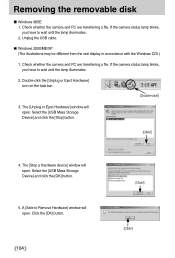
Removing the removable disk Windows 98SE 1. The [Unplug or Eject Hardware] window will open . If the camera status lamp blinks, you have to Remove Hardware] window will open . Select the [USB Mass Storage Device] and click the [OK] button. 5. Check whether the ... a file. The [Stop a Hardware device] window will open. Check whether the camera and PC are transferring a file. If the camera status lamp blinks, you have to wait until the lamp illuminates. 2. Select the [USB Mass Storage Device] and click the [Stop] button. [Click!] 4. Unplug the USB cable. Windows 2000/ME/...
Removing the removable disk Windows 98SE 1. The [Unplug or Eject Hardware] window will open . If the camera status lamp blinks, you have to Remove Hardware] window will open . Select the [USB Mass Storage Device] and click the [OK] button. 5. Check whether the ... a file. The [Stop a Hardware device] window will open. Check whether the camera and PC are transferring a file. If the camera status lamp blinks, you have to wait until the lamp illuminates. 2. Select the [USB Mass Storage Device] and click the [Stop] button. [Click!] 4. Unplug the USB cable. Windows 2000/ME/...


