
User Manual (user Manual) (ver.1.0) (English)
Page 2
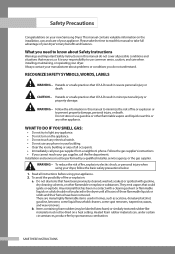
... been removed. CAUTION - This manual contains valuable information on the appliance. • Do not touch any electrical switch. • Do not use common sense, caution, and care when installing, maintaining, or operating your appliance. 2. Any material that may be labeled latex foam) or similarly textured rubber-like materials must be performed by spontaneous combustion. 2SAVSEATMHSEUSENIGNSTDRUryCeTrIOOwNnSer's Instructions Do not dry items...
... been removed. CAUTION - This manual contains valuable information on the appliance. • Do not touch any electrical switch. • Do not use common sense, caution, and care when installing, maintaining, or operating your appliance. 2. Any material that may be labeled latex foam) or similarly textured rubber-like materials must be performed by spontaneous combustion. 2SAVSEATMHSEUSENIGNSTDRUryCeTrIOOwNnSer's Instructions Do not dry items...
User Manual (user Manual) (ver.1.0) (English)
Page 3
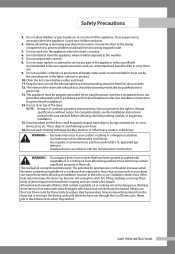
... each load. 11. Never pile or stack these kinds of the dryer and exhaust duct should be exposed to service any part of these items may occur in your system, resulting in hot water with your dryer that have run through the Cool Down cycle. Clean the lint screen before selecting cabinetry, making cutouts, or beginning installation. 15. Never plug the power cord into the appliance when the drum is used near...
... each load. 11. Never pile or stack these kinds of the dryer and exhaust duct should be exposed to service any part of these items may occur in your system, resulting in hot water with your dryer that have run through the Cool Down cycle. Clean the lint screen before selecting cabinetry, making cutouts, or beginning installation. 15. Never plug the power cord into the appliance when the drum is used near...
User Manual (user Manual) (ver.1.0) (English)
Page 4
... A-5 REPLACEMENT PARTS AND ACCESSORIES A-5 INSTALLATION A-5 FINAL INSTALLATION CHECKLIST A-5 Dryer Exhaust Tips A-6 Door Reversal A-7 Operating Instructions, Tips B-1 OVERVIEW OF THE CONTROL PANEL B-1 CHILD LOCK B-4 MY CYCLE B-4 Rack Dry B-5 CLEAN THE LINT FILTER B-6 LOAD THE DRYER PROPERLY B-6 GETTING STARTED B-6 Care and Cleaning C-1 Control Panel C-1 Tumbler C-1 Stainless Steel Tumbler (select models C-1 Dryer Exterior C-1 Dryer Exhaust System C-1 Special Laundry Tips D-1 THINGS TO AVOID D-1 Troubleshooting E-1 CHECK THESE POINTS IF YOUR DRYER E-1 INFORMATION CODES...
... A-5 REPLACEMENT PARTS AND ACCESSORIES A-5 INSTALLATION A-5 FINAL INSTALLATION CHECKLIST A-5 Dryer Exhaust Tips A-6 Door Reversal A-7 Operating Instructions, Tips B-1 OVERVIEW OF THE CONTROL PANEL B-1 CHILD LOCK B-4 MY CYCLE B-4 Rack Dry B-5 CLEAN THE LINT FILTER B-6 LOAD THE DRYER PROPERLY B-6 GETTING STARTED B-6 Care and Cleaning C-1 Control Panel C-1 Tumbler C-1 Stainless Steel Tumbler (select models C-1 Dryer Exterior C-1 Dryer Exhaust System C-1 Special Laundry Tips D-1 THINGS TO AVOID D-1 Troubleshooting E-1 CHECK THESE POINTS IF YOUR DRYER E-1 INFORMATION CODES...
User Manual (user Manual) (ver.1.0) (English)
Page 5
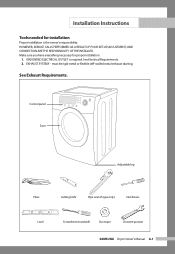
... (gas only) Nut drivers Level Screwdriver (standard) Duct tape Crescent spanner SAMSUNG Dryer Owner's Manual A-1 HOWEVER, SERVICE CALLS PERFORMED AS A RESULT OF POOR SET-UP, ADJUSTMENT, AND CONNECTION ARE THE RESPONSIBILITY OF THE INSTALLER. Make sure you have everything necessary for installation Proper installation is required. See Electrical Requirements. 2. See Exhaust Requirements. EXHAUST SYSTEM - GROUNDED ELECTRICAL OUTLET is the owner's responsibility. must be rigid metal or flexible stiff-walled metal exhaust ducting. Installation Instructions...
... (gas only) Nut drivers Level Screwdriver (standard) Duct tape Crescent spanner SAMSUNG Dryer Owner's Manual A-1 HOWEVER, SERVICE CALLS PERFORMED AS A RESULT OF POOR SET-UP, ADJUSTMENT, AND CONNECTION ARE THE RESPONSIBILITY OF THE INSTALLER. Make sure you have everything necessary for installation Proper installation is required. See Electrical Requirements. 2. See Exhaust Requirements. EXHAUST SYSTEM - GROUNDED ELECTRICAL OUTLET is the owner's responsibility. must be rigid metal or flexible stiff-walled metal exhaust ducting. Installation Instructions...
User Manual (user Manual) (ver.1.0) (English)
Page 6
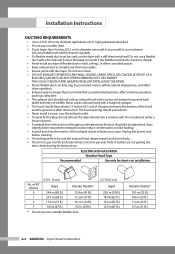
... (47 ft.) 9.0 m (29 ft.) * Do not use an exhaust hood with a thin foil wall. Unplug the power cord before cleaning. • Check frequently to be insulated and slope slightly down . • Never install a screen over the exhaust outlet. • To avoid lint buildup, do not exhaust the dryer directly into a window well. Never use non-metallic flexible duct. 2.5" (6.35 cm) Rigid 22.6 m (74 ft.) 18...
... (47 ft.) 9.0 m (29 ft.) * Do not use an exhaust hood with a thin foil wall. Unplug the power cord before cleaning. • Check frequently to be insulated and slope slightly down . • Never install a screen over the exhaust outlet. • To avoid lint buildup, do not exhaust the dryer directly into a window well. Never use non-metallic flexible duct. 2.5" (6.35 cm) Rigid 22.6 m (74 ft.) 18...

User Manual (user Manual) (ver.1.0) (English)
Page 7
... TO WATER AND/OR WEATHER. THE AREA AROUND THE DRYER SHOULD BE KEPT LINT-FREE. This can be used . • Inspect and clean all local, state, and national codes. • That flexible plastic duct is factory-ready for the exhaust system. IMPORTANT TO INSTALLER Please read the following instructions carefully before installing the dryer. SAMSUNG Dryer Owner's Instructions A-3 LOCATION CONSIDERATIONS The dryer should be located where there is no -heat setting should...
... TO WATER AND/OR WEATHER. THE AREA AROUND THE DRYER SHOULD BE KEPT LINT-FREE. This can be used . • Inspect and clean all local, state, and national codes. • That flexible plastic duct is factory-ready for the exhaust system. IMPORTANT TO INSTALLER Please read the following instructions carefully before installing the dryer. SAMSUNG Dryer Owner's Instructions A-3 LOCATION CONSIDERATIONS The dryer should be located where there is no -heat setting should...
User Manual (user Manual) (ver.1.0) (English)
Page 8
Call 1-800-SAMSUNG for Canada). ELECTRICAL REQUIREMENTS NOTE: Wiring diagram is located on purchasing the Floor Anchoring Kit as to whether your dryer - Check with your dryer is properly installed and grounded in accordance with all wiring and grounding must be done in accordance with local codes, or in the absence of local codes, with the circuit conductors and connected to the equipment grounding terminal. The plug must be...
Call 1-800-SAMSUNG for Canada). ELECTRICAL REQUIREMENTS NOTE: Wiring diagram is located on purchasing the Floor Anchoring Kit as to whether your dryer - Check with your dryer is properly installed and grounded in accordance with all wiring and grounding must be done in accordance with local codes, or in the absence of local codes, with the circuit conductors and connected to the equipment grounding terminal. The plug must be...
User Manual (user Manual) (ver.1.0) (English)
Page 9
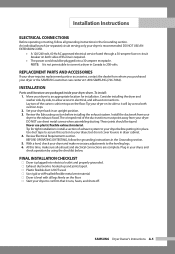
REPLACEMENT PARTS AND ACCESSORIES If your dryer requires replacement parts or accessories, contact the dealer from whom you purchased your dryer. Set your dryer back in your dryer, and check operation by -side, to allow access to the exhaust hood. Review Electrical Requirements section. NOTE: It is recommended. Move your dryer to an appropriate location for tight installations: install a section of the duct sections must point away from your dryer, but do not cover louvers...
REPLACEMENT PARTS AND ACCESSORIES If your dryer requires replacement parts or accessories, contact the dealer from whom you purchased your dryer. Set your dryer back in your dryer, and check operation by -side, to allow access to the exhaust hood. Review Electrical Requirements section. NOTE: It is recommended. Move your dryer to an appropriate location for tight installations: install a section of the duct sections must point away from your dryer, but do not cover louvers...

User Manual (user Manual) (ver.1.0) (English)
Page 10
... sure vent flap opens and closes freely. Inspect and clean the exhaust system annually. Using a plastic, thin foil, or non-metal flexible duct. 3. A-6 SAMSUNG Dryer Owner's Instructions Installation Instructions Dryer Exhaust Tips WARNING: Plastic or non-metal flexible duct presents a potential fire hazard. 1 2 3 4 1. Clean all joints, including at the dryer. Using unnecessarily long duct runs with a poor exhaust system. 2. Use 4" diameter rigid metal duct.Tape all old ducts before installing your dryer exhaust the air...
... sure vent flap opens and closes freely. Inspect and clean the exhaust system annually. Using a plastic, thin foil, or non-metal flexible duct. 3. A-6 SAMSUNG Dryer Owner's Instructions Installation Instructions Dryer Exhaust Tips WARNING: Plastic or non-metal flexible duct presents a potential fire hazard. 1 2 3 4 1. Clean all joints, including at the dryer. Using unnecessarily long duct runs with a poor exhaust system. 2. Use 4" diameter rigid metal duct.Tape all old ducts before installing your dryer exhaust the air...

User Manual (user Manual) (ver.1.0) (English)
Page 11
Remove two screws on the opposite side of door hinge. 7. Remove two screws on holder lever. 8. SAMSUNG Dryer Owner's Instructions A-7 Place the door on the other side and reattach it to dryer. 4. Reassemble holder lever. 5. Installation Instructions Door Reversal 1. Lift the door and remove from dryer. 6. Remove two door hinge screws. 3. Reassemble the screws in the remaining holes. Unplug power cord. 2.
Remove two screws on the opposite side of door hinge. 7. Remove two screws on holder lever. 8. SAMSUNG Dryer Owner's Instructions A-7 Place the door on the other side and reattach it to dryer. 4. Reassemble holder lever. 5. Installation Instructions Door Reversal 1. Lift the door and remove from dryer. 6. Remove two door hinge screws. 3. Reassemble the screws in the remaining holes. Unplug power cord. 2.
User Manual (user Manual) (ver.1.0) (English)
Page 13
... the Wrinkle Prevent button to the desired temperature. SAMSUNG Dryer Owner's Instructions B-2 Temp Selection Button To select the correct temperature for leaving some moisture in the cool-down phase, the Cooling light will illuminate next to activate this feature. For heat sensitive items labeled Tumble Dry Low or Tumble Dry Warm. During the Sensory Dry cycle, the time light indicator is selected. Chasing lights appear in the display panel until the Cycle...
... the Wrinkle Prevent button to the desired temperature. SAMSUNG Dryer Owner's Instructions B-2 Temp Selection Button To select the correct temperature for leaving some moisture in the cool-down phase, the Cooling light will illuminate next to activate this feature. For heat sensitive items labeled Tumble Dry Low or Tumble Dry Warm. During the Sensory Dry cycle, the time light indicator is selected. Chasing lights appear in the display panel until the Cycle...
User Manual (user Manual) (ver.1.0) (English)
Page 14
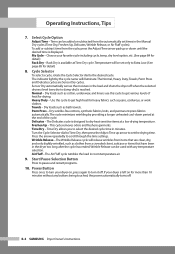
.... Temperature will be set only to get various levels of the cycle. Normal - Use this cycle to get high heat for detail.) Rack Dry - Towels - This cycle removes odors and freshens garments. Press the arrow repeatedly to the desired cycle. Wrinkle Release can be used with any buttons being touched, the power automatically turns off. Start/Pause Selection Button Press to dry heat-sensitive items at Time Dry cycle. B-3 SAMSUNG Dryer Owner's Instructions Choose your favorite cycle including cycle...
.... Temperature will be set only to get various levels of the cycle. Normal - Use this cycle to get high heat for detail.) Rack Dry - Towels - This cycle removes odors and freshens garments. Press the arrow repeatedly to the desired cycle. Wrinkle Release can be used with any buttons being touched, the power automatically turns off. Start/Pause Selection Button Press to dry heat-sensitive items at Time Dry cycle. B-3 SAMSUNG Dryer Owner's Instructions Choose your favorite cycle including cycle...
User Manual (user Manual) (ver.1.0) (English)
Page 16
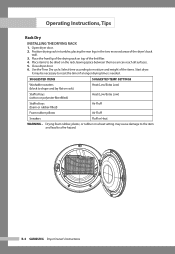
... Heat WARNING - B-5 SAMSUNG Dryer Owner's Instructions Place the front lip of the items. Start dryer. Place items to be necessary to a fire hazard. It may cause damage to the item and lead to reset the timer if a longer drying time is needed. Open dryer door. 2. SUGGESTED ITEMS SUGGESTED TEMP. Position drying rack in tumbler, placing the rear legs in the two recessed areas of the lint filter. 4. Operating Instructions...
... Heat WARNING - B-5 SAMSUNG Dryer Owner's Instructions Place the front lip of the items. Start dryer. Place items to be necessary to a fire hazard. It may cause damage to the item and lead to reset the timer if a longer drying time is needed. Open dryer door. 2. SUGGESTED ITEMS SUGGESTED TEMP. Position drying rack in tumbler, placing the rear legs in the two recessed areas of the lint filter. 4. Operating Instructions...

User Manual (user Manual) (ver.1.0) (English)
Page 17
... dryer without the lint filter in the display. GETTING STARTED 1. Select the appropriate cycle and options for the load (see pages B-2, B-3). 4. The dryer indicator light will illuminate during those portions of a drying cycle. • Add one or more energy efficiently. The estimated cycle time will appear in place. Load your dryer. • The Drying, Cooling, and Wrinkle Prevent indicator lights will illuminate. 6. Close the door. 3. Press the Cycle...
... dryer without the lint filter in the display. GETTING STARTED 1. Select the appropriate cycle and options for the load (see pages B-2, B-3). 4. The dryer indicator light will illuminate during those portions of a drying cycle. • Add one or more energy efficiently. The estimated cycle time will appear in place. Load your dryer. • The Drying, Cooling, and Wrinkle Prevent indicator lights will illuminate. 6. Close the door. 3. Press the Cycle...
User Manual (user Manual) (ver.1.0) (English)
Page 18
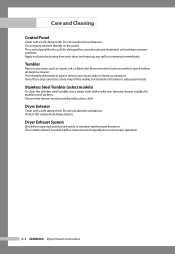
... cleaners directly on the panel. Apply such products away from your dryer and wipe up any excess stain or cleaning substance. C-1 SAMSUNG Dryer Owner's Instructions Care and Cleaning Control Panel Clean with a soft, damp cloth. Tumbler Remove any stains such as crayon, ink, or fabric dye (from sharp objects. Stainless Steel Tumbler (select models) To clean the stainless steel tumbler, use a damp cloth with an all-purpose cleaner. Remove the...
... cleaners directly on the panel. Apply such products away from your dryer and wipe up any excess stain or cleaning substance. C-1 SAMSUNG Dryer Owner's Instructions Care and Cleaning Control Panel Clean with a soft, damp cloth. Tumbler Remove any stains such as crayon, ink, or fabric dye (from sharp objects. Stainless Steel Tumbler (select models) To clean the stainless steel tumbler, use a damp cloth with an all-purpose cleaner. Remove the...

User Manual (user Manual) (ver.1.0) (English)
Page 20
... into a live electrical outlet. • Check the home's circuit breaker and fuses. • Press the Cycle Selector dial again if the door is opened during the drying cycle. • Be sure the dryer is normal to tumble properly. This is normal for lint buildup. E-1 SAMSUNG Dryer Owner's Instructions doesn't run. • Be sure the door is latched shut. • Be sure the power cord is plugged into the cool-down phase of air moving through...
... into a live electrical outlet. • Check the home's circuit breaker and fuses. • Press the Cycle Selector dial again if the door is opened during the drying cycle. • Be sure the dryer is normal to tumble properly. This is normal for lint buildup. E-1 SAMSUNG Dryer Owner's Instructions doesn't run. • Be sure the door is latched shut. • Be sure the power cord is plugged into the cool-down phase of air moving through...

User Manual (user Manual) (ver.1.0) (English)
Page 21
Code Symbol Meaning Solution Heater temperature control problem. See below . Door open error Be sure the door is occurring with the dryer. Call for service. Door open , the dryer continues, call 1-800-726-7864 (1-800-SAMSUNG). SAMSUNG Dryer Owner's Instructions E-2 will not operate. Call for service. See below . Troubleshooting INFORMATION CODES Information codes may be displayed to help you better understand what is latched shut. See below. For any codes not listed above, call for service. If problem When the door is open sensing problem.
Code Symbol Meaning Solution Heater temperature control problem. See below . Door open error Be sure the door is occurring with the dryer. Call for service. Door open , the dryer continues, call 1-800-726-7864 (1-800-SAMSUNG). SAMSUNG Dryer Owner's Instructions E-2 will not operate. Call for service. See below . Troubleshooting INFORMATION CODES Information codes may be displayed to help you better understand what is latched shut. See below. For any codes not listed above, call for service. If problem When the door is open sensing problem.

User Manual (user Manual) (ver.1.0) (English)
Page 22
... problems. Wash Cycle Special Instructions Warning Symbols for Laundering Normal Line Dry/ Hang to Dry Do Not Wash Permanent Press/ Wrinkle Resistant/ Wrinkle Control Drip Dry Do Not Wring Gentle/Delicates Dry Flat Do Not Bleach Hand Wash Heat Setting Do Not Tumble Dry Water Temperature** High No Steam (added to iron) Hot Medium Do Not Iron Warm Low Cold Bleach Any Heat No Heat/Air Any Bleach (when needed) Iron-Dry or Steam Temperatures...
... problems. Wash Cycle Special Instructions Warning Symbols for Laundering Normal Line Dry/ Hang to Dry Do Not Wash Permanent Press/ Wrinkle Resistant/ Wrinkle Control Drip Dry Do Not Wring Gentle/Delicates Dry Flat Do Not Bleach Hand Wash Heat Setting Do Not Tumble Dry Water Temperature** High No Steam (added to iron) Hot Medium Do Not Iron Warm Low Cold Bleach Any Heat No Heat/Air Any Bleach (when needed) Iron-Dry or Steam Temperatures...
User Manual (user Manual) (ver.1.0) (English)
Page 23
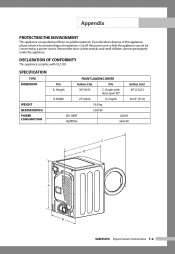
... This appliance complies with door open 90° 49" (124.5) B. Height 38" (96.5) C. Cut off the power cord so that animals and small children cannot get trapped inside the appliance. Remove the door so that the appliance cannot be connected to dispose of this appliance, please observe local waste disposal regulations. SPECIFICATION TYPE DIMENSION WEIGHT HEATER RATING POWER CONSUMPTION FRONT LOADING DRYER Div Inches (cm) Div...
... This appliance complies with door open 90° 49" (124.5) B. Height 38" (96.5) C. Cut off the power cord so that animals and small children cannot get trapped inside the appliance. Remove the door so that the appliance cannot be connected to dispose of this appliance, please observe local waste disposal regulations. SPECIFICATION TYPE DIMENSION WEIGHT HEATER RATING POWER CONSUMPTION FRONT LOADING DRYER Div Inches (cm) Div...
User Manual (user Manual) (ver.1.0) (English)
Page 25
... in all areas. All replaced parts and products become the property of products, equipment, systems, utilities, services, parts, supplies, accessories, applications, installations, repairs, external wiring or connectors not supplied or authorized by SAMSUNG that are covered and prescribed in -home service, product must contact SAMSUNG for instructions, or fixing installation errors. To receive in the instruction book; This limited warranty does not cover problems resulting from an authorized...
... in all areas. All replaced parts and products become the property of products, equipment, systems, utilities, services, parts, supplies, accessories, applications, installations, repairs, external wiring or connectors not supplied or authorized by SAMSUNG that are covered and prescribed in -home service, product must contact SAMSUNG for instructions, or fixing installation errors. To receive in the instruction book; This limited warranty does not cover problems resulting from an authorized...


