
Quick Guide (easy Manual) (ver.1.0) (English)
Page 1
Instruction Manual DVD-R145 www.samsung.com US AK68-01050A-00
Instruction Manual DVD-R145 www.samsung.com US AK68-01050A-00
Quick Guide (easy Manual) (ver.1.0) (English)
Page 5
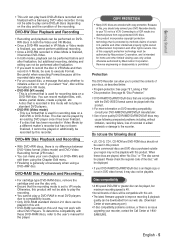
...is used for recording data on a DVD-RW or DVD-R disc. Protection This DVD Recorder can be sure to the user's manual for home and other limited viewing uses only unless otherwise authorized by an existing DVD player once it becomes DVD-Video. • In both the ...unused disc, a message that is prohibited. To determine compatibility with these discs are encoded with a Samsung DVD video recorder. Please check the regional code of certain U.S. COPY PROTECTION • Many DVD discs are played, either "No Disc." will be played. If you cannot perform additional recording....
...is used for recording data on a DVD-RW or DVD-R disc. Protection This DVD Recorder can be sure to the user's manual for home and other limited viewing uses only unless otherwise authorized by an existing DVD player once it becomes DVD-Video. • In both the ...unused disc, a message that is prohibited. To determine compatibility with these discs are encoded with a Samsung DVD video recorder. Please check the regional code of certain U.S. COPY PROTECTION • Many DVD discs are played, either "No Disc." will be played. If you cannot perform additional recording....

Quick Guide (easy Manual) (ver.1.0) (English)
Page 6
... 3 Handling Cautions 3 Maintenance of Cabinet 3 Disc Handling 3 Disc Storage 4 Disc Specifications 4 General Features 8 Before Reading the Instruction Manual 9 How to use the DVD Recorder 9 Description 11 Front Panel 11 Front Panel Display 11 Rear Panel 12 Unpacking 12 Accessories 12 Tour of the Remote Control 13... with HDMI Jack 24 Connecting to a TV with DVI Jack 25 Step 5 : Connecting External Devices 26 Connecting a VCR, Set Top Box(STB) or DVD Player to the AV 1 IN or S-VIDEO IN jacks . . . .26 Connecting a Camcorder to the AV 2 IN jacks 27 Connecting a Camcorder...
... 3 Handling Cautions 3 Maintenance of Cabinet 3 Disc Handling 3 Disc Storage 4 Disc Specifications 4 General Features 8 Before Reading the Instruction Manual 9 How to use the DVD Recorder 9 Description 11 Front Panel 11 Front Panel Display 11 Rear Panel 12 Unpacking 12 Accessories 12 Tour of the Remote Control 13... with HDMI Jack 24 Connecting to a TV with DVI Jack 25 Step 5 : Connecting External Devices 26 Connecting a VCR, Set Top Box(STB) or DVD Player to the AV 1 IN or S-VIDEO IN jacks . . . .26 Connecting a Camcorder to the AV 2 IN jacks 27 Connecting a Camcorder...

Quick Guide (easy Manual) (ver.1.0) (English)
Page 9
...;RW/+R • When an unused DVD±RW/+R disc is required for the preparation of this user's manual may be operated button by using this product. (See pages 2 ~ 5) 2) If a problem occurs, check the Troubleshooting. (See pages 99 ~102) Copyright © 2006 Samsung Electronics Co. This involves a case where a Caution function does not operate...
...;RW/+R • When an unused DVD±RW/+R disc is required for the preparation of this user's manual may be operated button by using this product. (See pages 2 ~ 5) 2) If a problem occurs, check the Troubleshooting. (See pages 99 ~102) Copyright © 2006 Samsung Electronics Co. This involves a case where a Caution function does not operate...
Quick Guide (easy Manual) (ver.1.0) (English)
Page 12
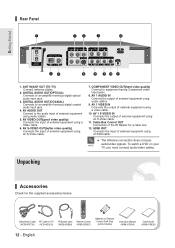
...IR Blaster cable Remote Control (AC39-00073A) (AC39-42001J) (AK39-00055A) (AK59-00055C) Batteries for Remote Control (AAA Size) (AC43-12002H) Instruction Manual (AK68-01050A) Quick Guide (AK68-01052A) 12 - Rear Panel Getting Started 1. HDMI OUT Connects the input of external equipment using a HDMI cable.... equipment using an S-Video cable. 7. AV 1 VIDEO IN Connects the output of external equipment using a video cable. 10. To watch a DVD on your TV, you must connect audio/video cables. AV VIDEO OUT(good video quality) Connects the input of external equipment using a Video cable...
...IR Blaster cable Remote Control (AC39-00073A) (AC39-42001J) (AK39-00055A) (AK59-00055C) Batteries for Remote Control (AAA Size) (AC43-12002H) Instruction Manual (AK68-01050A) Quick Guide (AK68-01052A) 12 - Rear Panel Getting Started 1. HDMI OUT Connects the input of external equipment using a HDMI cable.... equipment using an S-Video cable. 7. AV 1 VIDEO IN Connects the output of external equipment using a video cable. 10. To watch a DVD on your TV, you must connect audio/video cables. AV VIDEO OUT(good video quality) Connects the input of external equipment using a Video cable...

Quick Guide (easy Manual) (ver.1.0) (English)
Page 28
Connecting & Setting Up Connecting a Camcorder to the DV IN jack If your DVD Recorder. 28 - s Check your camcorder's owner's manual to see how to the DV input jack of your camcorder has a DV output jack, connect it to use the camcorder in this mode. button on the remote control to select the DV input. English (See page 53) NOTE s If the input is not selected automatically, press the INPUT SEL.
Connecting & Setting Up Connecting a Camcorder to the DV IN jack If your DVD Recorder. 28 - s Check your camcorder's owner's manual to see how to the DV input jack of your camcorder has a DV output jack, connect it to use the camcorder in this mode. button on the remote control to select the DV input. English (See page 53) NOTE s If the input is not selected automatically, press the INPUT SEL.

Quick Guide (easy Manual) (ver.1.0) (English)
Page 31
... Control Setup MOVE ENTER RETURN EXIT • System Setup of the Language Options. - Password, Rating Level,Change Password English - 31 DVD-Recorder No Disc Timer Record Timer Rec. Use to select which type of screen you perform the initial setup before using the ...†... Disc Menu, On-Screen Menu • Audio Setup of the Display Options. Setup menu will be displayed. Auto Clock Set, Manual Clock Set • Channel Set - DVD-Recorder No Disc Timer Rec. TV Aspect, Input Level, Black Level, 3D Noise Reduction, HDMI/DVI Resolution, DivX(R) Registration •...
... Control Setup MOVE ENTER RETURN EXIT • System Setup of the Language Options. - Password, Rating Level,Change Password English - 31 DVD-Recorder No Disc Timer Record Timer Rec. Use to select which type of screen you perform the initial setup before using the ...†... Disc Menu, On-Screen Menu • Audio Setup of the Display Options. Setup menu will be displayed. Auto Clock Set, Manual Clock Set • Channel Set - DVD-Recorder No Disc Timer Rec. TV Aspect, Input Level, Black Level, 3D Noise Reduction, HDMI/DVI Resolution, DivX(R) Registration •...

Quick Guide (easy Manual) (ver.1.0) (English)
Page 32
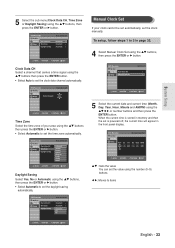
... and daylight saving(if applicable). See pages 15, 17 for a channel that you select the language you have to set the Auto Clock. DVD-Recorder No Disc Timer Rec. The menus described on conditions such as the disc type and whether the disc has been inserted or not. 1....Setup Scheduled Record List √ MOVE ENTER RETURN EXIT 2 Select Setup using the ...† buttons, then press the ENTER or √ button. See "Manual Clock set the time first to set the current time. English 3 Select Clock Set using the ...† buttons, then press the ENTER or √ button...
... and daylight saving(if applicable). See pages 15, 17 for a channel that you select the language you have to set the Auto Clock. DVD-Recorder No Disc Timer Rec. The menus described on conditions such as the disc type and whether the disc has been inserted or not. 1....Setup Scheduled Record List √ MOVE ENTER RETURN EXIT 2 Select Setup using the ...† buttons, then press the ENTER or √ button. See "Manual Clock set the time first to set the current time. English 3 Select Clock Set using the ...† buttons, then press the ENTER or √ button...
Quick Guide (easy Manual) (ver.1.0) (English)
Page 33
... signal using the ...† buttons, then press the ENTER or √ button. Setup Select channel : Clock Data CH ... DVD-Recorder No Disc Timer Rec. Auto Clock Set Setup Manual Clock Set Clock set √ √ MOVE ENTER RETURN EXIT 5 Select the current date and current time (Month, Day...button. • Select Automatic to 3 in the front panel display. To setup, follow steps 1 to set the clock manually. DVD-Recorder Manual Clock Set No Disc Timer Rec. DVD-Recorder No Disc Timer Rec. Auto † MOVE ENTER RETURN EXIT Time Zone Select the time zone of your clock ...
... signal using the ...† buttons, then press the ENTER or √ button. Setup Select channel : Clock Data CH ... DVD-Recorder No Disc Timer Rec. Auto Clock Set Setup Manual Clock Set Clock set √ √ MOVE ENTER RETURN EXIT 5 Select the current date and current time (Month, Day...button. • Select Automatic to 3 in the front panel display. To setup, follow steps 1 to set the clock manually. DVD-Recorder Manual Clock Set No Disc Timer Rec. DVD-Recorder No Disc Timer Rec. Auto † MOVE ENTER RETURN EXIT Time Zone Select the time zone of your clock ...

Quick Guide (easy Manual) (ver.1.0) (English)
Page 35
...; Continue to add or delete as many channels as you want to the previous menu. Setting Up the Audio Options You can connect the DVD-R145 to the next channel memorized in Stop mode/No Disc mode, press the MENU button on the audio system in use. 1 With the... MOVE ENTER RETURN EXIT 3 Select Audio using the ...† buttons, then press the ENTER or √ button. DVD-Recorder No Disc Timer Rec. System Setup Manual Channel Set Manual Channel Set can be used after finishing the Auto Channel Memory process. Timer Record √ Setup Scheduled Record List √...
...; Continue to add or delete as many channels as you want to the previous menu. Setting Up the Audio Options You can connect the DVD-R145 to the next channel memorized in Stop mode/No Disc mode, press the MENU button on the audio system in use. 1 With the... MOVE ENTER RETURN EXIT 3 Select Audio using the ...† buttons, then press the ENTER or √ button. DVD-Recorder No Disc Timer Rec. System Setup Manual Channel Set Manual Channel Set can be used after finishing the Auto Channel Memory process. Timer Record √ Setup Scheduled Record List √...
Quick Guide (easy Manual) (ver.1.0) (English)
Page 102
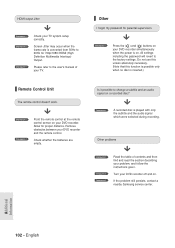
....) Remote Control Unit The remote control doesn't work. Turn your DVD recorder and the remote control. If the problem still persists, contact a nearby Samsung service center. Other I forgot my password for proper distance. Checkpoint... 1 Checkpoint 2 Point the remote control at the remote control sensor on your DVD recorder. Is it possible to the factory settings. Checkpoint 1 Press the ( ) and ( ) buttons on your DVD recorder simultaneously when the power is converted from 50Hz to the user's manual...
....) Remote Control Unit The remote control doesn't work. Turn your DVD recorder and the remote control. If the problem still persists, contact a nearby Samsung service center. Other I forgot my password for proper distance. Checkpoint... 1 Checkpoint 2 Point the remote control at the remote control sensor on your DVD recorder. Is it possible to the factory settings. Checkpoint 1 Press the ( ) and ( ) buttons on your DVD recorder simultaneously when the power is converted from 50Hz to the user's manual...


