Instruction Manual
Page 4
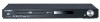
... OPEN COVER AND DO NOT REPAIR YOURSELF. ENG-4 If the Region number of a DVD disc does not correspond to the Region number of this DVD player, the DVD player cannot play the disc. • The product unit accompanying this user manual is licensed under direct sunlight. • Keep in a cool ventilated area. • Store vertically. • Keep in combination with the POWER button, or disconnect and then reconnect the AC power cord...
... OPEN COVER AND DO NOT REPAIR YOURSELF. ENG-4 If the Region number of a DVD disc does not correspond to the Region number of this DVD player, the DVD player cannot play the disc. • The product unit accompanying this user manual is licensed under direct sunlight. • Keep in a cool ventilated area. • Store vertically. • Keep in combination with the POWER button, or disconnect and then reconnect the AC power cord...

Instruction Manual
Page 6
... you start 5 Chapter 1: Setup General Features 7 Disc Type and Characteristics 8 Description 9 Tour of the Remote Control 12 Chapter 2: Connections Choosing a Connection 13 Chapter 3: Basic Functions Playing a Disc 23 Using the Search and Skip Functions 25 Using the Display Function 26 Using the Disc and Title Menu 28 Using the Function Menu 29 Repeat Play 30 Slow Repeat Play 31 Program Play & Random Play 32 Chapter 4: Advanced Functions Adjusting the Aspect Ratio (EZ View 33 Selecting the Audio Language 35 Selecting the Subtitle Language 36 Changing the...
... you start 5 Chapter 1: Setup General Features 7 Disc Type and Characteristics 8 Description 9 Tour of the Remote Control 12 Chapter 2: Connections Choosing a Connection 13 Chapter 3: Basic Functions Playing a Disc 23 Using the Search and Skip Functions 25 Using the Display Function 26 Using the Disc and Title Menu 28 Using the Function Menu 29 Repeat Play 30 Slow Repeat Play 31 Program Play & Random Play 32 Chapter 4: Advanced Functions Adjusting the Aspect Ratio (EZ View 33 Selecting the Audio Language 35 Selecting the Subtitle Language 36 Changing the...
Instruction Manual
Page 7
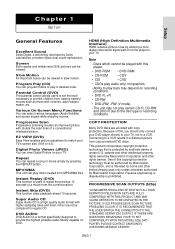
... REGARDING YOUR TV SET COMPATIBILITY WITH THIS MODEL 525p DVD PLAYER, PLEASE CONTACT SAMSUNG'S CUSTOMER SERVICE CENTER." Progressive Scan Progressive scanning creates an improved picture with double the scan lines of a movie from the current position. Super Audio CD Super Audio CD is protected by pressing the REPEAT button. Use of this, you should only connect your DVD player directly to a VCR results in desired order. Parental Control (DVD) The parental control allows users to set the level...
... REGARDING YOUR TV SET COMPATIBILITY WITH THIS MODEL 525p DVD PLAYER, PLEASE CONTACT SAMSUNG'S CUSTOMER SERVICE CENTER." Progressive Scan Progressive scanning creates an improved picture with double the scan lines of a movie from the current position. Super Audio CD Super Audio CD is protected by pressing the REPEAT button. Use of this, you should only connect your DVD player directly to a VCR results in desired order. Parental Control (DVD) The parental control allows users to set the level...
Instruction Manual
Page 8
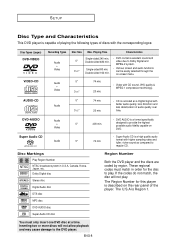
.... - DVD AUDIO is Region 1. ENG-8 CD is recorded as a Digital Signal with higher sampling rates and fuller, richer sound as compared to the DVD player. If the codes do not match, the disc will not allow playback and may cause damage to regular CD. Double-sided 160 min. - SETUP Disc Type and Characteristics This DVD player is capable of playing the following types of discs with CD sound, VHS quality...
.... - DVD AUDIO is Region 1. ENG-8 CD is recorded as a Digital Signal with higher sampling rates and fuller, richer sound as compared to the DVD player. If the codes do not match, the disc will not allow playback and may cause damage to regular CD. Double-sided 160 min. - SETUP Disc Type and Characteristics This DVD player is capable of playing the following types of discs with CD sound, VHS quality...
Instruction Manual
Page 10
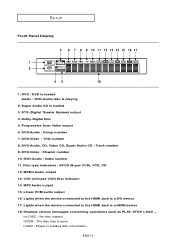
...Group number 7. DVD-Audio, CD, Video CD, Super Audio CD : Track number 9. DVD-Video : Chapter number 10. Displays various messages concerning operations such as PLAY, STOP, LOAD ... DVD : DVD is loaded Audio : DVD-Audio disc is open. DVD-Audio : Index number 11. DTS (Digital Theater System) output 4. MPEG Audio output 13. Linear PCM audio output 16. no DISC : No disc loaded. OPEN : The disc tray is playing 2. SETUP Front Panel Display 3 6 7 8 9 10 11 12 13 14 15 16 17 1 2 45 18 1. Progressive Scan Video output 6. Lights when the device connected to the HDMI Jack...
...Group number 7. DVD-Audio, CD, Video CD, Super Audio CD : Track number 9. DVD-Video : Chapter number 10. Displays various messages concerning operations such as PLAY, STOP, LOAD ... DVD : DVD is loaded Audio : DVD-Audio disc is open. DVD-Audio : Index number 11. DTS (Digital Theater System) output 4. MPEG Audio output 13. Linear PCM audio output 16. no DISC : No disc loaded. OPEN : The disc tray is playing 2. SETUP Front Panel Display 3 6 7 8 9 10 11 12 13 14 15 16 17 1 2 45 18 1. Progressive Scan Video output 6. Lights when the device connected to the HDMI Jack...
Instruction Manual
Page 11
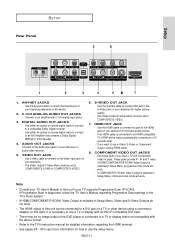
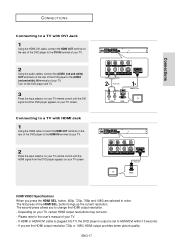
... Scan is selected in Setup Menu, progressive scan mode will work . - The HDMI output of your Samsung television or AV device. 2. 5.1CH ANALOG AUDIO OUT JACKS - DIGITAL AUDIO OUT JACKS - AUDIO OUT JACKS Connect to the Audio input jacks of this jack to the Video input jack on your television for higher picture quality. - Refer to COMPOSITE/S-VIDEO. 7. Setup SETUP Rear Panel 3 8 1 2 3 4 56 7 1. ANYNET JACKS - The Video Output in the TV's menu system. - COMPONENT VIDEO OUT JACKS - If HDMI/COMPONENT(P-SCAN) Video Output is supported, follow the TV User's Manual...
... Scan is selected in Setup Menu, progressive scan mode will work . - The HDMI output of your Samsung television or AV device. 2. 5.1CH ANALOG AUDIO OUT JACKS - DIGITAL AUDIO OUT JACKS - AUDIO OUT JACKS Connect to the Audio input jacks of this jack to the Video input jack on your television for higher picture quality. - Refer to COMPOSITE/S-VIDEO. 7. Setup SETUP Rear Panel 3 8 1 2 3 4 56 7 1. ANYNET JACKS - The Video Output in the TV's menu system. - COMPONENT VIDEO OUT JACKS - If HDMI/COMPONENT(P-SCAN) Video Output is supported, follow the TV User's Manual...

Instruction Manual
Page 12
... mode) Operates frame by frame play . 4. TV/VIDEO Button Press to program a specific order. 34. Button Selects Video output format. 1 18 8. ZOOM Button 21 Enlarges DVD picture. 5 22 14. SACD/CD Button Selects Super Audio CD or CD playback mode. 9 25 18. Button HDMI or DVI Output resolution setup. 16 32 25. VOL (+, -) Buttons Control volume. 35. CLEAR Button Use to access various audio functions on or off . 11 26 19. CH ( , ) Buttons 13 29 Channel selection. 14 30 23. DVD POWER Button Turns the power on a disc...
... mode) Operates frame by frame play . 4. TV/VIDEO Button Press to program a specific order. 34. Button Selects Video output format. 1 18 8. ZOOM Button 21 Enlarges DVD picture. 5 22 14. SACD/CD Button Selects Super Audio CD or CD playback mode. 9 25 18. Button HDMI or DVI Output resolution setup. 16 32 25. VOL (+, -) Buttons Control volume. 35. CLEAR Button Use to access various audio functions on or off . 11 26 19. CH ( , ) Buttons 13 29 Channel selection. 14 30 23. DVD POWER Button Turns the power on a disc...

Instruction Manual
Page 13
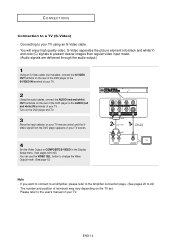
... TV remote control until the Video signal from the DVD player appears on your TV. - The number and position of terminals may be generated if the audio cable is one audio input terminal on those particular components. When the Video Output in Setup menu is inserted, the Video Output mode changes in stop mode or no disc is set . ENG-13 Refer to the user's manual of the additional components (such as a TV) you want to connect...
... TV remote control until the Video signal from the DVD player appears on your TV. - The number and position of terminals may be generated if the audio cable is one audio input terminal on those particular components. When the Video Output in Setup menu is inserted, the Video Output mode changes in stop mode or no disc is set . ENG-13 Refer to the user's manual of the additional components (such as a TV) you want to connect...
Instruction Manual
Page 14
... input selector on your TV remote control until the SVideo signal from the DVD player appears on your TV screen. 4 Set the Video Output to COMPOSITE/S-VIDEO in the Display Setup menu. (See pages 64 to your TV. Please refer to change the Video Output mode. (See page 12) RED WHITE Audio Cable RED WHITE S-Video Cable (not included) Note - ENG-14 button to the user's manual of your TV using an S-Video cable. - If you want to connect...
... input selector on your TV remote control until the SVideo signal from the DVD player appears on your TV screen. 4 Set the Video Output to COMPOSITE/S-VIDEO in the Display Setup menu. (See pages 64 to your TV. Please refer to change the Video Output mode. (See page 12) RED WHITE Audio Cable RED WHITE S-Video Cable (not included) Note - ENG-14 button to the user's manual of your TV using an S-Video cable. - If you want to connect...
Instruction Manual
Page 15
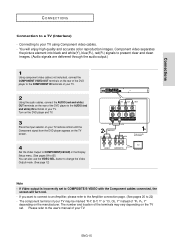
... remote control until the Component signal from the DVD player appears on the manufacturer. You will turn red. - The number and location of the terminals may be marked "R-Y, B-Y, Y" or "Cr, Cb, Y" instead of "PR, PB, Y" depending on the TV screen. 4 Set the Video Output to COMPONENT(I-SCAN) in the Display Setup menu. (See pages 64 to the user's manual of your TV. Please refer to 65) You can also use...
... remote control until the Component signal from the DVD player appears on the manufacturer. You will turn red. - The number and location of the terminals may be marked "R-Y, B-Y, Y" or "Cr, Cb, Y" instead of "PR, PB, Y" depending on the TV screen. 4 Set the Video Output to COMPONENT(I-SCAN) in the Display Setup menu. (See pages 64 to the user's manual of your TV. Please refer to 65) You can also use...

Instruction Manual
Page 16
...) 1 Using component video cables (not included), connect the COMPONENT VIDEO OUT terminals on the rear of the DVD player to the COMPONENT IN terminals of your TV. If Progressive Scan is "Progressive Scan"? Turn on the DVD player and TV. 3 Press the input selector on your TV remote control until the Component signal from the illustration above. Depending on your TV supports Progressive Scan. What is supported, follow the TV User's Manual regarding Progressive Scan settings in the Display Setup menu...
...) 1 Using component video cables (not included), connect the COMPONENT VIDEO OUT terminals on the rear of the DVD player to the COMPONENT IN terminals of your TV. If Progressive Scan is "Progressive Scan"? Turn on the DVD player and TV. 3 Press the input selector on your TV remote control until the Component signal from the illustration above. Depending on your TV supports Progressive Scan. What is supported, follow the TV User's Manual regarding Progressive Scan settings in the Display Setup menu...
Instruction Manual
Page 17
... 1 Using the HDMI cable connect the HDMI OUT terminal on the rear of the DVD player to change the HDMI output resolution. - The second press allows you to the HDMI IN terminal of your TV. - RED WHITE Audio Cable RED WHITE HDMI-DVI cable HDMI cable HDMI VIDEO Specifications When you set to HDMI/DVI within 10 seconds. - If you press the HDMI SEL. Turn on the DVD player and TV. 3 Press the input selector on your TV remote control...
... 1 Using the HDMI cable connect the HDMI OUT terminal on the rear of the DVD player to change the HDMI output resolution. - The second press allows you to the HDMI IN terminal of your TV. - RED WHITE Audio Cable RED WHITE HDMI-DVI cable HDMI cable HDMI VIDEO Specifications When you set to HDMI/DVI within 10 seconds. - If you press the HDMI SEL. Turn on the DVD player and TV. 3 Press the input selector on your TV remote control...
Instruction Manual
Page 19
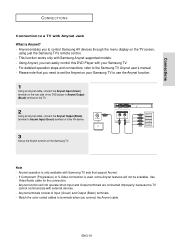
... Samsung TV Anynet user's manual - This function works only with Samsung TV sets that you need to set the Anynet on the TV screen, using just the Samsung TV's remote control. - Use Video/Audio cable for the connection. - Anynet function will not operate when Input and Output terminals are connected improperly, because the TV cannot communicate with Anynet Jack What is used, some Anynet features will not be available. Match the color-coded cables to control Samsung AV devices through the menu display...
... Samsung TV Anynet user's manual - This function works only with Samsung TV sets that you need to set the Anynet on the TV screen, using just the Samsung TV's remote control. - Use Video/Audio cable for the connection. - Anynet function will not operate when Input and Output terminals are connected improperly, because the TV cannot communicate with Anynet Jack What is used, some Anynet features will not be available. Match the color-coded cables to control Samsung AV devices through the menu display...
Instruction Manual
Page 38
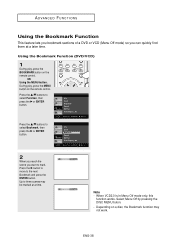
... button. Select Menu Off by pressing the DISC MENU buton. - ENG-38 OR Using the MENU button. Info Zoom Bookmark Repeat EZ View Front Display : On 2 When you reach the scene you can quickly find them at a time. When VCD2.0 is in Menu Off mode only, this function works. Depending on the remote control. Note - ADVANCED FUNCTIONS Using the Bookmark Function This feature lets you bookmark sections of a DVD or VCD (Menu Off mode...
... button. Select Menu Off by pressing the DISC MENU buton. - ENG-38 OR Using the MENU button. Info Zoom Bookmark Repeat EZ View Front Display : On 2 When you reach the scene you can quickly find them at a time. When VCD2.0 is in Menu Off mode only, this function works. Depending on the remote control. Note - ADVANCED FUNCTIONS Using the Bookmark Function This feature lets you bookmark sections of a DVD or VCD (Menu Off mode...
Instruction Manual
Page 60
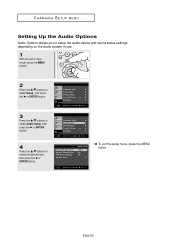
CHANGING SETUP MENU Setting Up the Audio Options Audio Options allows you to setup the audio device and sound status settings depending on the audio system in use. 1 With the unit in Stop mode, press the MENU button. 2 Press the .../† buttons to select Audio Setup, then press the √ or ENTER button. Language Setup √ Audio Setup √ Display Setup √ Parental Setup : √ EZ Setup √ Setup 3 Press the .../† buttons to select Setup, then press the √ or ENTER button. Dolby...
CHANGING SETUP MENU Setting Up the Audio Options Audio Options allows you to setup the audio device and sound status settings depending on the audio system in use. 1 With the unit in Stop mode, press the MENU button. 2 Press the .../† buttons to select Audio Setup, then press the √ or ENTER button. Language Setup √ Audio Setup √ Display Setup √ Parental Setup : √ EZ Setup √ Setup 3 Press the .../† buttons to select Setup, then press the √ or ENTER button. Dolby...
Instruction Manual
Page 64
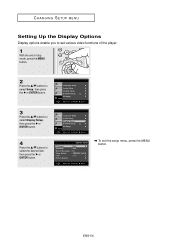
CHANGING SETUP MENU Setting Up the Display Options Display options enable you to set various video functions of the player. 1 With the unit in Stop mode, press the MENU button. 2 Press the .../† buttons to select Display Setup, then press the √ or ENTER button. Language Setup √ Audio Setup √ Display Setup √ Parental Setup : √ EZ Setup √ Setup 3 Press the .../† buttons to select Setup, then press the √ or ENTER button. DISPLAY SETUP TV Aspect Still Mode Screen Messages Video Output HDMI Picture Quality : Wide...
CHANGING SETUP MENU Setting Up the Display Options Display options enable you to set various video functions of the player. 1 With the unit in Stop mode, press the MENU button. 2 Press the .../† buttons to select Display Setup, then press the √ or ENTER button. Language Setup √ Audio Setup √ Display Setup √ Parental Setup : √ EZ Setup √ Setup 3 Press the .../† buttons to select Setup, then press the √ or ENTER button. DISPLAY SETUP TV Aspect Still Mode Screen Messages Video Output HDMI Picture Quality : Wide...
Instruction Manual
Page 66
... bit depth is 8 bits - HD-JPEG • HD : High Definition image source - levels of color Ful range - CHANGING SETUP MENU ˆ HDMI This setting is used when the unit is connected by HDMI or DVI to find out if your TV supports Progressive Scan. Format You can select either Mode A or Mode B to set the HDMI output resolution 720p or 1080i, HDMI output provides better picture quality. Brightness : Level 1 ~ Level 5 -
... bit depth is 8 bits - HD-JPEG • HD : High Definition image source - levels of color Ful range - CHANGING SETUP MENU ˆ HDMI This setting is used when the unit is connected by HDMI or DVI to find out if your TV supports Progressive Scan. Format You can select either Mode A or Mode B to set the HDMI output resolution 720p or 1080i, HDMI output provides better picture quality. Brightness : Level 1 ~ Level 5 -
Instruction Manual
Page 69
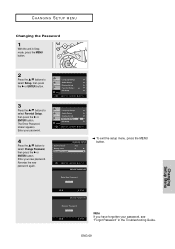
... Password - - - - CHANGING SETUP MENU Changing the Password 1 With the unit in the Troubleshooting Guide. Language Setup √ Audio Setup √ Display Setup √ Parental Setup : √ EZ Setup √ Setup 3 Press the .../† buttons to select Setup, then press the √ or ENTER button. Re-enter the new password again. CHANGE PASSWORD Re-enter Password - - - - Enter your new password. Note If you have forgotten your password, see "Forgot Password" in Stop mode, press the MENU button. The Enter Password screen appears. ENG-69 Changing Setup Menu...
... Password - - - - CHANGING SETUP MENU Changing the Password 1 With the unit in the Troubleshooting Guide. Language Setup √ Audio Setup √ Display Setup √ Parental Setup : √ EZ Setup √ Setup 3 Press the .../† buttons to select Setup, then press the √ or ENTER button. Re-enter the new password again. CHANGE PASSWORD Re-enter Password - - - - Enter your new password. Note If you have forgotten your password, see "Forgot Password" in Stop mode, press the MENU button. The Enter Password screen appears. ENG-69 Changing Setup Menu...
Instruction Manual
Page 70
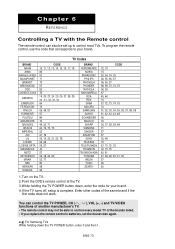
The remote control may not be set the brand code again. e.g) For Samsung TVs While holding the TV POWER button down the TV POWER button, enter 0 and then 1. Enter other codes of the same brand if the first code does not work. ENG-70 If you replace the remote control's batteries, set up to control most TVs. TV Codes BRAND ANAM AIWA BANG&OLUFSEN BLAUPUNKT BRANDT BRIONVEGA CGE CONTINENTAL EDISON...
The remote control may not be set the brand code again. e.g) For Samsung TVs While holding the TV POWER button down the TV POWER button, enter 0 and then 1. Enter other codes of the same brand if the first code does not work. ENG-70 If you replace the remote control's batteries, set up to control most TVs. TV Codes BRAND ANAM AIWA BANG&OLUFSEN BLAUPUNKT BRANDT BRIONVEGA CGE CONTINENTAL EDISON...

Instruction Manual
Page 71
... the region number of the instruction book that the disc is fixed on your nearest Samsung authorized service center or call 1-800-SAMSUNG. The picture is noisy or distorted • Make sure that is not available at a distance of range. No audio. • Some of the functions selected in the Setup Menu may need replacing. • Operate the remote control at the moment. 4. The DVD's software doesn't support the feature (e.g., angles). 3. All settings...
... the region number of the instruction book that the disc is fixed on your nearest Samsung authorized service center or call 1-800-SAMSUNG. The picture is noisy or distorted • Make sure that is not available at a distance of range. No audio. • Some of the functions selected in the Setup Menu may need replacing. • Operate the remote control at the moment. 4. The DVD's software doesn't support the feature (e.g., angles). 3. All settings...


