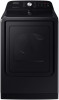
User Manual
Page 2
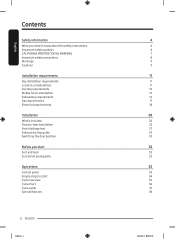
... safety instructions Important safety symbols CALIFORNIA PROPOSITION 65 WARNING Important safety precautions Warnings Cautions Installation requirements Key installation requirements Location considerations Ducting requirements Mobile home installation Exhausting requirements Gas requirements Electrical requirements Installation What's included Step-by-step installation Vent blockage test Exhaust ducting guide Switching the door position Before you start Sort and load Functional prerequisite Operations Control panel Simple steps to start Cycle overview Cycle chart Cycle guide Special features...
... safety instructions Important safety symbols CALIFORNIA PROPOSITION 65 WARNING Important safety precautions Warnings Cautions Installation requirements Key installation requirements Location considerations Ducting requirements Mobile home installation Exhausting requirements Gas requirements Electrical requirements Installation What's included Step-by-step installation Vent blockage test Exhaust ducting guide Switching the door position Before you start Sort and load Functional prerequisite Operations Control panel Simple steps to start Cycle overview Cycle chart Cycle guide Special features...
User Manual
Page 6
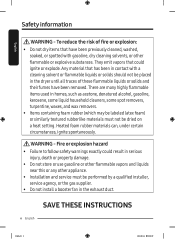
... be performed by a qualified installer, service agency, or the gas supplier. • Do not install a booster fan in contact with gasoline, dry cleaning solvents, or other appliance. • Installation and service must not be placed in the dryer until all traces of fire or explosion: • Do not dry items that has been in the exhaust duct. Fire or explosion hazard •...
... be performed by a qualified installer, service agency, or the gas supplier. • Do not install a booster fan in contact with gasoline, dry cleaning solvents, or other appliance. • Installation and service must not be placed in the dryer until all traces of fire or explosion: • Do not dry items that has been in the exhaust duct. Fire or explosion hazard •...

User Manual
Page 8
... not store or use heat to the drying compartment. 7. Close supervision of lint, dust, and dirt. 15. Do not install or store this appliance. 2. Do not repair or replace any other flammable or explosive substances, as mops and cleaning cloths. Clean the lint screen before using your dryer. Keep area around the exhaust opening and adjacent surrounding areas free from service or discarded, remove the door to dry articles containing foam...
... not store or use heat to the drying compartment. 7. Close supervision of lint, dust, and dirt. 15. Do not install or store this appliance. 2. Do not repair or replace any other flammable or explosive substances, as mops and cleaning cloths. Clean the lint screen before using your dryer. Keep area around the exhaust opening and adjacent surrounding areas free from service or discarded, remove the door to dry articles containing foam...

User Manual
Page 9
... not dry clothing with the controls. • Do not repair, replace, or attempt to service any part of the dryer and exhaust duct should be cleaned periodically by qualified service personnel. • This appliance must be detected by the manufacturer of the fabric softener or product. • Clean the lint screen before or after each load. • Keep the area around the exhaust opening and surrounding areas free from lint...
... not dry clothing with the controls. • Do not repair, replace, or attempt to service any part of the dryer and exhaust duct should be cleaned periodically by qualified service personnel. • This appliance must be detected by the manufacturer of the fabric softener or product. • Clean the lint screen before or after each load. • Keep the area around the exhaust opening and surrounding areas free from lint...

User Manual
Page 11
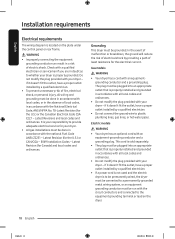
Service Personnel - Key installation requirements • A grounded electrical outlet. • A power cord for electric dryers (except in . (460 mm) above the floor for gas models) that must meet national and local regulations. • An exhaust system made of electric shock only during servicing. WARNING • Make sure to exhaust the dryer outdoors to prevent a child from water and weather. Location considerations • Adequate clearances between the dryer and adjacent walls or...
Service Personnel - Key installation requirements • A grounded electrical outlet. • A power cord for electric dryers (except in . (460 mm) above the floor for gas models) that must meet national and local regulations. • An exhaust system made of electric shock only during servicing. WARNING • Make sure to exhaust the dryer outdoors to prevent a child from water and weather. Location considerations • Adequate clearances between the dryer and adjacent walls or...

User Manual
Page 17
... National Fuel Gas Code requires that an accessible, approved manual gas shut-off valve be installed within 6" of your dryer. • Gas dryers installed in residential garages must be raised 18 inches (46 cm) above the floor. • Additionally, a 1/8" (0.3 cm) N.P.T. (National Pipe Thread) plugged tapping, accessible for use the proper LP Kit accordingly. NOTE • Your dryer uses an automatic ignition system to use in accordance with LP (liquid propane) gas, it...
... National Fuel Gas Code requires that an accessible, approved manual gas shut-off valve be installed within 6" of your dryer. • Gas dryers installed in residential garages must be raised 18 inches (46 cm) above the floor. • Additionally, a 1/8" (0.3 cm) N.P.T. (National Pipe Thread) plugged tapping, accessible for use the proper LP Kit accordingly. NOTE • Your dryer uses an automatic ignition system to use in accordance with LP (liquid propane) gas, it...
User Manual
Page 18
... rear frame. Latest Revision (for Canada) and local codes and ordinances. English Installation requirements Electrical requirements The wiring diagram is located on the dryer. 18 English Untitled-1 18 2022-06-14 10:23:10 Do not modify the plug provided with your dryer. • All gas installations must be plugged into an appropriate outlet that is properly installed and grounded in doubt as to plastic plumbing lines, gas lines, or hot water...
... rear frame. Latest Revision (for Canada) and local codes and ordinances. English Installation requirements Electrical requirements The wiring diagram is located on the dryer. 18 English Untitled-1 18 2022-06-14 10:23:10 Do not modify the plug provided with your dryer. • All gas installations must be plugged into an appropriate outlet that is properly installed and grounded in doubt as to plastic plumbing lines, gas lines, or hot water...

User Manual
Page 19
... approved electrical service fused through the neutral conductor. (Use a 4-prong plug for a 4 wire receptacle, NEMA type 14-30R.) Electric models - NOTE All Canadian models are shipped with tinned leads. • Do not reuse a power supply cord from an old dryer. English Electrical connections Before operating or testing, follow all grounding instructions in the "Grounding" section. U.S. A 30-ampere fuse or circuit breaker on both sides of Electric Shock When local codes allow, you may convert a dryer to...
... approved electrical service fused through the neutral conductor. (Use a 4-prong plug for a 4 wire receptacle, NEMA type 14-30R.) Electric models - NOTE All Canadian models are shipped with tinned leads. • Do not reuse a power supply cord from an old dryer. English Electrical connections Before operating or testing, follow all grounding instructions in the "Grounding" section. U.S. A 30-ampere fuse or circuit breaker on both sides of Electric Shock When local codes allow, you may convert a dryer to...

User Manual
Page 22
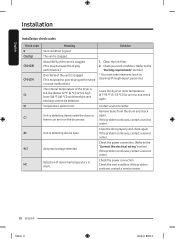
... "Exhaust ducting guide" section. Turn on the gas supply, and check for gas leaks. 22 English Untitled-1 22 2022-06-14 10:23:11 Step by -step installation Make sure you remove the protective film before completing the product installation. Connect the gas supply to all threads. 4. To change the door direction, see "Switching the door position" on page 17. 1. Tip the dryer on its final location, and then set...
... "Exhaust ducting guide" section. Turn on the gas supply, and check for gas leaks. 22 English Untitled-1 22 2022-06-14 10:23:11 Step by -step installation Make sure you remove the protective film before completing the product installation. Connect the gas supply to all threads. 4. To change the door direction, see "Switching the door position" on page 17. 1. Tip the dryer on its final location, and then set...

User Manual
Page 26
... metal duct material, not plastic flexible duct. • The dryer is level and is sitting firmly on . Allowing your dryer off properly. If the gas does not ignite within 5 minutes, turn your dryer to your dryer has been turned on the floor. • The dryer starts, runs, heats, and shuts off and wait 5 minutes. English Installation STEP 5 Power on a heat setting will purge the line. For gas models: • The gas is connected...
... metal duct material, not plastic flexible duct. • The dryer is level and is sitting firmly on . Allowing your dryer off properly. If the gas does not ignite within 5 minutes, turn your dryer to your dryer has been turned on the floor. • The dryer starts, runs, heats, and shuts off and wait 5 minutes. English Installation STEP 5 Power on a heat setting will purge the line. For gas models: • The gas is connected...

User Manual
Page 27
... blocked ), refer to the "Ducting requirements" section on page 14 and the "Exhaust ducting guide" section below, and then take proper measures to correct any blockage or problems. Proper ducting can turn off. If the duct system cannot exhaust properly, the check code appears, and the dryer sounds an alarm tone. Use caution to turn off immediately by pressing the POWER button. NOTE The Vent Blockage Test must run the AIR FLUFF cycle...
... blocked ), refer to the "Ducting requirements" section on page 14 and the "Exhaust ducting guide" section below, and then take proper measures to correct any blockage or problems. Proper ducting can turn off. If the duct system cannot exhaust properly, the check code appears, and the dryer sounds an alarm tone. Use caution to turn off immediately by pressing the POWER button. NOTE The Vent Blockage Test must run the AIR FLUFF cycle...
User Manual
Page 28
... may lead to poor drying performance or cause malfunction) The internal temperature of abnormal temperature in drum. Remove items from the drum and check again. Check the power connection. Contact a service center. Check your vent condition. (Refer to the "Connect the electrical wiring" section) If the problem continues, contact a service center. Close the door properly and check again. Temperature sensor error Unit is detecting items inside the drum or there is an error on the dry sensor.
... may lead to poor drying performance or cause malfunction) The internal temperature of abnormal temperature in drum. Remove items from the drum and check again. Check the power connection. Contact a service center. Check your vent condition. (Refer to the "Connect the electrical wiring" section) If the problem continues, contact a service center. Close the door properly and check again. Temperature sensor error Unit is detecting items inside the drum or there is an error on the dry sensor.

User Manual
Page 34
... air at any time during operation 1. Icon description Sensor Dry Filter Check Child Lock This icon appears when the dryer operates the cycle which senses the internal humidity to start or stop operation. 2. To change the cycle during the Wrinkle Prevent cycle. Press and hold START/PAUSE again to adjust the drying time for the Manual Dry cycles. The load is on Child Lock, see page 38. Displays all cycle information, including the cycle time, information code, and operating status. Clean the lint filter before starting a cycle...
... air at any time during operation 1. Icon description Sensor Dry Filter Check Child Lock This icon appears when the dryer operates the cycle which senses the internal humidity to start or stop operation. 2. To change the cycle during the Wrinkle Prevent cycle. Press and hold START/PAUSE again to adjust the drying time for the Manual Dry cycles. The load is on Child Lock, see page 38. Displays all cycle information, including the cycle time, information code, and operating status. Clean the lint filter before starting a cycle...

User Manual
Page 39
... exhaust hood must be still visible but will not affect subsequent loads. Be careful not to ensure proper air flow. Remove cleaner residue and dry with a mild, non-abrasive cleaner suitable for best performance and to the cleaning cloth. Do not contact the following parts while the appliance is energized: Control board and inlet valve. Powder coated drum To clean the powder coated drum, use a damp cloth...
... exhaust hood must be still visible but will not affect subsequent loads. Be careful not to ensure proper air flow. Remove cleaner residue and dry with a mild, non-abrasive cleaner suitable for best performance and to the cleaning cloth. Do not contact the following parts while the appliance is energized: Control board and inlet valve. Powder coated drum To clean the powder coated drum, use a damp cloth...
User Manual
Page 40
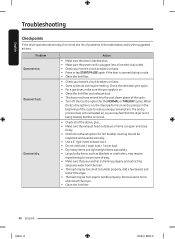
... door is latched shut. • Make sure the power cord is on . • Clean the lint filter and exhaust duct. • The dryer may feel that your washer is normal. • Check all of the above, plus... • Make sure the exhaust hood outside your home's circuit breakers or fuses. • Some cycles do not require heating. The air dry process does not use heated air, so you may have moved into a live electrical outlet. • Check...
... door is latched shut. • Make sure the power cord is on . • Clean the lint filter and exhaust duct. • The dryer may feel that your washer is normal. • Check all of the above, plus... • Make sure the exhaust hood outside your home's circuit breakers or fuses. • Some cycles do not require heating. The air dry process does not use heated air, so you may have moved into a live electrical outlet. • Check...

User Manual
Page 41
... will stop after a short time. Has odors. Water drips from clothes that naturally build up lint, clean the filter during the drying cycle. • Make sure the dryer is leveled properly as outlined in the air, completely ventilate the room before drying. • Small loads of air moving through the tumbler, and exhausts it is normal as coins, loose buttons, nails, etc. Remove promptly. • It is...
... will stop after a short time. Has odors. Water drips from clothes that naturally build up lint, clean the filter during the drying cycle. • Make sure the dryer is leveled properly as outlined in the air, completely ventilate the room before drying. • Small loads of air moving through the tumbler, and exhausts it is normal as coins, loose buttons, nails, etc. Remove promptly. • It is...

User Manual
Page 43
...; Check for a clogged lint screen • Check if the vent system is restricted. • If this information code remains, contact a Samsung service center. High temperature heating check • Clean the lint filter. • If this information code remains, contact a Samsung service center. (enter the line test mode) The electronic control needs to operate, you should do, check the list of codes in the door. Code dC FC AC HC 9C1 tC dF Action Operating the dryer with the door open. •...
...; Check for a clogged lint screen • Check if the vent system is restricted. • If this information code remains, contact a Samsung service center. High temperature heating check • Clean the lint filter. • If this information code remains, contact a Samsung service center. (enter the line test mode) The electronic control needs to operate, you should do, check the list of codes in the door. Code dC FC AC HC 9C1 tC dF Action Operating the dryer with the door open. •...

User Manual
Page 45
Specification sheet Type Model name Capacity (Cu.ft) Water pressure (psi (kPa)) Weight lb (kg) Heater rating Electric (W) Gas (BTU/hr) Power consumption (W) Front loading dryer DVE(G)50B5100* 7.4 20-116 (137-800) 119.0 (54.0) 5300 20000 5400 Untitled-1 45 English 45 2022-06-14 10:23:16 Cut off the power cord so that animals and small children cannot get trapped inside the appliance. English Warning symbols for...
Specification sheet Type Model name Capacity (Cu.ft) Water pressure (psi (kPa)) Weight lb (kg) Heater rating Electric (W) Gas (BTU/hr) Power consumption (W) Front loading dryer DVE(G)50B5100* 7.4 20-116 (137-800) 119.0 (54.0) 5300 20000 5400 Untitled-1 45 English 45 2022-06-14 10:23:16 Cut off the power cord so that animals and small children cannot get trapped inside the appliance. English Warning symbols for...

User Manual
Page 46
... codes or correction of household electrical or plumbing (i.e., house wiring, fuses, or water inlet hoses). and service to correct installation not in -home instruction on products purchased and used in -home service is not available, SAMSUNG may use your product; To receive in repairing a product, or replace the product with the product. During the applicable warranty period, a product will provide in an area where service by a SAMSUNG authorized servicer...
... codes or correction of household electrical or plumbing (i.e., house wiring, fuses, or water inlet hoses). and service to correct installation not in -home instruction on products purchased and used in -home service is not available, SAMSUNG may use your product; To receive in repairing a product, or replace the product with the product. During the applicable warranty period, a product will provide in an area where service by a SAMSUNG authorized servicer...

User Manual
Page 48
... workmanship encountered in normal, noncommercial use of SAMSUNG and must contact SAMSUNG for instructions, or fixing installation errors. accidents, abuse, neglect, fire, water, lightning, or other acts of a service call for problem determination and service procedures. problems caused by a SAMSUNG authorized service center. All replaced parts and products become the property of products, equipment, systems, utilities, services, parts, supplies, accessories, applications, installations, repairs, external wiring or connectors not supplied or authorized by...
... workmanship encountered in normal, noncommercial use of SAMSUNG and must contact SAMSUNG for instructions, or fixing installation errors. accidents, abuse, neglect, fire, water, lightning, or other acts of a service call for problem determination and service procedures. problems caused by a SAMSUNG authorized service center. All replaced parts and products become the property of products, equipment, systems, utilities, services, parts, supplies, accessories, applications, installations, repairs, external wiring or connectors not supplied or authorized by...


