User Manual (ENGLISH)
Page 4
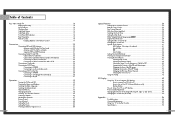
... Your New Wide TV 10 Replacing the Lamp 10 List of Features ...12 Checking Parts...12 Side Panel Buttons 13 Side Panel Jacks 13 Front Panel LED Indicators 14 Rear Panel Jacks 15 Remote...to R,G,B 27 Operation ...30 Turning the TV On and Off 30 Viewing the Menus and Displays 30 Selecting the Menu Language 31 Selecting the Antenna Input 31 Channel Memory 33 Changing Channels 34 ...Setting the Blue Screen Mode 59 Changing the Screen Size 60 Special Audio Options 61 MTS Settings: Choosing a Soundtrack 61 Virtual Dolby 62 BBE ...63 Auto Volume 64 Setting The On/Off Melody 65...
... Your New Wide TV 10 Replacing the Lamp 10 List of Features ...12 Checking Parts...12 Side Panel Buttons 13 Side Panel Jacks 13 Front Panel LED Indicators 14 Rear Panel Jacks 15 Remote...to R,G,B 27 Operation ...30 Turning the TV On and Off 30 Viewing the Menus and Displays 30 Selecting the Menu Language 31 Selecting the Antenna Input 31 Channel Memory 33 Changing Channels 34 ...Setting the Blue Screen Mode 59 Changing the Screen Size 60 Special Audio Options 61 MTS Settings: Choosing a Soundtrack 61 Virtual Dolby 62 BBE ...63 Auto Volume 64 Setting The On/Off Melody 65...

User Manual (ENGLISH)
Page 7
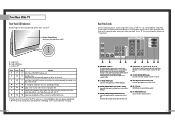
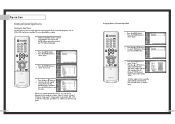
... from a camcorder or video game. ´ AUDIO Input jacks Connect the audio signal from a camcorder or video game. ˇ S-VIDEO Input jack Connect an S-video signal from the side panel or remote control • Automatic timer to turn the TV on and off at any piece is a full-featured... menu system you can access from a camcorder or video game. (S-Video 3 jack and Audio L/R input 3 are used in -Picture capability that lets you watch two channels at once • Widescreen TV with adjustable image size • Life-like clear images provided by DNle technology Checking Parts Once you...
... from a camcorder or video game. ´ AUDIO Input jacks Connect the audio signal from a camcorder or video game. ˇ S-VIDEO Input jack Connect an S-video signal from the side panel or remote control • Automatic timer to turn the TV on and off at any piece is a full-featured... menu system you can access from a camcorder or video game. (S-Video 3 jack and Audio L/R input 3 are used in -Picture capability that lets you watch two channels at once • Widescreen TV with adjustable image size • Life-like clear images provided by DNle technology Checking Parts Once you...
User Manual (ENGLISH)
Page 8
... too high, the power will automatically appear in about 25 seconds. Lamp cover on rear of your TV. Please contact a certified technician. • It takes about 30 seconds for repair and software upgrades. ' PC VIDEO INPUT jack Connect to an external source, such as a VCR. You'll occasionally hear ... the front panel indicate the status of your TV. Check if the ventilation hole on the rear of the set is connected to ANT-A. ´ S-VIDEO INPUT jacks Connects an S-Video signal from an S-VHS VCR or DVD player. ˇ VIDEO/AUDIO INPUT jacks(VCR1, VCR2) Connect video/audio signals ...
... too high, the power will automatically appear in about 25 seconds. Lamp cover on rear of your TV. Please contact a certified technician. • It takes about 30 seconds for repair and software upgrades. ' PC VIDEO INPUT jack Connect to an external source, such as a VCR. You'll occasionally hear ... the front panel indicate the status of your TV. Check if the ventilation hole on the rear of the set is connected to ANT-A. ´ S-VIDEO INPUT jacks Connects an S-Video signal from an S-VHS VCR or DVD player. ˇ VIDEO/AUDIO INPUT jacks(VCR1, VCR2) Connect video/audio signals ...
User Manual (ENGLISH)
Page 14
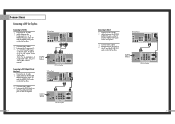
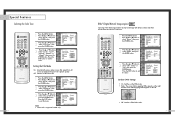
Incoming Cable or Antenna DTV Set Top Box TV Rear Panel 2 Connect video cables between the Component (1, 2 or 3) Y, PB and PR inputs on the TV and Y, PB and PR (or Y, CB, CR) outputs on the Set Top Box. TV Rear Panel Incoming Cable or Antenna DTV Set Top Box 27 Incoming Cable or Antenna DTV Set Top... Box 26 Connecting to R,G,B 1 Connect a set of audio cables between the PC/DVI AUDIO IN jacks on the TV...
Incoming Cable or Antenna DTV Set Top Box TV Rear Panel 2 Connect video cables between the Component (1, 2 or 3) Y, PB and PR inputs on the TV and Y, PB and PR (or Y, CB, CR) outputs on the Set Top Box. TV Rear Panel Incoming Cable or Antenna DTV Set Top Box 27 Incoming Cable or Antenna DTV Set Top... Box 26 Connecting to R,G,B 1 Connect a set of audio cables between the PC/DVI AUDIO IN jacks on the TV...
User Manual (ENGLISH)
Page 16
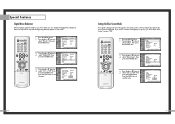
...1 With the power on, press the MENU button on -screen menu system allows you to control the settings of your TV. or † button to select to items in the menu. Input Picture Sound Channel Setup Picture Picture Mode : Dynamic √ Custom Picture √ Color Tone : Normal √ Film ... and Off Press the POWER button on the remote control or on the side panel to turn your TV on the screen. Press the ... Input Picture Sound Channel Setup Setup Time √ V-Chip √ Closed Caption √ Language : English √ Melody : On √ Blue Screen : Off √...
...1 With the power on, press the MENU button on -screen menu system allows you to control the settings of your TV. or † button to select to items in the menu. Input Picture Sound Channel Setup Picture Picture Mode : Dynamic √ Custom Picture √ Color Tone : Normal √ Film ... and Off Press the POWER button on the remote control or on the side panel to turn your TV on the screen. Press the ... Input Picture Sound Channel Setup Setup Time √ V-Chip √ Closed Caption √ Language : English √ Melody : On √ Blue Screen : Off √...
User Manual (ENGLISH)
Page 17
.... or † button to select "Add/Delete", then press the ENTER button. The TV will begin memorizing all of cable system you must select what broadcast source your cable company). Input Picture Sound Channel Setup Channel Antenna : A Air/CATV : Air Auto Program Favorite Channel ... Button to select the type of cable system: "STD", "HRC" or "IRC". (If you connected cable, press the ... Input Picture Sound Channel Setup Input Picture Sound Channel Setup Channel Antenna : A Air/CATV : Air Auto Program Favorite Channel Channel Label Fine Tune Add/Delete ▼...
.... or † button to select "Add/Delete", then press the ENTER button. The TV will begin memorizing all of cable system you must select what broadcast source your cable company). Input Picture Sound Channel Setup Channel Antenna : A Air/CATV : Air Auto Program Favorite Channel ... Button to select the type of cable system: "STD", "HRC" or "IRC". (If you connected cable, press the ... Input Picture Sound Channel Setup Input Picture Sound Channel Setup Channel Antenna : A Air/CATV : Air Auto Program Favorite Channel Channel Label Fine Tune Add/Delete ▼...
User Manual (ENGLISH)
Page 18
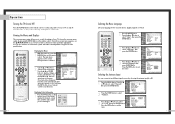
...122, press "+100", then "2", then "2" . or † button to another. The TV changes to the last channel you were watching. 34 Selecting Your Favorite Channels You can be set as TV and CATV). Input Picture Sound Channel Setup Channel Antenna : AAir Air/CATV : SATiDr Auto Program HRC Favorite ...Channel IRC Channel Label Fine Tune Add/Delete ▼ More Move Enter Return 3 Press the ... Press the ... The TV changes each available input source (such as Favorite channels. Then, when you press the FAV.CH button on the remote control, the...
...122, press "+100", then "2", then "2" . or † button to another. The TV changes to the last channel you were watching. 34 Selecting Your Favorite Channels You can be set as TV and CATV). Input Picture Sound Channel Setup Channel Antenna : AAir Air/CATV : SATiDr Auto Program HRC Favorite ...Channel IRC Channel Label Fine Tune Add/Delete ▼ More Move Enter Return 3 Press the ... Press the ... The TV changes each available input source (such as Favorite channels. Then, when you press the FAV.CH button on the remote control, the...
User Manual (ENGLISH)
Page 19
... - - - - - - - - - - - - - - - - ▼ Move Clear Clear Clear Clear Clear Adjust Return Return 5 Press the √ button to switch to the next field, Input which will change the channels automatically, one by one. Press the EXIT button to select "Channel", then press the ENTER button. 3 Press the ... Channel Label...each field is a letter, a number, or a blank. Press the ... Input Picture Channel ▲ More Channel Scan LNA : Off Sound Channel Setup Move Enter √ √ Return 3 The TV will be selected. Repeat Sound Channel the process to select a letter, a ...
... - - - - - - - - - - - - - - - - ▼ Move Clear Clear Clear Clear Clear Adjust Return Return 5 Press the √ button to switch to the next field, Input which will change the channels automatically, one by one. Press the EXIT button to select "Channel", then press the ENTER button. 3 Press the ... Channel Label...each field is a letter, a number, or a blank. Press the ... Input Picture Channel ▲ More Channel Scan LNA : Off Sound Channel Setup Move Enter √ √ Return 3 The TV will be selected. Repeat Sound Channel the process to select a letter, a ...

User Manual (ENGLISH)
Page 20
...; Film Mode : Off √ DNIe : On √ Digital NR : On √ Size √ PIP √ Move Enter Return 2 Press the ... Input Picture Sound Channel Setup Picture Picture Mode : Dynamic √ Custom Picture √ Color Tone : Normal √ Film Mode : Off √ DNIe : On &#... the item, using the on the remote control to change . Dynamic Guide to Automatic Picture Settings • Choose Standard to set the TV to operate at top performance according to change the picture settings. 2 Press P.MODE repeatedly to select the "Dynamic", "Standard", "Movie"...
...; Film Mode : Off √ DNIe : On √ Digital NR : On √ Size √ PIP √ Move Enter Return 2 Press the ... Input Picture Sound Channel Setup Picture Picture Mode : Dynamic √ Custom Picture √ Color Tone : Normal √ Film Mode : Off √ DNIe : On &#... the item, using the on the remote control to change . Dynamic Guide to Automatic Picture Settings • Choose Standard to set the TV to operate at top performance according to change the picture settings. 2 Press P.MODE repeatedly to select the "Dynamic", "Standard", "Movie"...

User Manual (ENGLISH)
Page 21
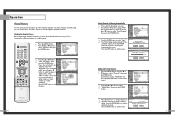
.... Operation Sound Control You can control and customize the sound levels and settings of the TV with the VOL - to adjust the settings yourself. 41 or † button to exit. Input Picture Sound Channel Setup Sound Sound Mode : Standard √ Custom Sound √ Virtual... Off √ MTS : Mono √ Auto Volume : Off √ Move Enter Return Continued... 40 3 Press the ... Custom Sound Input Bass 50 Treble 50 Picture Balance L/R 50 Sound Channel Setup Move Enter Return You can continue to make adjustments, or press the EXIT button ...
.... Operation Sound Control You can control and customize the sound levels and settings of the TV with the VOL - to adjust the settings yourself. 41 or † button to exit. Input Picture Sound Channel Setup Sound Sound Mode : Standard √ Custom Sound √ Virtual... Off √ MTS : Mono √ Auto Volume : Off √ Move Enter Return Continued... 40 3 Press the ... Custom Sound Input Bass 50 Treble 50 Picture Balance L/R 50 Sound Channel Setup Move Enter Return You can continue to make adjustments, or press the EXIT button ...

User Manual (ENGLISH)
Page 22
...button to select the correct hour. Clock Input Picture Sound Channel Set the current date and time Hour ▲ 10 ▼ Min am/pm 00 am Vol Activation 03 10 No Setup Move Enter Return 5 Press the √ button to turn the TV on or off automatically at specific times that... you choose. Press the EXIT button to select "Time". 3 Press the ... Before using the timers, you must set to select "Min", then press the ... Input Picture Sound Channel Setup Setup Time √ V-Chip ...
...button to select the correct hour. Clock Input Picture Sound Channel Set the current date and time Hour ▲ 10 ▼ Min am/pm 00 am Vol Activation 03 10 No Setup Move Enter Return 5 Press the √ button to turn the TV on or off automatically at specific times that... you choose. Press the EXIT button to select "Time". 3 Press the ... Before using the timers, you must set to select "Min", then press the ... Input Picture Sound Channel Setup Setup Time √ V-Chip ...

User Manual (ENGLISH)
Page 23
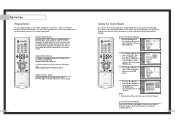
...TV to stay on. or † button to select the proper time of day (am CH Vol Activation ▲ 06 10 No ▼ Move Enter Return 9 Press the √ button to select "Activation", then press the ... Input...select the time interval for example). 44 Setting the Sleep Timer You can set the "On Timer". Input Picture Sound Channel Setup On Timer Set On Timer Hour Min am/pm 6 30 am ▼...at the bottom of the screen. or † button to select the channel you want when the TV turns on. Input Picture Sound Channel Setup On Timer Set On Timer Hour Min am/pm 6 30 am CH Vol...
...TV to stay on. or † button to select the proper time of day (am CH Vol Activation ▲ 06 10 No ▼ Move Enter Return 9 Press the √ button to select "Activation", then press the ... Input...select the time interval for example). 44 Setting the Sleep Timer You can set the "On Timer". Input Picture Sound Channel Setup On Timer Set On Timer Hour Min am/pm 6 30 am ▼...at the bottom of the screen. or † button to select the channel you want when the TV turns on. Input Picture Sound Channel Setup On Timer Set On Timer Hour Min am/pm 6 30 am CH Vol...
User Manual (ENGLISH)
Page 24
..., S-Video2, Component1, Component2, Component3, DVI or PC on the TV's rear panel, and Video3 or S-Video3 on the TV's side panel. 46 Assigning Names to External Input Mode 1 Press the MENU button. Press the ENTER button to exit the menu. Input Picture Sound Channel Setup Input Source List Edit Name Move Enter √ √ Return 2 Press...
..., S-Video2, Component1, Component2, Component3, DVI or PC on the TV's rear panel, and Video3 or S-Video3 on the TV's side panel. 46 Assigning Names to External Input Mode 1 Press the MENU button. Press the ENTER button to exit the menu. Input Picture Sound Channel Setup Input Source List Edit Name Move Enter √ √ Return 2 Press...

User Manual (ENGLISH)
Page 28
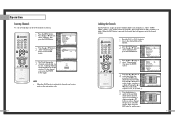
...; More Channel Scan LNA : OfOf ff On Move Enter Return NOTE • This function works in ANT-A mode only (not available in the TV's memory, press the ENTER button. (A * icon will appear.) Reset Move 3 Return Enter Fine Tune To reset the fine tuning to Air 12...LNA : Off Move Enter √ √ Return 3 Press the ... or † button to select "Fine Tune", then press the ENTER button. Input Picture Sound Channel Setup Channel Antenna : A Air/CATV : Air Auto Program Favorite Channel Channel Label Fine Tune Add/Delete ▼ More Move Enter Return 4...
...; More Channel Scan LNA : OfOf ff On Move Enter Return NOTE • This function works in ANT-A mode only (not available in the TV's memory, press the ENTER button. (A * icon will appear.) Reset Move 3 Return Enter Fine Tune To reset the fine tuning to Air 12...LNA : Off Move Enter √ √ Return 3 Press the ... or † button to select "Fine Tune", then press the ENTER button. Input Picture Sound Channel Setup Channel Antenna : A Air/CATV : Air Auto Program Favorite Channel Channel Label Fine Tune Add/Delete ▼ More Move Enter Return 4...
User Manual (ENGLISH)
Page 29
...NR Size PIP : Dynamic : Normal : OfOf ff : OnOn : On Move Enter Return 56 DNIeTM (Digital Natural Image engine) Samsung's New Technology enables an improved image with detail, contrast and white enhancement and 3D noise reduction. 1 Press the MENU button. ... Off √ DNIe : On √ Digital NR : On √ Size √ PIP √ Move Enter Return 2 Press the ... Press the ... Input Picture Sound Channel Setup Picture Picture Mode : Dynamic √ Custom Picture √ Color Tone : Normal √ Film Mode : Off √ DNIe : On...
...NR Size PIP : Dynamic : Normal : OfOf ff : OnOn : On Move Enter Return 56 DNIeTM (Digital Natural Image engine) Samsung's New Technology enables an improved image with detail, contrast and white enhancement and 3D noise reduction. 1 Press the MENU button. ... Off √ DNIe : On √ Digital NR : On √ Size √ PIP √ Move Enter Return 2 Press the ... Press the ... Input Picture Sound Channel Setup Picture Picture Mode : Dynamic √ Custom Picture √ Color Tone : Normal √ Film Mode : Off √ DNIe : On...
User Manual (ENGLISH)
Page 30
... : English √ Melody : On √ Blue Screen : Off √ PC Setup √ Move Enter Return 2 Press the ... Input Picture Sound Channel Setup Picture Picture Mode Custom Picture Color Tone Film Mode DNIe Digital NR Size PIP : Dynamic : Normal : Off : On ... press the ENTER button. Special Features Digital Noise Reduction If the broadcast signal received by your TV is very weak, a blue screen automatically replaces the noisy picture background. Input Picture Sound Channel Setup Setup Time √ V-Chip √ Closed Caption √ Language ...
... : English √ Melody : On √ Blue Screen : Off √ PC Setup √ Move Enter Return 2 Press the ... Input Picture Sound Channel Setup Picture Picture Mode Custom Picture Color Tone Film Mode DNIe Digital NR Size PIP : Dynamic : Normal : Off : On ... press the ENTER button. Special Features Digital Noise Reduction If the broadcast signal received by your TV is very weak, a blue screen automatically replaces the noisy picture background. Input Picture Sound Channel Setup Setup Time √ V-Chip √ Closed Caption √ Language ...

User Manual (ENGLISH)
Page 31
... Off √ BBE : Off √ MTS : Mono √ Auto Volume : Off √ Move Enter Return 2 Press the ... Input Picture Sound Channel Setup Sound Sound Mode : Standard √ Custom Sound √ Virtual Dolby : Off √ BBE : Off √ ... to scroll the picture. or † button to 16:9 wide mode. Zoom2 Magnifies the size of the TV screen. or † button to scroll the picture. 4:3 Sets the picture to select "Sound", then press...menu. This is usually a foreign-language translation. 61 or † button to select "MTS", then press the ENTER button.
... Off √ BBE : Off √ MTS : Mono √ Auto Volume : Off √ Move Enter Return 2 Press the ... Input Picture Sound Channel Setup Sound Sound Mode : Standard √ Custom Sound √ Virtual Dolby : Off √ BBE : Off √ ... to scroll the picture. or † button to 16:9 wide mode. Zoom2 Magnifies the size of the TV screen. or † button to scroll the picture. 4:3 Sets the picture to select "Sound", then press...menu. This is usually a foreign-language translation. 61 or † button to select "MTS", then press the ENTER button.

User Manual (ENGLISH)
Page 32
... : Standard √ Custom Sound √ Virtual Dolby : Off √ BBE : Off √ MTS : Mono √ Auto Volume : Off √ Move Enter Return 3 Press the ... Input Picture Sound Channel Setup Sound Sound Mode : Standard √ Custom Sound √ Virtual Dolby : Off √ BBE : Off √ MTS : Mono √ Auto Volume : Off... ON at the same time. 63 or † button to provide a home Theater-like Dolby effect. Special Features Virtual Dolby This feature allows the TV's L/R speakers to select "Off" or "On", then press the ENTER button.
... : Standard √ Custom Sound √ Virtual Dolby : Off √ BBE : Off √ MTS : Mono √ Auto Volume : Off √ Move Enter Return 3 Press the ... Input Picture Sound Channel Setup Sound Sound Mode : Standard √ Custom Sound √ Virtual Dolby : Off √ BBE : Off √ MTS : Mono √ Auto Volume : Off... ON at the same time. 63 or † button to provide a home Theater-like Dolby effect. Special Features Virtual Dolby This feature allows the TV's L/R speakers to select "Off" or "On", then press the ENTER button.

User Manual (ENGLISH)
Page 33
...: Off √ PC Setup √ Move Enter Return 3 Press the ... or † button to come on when the TV is low. 1 Press the MENU button. Input Picture Sound Channel Setup Sound Sound Mode : Standard √ Custom Sound √ Virtual Dolby : Off √ BBE : Off... √ Auto Volume : Off √ Move Enter Return 3 Press the ... or † button to select "Sound", then press the ENTER button. Input Picture Sound Channel Setup Setup Time √ V-Chip √ Closed Caption √ Language : English √ Melody : On √ Blue Screen : ...
...: Off √ PC Setup √ Move Enter Return 3 Press the ... or † button to come on when the TV is low. 1 Press the MENU button. Input Picture Sound Channel Setup Sound Sound Mode : Standard √ Custom Sound √ Virtual Dolby : Off √ BBE : Off... √ Auto Volume : Off √ Move Enter Return 3 Press the ... or † button to select "Sound", then press the ENTER button. Input Picture Sound Channel Setup Setup Time √ V-Chip √ Closed Caption √ Language : English √ Melody : On √ Blue Screen : ...

User Manual (ENGLISH)
Page 34
... Just press the PIP button on the tape's package or your TV is the Picture-in the TV, Video or Component(480i) mode. 67 Press the EXIT button to select "On", then press the ENTER button. Input Picture Sound Channel Setup Closed Caption Closed Caption Caption Mode : OCCn1... : CCCC21 CC3 CC4 Text1 Text2 Text3 Text4 Move Enter Return • CC1~CC4: In caption mode, caption appears at once, even if you turn the TV off while watching and ...
... Just press the PIP button on the tape's package or your TV is the Picture-in the TV, Video or Component(480i) mode. 67 Press the EXIT button to select "On", then press the ENTER button. Input Picture Sound Channel Setup Closed Caption Closed Caption Caption Mode : OCCn1... : CCCC21 CC3 CC4 Text1 Text2 Text3 Text4 Move Enter Return • CC1~CC4: In caption mode, caption appears at once, even if you turn the TV off while watching and ...


