
User Manual Ver.1.0 (English)
Page 7
... digital/analog media or devices is not compatible with other recording media for personal enjoyment. Before reading this user manual Important information on use About this user manual Thank you obtain permission beforehand. 3 If set the corresponding function. We also recommend you use only. Before using this camcorder using the internal software of very small objects. Please read the 'Safety information' carefully and then operate the product properly. • In this manual, a 'memory card (card...
... digital/analog media or devices is not compatible with other recording media for personal enjoyment. Before reading this user manual Important information on use About this user manual Thank you obtain permission beforehand. 3 If set the corresponding function. We also recommend you use only. Before using this camcorder using the internal software of very small objects. Please read the 'Safety information' carefully and then operate the product properly. • In this manual, a 'memory card (card...
User Manual Ver.1.0 (English)
Page 13
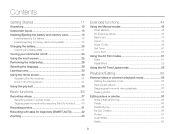
... battery and memory card 15 Inserting/ejecting the battery 15 Inserting/ejecting a memory card (not supplied 16 Charging the battery 20 Checking the battery state 21 Turning your camcorder on/off 24 Using the touch screen 25 Performing the initial setup 28 Selecting the language 29 Learning icons 30 Using the Home screen 34 Accessing the Home screen 34 Icons on the Home screen 34 Using the grip belt 35 Basic functions 36 Recording videos 37 Recording videos in playback mode...
... battery and memory card 15 Inserting/ejecting the battery 15 Inserting/ejecting a memory card (not supplied 16 Charging the battery 20 Checking the battery state 21 Turning your camcorder on/off 24 Using the touch screen 25 Performing the initial setup 28 Selecting the language 29 Learning icons 30 Using the Home screen 34 Accessing the Home screen 34 Icons on the Home screen 34 Using the grip belt 35 Basic functions 36 Recording videos 37 Recording videos in playback mode...
User Manual Ver.1.0 (English)
Page 16
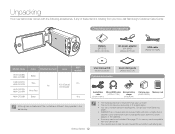
... unauthorized use of accessories such as the AC power adaptor or the batteries. • A memory card is missing from your accessories Battery (BP125A) (AD43-00197A) AC power adaptor (AA-MA9) (AD44-00151A) USB cable (AD39-00194A) Model name HMX-Q20BN HMX-Q200BN HMX-Q20TN HMX-Q200TN HMX-Q20RN HMX-Q200RN HMX-QF20BN Color Internal memory Lens Black Titan No X20 (Optical) X40 (Digital) Wine Red Black WiFi module No Yes User manual CD (AD46-00423A) Optional accessories Quick start guide...
... unauthorized use of accessories such as the AC power adaptor or the batteries. • A memory card is missing from your accessories Battery (BP125A) (AD43-00197A) AC power adaptor (AA-MA9) (AD44-00151A) USB cable (AD39-00194A) Model name HMX-Q20BN HMX-Q200BN HMX-Q20TN HMX-Q200TN HMX-Q20RN HMX-Q200RN HMX-QF20BN Color Internal memory Lens Black Titan No X20 (Optical) X40 (Digital) Wine Red Black WiFi module No Yes User manual CD (AD46-00423A) Optional accessories Quick start guide...
User Manual Ver.1.0 (English)
Page 23
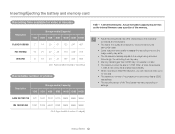
... more memory the camcorder uses. • Lower resolution and quality increases the recording time, but the image quality may differ depending on settings. Accordingly, the recording time may vary. • Memory cards bigger than 64GB may not operate normally. • The maximum video file size is 9999, respectively. • The recording length of recordable photo and video files is 1.8GB. Getting Started 19 Inserting/Ejecting the battery and memory card Recording time available for video in Web...
... more memory the camcorder uses. • Lower resolution and quality increases the recording time, but the image quality may differ depending on settings. Accordingly, the recording time may vary. • Memory cards bigger than 64GB may not operate normally. • The maximum video file size is 9999, respectively. • The recording length of recordable photo and video files is 1.8GB. Getting Started 19 Inserting/Ejecting the battery and memory card Recording time available for video in Web...
User Manual Ver.1.0 (English)
Page 34
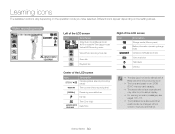
... Film mode/Art Time Lapse mode/ / / Vertical HD Recording mode Video/Photo recording mode tab Zoom tab Playback tab Center of the LCD screen Icon STBY / z/ 00:00:00 Description Operating status (standby/recording/ pause) Time counter (video recording time) [253Min] Remaining recordable time My Clip JAN/01/2012 12:00 AM Time Zone (Visit) Date/Time Right of the LCD screen Icon Description Storage media (Memory card) Battery information (remaining charge level) Optical zoom/Digital zoom bar Video resolution Tele Macro OIS Duo • The settings of functions...
... Film mode/Art Time Lapse mode/ / / Vertical HD Recording mode Video/Photo recording mode tab Zoom tab Playback tab Center of the LCD screen Icon STBY / z/ 00:00:00 Description Operating status (standby/recording/ pause) Time counter (video recording time) [253Min] Remaining recordable time My Clip JAN/01/2012 12:00 AM Time Zone (Visit) Date/Time Right of the LCD screen Icon Description Storage media (Memory card) Battery information (remaining charge level) Optical zoom/Digital zoom bar Video resolution Tele Macro OIS Duo • The settings of functions...
User Manual Ver.1.0 (English)
Page 36
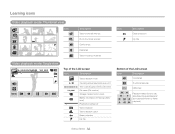
...Video playback mode: Thumbnail view Icon Description Video thumbnail view tab Photo thumbnail view tab Combine tab Delete tab Video recording mode tab Icon Description Erase protection My Clip Video playback mode: Single view 00:00:20/00:01:03 100_0001 Top of the LCD screen Icon Description Video playback mode X / Operating status (playback/pause etc.) 00:00:20/00:01:03 Time code (elapsed time/recorded time) 100_0001 File name (File number) Storage media (memory card) Battery information (remaining battery level) Playback progress bar Video resolution Video playback option Erase...
...Video playback mode: Thumbnail view Icon Description Video thumbnail view tab Photo thumbnail view tab Combine tab Delete tab Video recording mode tab Icon Description Erase protection My Clip Video playback mode: Single view 00:00:20/00:01:03 100_0001 Top of the LCD screen Icon Description Video playback mode X / Operating status (playback/pause etc.) 00:00:20/00:01:03 Time code (elapsed time/recorded time) 100_0001 File name (File number) Storage media (memory card) Battery information (remaining battery level) Playback progress bar Video resolution Video playback option Erase...
User Manual Ver.1.0 (English)
Page 38
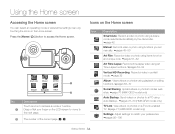
... using Auto Backup. ¬pages 78~80 (HMX-QF20 model only) TV Link: View videos or photos on a TV Link-enabled TV. ¬page 77 (HMX-QF20 model only) Settings: Adjust settings to match your finger on the Home screen. Smart Auto Manual Art Film 1 Art Time Vertical HD Album Lapse Recording 1• 2 No. 1 2 Description Touch an icon to access the Home screen. Press the [Home ( )] button to access a mode or function. Drag...
... using Auto Backup. ¬pages 78~80 (HMX-QF20 model only) TV Link: View videos or photos on a TV Link-enabled TV. ¬page 77 (HMX-QF20 model only) Settings: Adjust settings to match your finger on the Home screen. Smart Auto Manual Art Film 1 Art Time Vertical HD Album Lapse Recording 1• 2 No. 1 2 Description Touch an icon to access the Home screen. Press the [Home ( )] button to access a mode or function. Drag...
User Manual Ver.1.0 (English)
Page 42
... power cable/battery is disconnected or recording is disabled during video recording. • Recording videos in a quiet environment increases microphone sensitivity that damaged data cannot be recovered. • Do not turn off the OIS Duo function when the camcorder is mounted on images and prevent images from being recorded. • The [Home ( )] button cannot be recorded/edited. • Samsung is not responsible for any problems with the audio or video recording. • For various functions...
... power cable/battery is disconnected or recording is disabled during video recording. • Recording videos in a quiet environment increases microphone sensitivity that damaged data cannot be recovered. • Do not turn off the OIS Duo function when the camcorder is mounted on images and prevent images from being recorded. • The [Home ( )] button cannot be recorded/edited. • Samsung is not responsible for any problems with the audio or video recording. • For various functions...
User Manual Ver.1.0 (English)
Page 45
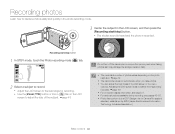
Recording photos Learn how to capture photos easily and quickly in the photo recording mode. 3 Center the subject in the LCD screen, and then press the [Recording start/stop] button. • The shutter sound is heard and the photo is recorded. [Recording start/stop] button 1 In STBY mode, touch the Photo recording mode ( 9999 ) tab. 2 Select a subject to record. • Adjust the LCD screen to adjust the size of the subject. ¬page 43 Do not turn off the camcorder or remove the memory card when...
Recording photos Learn how to capture photos easily and quickly in the photo recording mode. 3 Center the subject in the LCD screen, and then press the [Recording start/stop] button. • The shutter sound is heard and the photo is recorded. [Recording start/stop] button 1 In STBY mode, touch the Photo recording mode ( 9999 ) tab. 2 Select a subject to record. • Adjust the LCD screen to adjust the size of the subject. ¬page 43 Do not turn off the camcorder or remove the memory card when...
User Manual Ver.1.0 (English)
Page 46
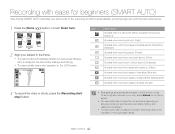
... the [Home ( )] button Š touch Smart Auto. To set or adjust functions on your subject in the Smart Auto mode. Basic functions 42 STBY 00:00:00 [253Min] Icon Description Appears when the camcorder fails to recognize the recording situations. Smart Auto Manual Art Film Art Time Lapse Vertical HD Recording 1• Album 2 Align your own, select Manual on the Home screen. • The camcorder may not...
... the [Home ( )] button Š touch Smart Auto. To set or adjust functions on your subject in the Smart Auto mode. Basic functions 42 STBY 00:00:00 [253Min] Icon Description Appears when the camcorder fails to recognize the recording situations. Smart Auto Manual Art Film Art Time Lapse Vertical HD Recording 1• Album 2 Align your own, select Manual on the Home screen. • The camcorder may not...
User Manual Ver.1.0 (English)
Page 89
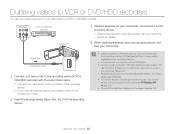
... screen. ¬page 102 Using with other devices 85 Signal flow Audio/Video cable 1 Connect your camcorder to the recording device (VCR or DVD/HDD recorder) with the Audio/Video cable. • Connect your camcorder to the input jacks of the recording device. • If your recording device has an input selector, set TV Display: Off. ¬page 102 • To record the date/time, display it to the correct input mode. 2 Insert the storage device (tape, disc, etc.) into the recording device. • Videos recorded on your camcorder to a VCR or DVD/HDD recorder...
... screen. ¬page 102 Using with other devices 85 Signal flow Audio/Video cable 1 Connect your camcorder to the recording device (VCR or DVD/HDD recorder) with the Audio/Video cable. • Connect your camcorder to the input jacks of the recording device. • If your recording device has an input selector, set TV Display: Off. ¬page 102 • To record the date/time, display it to the correct input mode. 2 Insert the storage device (tape, disc, etc.) into the recording device. • Videos recorded on your camcorder to a VCR or DVD/HDD recorder...
User Manual Ver.1.0 (English)
Page 91
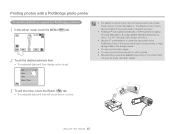
... (Camera & Imaging Products Association), an image transfer standard developed by all printers. Off Date Time Date & Time 3 To exit the menu, touch the Return ( ) tab. • The selected date and time will be printed on the printer. Refer to power the camcorder during printing, it might damage data on the storage media. • You cannot print video images. • You cannot print photos recorded on other devices 87 Printing photos with...
... (Camera & Imaging Products Association), an image transfer standard developed by all printers. Off Date Time Date & Time 3 To exit the menu, touch the Return ( ) tab. • The selected date and time will be printed on the printer. Refer to power the camcorder during printing, it might damage data on the storage media. • You cannot print video images. • You cannot print photos recorded on other devices 87 Printing photos with...
User Manual Ver.1.0 (English)
Page 97
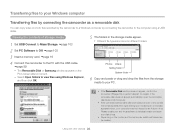
.... 2 Set PC Software to Off. ¬page 103 3 Insert a memory card. ¬page 16 4 Connect the camcorder to the PC with other devices 93 • If the Removable Disk window does not appear, confirm the connection (¬page 89) or perform steps 1 to 4 again. Using with the USB cable. ¬page 89 • The Removable Disk or Samsung window appears on the functions of the camcorder, additional folders can copy video or photo files recorded...
.... 2 Set PC Software to Off. ¬page 103 3 Insert a memory card. ¬page 16 4 Connect the camcorder to the PC with other devices 93 • If the Removable Disk window does not appear, confirm the connection (¬page 89) or perform steps 1 to 4 again. Using with the USB cable. ¬page 89 • The Removable Disk or Samsung window appears on the functions of the camcorder, additional folders can copy video or photo files recorded...
User Manual Ver.1.0 (English)
Page 106
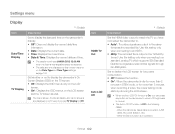
... recording a video, the power saving mode starts by this setting only when connecting to a standard, analog TV which supports SD (Standard Definition) progressive scan (480p) signals through its HDMI jacks. When the camcorder has a cable connection. (USB cable, AC power adaptor, etc.) - The menu screen, thumbnail display, and demo screens are output in the following cases: - Use this function depend on the Date Type and Time Type settings. ¬page 104 Set whether or not to display the camcorder's On Screen Display...
... recording a video, the power saving mode starts by this setting only when connecting to a standard, analog TV which supports SD (Standard Definition) progressive scan (480p) signals through its HDMI jacks. When the camcorder has a cable connection. (USB cable, AC power adaptor, etc.) - The menu screen, thumbnail display, and demo screens are output in the following cases: - Use this function depend on the Date Type and Time Type settings. ¬page 104 Set whether or not to display the camcorder's On Screen Display...

User Manual Ver.1.0 (English)
Page 107
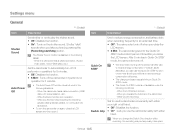
... PC Software function, set . • HDMI: Displays the HDMI guide. • Composite: Displays the Composite guide. Select a mode to use when connecting the camcorder to a PC or printer with a USB cable. • Mass Storage*: Connect to a PC to transfer videos or photos. ¬page 93 • PictBridge: Connect to a PictBridge printer to print photos directly (when using the PictBridge function). ¬page 86 * : Default Item Description TV Connect Guide View the connection instructions before connecting the camcorder to the user manual...
... PC Software function, set . • HDMI: Displays the HDMI guide. • Composite: Displays the Composite guide. Select a mode to use when connecting the camcorder to a PC or printer with a USB cable. • Mass Storage*: Connect to a PC to transfer videos or photos. ¬page 93 • PictBridge: Connect to a PictBridge printer to print photos directly (when using the PictBridge function). ¬page 86 * : Default Item Description TV Connect Guide View the connection instructions before connecting the camcorder to the user manual...
User Manual Ver.1.0 (English)
Page 109
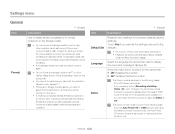
... Description Use to reduce energy consumption and battery drain when recording frequently for 5 minutes. When the camcorder has a cable connection. (Audio/ Video cable, micro HDMI cable, etc.) Set the camcorder to automatically turn the camcorder on the shutter sound. While you close the LCD screen. When the LCD screen is disabled in operation. - When you take a photo by pressing the [Recording start/stop] button. Shutter "click" sounds when you change the Switch Grip direction while recording, the recording may be temporarily interrupted. Auto Power Off...
... Description Use to reduce energy consumption and battery drain when recording frequently for 5 minutes. When the camcorder has a cable connection. (Audio/ Video cable, micro HDMI cable, etc.) Set the camcorder to automatically turn the camcorder on the shutter sound. While you close the LCD screen. When the LCD screen is disabled in operation. - When you take a photo by pressing the [Recording start/stop] button. Shutter "click" sounds when you change the Switch Grip direction while recording, the recording may be temporarily interrupted. Auto Power Off...
User Manual Ver.1.0 (English)
Page 110
... format the storage media on a memory card, including protected files. If you set Demo to power the camcorder, the Auto Power Off function turns the camcorder off the power) during formatting. • If the storage media becomes corrupted, format it is canceled in STBY mode if it again. • Do not format the storage media on the storage media. • Do not remove the storage media or perform any button (Recording start , set Auto Power Off to display the menu and messages...
... format the storage media on a memory card, including protected files. If you set Demo to power the camcorder, the Auto Power Off function turns the camcorder off the power) during formatting. • If the storage media becomes corrupted, format it is canceled in STBY mode if it again. • Do not format the storage media on the storage media. • Do not remove the storage media or perform any button (Recording start , set Auto Power Off to display the menu and messages...

User Manual Ver.1.0 (English)
Page 115
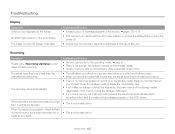
... device. Troubleshooting Playback Message Read Error Corrupted file Icon Informs that have different resolutions. This file cannot be combined. You cannot edit due to insufficient space in Card. Action • You cannot combine files that ... - Action • Use the camcorder to format the storage media after backing up important files to exceed 1.8GB cannot be combined. Informs that you want to delete unnecessary parts of the combined files...
... device. Troubleshooting Playback Message Read Error Corrupted file Icon Informs that have different resolutions. This file cannot be combined. You cannot edit due to insufficient space in Card. Action • You cannot combine files that ... - Action • Use the camcorder to format the storage media after backing up important files to exceed 1.8GB cannot be combined. Informs that you want to delete unnecessary parts of the combined files...
User Manual Ver.1.0 (English)
Page 119
... use a memory card with low writing speed, the camcorder automatically stops recording videos and a corresponding message appears on content and features used. • When you make recordings or delete files frequently, the performance of the LCD. black for recording on the screen. ¬pages 108~113 • This occurs if you disconnect the AC power adaptor or remove the battery before turning the power off. • Ambient light is not a malfunction. The actual recording time...
... use a memory card with low writing speed, the camcorder automatically stops recording videos and a corresponding message appears on content and features used. • When you make recordings or delete files frequently, the performance of the LCD. black for recording on the screen. ¬pages 108~113 • This occurs if you disconnect the AC power adaptor or remove the battery before turning the power off. • Ambient light is not a malfunction. The actual recording time...

User Manual Ver.1.0 (English)
Page 129
Specifications Model name HMX-Q20BN/HMX-Q20TN/HMX-Q20RN HMX-Q200BN/HMX-Q200TN/HMX-Q200RN HMX-QF20BN Video signal NTSC Picture compression format H.264 (MPEG-4.AVC) Audio compression format AAC (Advanced Audio Coding) Image device 1/4" CMOS System Effective pixels 1.75 mega pixels Total pixels 5.1 mega pixels Lens F1.8 ~ F3.9, X20 Optical Zoom, X40 Digital Zoom Focal length 2.6mm ~ 52mm Wireless networking protocol WiFi (802.11b/g/n) LCD screen Size/dot number LCD screen method Composite output 2.7" Wide Touch LCD / 230k TFT LCD 1Vp-p (75 Ω...
Specifications Model name HMX-Q20BN/HMX-Q20TN/HMX-Q20RN HMX-Q200BN/HMX-Q200TN/HMX-Q200RN HMX-QF20BN Video signal NTSC Picture compression format H.264 (MPEG-4.AVC) Audio compression format AAC (Advanced Audio Coding) Image device 1/4" CMOS System Effective pixels 1.75 mega pixels Total pixels 5.1 mega pixels Lens F1.8 ~ F3.9, X20 Optical Zoom, X40 Digital Zoom Focal length 2.6mm ~ 52mm Wireless networking protocol WiFi (802.11b/g/n) LCD screen Size/dot number LCD screen method Composite output 2.7" Wide Touch LCD / 230k TFT LCD 1Vp-p (75 Ω...


