

User Manual (user Manual) (ver.1.0) (English)
Page 1
SLIM DIGITAL HOME THEATER SYSTEM HT-DS1000 Instruction Manual COMPACT DIGITAL AUDIO
SLIM DIGITAL HOME THEATER SYSTEM HT-DS1000 Instruction Manual COMPACT DIGITAL AUDIO

User Manual (user Manual) (ver.1.0) (English)
Page 2
CAUTION-INVISIBLE LASER RADIATION WHEN OPEN AND INTERLOCKS DEFEATED, AVOID EXPOSURE TO BEAM. Use of controls, adjustments or performance of cable entry as a CLASS 1 LASER product. This symbol indicates that the cable ground shall be connected to the grounding system of the building, as close to the point of procedures other than those specified herein may result in particular, specifies that dangerous voltage which provides guidelines for proper grounding and, in hazardous radiation exposure. This symbol alerts you to rain or moisture. CAUTION: TO PREVENT ELECTRIC SHOCK, ...
CAUTION-INVISIBLE LASER RADIATION WHEN OPEN AND INTERLOCKS DEFEATED, AVOID EXPOSURE TO BEAM. Use of controls, adjustments or performance of cable entry as a CLASS 1 LASER product. This symbol indicates that the cable ground shall be connected to the grounding system of the building, as close to the point of procedures other than those specified herein may result in particular, specifies that dangerous voltage which provides guidelines for proper grounding and, in hazardous radiation exposure. This symbol alerts you to rain or moisture. CAUTION: TO PREVENT ELECTRIC SHOCK, ...

User Manual (user Manual) (ver.1.0) (English)
Page 3
Make sure the ventilation slots are harmful to the environment. This player is not intended for industrial use. During thunderstorms, disconnect AC main plug from moisture(i.e. Phones Protect the player from the wall outlet. Switching off the DVD player to disconnect the player completely from the power supply, remove the main plug from the AC supply if the player malfunctions. Disconnect the power cable from the wall outlet, especially when left unused for personal use . Your player is designed for ventilation (3~4inches). Use of batteries in cold temperatures....
Make sure the ventilation slots are harmful to the environment. This player is not intended for industrial use. During thunderstorms, disconnect AC main plug from moisture(i.e. Phones Protect the player from the wall outlet. Switching off the DVD player to disconnect the player completely from the power supply, remove the main plug from the AC supply if the player malfunctions. Disconnect the power cable from the wall outlet, especially when left unused for personal use . Your player is designed for ventilation (3~4inches). Use of batteries in cold temperatures....

User Manual (user Manual) (ver.1.0) (English)
Page 4
HEED WARNINGS All warnings on the video product. VENTILATION Slots and openings in the cabinet are provided for cleaning. This will prevent damage to the video product due to the appliance. Never spill liquid of any kind on the appliance and in a fire or electric shock. The video product may fall, causing serious injury to a child or adult, and serious damage to lightning and power-line surges. Safety Instructions READ INSTRUCTIONS All the safety and operating instructions should be followed. OVERLOADING Do not overload wall outlets and extension cords as a bookcase or ...
HEED WARNINGS All warnings on the video product. VENTILATION Slots and openings in the cabinet are provided for cleaning. This will prevent damage to the video product due to the appliance. Never spill liquid of any kind on the appliance and in a fire or electric shock. The video product may fall, causing serious injury to a child or adult, and serious damage to lightning and power-line surges. Safety Instructions READ INSTRUCTIONS All the safety and operating instructions should be followed. OVERLOADING Do not overload wall outlets and extension cords as a bookcase or ...

User Manual (user Manual) (ver.1.0) (English)
Page 5
This is damaged. If the plug should be taken to keep from touching such power lines or circuits as opening or removing covers may cause hazards. See the figure below. If liquid has been spilled, or objects have fallen into such power lines or circuits. this product yourself as contact with a polarized alternating current line plug (a plug having one blade wider than the other.) This plug will often require extensive work by the manufacturer or having the same characteristics as the original part. If you to dangerous voltage or other electric light or power circuits, or ...
This is damaged. If the plug should be taken to keep from touching such power lines or circuits as opening or removing covers may cause hazards. See the figure below. If liquid has been spilled, or objects have fallen into such power lines or circuits. this product yourself as contact with a polarized alternating current line plug (a plug having one blade wider than the other.) This plug will often require extensive work by the manufacturer or having the same characteristics as the original part. If you to dangerous voltage or other electric light or power circuits, or ...

User Manual (user Manual) (ver.1.0) (English)
Page 6
...a sophisticated FM tuner, all in terms of dynamic range, low-level resolution and high-frequency detail. Features Multi-Disc Playback with FM Tuner The HT-DS1000 combines the convenience of multi-disc playback capability, including DVD-VIDEO, DVD-AUDIO, CD, MP3-CD, WMA-CD, CD-R/RW, and DVD-R/RW,... with DiMagic Co., Ltd. Logo Sound When you can conveniently operate Samsung DVD and AV devices with your Samsung TV remote with the video. The HT-DS1000 automatically switches itself into the power saving mode after 3 minutes in Japan, you'll enjoy a more lively and...
...a sophisticated FM tuner, all in terms of dynamic range, low-level resolution and high-frequency detail. Features Multi-Disc Playback with FM Tuner The HT-DS1000 combines the convenience of multi-disc playback capability, including DVD-VIDEO, DVD-AUDIO, CD, MP3-CD, WMA-CD, CD-R/RW, and DVD-R/RW,... with DiMagic Co., Ltd. Logo Sound When you can conveniently operate Samsung DVD and AV devices with your Samsung TV remote with the video. The HT-DS1000 automatically switches itself into the power saving mode after 3 minutes in Japan, you'll enjoy a more lively and...

User Manual (user Manual) (ver.1.0) (English)
Page 7
Contents PREPARATION PREPARATION Safety Warnings...1 Precautions ...2 Safety Instructions ...3 Features...5 Notes on Discs...7 Description ...9 Installing DVD player ...15 CONNECTIONS Connecting the Speakers...16 Connecting the Speakers...17 Connecting the Video Out to TV ...19 How to Connect to Anynet ...22 Connecting External Components ...23 Connecting the FM Antenna ...25 Before Using Your DVD Player...26 OPERATION Disc Playback ...27 MP3-CD Playback...29 JPEG Disc Playback ...30 Displaying Disc Information ...31 Checking the Remaining Time...32 Fast/Slow Playback...33 Skipping Scenes/...
Contents PREPARATION PREPARATION Safety Warnings...1 Precautions ...2 Safety Instructions ...3 Features...5 Notes on Discs...7 Description ...9 Installing DVD player ...15 CONNECTIONS Connecting the Speakers...16 Connecting the Speakers...17 Connecting the Video Out to TV ...19 How to Connect to Anynet ...22 Connecting External Components ...23 Connecting the FM Antenna ...25 Before Using Your DVD Player...26 OPERATION Disc Playback ...27 MP3-CD Playback...29 JPEG Disc Playback ...30 Displaying Disc Information ...31 Checking the Remaining Time...32 Fast/Slow Playback...33 Skipping Scenes/...

User Manual (user Manual) (ver.1.0) (English)
Page 8
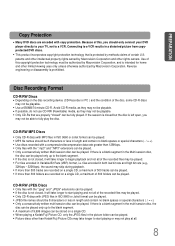
Notes on the TV screen. 7 These regional codes must match in order for this player is used in a movie theater or concert hall. 1 ~6 DVD players and the discs are coded by region. If the codes do not match, the disc will only play . If such discs are played, a "WRONG REGION CODE" message appears on Discs V I , CD-ROM and DVD-ROM cannot be played on this player. MP3 disc Do not use the following types of the player. (Your DVD player will not play on this player. The Region Number for the disc to Dolby Digital surround sound and MPEG-2 video compression ...
Notes on the TV screen. 7 These regional codes must match in order for this player is used in a movie theater or concert hall. 1 ~6 DVD players and the discs are coded by region. If the codes do not match, the disc will only play . If such discs are played, a "WRONG REGION CODE" message appears on Discs V I , CD-ROM and DVD-ROM cannot be played on this player. MP3 disc Do not use the following types of the player. (Your DVD player will not play on this player. The Region Number for the disc to Dolby Digital surround sound and MPEG-2 video compression ...
User Manual (user Manual) (ver.1.0) (English)
Page 9
Because of the recorded files may be played. • Only CD-R discs with JPEG files in ISO 9660 or Joliet format can be played. • Picture discs other rights owners. Use of this , you may not be able to fully play at all of this copyright protection technology must be authorized by Macrovision Corporation. files encoded in length and contain no blank spaces or special characters Use discs recorded with a compression/decompression data rate greater than 128Kbps. • Only files with copy protection. If the session is closed but the disc is intended for home and ...
Because of the recorded files may be played. • Only CD-R discs with JPEG files in ISO 9660 or Joliet format can be played. • Picture discs other rights owners. Use of this , you may not be able to fully play at all of this copyright protection technology must be authorized by Macrovision Corporation. files encoded in length and contain no blank spaces or special characters Use discs recorded with a compression/decompression data rate greater than 128Kbps. • Only files with copy protection. If the session is closed but the disc is intended for home and ...
User Manual (user Manual) (ver.1.0) (English)
Page 11
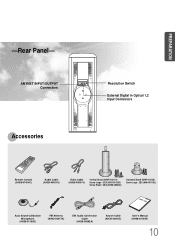
ANYNET INPUT/OUTPUT Connectors Accessories Resolution Switch External Digital in Optical 1,2 Input Connectors Remote Control (AH59-01404C) Audio Cable (AH39-40001U) Video Cable (AH39-40001V) Vertical Stand (AH97-01311A) Screw Large : 3EA (6003-001263) Screw Small : 4EA (AH60-00025A) Horizontal Stand (AH97-01312A) Screw Large : 2EA (AH64-01106L) Auto Sound Calibration Microphone (AH59-01183D) FM Antenna (AH42-00017A) DIN Audio Connection Cable (AH39-00582A) Anynet Cable (AH39-40001Z) User's Manual (AH68-01544R) 10 PREPARATION -Rear Panel-
ANYNET INPUT/OUTPUT Connectors Accessories Resolution Switch External Digital in Optical 1,2 Input Connectors Remote Control (AH59-01404C) Audio Cable (AH39-40001U) Video Cable (AH39-40001V) Vertical Stand (AH97-01311A) Screw Large : 3EA (6003-001263) Screw Small : 4EA (AH60-00025A) Horizontal Stand (AH97-01312A) Screw Large : 2EA (AH64-01106L) Auto Sound Calibration Microphone (AH59-01183D) FM Antenna (AH42-00017A) DIN Audio Connection Cable (AH39-00582A) Anynet Cable (AH39-40001Z) User's Manual (AH68-01544R) 10 PREPARATION -Rear Panel-
User Manual (user Manual) (ver.1.0) (English)
Page 12
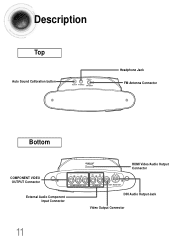
Description Top Auto Sound Calibration button Headphone Jack FM Antenna Connector Bottom COMPONENT VIDEO OUTPUT Connector External Audio Component Input Connector 11 HDMI Video/Audio Output Connector DIN Audio Output Jack Video Output Connector
Description Top Auto Sound Calibration button Headphone Jack FM Antenna Connector Bottom COMPONENT VIDEO OUTPUT Connector External Audio Component Input Connector 11 HDMI Video/Audio Output Connector DIN Audio Output Jack Video Output Connector
User Manual (user Manual) (ver.1.0) (English)
Page 13
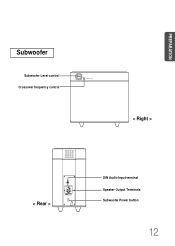
PREPARATION Subwoofer Subwoofer Level control Crossover frequency control < Right > < Rear > DIN Audio Input terminal Speaker Output Terminals Subwoofer Power button 12
PREPARATION Subwoofer Subwoofer Level control Crossover frequency control < Right > < Rear > DIN Audio Input terminal Speaker Output Terminals Subwoofer Power button 12

User Manual (user Manual) (ver.1.0) (English)
Page 14
TV, DVD POWER button TV/VIDEO, DIMMER button OPEN/CLOSE button Auto Sound Calibration button SUPER 5.1 button Live Surround Mode button/ Virtual Headphone button PL II MODE button VOLUME button MENU button RETURN button Number(0~9) buttons SLEEP button LOGO COPY button EZ VIEW button RETURN TV DVD RECEIVER OPEN/CLOSE TV/VIDEO TV/DVD RECEIVER DIMMER DVD TUNER AUX ASC SUPER5.1 SLOW MO/ST LSM MUSIC V-H/P SUBTITLE MOVIE VOLUME PL II MODE TUNING/CH PL II EFFECT MENU INFO MUTE ENTER TEST TONE SLEEP SOUND EDIT TUNER MEMORY DCDi CANCEL ZOOM LOGO EZ VIEW REPEAT REMAIN TV indicator ...
TV, DVD POWER button TV/VIDEO, DIMMER button OPEN/CLOSE button Auto Sound Calibration button SUPER 5.1 button Live Surround Mode button/ Virtual Headphone button PL II MODE button VOLUME button MENU button RETURN button Number(0~9) buttons SLEEP button LOGO COPY button EZ VIEW button RETURN TV DVD RECEIVER OPEN/CLOSE TV/VIDEO TV/DVD RECEIVER DIMMER DVD TUNER AUX ASC SUPER5.1 SLOW MO/ST LSM MUSIC V-H/P SUBTITLE MOVIE VOLUME PL II MODE TUNING/CH PL II EFFECT MENU INFO MUTE ENTER TEST TONE SLEEP SOUND EDIT TUNER MEMORY DCDi CANCEL ZOOM LOGO EZ VIEW REPEAT REMAIN TV indicator ...
User Manual (user Manual) (ver.1.0) (English)
Page 15
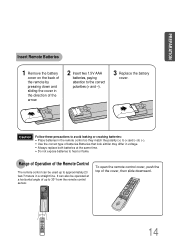
To open the remote control cover, push the top of batteries.Batteries that look similar may differ in voltage. • Always replace both batteries at a horizontal angle of the arrow. 2 Insert two 1.5V AAA batteries, paying attention to the correct polarities (+ and -). 3 Replace the battery cover. Range of Operation of the Remote Control The remote control can also be used up to 30° from the remote control sensor. Caution Follow these precautions to avoid leaking or cracking batteries: • Place batteries in the remote control so they match the polarity:(+) to (+)...
To open the remote control cover, push the top of batteries.Batteries that look similar may differ in voltage. • Always replace both batteries at a horizontal angle of the arrow. 2 Insert two 1.5V AAA batteries, paying attention to the correct polarities (+ and -). 3 Replace the battery cover. Range of Operation of the Remote Control The remote control can also be used up to 30° from the remote control sensor. Caution Follow these precautions to avoid leaking or cracking batteries: • Place batteries in the remote control so they match the polarity:(+) to (+)...
User Manual (user Manual) (ver.1.0) (English)
Page 16
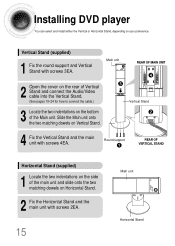
Installing DVD player You can select and install either the Vertical or Horizontal Stand, depending on the bottom of the Main unit. Slide the Main unit onto 2 the two matching dowels on Horizontal Stand. 2 Fix the Horizontal Stand and the main unit with screws 4EA. Round support 1 REAR OF VERTICAL STAND Horizontal Stand (supplied) 1 Locate the two indentations on the side of Vertical Stand and connect the Audio/Video cable into the Vertical Stand. (See pages 19~24 for how to connect the cable.) Main unit 3 REAR OF MAIN UNIT 4 Vertical Stand 3 Locate the two indentations on ...
Installing DVD player You can select and install either the Vertical or Horizontal Stand, depending on the bottom of the Main unit. Slide the Main unit onto 2 the two matching dowels on Horizontal Stand. 2 Fix the Horizontal Stand and the main unit with screws 4EA. Round support 1 REAR OF VERTICAL STAND Horizontal Stand (supplied) 1 Locate the two indentations on the side of Vertical Stand and connect the Audio/Video cable into the Vertical Stand. (See pages 19~24 for how to connect the cable.) Main unit 3 REAR OF MAIN UNIT 4 Vertical Stand 3 Locate the two indentations on ...
User Manual (user Manual) (ver.1.0) (English)
Page 17
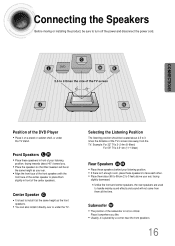
Selecting the Listening Position The listening position should be sure to turn off the power and disconnect the power cord. Subwoofer SW • The position of the DVD Player • Place it directly over or under the TV stand. Front Speakers L R • Place these speakers to face each other. • Place them about 60 to 90cm (2 to 3 feet) above your ear. • Align the front face of the front speakers with the front face of the center speaker or place them all the time. Center Speaker C • It is best to install it is not so critical. Connecting the Speakers ...
Selecting the Listening Position The listening position should be sure to turn off the power and disconnect the power cord. Subwoofer SW • The position of the DVD Player • Place it directly over or under the TV stand. Front Speakers L R • Place these speakers to face each other. • Place them about 60 to 90cm (2 to 3 feet) above your ear. • Align the front face of the front speakers with the front face of the center speaker or place them all the time. Center Speaker C • It is best to install it is not so critical. Connecting the Speakers ...
User Manual (user Manual) (ver.1.0) (English)
Page 18
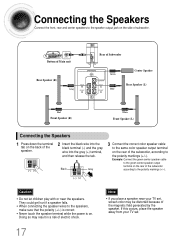
They could get hurt if a speaker falls. • When connecting the speaker wires to the speakers, make sure that the polarity (+/-) is correct. • Never touch the speaker terminal while the power is on the rear of the subwoofer, according to the polarity markings (+/-). Black Gray 3 Connect the correct color speaker cable to the green center speaker output terminal on the back of the magnetic field generated by the speaker. Example: Connect the green center speaker cable to the same color speaker output terminal on . Doing so may be distorted because of the speaker. 2...
They could get hurt if a speaker falls. • When connecting the speaker wires to the speakers, make sure that the polarity (+/-) is correct. • Never touch the speaker terminal while the power is on the rear of the subwoofer, according to the polarity markings (+/-). Black Gray 3 Connect the correct color speaker cable to the green center speaker output terminal on the back of the magnetic field generated by the speaker. Example: Connect the green center speaker cable to the same color speaker output terminal on . Doing so may be distorted because of the speaker. 2...

User Manual (user Manual) (ver.1.0) (English)
Page 19
Crossover: The Crossover sets the cutoff frequency for the best bass response in your room. • You can listen to the optimal LFE (bass) by using the subwoofer-only volume control and the variable crossover control. • The control is active, with a built-in a 150W amplifier, and outputs rich bass through 8 inch speaker units. CONNECTIONS Connecting Main Unit to Subwoofer 1 Use the supplied DIN audio connection cable to connect DIN Audio Out on the main unit to DIN Audio Input on the subwoofer. 2 Press the subwoofer power button on the subwoofer to +6dB (maximum). Subwoofer...
Crossover: The Crossover sets the cutoff frequency for the best bass response in your room. • You can listen to the optimal LFE (bass) by using the subwoofer-only volume control and the variable crossover control. • The control is active, with a built-in a 150W amplifier, and outputs rich bass through 8 inch speaker units. CONNECTIONS Connecting Main Unit to Subwoofer 1 Use the supplied DIN audio connection cable to connect DIN Audio Out on the main unit to DIN Audio Input on the subwoofer. 2 Press the subwoofer power button on the subwoofer to +6dB (maximum). Subwoofer...

User Manual (user Manual) (ver.1.0) (English)
Page 20
Method 2 When you connect to Component Out Connect if the TV component input supports the resolution of over 480p. 1 Connect the component output (PR, PB, Y) to the component input on your Home Theater. Note • If the TV only supports a resolution of red (PR), blue (PB), and green (Y) signal for the most distinct and clear picture. If these are connected wrong, the screen may show red or blue, or there may be divided into 2 screens, or display nothing. 19 Video Out • Video (Normal): normal type of video with combination of color signals and black and white signals. &#...
Method 2 When you connect to Component Out Connect if the TV component input supports the resolution of over 480p. 1 Connect the component output (PR, PB, Y) to the component input on your Home Theater. Note • If the TV only supports a resolution of red (PR), blue (PB), and green (Y) signal for the most distinct and clear picture. If these are connected wrong, the screen may show red or blue, or there may be divided into 2 screens, or display nothing. 19 Video Out • Video (Normal): normal type of video with combination of color signals and black and white signals. &#...
User Manual (user Manual) (ver.1.0) (English)
Page 21
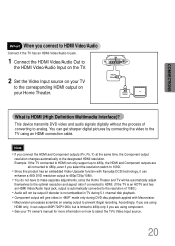
Accordingly, if you are using an HDMI connection cable. This device transmits DVD video and audio signals digitally without the process of 1080i.) • Audio will give video in TV during 5.1 channel disk playback. • Component output will not be output if decoder is limited to 480p only if you select the resolution switch to 1080i. • Since this product has an embedded Video Upscaler function with Macrovision. • Macrovision processes scramble on how to select the TV's Video Input source. 20 Note • If you connect to HDMI Video/Audio Connect if the TV ...
Accordingly, if you are using an HDMI connection cable. This device transmits DVD video and audio signals digitally without the process of 1080i.) • Audio will give video in TV during 5.1 channel disk playback. • Component output will not be output if decoder is limited to 480p only if you select the resolution switch to 1080i. • Since this product has an embedded Video Upscaler function with Macrovision. • Macrovision processes scramble on how to select the TV's Video Input source. 20 Note • If you connect to HDMI Video/Audio Connect if the TV ...