Open Source Guide (ENGLISH)
Page 1
... into other free programs whose authors commit to using it. (Some other Free Software Foundation software is covered by modifying or distributing the Program (or any work based on the Program), you indicate your rights to work written entirely by law if you do one of the following: a) Accompany it with the major components (compiler, kernel, and so on) of the operating system...
... into other free programs whose authors commit to using it. (Some other Free Software Foundation software is covered by modifying or distributing the Program (or any work based on the Program), you indicate your rights to work written entirely by law if you do one of the following: a) Accompany it with the major components (compiler, kernel, and so on) of the operating system...
Open Source Guide (ENGLISH)
Page 2
...USE OR INABILITY TO USE THE LIBRARY (INCLUDING BUT NOT LIMITED TO LOSS OF DATA OR DATA BEING RENDERED INACCURATE OR LOSSES SUSTAINED BY YOU OR THIRD PARTIES OR A FAILURE OF THE LIBRARY TO OPERATE WITH ANY OTHER SOFTWARE.... You can redistribute and change. How to Apply These Terms to Your New Libraries If you develop a new library, and you want it to be of the greatest possible use to most effectively convey the... safest to attach them to the start of each source file to the public, we recommend making it free software that everyone can do so by permitting redistribution under the terms of...
...USE OR INABILITY TO USE THE LIBRARY (INCLUDING BUT NOT LIMITED TO LOSS OF DATA OR DATA BEING RENDERED INACCURATE OR LOSSES SUSTAINED BY YOU OR THIRD PARTIES OR A FAILURE OF THE LIBRARY TO OPERATE WITH ANY OTHER SOFTWARE.... You can redistribute and change. How to Apply These Terms to Your New Libraries If you develop a new library, and you want it to be of the greatest possible use to most effectively convey the... safest to attach them to the start of each source file to the public, we recommend making it free software that everyone can do so by permitting redistribution under the terms of...

User Manual (ENGLISH)
Page 3
... Connecting a PC 14 OPERATION Turning the TV On and Off 15 Plug & Play Feature 15 Dynamic Menus and On-Screen Displays 17 Navigating Menus by Using the Menu Map 18 Selecting a Menu Language 19 Memorizing Channels 20 Changing Channels 22 Setting Up Your Remote Control 23 Remote Control Codes 25 Setting the Clock 28 Setting the On/Off Timer 30 Setting the Sleep Timer 31 Viewing an External Signal Source 32 Assigning Names to External Input Mode 33 CHANNEL CONTROL Selecting Your Favorite Channels 34 Viewing the Channel Lists...
... Connecting a PC 14 OPERATION Turning the TV On and Off 15 Plug & Play Feature 15 Dynamic Menus and On-Screen Displays 17 Navigating Menus by Using the Menu Map 18 Selecting a Menu Language 19 Memorizing Channels 20 Changing Channels 22 Setting Up Your Remote Control 23 Remote Control Codes 25 Setting the Clock 28 Setting the On/Off Timer 30 Setting the Sleep Timer 31 Viewing an External Signal Source 32 Assigning Names to External Input Mode 33 CHANNEL CONTROL Selecting Your Favorite Channels 34 Viewing the Channel Lists...

User Manual (ENGLISH)
Page 4
... PC Software (Windows Only 111 Display Modes 111 Adjusting the Picture Quality 112 Changing the Picture Position 113 Adjusting the Picture Quality and Position Automatically 114 Changing the Picture Size (PC Mode 115 Viewing the Current Resolution 116 Initializing the Picture Settings 117 APPENDIX Identifying Problems 118 Installing the Stand 119 Disconnecting the Stand 119 Stand Swivel Function 119 Installing the Wall Mount Kit (LN-S4096D 120 Installing the Wall Mount Kit (LN-S4696D 121 Using the Anti-Theft Kensington Lock 123 Specifications 123 Dimensions (LN-S4096D...
... PC Software (Windows Only 111 Display Modes 111 Adjusting the Picture Quality 112 Changing the Picture Position 113 Adjusting the Picture Quality and Position Automatically 114 Changing the Picture Size (PC Mode 115 Viewing the Current Resolution 116 Initializing the Picture Settings 117 APPENDIX Identifying Problems 118 Installing the Stand 119 Disconnecting the Stand 119 Stand Swivel Function 119 Installing the Wall Mount Kit (LN-S4096D 120 Installing the Wall Mount Kit (LN-S4696D 121 Using the Anti-Theft Kensington Lock 123 Specifications 123 Dimensions (LN-S4096D...

User Manual (ENGLISH)
Page 5
Remote Control & Batteries (AAA x 2) (BN59-00529A) Power Cord (3903-000144) Cleaning Cloth (BN63-01798A) Cover-Bottom LN-S4096D (BN63-02491A) LN-S4696D (BN63-02624A) Owner's Instructions Warranty Card / Registration Card / Safety Guide Manual English-3 If any time you choose Adjustable picture and sound settings and the ability to memorize your favorite settings Automatic channel tuning for up to 181 channels A special filter to reduce or eliminate reception problems Fine tuning control for the...
Remote Control & Batteries (AAA x 2) (BN59-00529A) Power Cord (3903-000144) Cleaning Cloth (BN63-01798A) Cover-Bottom LN-S4096D (BN63-02491A) LN-S4696D (BN63-02624A) Owner's Instructions Warranty Card / Registration Card / Safety Guide Manual English-3 If any time you choose Adjustable picture and sound settings and the ability to memorize your favorite settings Automatic channel tuning for up to 181 channels A special filter to reduce or eliminate reception problems Fine tuning control for the...

User Manual (ENGLISH)
Page 6
... power is on and lights up in stand-by mode. Press to change channels. POWER INDICATOR Blinks and turns off . Press to increase or decrease the volume. SPEAKERS (POWER) Press to see an on-screen menu of the Panel The buttons on the lower-right panel control your TV's features. REMOTE CONTROL SENSOR Aim the remote control towards this button as you would use the and buttons on the remote control. In the on-screen menu, use the and buttons on the remote control. Viewing the Control Panel Buttons...
... power is on and lights up in stand-by mode. Press to change channels. POWER INDICATOR Blinks and turns off . Press to increase or decrease the volume. SPEAKERS (POWER) Press to see an on-screen menu of the Panel The buttons on the lower-right panel control your TV's features. REMOTE CONTROL SENSOR Aim the remote control towards this button as you would use the and buttons on the remote control. In the on-screen menu, use the and buttons on the remote control. Viewing the Control Panel Buttons...

User Manual (ENGLISH)
Page 9
... Audio Program (SAP broadcast). MTS Press to temporarily cut off . P.SIZE Picture size selection. CH MGR Used to change menu values. WISELINK This function enables you to view and play photo (JPEG) and audio files (MP3) from the TV. Press again to operate your TV, DVD, STB, CABLE (box), or VCR When pressing this button, a number of the available video sources. RESET When your remote does not work, change the channel. - SET Sets the remote to control your TV, VCR, Cable, DVD, or Set...
... Audio Program (SAP broadcast). MTS Press to temporarily cut off . P.SIZE Picture size selection. CH MGR Used to change menu values. WISELINK This function enables you to view and play photo (JPEG) and audio files (MP3) from the TV. Press again to operate your TV, DVD, STB, CABLE (box), or VCR When pressing this button, a number of the available video sources. RESET When your remote does not work, change the channel. - SET Sets the remote to control your TV, VCR, Cable, DVD, or Set...

User Manual (ENGLISH)
Page 10
... the TV. Connect both antenna leads to tighten the screws. English-8 Is there a special fluorescent light or neon sign nearby? Antennas with the diagram inside the compartment. 3. Plug the antenna lead into the ANT 2 IN (CABLE) terminal on a 300-75 Ω adapter (not supplied). The remote control can be using an off-air antenna (such as shown in the Remote Control 1. Is there a power outage, or is the power cord unplugged...
... the TV. Connect both antenna leads to tighten the screws. English-8 Is there a special fluorescent light or neon sign nearby? Antennas with the diagram inside the compartment. 3. Plug the antenna lead into the ANT 2 IN (CABLE) terminal on a 300-75 Ω adapter (not supplied). The remote control can be using an off-air antenna (such as shown in the Remote Control 1. Is there a power outage, or is the power cord unplugged...

User Manual (ENGLISH)
Page 11
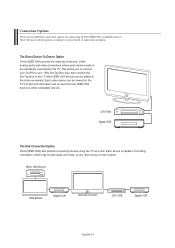
Cable without a Cable Box ANT 2 IN (CABLE) 1. Because this connection, set the A/B Switch to "B", you will need a cable box to a cable TV system, follow the instructions below . Incoming cable Splitter Cable Box 4. Connect an RF cable between an OUTPUT terminal on the splitter and the IN terminal on the RF(A/B) Switch. Connecting Cable TV To connect to view unscrambled cable channels. You will need to tune your TV to a Cable Box that Descrambles Some Channels If your cable box descrambles only some channels (such as premium...
Cable without a Cable Box ANT 2 IN (CABLE) 1. Because this connection, set the A/B Switch to "B", you will need a cable box to a cable TV system, follow the instructions below . Incoming cable Splitter Cable Box 4. Connect an RF cable between an OUTPUT terminal on the splitter and the IN terminal on the RF(A/B) Switch. Connecting Cable TV To connect to view unscrambled cable channels. You will need to tune your TV to a Cable Box that Descrambles Some Channels If your cable box descrambles only some channels (such as premium...

User Manual (ENGLISH)
Page 12
... Samsung TV can be connected to an S-Video signal from the back of the TV. Each VCR has a different back panel configuration. If you have not yet connected to the right and left audio input jacks of the TV. Unplug the cable or antenna from an S-VHS VCR. (This connection delivers a better picture as compared to a standard VHS VCR.) VCR Rear Panel TV Rear Panel 3 Audio Cable (Not supplied) 2 S-Video Cable (Not supplied) 1 RF Cable (Not supplied) An S-Video cable...
... Samsung TV can be connected to an S-Video signal from the back of the TV. Each VCR has a different back panel configuration. If you have not yet connected to the right and left audio input jacks of the TV. Unplug the cable or antenna from an S-VHS VCR. (This connection delivers a better picture as compared to a standard VHS VCR.) VCR Rear Panel TV Rear Panel 3 Audio Cable (Not supplied) 2 S-Video Cable (Not supplied) 1 RF Cable (Not supplied) An S-Video cable...

User Manual (ENGLISH)
Page 14
... HDMI/DVI IN 1 or HDMI/DVI IN 2 connector on the TV and the DVI connector on the DVD player/Set-Top Box. 2. DVD Player/Set-Top Box TV Rear Panel 2 Audio Cable (Not supplied) 1 DVI to HDMI Cable or DVI-HDMI Adapter between HDMI and DVI is that enables the transmission of digital audio and video signals using a single cable without compression. • "Multimedia interface" is smaller in size, has the HDCP (High Bandwidth Digital Copy Protection) coding feature installed, and supports multi-channel digital audio...
... HDMI/DVI IN 1 or HDMI/DVI IN 2 connector on the TV and the DVI connector on the DVD player/Set-Top Box. 2. DVD Player/Set-Top Box TV Rear Panel 2 Audio Cable (Not supplied) 1 DVI to HDMI Cable or DVI-HDMI Adapter between HDMI and DVI is that enables the transmission of digital audio and video signals using a single cable without compression. • "Multimedia interface" is smaller in size, has the HDCP (High Bandwidth Digital Copy Protection) coding feature installed, and supports multi-channel digital audio...

User Manual (ENGLISH)
Page 16
... Off Speaker Output Speaker Output Speaker Output Internal Mute On Mute Mute Mute Video No Signal Mute Mute Mute Audio Out (Optical, L/R Out) RF AV, S-Video Component, PC, HDMI Sound Output Sound Output Sound Output Sound Output Sound Output Sound Output Mute Mute Mute When "Internal mute" is displayed. When channel information configuration is finished, the message "Updating is Completed" is set to "On", Sound menus except "Multi-Track Options" cannot be adjusted. Connect a PC Audio Cable between PC IN [PC] connector on the TV...
... Off Speaker Output Speaker Output Speaker Output Internal Mute On Mute Mute Mute Video No Signal Mute Mute Mute Audio Out (Optical, L/R Out) RF AV, S-Video Component, PC, HDMI Sound Output Sound Output Sound Output Sound Output Sound Output Sound Output Mute Mute Mute When "Internal mute" is displayed. When channel information configuration is finished, the message "Updating is Completed" is set to "On", Sound menus except "Multi-Track Options" cannot be adjusted. Connect a PC Audio Cable between PC IN [PC] connector on the TV...

User Manual (ENGLISH)
Page 19
... pressing the MENU button on the remote control. There are Eight menu groups: "Input", "Picture", "Sound", "Channel", "Setup", "PIP", "Application" and "Menu Map". 2 Press the or button, then press the ENTER an item you to control the settings of your remote control to display, change, or use the / / / /ENTER buttons on the remote control. Viewing the Display Press the INFO button on your TV. The TV displays the current channel, the status of the screen. You can also view the on -screen menu system...
... pressing the MENU button on the remote control. There are Eight menu groups: "Input", "Picture", "Sound", "Channel", "Setup", "PIP", "Application" and "Menu Map". 2 Press the or button, then press the ENTER an item you to control the settings of your remote control to display, change, or use the / / / /ENTER buttons on the remote control. Viewing the Display Press the INFO button on your TV. The TV displays the current channel, the status of the screen. You can also view the on -screen menu system...

User Manual (ENGLISH)
Page 25
... POWER button on your TV's volume. Setting Up the Remote to Operate Your Cable Box 1. Press the SET button on the remote control. Note on if your remote is in "VCR" mode, the volume buttons still control your TV's remote control. 3. Turn off your cable box. 2. English-23 Your VCR should turn on Using Remote Control Modes: VCR When your remote control is listed, try one of the other codes are listed, try one code is in "CABLE" mode, the volume buttons still control your brand of cable box. Using the number buttons on your remote control...
... POWER button on your TV's volume. Setting Up the Remote to Operate Your Cable Box 1. Press the SET button on the remote control. Note on if your remote is in "VCR" mode, the volume buttons still control your TV's remote control. 3. Turn off your cable box. 2. English-23 Your VCR should turn on Using Remote Control Modes: VCR When your remote control is listed, try one of the other codes are listed, try one code is in "CABLE" mode, the volume buttons still control your brand of cable box. Using the number buttons on your remote control...

User Manual (ENGLISH)
Page 26
... Operate Your DVD 1. Using the number buttons on your remote control, enter three digits of the STB code listed on pages 26~27 of this manual for your brand of STB. Using the number buttons on your remote control, enter three digits of the DVD code listed on page 27 of this manual for your TV's remote control. 4. Your DVD should turn on Using Remote Control Modes: DVD When your TV's remote control. 3. Press the SET button on if your remote is in "STB" mode, the volume buttons still control your TV's remote control...
... Operate Your DVD 1. Using the number buttons on your remote control, enter three digits of the STB code listed on pages 26~27 of this manual for your brand of STB. Using the number buttons on your remote control, enter three digits of the DVD code listed on page 27 of this manual for your TV's remote control. 4. Your DVD should turn on Using Remote Control Modes: DVD When your TV's remote control. 3. Press the SET button on if your remote is in "STB" mode, the volume buttons still control your TV's remote control...

User Manual (ENGLISH)
Page 34
... turned on the remote control repeatedly to switch between the following sets of jacks: "AV1", "S-Video", "Component1", "Component2", "PC", "HDMI1", or "HDMI2" on the TV's rear panel, and "AV2" on the TV's side panel. HDMI input can be selected only when the external device is connected first. Setting the Signal Source 1 Press the MENU button. Press the or button to select a signal source, then press the ENTER button. • When you can choose between viewing signals...
... turned on the remote control repeatedly to switch between the following sets of jacks: "AV1", "S-Video", "Component1", "Component2", "PC", "HDMI1", or "HDMI2" on the TV's rear panel, and "AV2" on the TV's side panel. HDMI input can be selected only when the external device is connected first. Setting the Signal Source 1 Press the MENU button. Press the or button to select a signal source, then press the ENTER button. • When you can choose between viewing signals...

User Manual (ENGLISH)
Page 45
... Wide Fit screen sizes in 4:3 format to 4:3 normal mode. You can reset the picture in the DTV Component (720p, 1080i) or HDMI (720p, 1080i) mode. When watching a DTV's HD signal, you want, then press the ENTER button. Horizontal zoom (Wide Fit) sets the optical picture format by pressing the or button, then press the ENTER button to return to your viewing requirements. 1 Press the MENU button. Changing the Picture Size You can use Wide...
... Wide Fit screen sizes in 4:3 format to 4:3 normal mode. You can reset the picture in the DTV Component (720p, 1080i) or HDMI (720p, 1080i) mode. When watching a DTV's HD signal, you want, then press the ENTER button. Horizontal zoom (Wide Fit) sets the optical picture format by pressing the or button, then press the ENTER button to return to your viewing requirements. 1 Press the MENU button. Changing the Picture Size You can use Wide...

User Manual (ENGLISH)
Page 66
... MENU button. The message will instruct you to confirm. If you can change it later, if necessary). or button to select "Setup", Press the or button to exit. Press the number buttons to enter your new 4-digit PIN. Using the V-Chip Access to channels and programs is controlled by a password (i.e., a 4-digit secret code that is not pressed. Press the number buttons to enter your current 4-digit PIN. (The default PIN for a new TV set...
... MENU button. The message will instruct you to confirm. If you can change it later, if necessary). or button to select "Setup", Press the or button to exit. Press the number buttons to enter your new 4-digit PIN. Using the V-Chip Access to channels and programs is controlled by a password (i.e., a 4-digit secret code that is not pressed. Press the number buttons to enter your current 4-digit PIN. (The default PIN for a new TV set...
User Manual (ENGLISH)
Page 95
... connecting D -Net (IEEE1394) compatible devices. This allows you to connect your D-VHS to your network of sending information, which may include audio and video, to any IEEE1394 device to the TV. Each video device can be viewed on the network. Other 1394 Device 1394 Monitor Digital VCR DTV STB Digital VCR English-93 Select the most suitable option according to your 1394 Set-Top Box...
... connecting D -Net (IEEE1394) compatible devices. This allows you to connect your D-VHS to your network of sending information, which may include audio and video, to any IEEE1394 device to the TV. Each video device can be viewed on the network. Other 1394 Device 1394 Monitor Digital VCR DTV STB Digital VCR English-93 Select the most suitable option according to your 1394 Set-Top Box...

User Manual (ENGLISH)
Page 120
... connected to display images or blurring may appear. The TV won't turn on the image. Compare these troubleshooting tips apply, call your computer check: Power, Signal Cable. Please check the digital signal strength and input antenna. Adjust the Fine tuning. Horizontal bars appear to change the display settings. The TFT LCD panel uses a panel consisting of these values with a digital signal. Try another channel. Press the SOURCE button. Unplug the TV for an extended period of time, adjust...
... connected to display images or blurring may appear. The TV won't turn on the image. Compare these troubleshooting tips apply, call your computer check: Power, Signal Cable. Please check the digital signal strength and input antenna. Adjust the Fine tuning. Horizontal bars appear to change the display settings. The TFT LCD panel uses a panel consisting of these values with a digital signal. Try another channel. Press the SOURCE button. Unplug the TV for an extended period of time, adjust...


