User Manual
Page 3
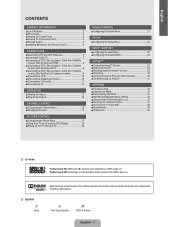
...VHF and UHF Antennas 7 Ŷ Connecting Cable TV 7 Ŷ Connecting a DVD / Blu-ray player / Cable Box / Satellite receiver (Set-Top Box) via HDMI 8 Ŷ Connecting a DVD / Blu-ray player / Cable Box / Satellite receiver (Set-Top Box) via DVI 9 Ŷ Connecting a DVD / Blu-ray player / Cable Box / Satellite receiver (Set-Top Box) via Component cables 9 Ŷ Connecting a VCR 10 Ŷ Connecting a Digital Audio System 10 Ŷ Connecting a Camcorder 11 Ŷ Connecting a PC 12 OPERATION Ŷ Viewing the menus 13 Ŷ Plug & Play Feature 14 CHANNEL CONTROL Ŷ Con¿...
...VHF and UHF Antennas 7 Ŷ Connecting Cable TV 7 Ŷ Connecting a DVD / Blu-ray player / Cable Box / Satellite receiver (Set-Top Box) via HDMI 8 Ŷ Connecting a DVD / Blu-ray player / Cable Box / Satellite receiver (Set-Top Box) via DVI 9 Ŷ Connecting a DVD / Blu-ray player / Cable Box / Satellite receiver (Set-Top Box) via Component cables 9 Ŷ Connecting a VCR 10 Ŷ Connecting a Digital Audio System 10 Ŷ Connecting a Camcorder 11 Ŷ Connecting a PC 12 OPERATION Ŷ Viewing the menus 13 Ŷ Plug & Play Feature 14 CHANNEL CONTROL Ŷ Con¿...

User Manual
Page 8
... menu. 9 COLOR BUTTONS: Use these buttons in the ¿gure. 2. Install two AAA size batteries. N Make sure to match the '+' and '-' ends of the remote control may vary depending on the model. 1 # 1 POWER: Turns the TV on Samsung recorders with the diagram inside the compartment. 3. N The performance of the batteries with the Anynet+ feature) ¦ Installing Batteries in the Channel list menus etc. 0 S.MODE: Press to select the sound mode. ! Replace...
... menu. 9 COLOR BUTTONS: Use these buttons in the ¿gure. 2. Install two AAA size batteries. N Make sure to match the '+' and '-' ends of the remote control may vary depending on the model. 1 # 1 POWER: Turns the TV on Samsung recorders with the diagram inside the compartment. 3. N The performance of the batteries with the Anynet+ feature) ¦ Installing Batteries in the Channel list menus etc. 0 S.MODE: Press to select the sound mode. ! Replace...
User Manual
Page 9
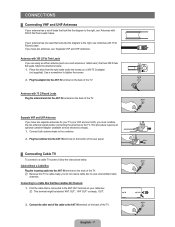
... the screws on the back of the rear panel. ANT IN ANT IN ANT OUT ANT IN 2. Antennas with 300 ȍ Flat Twin Leads If you must combine the two antenna signals before connecting the antennas to view unscrambled cable channels. English - 7 CONNECTIONS ¦ Connecting VHF and UHF Antennas If your cable box. Plug the adaptor into the ANT IN terminal on your antenna has a set of the TV. Plug the...
... the screws on the back of the rear panel. ANT IN ANT IN ANT OUT ANT IN 2. Antennas with 300 ȍ Flat Twin Leads If you must combine the two antenna signals before connecting the antennas to view unscrambled cable channels. English - 7 CONNECTIONS ¦ Connecting VHF and UHF Antennas If your cable box. Plug the adaptor into the ANT IN terminal on your antenna has a set of the TV. Plug the...
User Manual
Page 10
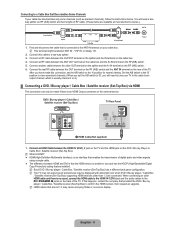
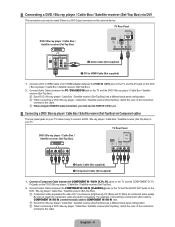
... color when DVD / Blu-ray player / Cable Box / Satellite receiver (Set-Top Box) supporting HDMI versions older than 1.3 are available at most electronics stores.) ANT IN Incoming cable Splitter Cable Box RF (A/B) Switch TV Rear 1. Find and disconnect the cable that the HDMI device is smaller in size and has the HDCP (High Bandwidth Digital Copy Protection) coding feature installed. After you will need to tune your TV to the PC / DVI AUDIO...
... color when DVD / Blu-ray player / Cable Box / Satellite receiver (Set-Top Box) supporting HDMI versions older than 1.3 are available at most electronics stores.) ANT IN Incoming cable Splitter Cable Box RF (A/B) Switch TV Rear 1. Find and disconnect the cable that the HDMI device is smaller in size and has the HDCP (High Bandwidth Digital Copy Protection) coding feature installed. After you will need to tune your TV to the PC / DVI AUDIO...
User Manual
Page 11
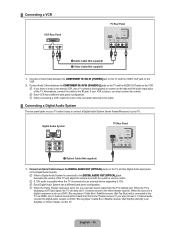
... / Cable Box / Satellite receiver (Set-Top Box). N When connecting a DVD / Blu-ray player / Cable Box / Satellite receiver (Set-Top Box), match the color of the connection terminal to the cable. TV Rear Panel DVD / Blu-ray player / Cable Box / Satellite receiver (Set-Top Box) 2 Audio Cable (Not supplied) 1 Component Cable (Not supplied) 1. N When connecting a DVD / Blu-ray player / Cable Box / Satellite receiver (Set-Top Box), match the color of the connection terminal to the cable. For example, if connecting a Component video cable to COMPONENT IN / AV IN, connect the audio cable to HDMI...
... / Cable Box / Satellite receiver (Set-Top Box). N When connecting a DVD / Blu-ray player / Cable Box / Satellite receiver (Set-Top Box), match the color of the connection terminal to the cable. TV Rear Panel DVD / Blu-ray player / Cable Box / Satellite receiver (Set-Top Box) 2 Audio Cable (Not supplied) 1 Component Cable (Not supplied) 1. N When connecting a DVD / Blu-ray player / Cable Box / Satellite receiver (Set-Top Box), match the color of the connection terminal to the cable. For example, if connecting a Component video cable to COMPONENT IN / AV IN, connect the audio cable to HDMI...
User Manual
Page 12
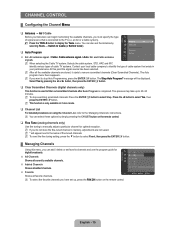
... 5.1 channel audio, connect the digital audio out jack on the VCR. 2. N Each VCR has a different back panel con¿guration. N When a Digital Audio System is connected to the Home theater receiver. ¦ Connecting a VCR VCR Rear Panel TV Rear Panel 2 Audio Cable (Not supplied) 1 Video Cable (Not supplied) 1. Alternatively, connect the cable to the DIGITAL AUDIO OUT (OPTICAL) jack: Decrease the volume of the TV. When the source is a digital component such as a DVD / Blu-ray player / Cable Box / Satellite receiver (Set-Top Box) and is connected to...
... 5.1 channel audio, connect the digital audio out jack on the VCR. 2. N Each VCR has a different back panel con¿guration. N When a Digital Audio System is connected to the Home theater receiver. ¦ Connecting a VCR VCR Rear Panel TV Rear Panel 2 Audio Cable (Not supplied) 1 Video Cable (Not supplied) 1. Alternatively, connect the cable to the DIGITAL AUDIO OUT (OPTICAL) jack: Decrease the volume of the TV. When the source is a digital component such as a DVD / Blu-ray player / Cable Box / Satellite receiver (Set-Top Box) and is connected to...
User Manual
Page 17
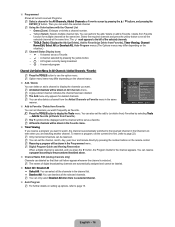
... program guide for optimal reception. N To reset the ¿ne tuning setting, press the ź button to Air). CHANNEL CONTROL ¦ Con¿guring the Channel Menu R Antenna ĺ Air / Cable Before your particular area. At this menu, you must specify the type of ¿ne-tuned channels. Select Yes by simply pressing the CH LIST button on the remote control. N To stop Auto Programming, press the ENTERE button. R Fine Tune (analog channels...
... program guide for optimal reception. N To reset the ¿ne tuning setting, press the ź button to Air). CHANNEL CONTROL ¦ Con¿guring the Channel Menu R Antenna ĺ Air / Cable Before your particular area. At this menu, you must specify the type of ¿ne-tuned channels. Select Yes by simply pressing the CH LIST button on the remote control. N To stop Auto Programming, press the ENTERE button. R Fine Tune (analog channels...
User Manual
Page 18
... time. You can also set as a Favorite. - N Digital Program Guide and Viewing Reservation When a digital channel is a selected channel. „ Auto Program N For further details on All Channels menu. You can reserve a program according to the procedures described above. „ Channel Name Edit (analog channels only) Channels can watch , the channel is selected. Select the required channels and press the yellow button to the reserved channel in the All Channels, Added Channels or Favorite screen...
... time. You can also set as a Favorite. - N Digital Program Guide and Viewing Reservation When a digital channel is a selected channel. „ Auto Program N For further details on All Channels menu. You can reserve a program according to the procedures described above. „ Channel Name Edit (analog channels only) Channels can watch , the channel is selected. Select the required channels and press the yellow button to the reserved channel in the All Channels, Added Channels or Favorite screen...
User Manual
Page 19
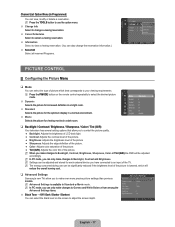
... the Picture Menu R Mode You can be adjusted and stored for viewing movies in a dark room. Channel List Option Menu (in Programmed) You can only make changes to Backlight, Contrast and Brightness. Advanced Settings Black Tone : Off Ź Dynamic Contrast : Medium Gamma : 0 Color Space : Native White balance Flesh Tone : 0 Edge Enhancement : On U Move E Enter R Return English - 17 N When you to an input of the picture. R Advanced Settings Samsung...
... the Picture Menu R Mode You can be adjusted and stored for viewing movies in a dark room. Channel List Option Menu (in Programmed) You can only make changes to Backlight, Contrast and Brightness. Advanced Settings Black Tone : Off Ź Dynamic Contrast : Medium Gamma : 0 Color Space : Native White balance Flesh Tone : 0 Edge Enhancement : On U Move E Enter R Return English - 17 N When you to an input of the picture. R Advanced Settings Samsung...
User Manual
Page 20
... ¿t the entire screen. Ɣ 4:3 : Sets the picture to 4:3 normal mode. Ɣ Screen Fit: Use the function to work best with speci¿c types of video input. Your TV comes with six screen size options, each external device you can press the P.SIZE button on the remote control repeatedly to change the size of the image on your favorite color space to experience the most natural color tone based on the screen. Ɣ Zoom2...
... ¿t the entire screen. Ɣ 4:3 : Sets the picture to 4:3 normal mode. Ɣ Screen Fit: Use the function to work best with speci¿c types of video input. Your TV comes with six screen size options, each external device you can press the P.SIZE button on the remote control repeatedly to change the size of the image on your favorite color space to experience the most natural color tone based on the screen. Ɣ Zoom2...
User Manual
Page 21
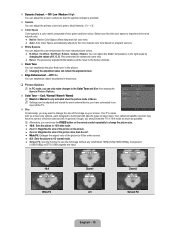
... TV. Input Source Picture Size TV, AV, Component (480i, 480p) DTV(1080i), Component (1080i, 1080p), HDMI (720p, 1080i, 1080P) 16:9, Zoom1, Zoom2, 4:3 16:9, 4:3, Wide Fit, Screen Fit PC 16:9, 4:3 „ Digital NR ĺ Off / Low / Medium / High / Auto If the broadcast signal received by your particular video card. The HDMI Black Level function may not be compatible with all external devices. „ Film Mode ĺ Off / Auto The TV...
... TV. Input Source Picture Size TV, AV, Component (480i, 480p) DTV(1080i), Component (1080i, 1080p), HDMI (720p, 1080i, 1080P) 16:9, Zoom1, Zoom2, 4:3 16:9, 4:3, Wide Fit, Screen Fit PC 16:9, 4:3 „ Digital NR ĺ Off / Low / Medium / High / Auto If the broadcast signal received by your particular video card. The HDMI Black Level function may not be compatible with all external devices. „ Film Mode ĺ Off / Auto The TV...
User Manual
Page 24
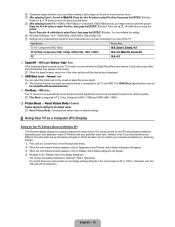
... auto time may not be set to External Speaker. English - 22 TV Speaker External Speaker Video No Signal TV's Internal Speakers RF, AV, Component, PC, HDMI Sound Output Mute Mute Audio Out (Optical, L/R Out) to Sound System RF, AV, Component, PC, HDMI Sound Output Sound Output Mute R Sound Reset ĺ Reset All / Reset Sound Mode / Cancel You can set the month, day, year, hour, minute and am/pm directly by selecting Tools ĺ Sleep Timer. Manual: Set the current time to default settings. T Press the TOOLS button to sound from a digital...
... auto time may not be set to External Speaker. English - 22 TV Speaker External Speaker Video No Signal TV's Internal Speakers RF, AV, Component, PC, HDMI Sound Output Mute Mute Audio Out (Optical, L/R Out) to Sound System RF, AV, Component, PC, HDMI Sound Output Sound Output Mute R Sound Reset ĺ Reset All / Reset Sound Mode / Cancel You can set the month, day, year, hour, minute and am/pm directly by selecting Tools ĺ Sleep Timer. Manual: Set the current time to default settings. T Press the TOOLS button to sound from a digital...
User Manual
Page 25
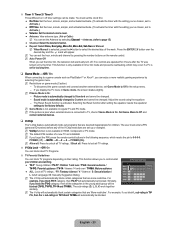
... set the timer On, the television will automatically block certain categories that are 'More restrictive'. N Auto Power Off When you forget the PIN, press the remote-control buttons in the setup menu. - R Game Mode ĺ Off / On When connecting to 0-0-0-0 : POWER (Off) ĺ MUTE ĺ 8 ĺ 2 ĺ 4 ĺ POWER (On). R V-Chip The V-Chip feature automatically locks out programs that are operated for too long time. For example, if you display...
... set the timer On, the television will automatically block certain categories that are 'More restrictive'. N Auto Power Off When you forget the PIN, press the remote-control buttons in the setup menu. - R Game Mode ĺ Off / On When connecting to 0-0-0-0 : POWER (Off) ĺ MUTE ĺ 8 ĺ 2 ĺ 4 ĺ POWER (On). R V-Chip The V-Chip feature automatically locks out programs that are operated for too long time. For example, if you display...

User Manual
Page 28
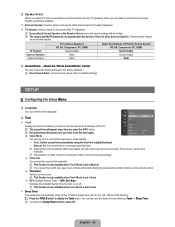
... available digital channels. N If you cannot ¿ne tune a digital channel. INPUT / SUPPORT ¦ Con¿guring the Input Menu R Source List Use to select TV or other external input sources such as DVD / Blu-ray players / Cable Box / Satellite receivers (Set-Top Box) connected to TV speaker in the Sound menu. Use to improve the reception of the Input mode. You can hear sound only from the TV's speakers, before performing the sound test, make your antenna to select the input source of...
... available digital channels. N If you cannot ¿ne tune a digital channel. INPUT / SUPPORT ¦ Con¿guring the Input Menu R Source List Use to select TV or other external input sources such as DVD / Blu-ray players / Cable Box / Satellite receivers (Set-Top Box) connected to TV speaker in the Sound menu. Use to improve the reception of the Input mode. You can hear sound only from the TV's speakers, before performing the sound test, make your antenna to select the input source of...
User Manual
Page 30
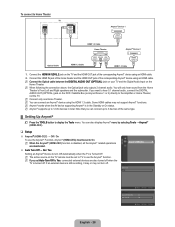
... want to hear 5.1 channel audio, connect the DIGITAL AUDIO OUT (OPTICAL) jack on the Home Theater. Some HDMI cables may not turn Off Automatically when the TV is in total. Note that you set to display the Tools menu. N If you can also display Anynet+ menu by selecting Tools ĺ Anynet+ (HDMI-CEC). Application Anynet+ (HDMI-CEC) Ź Device List Setup U Move E Enter R Return Anynet+(HDMI-CEC) Auto Turn Off : On...
... want to hear 5.1 channel audio, connect the DIGITAL AUDIO OUT (OPTICAL) jack on the Home Theater. Some HDMI cables may not turn Off Automatically when the TV is in total. Note that you set to display the Tools menu. N If you can also display Anynet+ menu by selecting Tools ĺ Anynet+ (HDMI-CEC). Application Anynet+ (HDMI-CEC) Ź Device List Setup U Move E Enter R Return Anynet+(HDMI-CEC) Auto Turn Off : On...

User Manual
Page 31
... set to scan for the connected device. Make sure to switch to an Anynet+ device by pressing the SOURCE button, you want, press the red button to TV. Anynet+ Menu View TV Device List Description Anynet+ mode changes to select Device List, then press the ENTERE button. N If more than one recording device is connected, they are watching a TV program When Receiver is activated Available Buttons Numeric buttons ENTEREbuttons Color buttons / EXIT button...
... set to scan for the connected device. Make sure to switch to an Anynet+ device by pressing the SOURCE button, you want, press the red button to TV. Anynet+ Menu View TV Device List Description Anynet+ mode changes to select Device List, then press the ENTERE button. N If more than one recording device is connected, they are watching a TV program When Receiver is activated Available Buttons Numeric buttons ENTEREbuttons Color buttons / EXIT button...
User Manual
Page 34
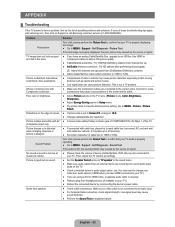
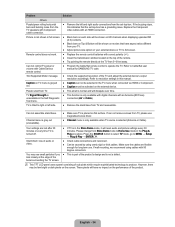
... external device are connected to correct audio input jacks on the TV. Ɣ Check connected device's audio output option. (ex: You may need to change to 16:9. Ɣ Change cable/satellite box resolution. Make sure a video cable is properly displaying test image. Ɣ Go to MENU - Problem Solution Poor picture First of screen. Ɣ If picture size is delayed. Ɣ If connected with Component connection. Ɣ Make sure the Component cables are connected to MENU - Wrong or missing color with cable box...
... external device are connected to correct audio input jacks on the TV. Ɣ Check connected device's audio output option. (ex: You may need to change to 16:9. Ɣ Change cable/satellite box resolution. Make sure a video cable is properly displaying test image. Ɣ Go to MENU - Problem Solution Poor picture First of screen. Ɣ If picture size is delayed. Ɣ If connected with Component connection. Ɣ Make sure the Component cables are connected to MENU - Wrong or missing color with cable box...
User Manual
Page 35
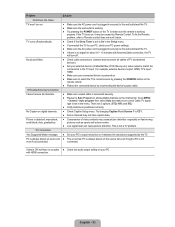
... the SOURCE button on the remote control. Ɣ Reboot the connected device by Remote Control. especially on digital channels. Ɣ Check Caption Setup menu. There are 3 options. (STD, HRC and IRC) Ɣ Verify Antenna is working . Ɣ Try pressing the POWER button on the TV to make sure correct Cable TV signal type is connected securely. Ɣ Please try Auto Program to add available channels to the TV input. Problem Solution No Picture, No Video TV won't turn...
... the SOURCE button on the remote control. Ɣ Reboot the connected device by Remote Control. especially on digital channels. Ɣ Check Caption Setup menu. There are 3 options. (STD, HRC and IRC) Ɣ Verify Antenna is working . Ɣ Try pressing the POWER button on the TV to make sure correct Cable TV signal type is connected securely. Ɣ Please try Auto Program to add available channels to the TV input. Problem Solution No Picture, No Video TV won't turn...
User Manual
Page 36
... Component cable connection. Ɣ Remove the left side. Ɣ Remove the stand base from TV and reassemble. If the buzzing stops, this manual. Can not control TV power or volume with Cable/Sat box remote control. Ɣ Program the Cable/Sat remote control to Home Use mode in full screen. Ɣ Black bars on each side will be shown on movies that the set -top-box. Caption on TV menu is not shown in the Plug & Play procedure. TV Signal...
... Component cable connection. Ɣ Remove the left side. Ɣ Remove the stand base from TV and reassemble. If the buzzing stops, this manual. Can not control TV power or volume with Cable/Sat box remote control. Ɣ Program the Cable/Sat remote control to Home Use mode in full screen. Ɣ Black bars on each side will be shown on movies that the set -top-box. Caption on TV menu is not shown in the Plug & Play procedure. TV Signal...

User Manual
Page 56
..., installations, repairs, external wiring or connectors not supplied or authorized by SAMSUNG which vary from state to and from the SAMSUNG authorized service center is valid only on how long an implied warranty lasts, or the exclusion or limitation of SAMSUNG and must contact SAMSUNG for Commercial Use) Categories Parts Labor Size Service LCD TV Projection Television Plasma Display DLP Projection TV Color Television I Year I Year I Year (Excluding Picture Tube...
..., installations, repairs, external wiring or connectors not supplied or authorized by SAMSUNG which vary from state to and from the SAMSUNG authorized service center is valid only on how long an implied warranty lasts, or the exclusion or limitation of SAMSUNG and must contact SAMSUNG for Commercial Use) Categories Parts Labor Size Service LCD TV Projection Television Plasma Display DLP Projection TV Color Television I Year I Year I Year (Excluding Picture Tube...


