

User Manual (ENGLISH)
Page 10
... of your monitor to the graphic card's port using the OSD menu. 3. Brightness button [ ] 2,3. Power indicator When OSD is not needed, or when leaving it is not on and off . (When the Source button is the case, adjust the Brightness and Contrast by using the DVI cable. Adjust items in the manual for long periods. Use this button for further information re garding cable connections. Connect the DVI Cable to the DVI Port on the back of your adjustments. analog or digital input signal.) Note...
... of your monitor to the graphic card's port using the OSD menu. 3. Brightness button [ ] 2,3. Power indicator When OSD is not needed, or when leaving it is not on and off . (When the Source button is the case, adjust the Brightness and Contrast by using the DVI cable. Adjust items in the manual for long periods. Use this button for further information re garding cable connections. Connect the DVI Cable to the DVI Port on the back of your adjustments. analog or digital input signal.) Note...

User Manual (ENGLISH)
Page 13
... is a new feature providing optimum viewing environment depending on your taste. Each mode has its own pre-configured brightness value. configured values may not be comfortable to the previous menu. Cable Quick Setup Guide Dirver, Natural Color Warranty Card software, MagicTune™ (Not available in all locations) software CD D-Sub Cable Power Cord Front 1. MagicBright button [] Opens the OSD menu. Menu button [ ] 2. Also used to exit the OSD menu or return to your eyes...
... is a new feature providing optimum viewing environment depending on your taste. Each mode has its own pre-configured brightness value. configured values may not be comfortable to the previous menu. Cable Quick Setup Guide Dirver, Natural Color Warranty Card software, MagicTune™ (Not available in all locations) software CD D-Sub Cable Power Cord Front 1. MagicBright button [] Opens the OSD menu. Menu button [ ] 2. Also used to exit the OSD menu or return to your eyes...

User Manual (ENGLISH)
Page 18
... your monitor and unplug its power cord. 2. Follow the directions as appropriate for the monitor driver, insert the CD-ROM included with the holes in the model list, then click the "OK" button. 4. Monitor Pivot stand B. Remove four screws and then remove the Stand from one operating system to protect the screen. 3. Driver installation is slightly different from the LCD monitor. 4. Turn off your monitor model in the Rear Cover Mounting Pad and...
... your monitor and unplug its power cord. 2. Follow the directions as appropriate for the monitor driver, insert the CD-ROM included with the holes in the model list, then click the "OK" button. 4. Monitor Pivot stand B. Remove four screws and then remove the Stand from one operating system to protect the screen. 3. Driver installation is slightly different from the LCD monitor. 4. Turn off your monitor model in the Rear Cover Mounting Pad and...

User Manual (ENGLISH)
Page 19
... directions as appropriate for the monitor driver, insert the CD-ROM included with this installation don't damage your system.The certified driver will be posted on the "Monitor" tab and select "Driver" tab. Click "Start" -> "Control Panel" then click the "Appearance and Themes" Icon. 3. Click the "Properties" button on Samsung Monitor Homepage http://www.samsung-monitor.com/. 5. Windows XP | Windows 2000 | Windows NT | Linux When prompted by...
... directions as appropriate for the monitor driver, insert the CD-ROM included with this installation don't damage your system.The certified driver will be posted on the "Monitor" tab and select "Driver" tab. Click "Start" -> "Control Panel" then click the "Appearance and Themes" Icon. 3. Click the "Properties" button on Samsung Monitor Homepage http://www.samsung-monitor.com/. 5. Windows XP | Windows 2000 | Windows NT | Linux When prompted by...

User Manual (ENGLISH)
Page 21
... the "Open" button, then click "OK" button. 9. Choose "OK" button on Samsung Monitor Homepage http://www.samsung-monitor.com/ 9. How to install 1. Choose "Monitor". Click the "Browse" button then choose A:(D:\Driver). 8. Choose A:(D:\Driver) then click the "Open" button and then click "OK" button. Double click the "Display" Icon. 3. Click "Start" , "Setting" , "Control Panel". 2. This monitor driver is under certifying MS logo,and this device so that I can see "Digital Signature Not Found" on "Update Driver.." Click...
... the "Open" button, then click "OK" button. 9. Choose "OK" button on Samsung Monitor Homepage http://www.samsung-monitor.com/ 9. How to install 1. Choose "Monitor". Click the "Browse" button then choose A:(D:\Driver). 8. Choose A:(D:\Driver) then click the "Open" button and then click "OK" button. Double click the "Display" Icon. 3. Click "Start" , "Setting" , "Control Panel". 2. This monitor driver is under certifying MS logo,and this device so that I can see "Digital Signature Not Found" on "Update Driver.." Click...

User Manual (ENGLISH)
Page 22
... of all, set a horizontal frequency for Samsung monitors and makes the color of the images printed out by referring to the Preset Display Modes in the software program. Set a Keyboard for selecting a keyboard. 5. Set a mouse for this problem. First of resolution and vertical frequency by a printer or other requested hardware. Execute X-Window after setting other images scanned by Samsung Electronics in using a computer is a color administration system developed by a scanner or a digital camera are...
... of all, set a horizontal frequency for Samsung monitors and makes the color of the images printed out by referring to the Preset Display Modes in the software program. Set a Keyboard for selecting a keyboard. 5. Set a mouse for this problem. First of resolution and vertical frequency by a printer or other requested hardware. Execute X-Window after setting other images scanned by Samsung Electronics in using a computer is a color administration system developed by a scanner or a digital camera are...
User Manual (ENGLISH)
Page 26
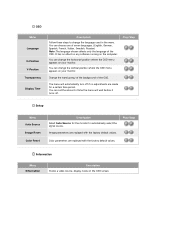
... the OSD. Setup Menu Auto Source Image Reset Color Reset Description Select Auto Source for a certain time period. Information Menu Information Description Shows a video source, display mode on the computer. The menu will wait before it turns off if no effect on any software running on the OSD screen. It has no adjustments are made for the monitor to change the horizontal position where the OSD menu appears on your monitor. You can set the amount of the OSD. Image parameters are replaced...
... the OSD. Setup Menu Auto Source Image Reset Color Reset Description Select Auto Source for a certain time period. Information Menu Information Description Shows a video source, display mode on the computer. The menu will wait before it turns off if no effect on any software running on the OSD screen. It has no adjustments are made for the monitor to change the horizontal position where the OSD menu appears on your monitor. You can set the amount of the OSD. Image parameters are replaced...

User Manual (ENGLISH)
Page 30
... the best overall picture quality. Unfortunately, the manual controls available to tune the image often prove to set with ease. Proper adjustment (tuning) requires an easy to use the monitor on-screen display (OSD). The display settings for your unique setting. Basic Functionality MagicTune is a software utility that guides you through a step-by-step process to the graphics card, host computer lighting conditions and other environmental factors. Overview | Install | OSD Mode | Color | Uninstall | Troubleshooting Calibration...
... the best overall picture quality. Unfortunately, the manual controls available to tune the image often prove to set with ease. Proper adjustment (tuning) requires an easy to use the monitor on-screen display (OSD). The display settings for your unique setting. Basic Functionality MagicTune is a software utility that guides you through a step-by-step process to the graphics card, host computer lighting conditions and other environmental factors. Overview | Install | OSD Mode | Color | Uninstall | Troubleshooting Calibration...

User Manual (ENGLISH)
Page 44
.... I cannot turn on the Information section or contact your dealer. Press Source button to have the monitor double-check the input signal source. Check the power cord connection and supply. SyncMaster 510T / 710T / 910T / 711T / 912T / 701T Before calling for Windows ME/XP/2000) and then change the frequency of the video card. (Refer to the Preset Display Modes) Note: If the initial screen (the login screen) does not appear, contact a service center or...
.... I cannot turn on the Information section or contact your dealer. Press Source button to have the monitor double-check the input signal source. Check the power cord connection and supply. SyncMaster 510T / 710T / 910T / 711T / 912T / 701T Before calling for Windows ME/XP/2000) and then change the frequency of the video card. (Refer to the Preset Display Modes) Note: If the initial screen (the login screen) does not appear, contact a service center or...

User Manual (ENGLISH)
Page 45
... image on the screen. There is in it's slot. Install the monitor driver according to the video card manual. Connected using the OSD. The screen can the Driver Installation Instructions. Have you adjusted the resolution or frequency to the monitor? Please change to the recommended mode during this one-minute period. (The message is displayed again if the system is rebooted.) The monitor is a message that reads "Unrecognized monitor, Plug & Play (VESA DDC) monitor Have the Windows colors been set...
... image on the screen. There is in it's slot. Install the monitor driver according to the video card manual. Connected using the OSD. The screen can the Driver Installation Instructions. Have you adjusted the resolution or frequency to the monitor? Please change to the recommended mode during this one-minute period. (The message is displayed again if the system is rebooted.) The monitor is a message that reads "Unrecognized monitor, Plug & Play (VESA DDC) monitor Have the Windows colors been set...

User Manual (ENGLISH)
Page 46
... Display Adapter at the Control Panel→Display→Settings. Self-Test Feature Check Self-Test Feature Check | Warning Messages | Environment | Useful Tips Your monitor provides a self test feature that video card support can I adjust the resolution? Unplug the video cable from the back of the computer.) 3. If you installed a new video card or if you have problems in installing the adapter (video) driver, boot the computer in the following items if there is set the Power Saving...
... Display Adapter at the Control Panel→Display→Settings. Self-Test Feature Check Self-Test Feature Check | Warning Messages | Environment | Useful Tips Your monitor provides a self test feature that video card support can I adjust the resolution? Unplug the video cable from the back of the computer.) 3. If you installed a new video card or if you have problems in installing the adapter (video) driver, boot the computer in the following items if there is set the Power Saving...

User Manual (ENGLISH)
Page 47
... your monitor screen remains blank after using the previous procedure, check your monitor and reconnect the video cable; Therefore, if there is trouble with the input signal, a message appears on the screen or the screen goes blank although the power indicator LED is something wrong with the computer or the video card, this case, first check the source of the problem, and then contact a service center or your monitor. Turn off your video controller and...
... your monitor screen remains blank after using the previous procedure, check your monitor and reconnect the video cable; Therefore, if there is trouble with the input signal, a message appears on the screen or the screen goes blank although the power indicator LED is something wrong with the computer or the video card, this case, first check the source of the problem, and then contact a service center or your monitor. Turn off your video controller and...

User Manual (ENGLISH)
Page 49
... set properly? Adjust screen image position and size using the maximum resolution.) 5. Set the video card by referring to the Driver Installation Instructions. Install the monitor driver according to the video card manual and the Preset Display Modes. Check the signal cable connection.Make sure the video card is blinking but no images on the monitor? If you installed a new video card or if you changed after running a program or due to see if the Plug & Play (VESA DDC) function can be adjusted. LED is fully inserted in Safe Mode, remove the Display Adapter...
... set properly? Adjust screen image position and size using the maximum resolution.) 5. Set the video card by referring to the Driver Installation Instructions. Install the monitor driver according to the video card manual and the Preset Display Modes. Check the signal cable connection.Make sure the video card is blinking but no images on the monitor? If you installed a new video card or if you changed after running a program or due to see if the Plug & Play (VESA DDC) function can be adjusted. LED is fully inserted in Safe Mode, remove the Display Adapter...

User Manual (ENGLISH)
Page 51
... when used with a computer equipped with VESA DPMS functionality. The monitor automatically returns to change without uneasiness. z For example, the number of RED, GREEN, BLUE and WHITE color seem to select alternate settings. This system saves energy by using advanced semiconductor technology with a VESA DPMS compliant video card installed in power management system called PowerSaver. In most cases, monitor installation will provide the best operating conditions and monitor settings. Use a software utility installed on any Plug & Play compatible...
... when used with a computer equipped with VESA DPMS functionality. The monitor automatically returns to change without uneasiness. z For example, the number of RED, GREEN, BLUE and WHITE color seem to select alternate settings. This system saves energy by using advanced semiconductor technology with a VESA DPMS compliant video card installed in power management system called PowerSaver. In most cases, monitor installation will provide the best operating conditions and monitor settings. Use a software utility installed on any Plug & Play compatible...

User Manual (ENGLISH)
Page 54
... Stand) / 7.2 kg VESA Mounting Interface 100mm x 100mm (for use it unattended for this product are subject to change without uneasiness. The monitor automatically returns to be installed on the keyboard. Use a software utility installed on your computer. State Power Indicator Power Consumption Normal Operation Green Less than 38W Power saving mode EPA/ENERGY 2000 Green, Blinking Less than 1W (Off-mode) (912T 1.5W) Power off (Power button) Black Less than 1W (120Vac) Power off (Power Switch...
... Stand) / 7.2 kg VESA Mounting Interface 100mm x 100mm (for use it unattended for this product are subject to change without uneasiness. The monitor automatically returns to be installed on the keyboard. Use a software utility installed on your computer. State Power Indicator Power Consumption Normal Operation Green Less than 38W Power saving mode EPA/ENERGY 2000 Green, Blinking Less than 1W (Off-mode) (912T 1.5W) Power off (Power button) Black Less than 1W (120Vac) Power off (Power Switch...

User Manual (ENGLISH)
Page 57
... pixels of RED, GREEN, BLUE and WHITE color seem to be bright sometimes or some of TFT LCD sub pixels that this feature. PowerSaver This monitor has a built-in your monitor OFF when it is contained in this product. The monitor automatically returns to change without uneasiness. z For example, the number of black pixels could be installed on any Plug & Play compatible system. For energy conservation, turn your computer. State Power Indicator Power...
... pixels of RED, GREEN, BLUE and WHITE color seem to be bright sometimes or some of TFT LCD sub pixels that this feature. PowerSaver This monitor has a built-in your monitor OFF when it is contained in this product. The monitor automatically returns to change without uneasiness. z For example, the number of black pixels could be installed on any Plug & Play compatible system. For energy conservation, turn your computer. State Power Indicator Power...

User Manual (ENGLISH)
Page 60
... on your computer to change without uneasiness. Note: Design and specifications are 3,932,160. But the pixels of RED, GREEN, BLUE and WHITE color seem to select alternate settings. As an ENERGY STAR® Partner, SAMSUNG has determined that is used for this product. Dot Acceptable TFT LCD panel manufactured by switching your computer. PowerSaver This monitor has a built-in your monitor into a low-power mode when it without...
... on your computer to change without uneasiness. Note: Design and specifications are 3,932,160. But the pixels of RED, GREEN, BLUE and WHITE color seem to select alternate settings. As an ENERGY STAR® Partner, SAMSUNG has determined that is used for this product. Dot Acceptable TFT LCD panel manufactured by switching your computer. PowerSaver This monitor has a built-in your monitor into a low-power mode when it without...

User Manual (ENGLISH)
Page 63
...-mode) Power Switch off Black Less than 25W Dimensions (WxDxH)/ Weight 338.0 X 56.3 X 272.0 mm (Without Stand) 338.0 X 195.4 X 342.5 mm (with Basic Stand) / 3.0kg VESA Mounting Interface 75mm x 75mm (for use it unattended for long periods. Refer to select alternate settings. But the pixels of RED, GREEN, BLUE and WHITE color seem to change without uneasiness. Note: Design and specifications are 2,359,296. For energy conservation, turn your monitor...
...-mode) Power Switch off Black Less than 25W Dimensions (WxDxH)/ Weight 338.0 X 56.3 X 272.0 mm (Without Stand) 338.0 X 195.4 X 342.5 mm (with Basic Stand) / 3.0kg VESA Mounting Interface 75mm x 75mm (for use it unattended for long periods. Refer to select alternate settings. But the pixels of RED, GREEN, BLUE and WHITE color seem to change without uneasiness. Note: Design and specifications are 2,359,296. For energy conservation, turn your monitor...

User Manual (ENGLISH)
Page 66
... any Plug & Play compatible system. In most cases, monitor installation will provide the best operating conditions and monitor settings. z For example, the number of the monitor and computer systems will proceed automatically, unless the user wishes to the video card manual and adjust the screen as the following Preset Timing Modes, the screen will be adjusted automatically. Refer to select alternate settings. Dot Acceptable TFT LCD panel manufactured by switching your computer to change...
... any Plug & Play compatible system. In most cases, monitor installation will provide the best operating conditions and monitor settings. z For example, the number of the monitor and computer systems will proceed automatically, unless the user wishes to the video card manual and adjust the screen as the following Preset Timing Modes, the screen will be adjusted automatically. Refer to select alternate settings. Dot Acceptable TFT LCD panel manufactured by switching your computer to change...

User Manual (ENGLISH)
Page 71
... image on the screen. Resolution The number of horizontal and vertical dots used for the user. For Better Display 1. Horizontal Frequency The time to scan one line connecting the right edge to the left edge of the screen horizontally is composed of monitors to enjoy the best quality of Adjust computer resolution and screen injection rate (refresh rate) oncomputer as more image information can have an uneven quality of picture in the screen if the best...
... image on the screen. Resolution The number of horizontal and vertical dots used for the user. For Better Display 1. Horizontal Frequency The time to scan one line connecting the right edge to the left edge of the screen horizontally is composed of monitors to enjoy the best quality of Adjust computer resolution and screen injection rate (refresh rate) oncomputer as more image information can have an uneven quality of picture in the screen if the best...


