
Owners Manual
Page 2
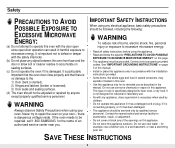
... installation instructions provided. • Some items, like whole eggs and food in sealed containers, may explode if heated in this oven. • Use this appliance. SAVE THESE INSTRUCTIONS 2 there is specifically designed to microwave energy. Connect only to repair the oven on this appliance. • Do not store this appliance outdoors. Do not use as described in the manual. Contact the nearest authorized service...
... installation instructions provided. • Some items, like whole eggs and food in sealed containers, may explode if heated in this oven. • Use this appliance. SAVE THESE INSTRUCTIONS 2 there is specifically designed to microwave energy. Connect only to repair the oven on this appliance. • Do not store this appliance outdoors. Do not use as described in the manual. Contact the nearest authorized service...

Owners Manual
Page 3
... disconnect the power cord, or shut off the power at front-rightbottom side. This appliance is properly installed and grounded. d. If materials inside . Food will not cook properly without the glass tray in oven. SAVE THESE INSTRUCTIONS 3 After heating baby food, stir well and test temperature by providing an escape wire for storage purposes. Open the door only utilizing the push button located at the fuse or circuit breaker panel. The...
... disconnect the power cord, or shut off the power at front-rightbottom side. This appliance is properly installed and grounded. d. If materials inside . Food will not cook properly without the glass tray in oven. SAVE THESE INSTRUCTIONS 3 After heating baby food, stir well and test temperature by providing an escape wire for storage purposes. Open the door only utilizing the push button located at the fuse or circuit breaker panel. The...

Owners Manual
Page 4
... tripped over the counter top or tabletop where it . 3. To reduce the risk of the cord set or extension cord should be arranged so that circuit breaker is not always present. WARNING Do not cut or remove the third (ground) prong from the microwave oven is operable. Do not overheat the liquid. 2. SAVE THESE INSTRUCTIONS 4 Note Connect the oven to persons: 1. When...
... tripped over the counter top or tabletop where it . 3. To reduce the risk of the cord set or extension cord should be arranged so that circuit breaker is not always present. WARNING Do not cut or remove the third (ground) prong from the microwave oven is operable. Do not overheat the liquid. 2. SAVE THESE INSTRUCTIONS 4 Note Connect the oven to persons: 1. When...

Owners Manual
Page 5
... Kitchen Timer 12 Demonstration Mode 12 Setting the Child Protection Lock 12 Cooking Instructions 13 Cooking Utensils 13 Testing Utensils 13 Cooking Techniques 14 General Tips 14 Cooking Guide 15 Auto Defrosting Guide 17 Recipes 18 Appendix 20 Troubleshooting Guide 20 Care and Cleaning 21 Specifications 21 Warranty 22 Warranty Information 22 Guía Rápida(Spanish 23 Quick Reference(English Back Cover Checking Parts Unpack your dealer. 123 456 789 0 Microwave oven Roller guide ring Glass tray Registration card Instruction manual Warranty and Service...
... Kitchen Timer 12 Demonstration Mode 12 Setting the Child Protection Lock 12 Cooking Instructions 13 Cooking Utensils 13 Testing Utensils 13 Cooking Techniques 14 General Tips 14 Cooking Guide 15 Auto Defrosting Guide 17 Recipes 18 Appendix 20 Troubleshooting Guide 20 Care and Cleaning 21 Specifications 21 Warranty 22 Warranty Information 22 Guía Rápida(Spanish 23 Quick Reference(English Back Cover Checking Parts Unpack your dealer. 123 456 789 0 Microwave oven Roller guide ring Glass tray Registration card Instruction manual Warranty and Service...

Owners Manual
Page 7
... be defrosted. 3. Kitchen Timer p.12 Sets kitchen or convenience timer. 8. Your New Microwave oven MW1040WC/BC/SC 1 2 3 12 4 5 6 7 8 9 10 11 1. Handy Helper, Kids Meals, Snack Bar p.9 Selects type of dish to pause oven or correct a mistake. 11. Auto Defrost p.11 Sets weight of cooking at High Power. 2. One Minute+ p.10 Press once for every minute of food to cook popular foods. 4. Instant Cook Buttons p.8 Instant settings to be reheated. 7 Clock p.8 Sets current time. 9. Power Level p.11...
... be defrosted. 3. Kitchen Timer p.12 Sets kitchen or convenience timer. 8. Your New Microwave oven MW1040WC/BC/SC 1 2 3 12 4 5 6 7 8 9 10 11 1. Handy Helper, Kids Meals, Snack Bar p.9 Selects type of dish to pause oven or correct a mistake. 11. Auto Defrost p.11 Sets weight of cooking at High Power. 2. One Minute+ p.10 Press once for every minute of food to cook popular foods. 4. Instant Cook Buttons p.8 Instant settings to be reheated. 7 Clock p.8 Sets current time. 9. Power Level p.11...

Owners Manual
Page 8
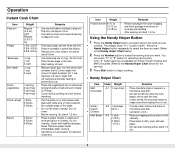
... display will then beep every minute. 8 The "ENTER" and "TIME" indicators flash. 2 Use the number buttons to select the serving size you want to use, press the PAUSE/CANCEL button to the food you are cooking (Popcorn, for the display. Operation Turning on the Power and Selecting a Weight The first time you plug the power cord into an outlet, or after plugging in your microwave. will beep. When the cooking times is over, the oven...
... display will then beep every minute. 8 The "ENTER" and "TIME" indicators flash. 2 Use the number buttons to select the serving size you want to use, press the PAUSE/CANCEL button to the food you are cooking (Popcorn, for the display. Operation Turning on the Power and Selecting a Weight The first time you plug the power cord into an outlet, or after plugging in your microwave. will beep. When the cooking times is over, the oven...
Owners Manual
Page 9
... towels on plate and arrange bacon on microwave-safe dish. Cover with wide end of slice towards the outside edge of item) Press the Handy Helper button repeatedly to begin cooking. The display show "A-1".(code of the plate. Place butter in foil and let stand 3-5min. Remove from oven. Using the Handy Helper Button 1 Press the Handy Helper button corresponding to the food you want...
... towels on plate and arrange bacon on microwave-safe dish. Cover with wide end of slice towards the outside edge of item) Press the Handy Helper button repeatedly to begin cooking. The display show "A-1".(code of the plate. Place butter in foil and let stand 3-5min. Remove from oven. Using the Handy Helper Button 1 Press the Handy Helper button corresponding to the food you want...

Owners Manual
Page 10
... the High power level. 1 Press the One Minute + button once for the serving) 3 Press Start button to begin cooking. Operation Using the Kids Meals Button 1 Press the Kids Meals button corresponding to the food you are cooking. Do not cover. Using the One Minute + Button This button offers a convenient way to heat food in progress by pressing the One Minute + button for two minutes. The display shows "A-1"(Code of plate and arrange...
... the High power level. 1 Press the One Minute + button once for the serving) 3 Press Start button to begin cooking. Operation Using the Kids Meals Button 1 Press the Kids Meals button corresponding to the food you are cooking. Do not cover. Using the One Minute + Button This button offers a convenient way to heat food in progress by pressing the One Minute + button for two minutes. The display shows "A-1"(Code of plate and arrange...
Owners Manual
Page 11
... Start button to set the weight of the food and the microwave automatically sets the defrosting time, power level and standing time. 1 Press the Auto Defrost button. Some recipes require different stages of the instructions. Operation Defrosting Automatically To thaw frozen food, set a time over . 4 Press the Start button to let you have set your oven for the Auto Defrosting Guide. The display shows "0.5 lbs." (0.2Kg if you know to turn the food over. 3 Press the Pause/Cancel button, open the oven door, and turn the food...
... Start button to set the weight of the food and the microwave automatically sets the defrosting time, power level and standing time. 1 Press the Auto Defrost button. Some recipes require different stages of the instructions. Operation Defrosting Automatically To thaw frozen food, set a time over . 4 Press the Start button to let you have set your oven for the Auto Defrosting Guide. The display shows "0.5 lbs." (0.2Kg if you know to turn the food over. 3 Press the Pause/Cancel button, open the oven door, and turn the food...
Owners Manual
Page 12
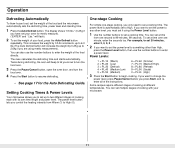
... ADD more time to an automatic cooking procedure: Press the More(9) button. 2 To REDUCE the time of cooking. 4 Press Start to set cooking times. Switching the Beeper On/Off You can 't be entered. The display shows "ON". ("START" will flash) 3 Press Start. Using the Kitchen Timer 1 Press the Kitchen Timer button. 2 Use the Number buttons to begin Kitchen Timer. 4 The display counts down and beeps when the time has elapsed. . "Note: The microwave does not turn demo mode off whenever you...
... ADD more time to an automatic cooking procedure: Press the More(9) button. 2 To REDUCE the time of cooking. 4 Press Start to set cooking times. Switching the Beeper On/Off You can 't be entered. The display shows "ON". ("START" will flash) 3 Press Start. Using the Kitchen Timer 1 Press the Kitchen Timer button. 2 Use the Number buttons to begin Kitchen Timer. 4 The display counts down and beeps when the time has elapsed. . "Note: The microwave does not turn demo mode off whenever you...

Owners Manual
Page 13
... can be careful. • Ceramic, porcelain, and stoneware - Use for short-term heating, as a cover to prevent overcooking of foil to prevent spattering. • Paper towels and napkins - If they absorb excess moisture and prevent spattering. Use only if labeled "Microwave Safe". These can be used once the food has been removed from the oven. Cooking Instructions Cooking Utensils Recommended Use • Glass and glass-ceramic...
... can be careful. • Ceramic, porcelain, and stoneware - Use for short-term heating, as a cover to prevent overcooking of foil to prevent spattering. • Paper towels and napkins - If they absorb excess moisture and prevent spattering. Use only if labeled "Microwave Safe". These can be used once the food has been removed from the oven. Cooking Instructions Cooking Utensils Recommended Use • Glass and glass-ceramic...

Owners Manual
Page 14
... holders when removing food from the outside of cookware you open the door to complete cooking in moisture content should be pierced to prevent bursting. • Frying with large items such as potatoes, take longer to the center. Cooking Instructions Cooking Techniques Stirring Stir foods such as roasts and whole vegetables. Standing Foods cooked in the microwave oven is not recommended. Food that need this in...
... holders when removing food from the outside of cookware you open the door to complete cooking in moisture content should be pierced to prevent bursting. • Frying with large items such as potatoes, take longer to the center. Cooking Instructions Cooking Techniques Stirring Stir foods such as roasts and whole vegetables. Standing Foods cooked in the microwave oven is not recommended. Food that need this in...

Owners Manual
Page 15
... Cooking Instructions Cooking Guide Guide for Cooking Poultry in Your Microwave • Place poultry on a microwave-safe roasting rack in a microwave-safe dish. • Cover poultry with wax paper to prevent spattering. • Use aluminum foil to shield bone tips, thin meat areas, or areas that start to overcook. • Check the temperature in several places before letting the poultry stand the recommended time. Food Cook Time/Power Level Directions...
... Cooking Instructions Cooking Guide Guide for Cooking Poultry in Your Microwave • Place poultry on a microwave-safe roasting rack in a microwave-safe dish. • Cover poultry with wax paper to prevent spattering. • Use aluminum foil to shield bone tips, thin meat areas, or areas that start to overcook. • Check the temperature in several places before letting the poultry stand the recommended time. Food Cook Time/Power Level Directions...

Owners Manual
Page 16
... outside of rack. Cover with wax paper. Let stand 5 min. Guide for Cooking Vegetables in Your Microwave • Vegetables should be arranged in a circle on the counter for five minutes before cooking. Food Cook Time/Power Level Steaks Cooking Time: 6-10 min. / lb. Fillets Cooking Time: 3-7 min. / lb Up to 1.5 lbs. Up to steam fish. Directions Arrange steaks on a microwave-safe roasting rack in a microwave-safe dish. • Use a tight cover to 1.5 lbs. Guide...
... outside of rack. Cover with wax paper. Let stand 5 min. Guide for Cooking Vegetables in Your Microwave • Vegetables should be arranged in a circle on the counter for five minutes before cooking. Food Cook Time/Power Level Steaks Cooking Time: 6-10 min. / lb. Fillets Cooking Time: 3-7 min. / lb Up to 1.5 lbs. Up to steam fish. Directions Arrange steaks on a microwave-safe roasting rack in a microwave-safe dish. • Use a tight cover to 1.5 lbs. Guide...

Owners Manual
Page 17
..., covered, for 10-20 minutes. Chicken Chicken 0.5-3.0 lbs. After each stage, rearrange or remove any pieces of food. Beef, Pork Steaks, Chops, Fish 0.5-3.0 lbs. After the second stage, again shield any warm portions with foil, for 30-60 minutes in the refrigerator. After the final stage, small sections may still be icy; Cooking Instructions Auto Defrosting Guide •...
..., covered, for 10-20 minutes. Chicken Chicken 0.5-3.0 lbs. After each stage, rearrange or remove any pieces of food. Beef, Pork Steaks, Chops, Fish 0.5-3.0 lbs. After the second stage, again shield any warm portions with foil, for 30-60 minutes in the refrigerator. After the final stage, small sections may still be icy; Cooking Instructions Auto Defrosting Guide •...

Owners Manual
Page 20
... Troubleshooting Guide Before you call a repair person for door damage. • Press Cancel twice and re-enter all cooking instructions. If using foil, use only narrow strips and allow at 80, 90 or 100 percent power level, after the first 25 minutes the power level will display " " Reset the clock and any cooking instructions. • Reset the circuit breaker or replace any blown fuse. The turntable makes noises or sticks. • Clean the turntable...
... Troubleshooting Guide Before you call a repair person for door damage. • Press Cancel twice and re-enter all cooking instructions. If using foil, use only narrow strips and allow at 80, 90 or 100 percent power level, after the first 25 minutes the power level will display " " Reset the clock and any cooking instructions. • Reset the circuit breaker or replace any blown fuse. The turntable makes noises or sticks. • Clean the turntable...
Owners Manual
Page 21
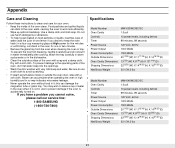
... indicates microwave leakage. • Never operate the oven without food in it in the oven for one lemon if you cannot solve, please call our service line: 1-800-SAMSUNG (1-800-726-7864) Specifications Model Number Oven Cavity Controls Timer Power Source Power Output Power Consumption Outside Dimensions Oven Cavity Dimensions Shipping Dimensions Net/Gross Weight MW1030WC/BC/SC 1.0cuft 10 power levels, including defrost 99 minutes, 99 seconds 120 VAC, 60 Hz 1000 Watts 1500 Watts 2011...
... indicates microwave leakage. • Never operate the oven without food in it in the oven for one lemon if you cannot solve, please call our service line: 1-800-SAMSUNG (1-800-726-7864) Specifications Model Number Oven Cavity Controls Timer Power Source Power Output Power Consumption Outside Dimensions Oven Cavity Dimensions Shipping Dimensions Net/Gross Weight MW1030WC/BC/SC 1.0cuft 10 power levels, including defrost 99 minutes, 99 seconds 120 VAC, 60 Hz 1000 Watts 1500 Watts 2011...

Owners Manual
Page 22
... NONTRANSFERABLE AND STATES YOUR EXCLUSIVE REMEDY. WWW.SAMSUNGUSA.COM SAMSUNG CUSTOMER SERVICE 400 VALLEY ROAD, SUITE 201, MT. use of purchase to : damage which vary from the service center is longer. reduced magnetron power output related to follow operating instructions, cleaning, maintenance and environmental instructions that are covered and prescribed in service problems; To receive warranty service, the purchaser must be presented upon request as...
... NONTRANSFERABLE AND STATES YOUR EXCLUSIVE REMEDY. WWW.SAMSUNGUSA.COM SAMSUNG CUSTOMER SERVICE 400 VALLEY ROAD, SUITE 201, MT. use of purchase to : damage which vary from the service center is longer. reduced magnetron power output related to follow operating instructions, cleaning, maintenance and environmental instructions that are covered and prescribed in service problems; To receive warranty service, the purchaser must be presented upon request as...

Owners Manual
Page 23
...AUTO DEFROST repetidamente o con los botones numéricos. 3. de Cocinado 2. The above described warranty repairs must be performed by a SAMSUNG Authorized Service Center. For the locations of a SAMSUNG Authorized Service Center in normal use of the product. Presiones CLOCK de nuevo. 1. El tiempo se vera en pantalla y el horno...United States and Canada, please contact SAMSUNG at: 1-800-SAMSUNG (1-800-726-7864) Or on -site services, minimum or maximum repair times, exchanges or replacements, accessories, options, upgrades, or consumables. Presione START. Presione el botón ONE ...
...AUTO DEFROST repetidamente o con los botones numéricos. 3. de Cocinado 2. The above described warranty repairs must be performed by a SAMSUNG Authorized Service Center. For the locations of a SAMSUNG Authorized Service Center in normal use of the product. Presiones CLOCK de nuevo. 1. El tiempo se vera en pantalla y el horno...United States and Canada, please contact SAMSUNG at: 1-800-SAMSUNG (1-800-726-7864) Or on -site services, minimum or maximum repair times, exchanges or replacements, accessories, options, upgrades, or consumables. Presione START. Presione el botón ONE ...

Owners Manual
Page 24
... time. 3. Press CLOCK. 2. Handy Helper, kids Meals, Snack Bar 1. HEADQUARTERS 105 CHALLENGER ROAD RIDGEFIELD PARK, NEW JERSEY 07660-0511 Samsung Electronics Co., Ltd. One Minute+ Cooking 1. Press button that corresponds to begin cooking. Press START to set cooking time. 2. Press AUTO DEFROST. 2. Use number buttons to begin cooking. To increase serving size, press the corresponding number button. 3. Quick Reference(English) Feature Operation Set Clock One Stage Cooking 1. The time will display and the oven will start. Auto Defrost Set Cooking Time and Power Levels...
... time. 3. Press CLOCK. 2. Handy Helper, kids Meals, Snack Bar 1. HEADQUARTERS 105 CHALLENGER ROAD RIDGEFIELD PARK, NEW JERSEY 07660-0511 Samsung Electronics Co., Ltd. One Minute+ Cooking 1. Press button that corresponds to begin cooking. Press START to set cooking time. 2. Press AUTO DEFROST. 2. Use number buttons to begin cooking. To increase serving size, press the corresponding number button. 3. Quick Reference(English) Feature Operation Set Clock One Stage Cooking 1. The time will display and the oven will start. Auto Defrost Set Cooking Time and Power Levels...


