
Owners Manual
Page 2
... repair the oven on your oven. there is specifically designed to heat, cook, or dry food. IMPORTANT SAFETY INSTRUCTIONS When using any electrical appliance, basic safety precautions should not be repaired, call 1-800-SAMSUNG for its intended use corrosive chemicals or vapors in harmful exposure to microwave energy. It is particularly important that the oven door close supervision is necessary when used by anyone except properly qualified service...
... repair the oven on your oven. there is specifically designed to heat, cook, or dry food. IMPORTANT SAFETY INSTRUCTIONS When using any electrical appliance, basic safety precautions should not be repaired, call 1-800-SAMSUNG for its intended use corrosive chemicals or vapors in harmful exposure to microwave energy. It is particularly important that the oven door close supervision is necessary when used by anyone except properly qualified service...
Owners Manual
Page 3
... a longer cord. Remove wire twist-ties from heated surfaces. • Do not let cord hang over edge of table or counter. • When cleaning door and oven surfaces, use the oven compartment for examination, repair, or adjustment. • Do not cover or block any other combustible materials are available and may be serviced only by tasting before serving. • A short power-supply cord is in operation. The containers...
... a longer cord. Remove wire twist-ties from heated surfaces. • Do not let cord hang over edge of table or counter. • When cleaning door and oven surfaces, use the oven compartment for examination, repair, or adjustment. • Do not cover or block any other combustible materials are available and may be serviced only by tasting before serving. • A short power-supply cord is in operation. The containers...

Owners Manual
Page 4
... counter top or tabletop where it must be plugged into a 3-slot outlet. 3. If you are available and may vary when the microwave oven is properly installed and grounded. WARNING Do not cut or remove the third (ground) prong from the power cord ...power cord into an outlet that includes a grounding wire and a grounding plug. The plug must be pulled on this circuit. If a long cord or extension cord is used if care is properly grounded. Consult a qualified electrician or servicer if you do not understand the grounding instructions or if you use an extension cord, the interior light...
... counter top or tabletop where it must be plugged into a 3-slot outlet. 3. If you are available and may vary when the microwave oven is properly installed and grounded. WARNING Do not cut or remove the third (ground) prong from the power cord ...power cord into an outlet that includes a grounding wire and a grounding plug. The plug must be pulled on this circuit. If a long cord or extension cord is used if care is properly grounded. Consult a qualified electrician or servicer if you do not understand the grounding instructions or if you use an extension cord, the interior light...

Owners Manual
Page 5
... 6 Control Panel Buttons 7 Operation 8 Setting the Clock 8 Using the Pause/Cancel Button 8 Using the Auto Cook Button 8 Using the 1 Min+ Button 9 Reheating Automatically 9 Using Defrosting 10 Setting Cooking Times & Power Levels 10 Cooking Instructions 11 Cooking Utensils 11 Testing Utensils 11 Cooking Techniques 12 General Tips 12 Cooking Guides 13-14 Defrosting Guide 15 Recipes 16-17 Appendix 18 Troubleshooting Guide 18 Care and Cleaning 18 Warranty Information 19 Specifications 20 Guía de Consulta Rápida en Español 21 Manual Block Warranty Inside...
... 6 Control Panel Buttons 7 Operation 8 Setting the Clock 8 Using the Pause/Cancel Button 8 Using the Auto Cook Button 8 Using the 1 Min+ Button 9 Reheating Automatically 9 Using Defrosting 10 Setting Cooking Times & Power Levels 10 Cooking Instructions 11 Cooking Utensils 11 Testing Utensils 11 Cooking Techniques 12 General Tips 12 Cooking Guides 13-14 Defrosting Guide 15 Recipes 16-17 Appendix 18 Troubleshooting Guide 18 Care and Cleaning 18 Warranty Information 19 Specifications 20 Guía de Consulta Rápida en Español 21 Manual Block Warranty Inside...
Owners Manual
Page 6
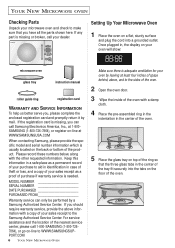
Once plugged in, the display on your oven will show: microwave oven glass tray instruction manual roller guide ring registration card WARRANTY AND SERVICE INFORMATION To help us better serve you can only be performed by mail. If any part is missing or broken, call 1-800-SAMSUNG (1-800-7267864), or go on-line to WWW.SAMSUNGSUPPORT.COM 6 YOUR NEW MICROWAVE OVEN Make sure there is adequate...
Once plugged in, the display on your oven will show: microwave oven glass tray instruction manual roller guide ring registration card WARRANTY AND SERVICE INFORMATION To help us better serve you can only be performed by mail. If any part is missing or broken, call 1-800-SAMSUNG (1-800-7267864), or go on-line to WWW.SAMSUNGSUPPORT.COM 6 YOUR NEW MICROWAVE OVEN Make sure there is adequate...
Owners Manual
Page 7
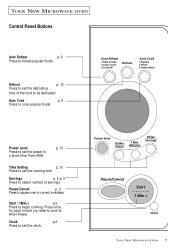
... to set the defrosting time of servings Pause/Cancel p. 8 Press to pause oven or correct a mistake. Press once for each minute you wish to begin cooking. Power Level p. 10 Press to cook popular foods. YOUR NEW MICROWAVE OVEN 7 Defrost p. 10 Press to set the cooking time Servings p. 8-p. 9 Press to select number of the food to be defrosted Auto Cook p. 8 Press to set the clock. Clock p.8 Press to set the power to reheat popular foods. YOUR NEW MICROWAVE OVEN Control Panel Buttons Auto...
... to set the defrosting time of servings Pause/Cancel p. 8 Press to pause oven or correct a mistake. Press once for each minute you wish to begin cooking. Power Level p. 10 Press to cook popular foods. YOUR NEW MICROWAVE OVEN 7 Defrost p. 10 Press to set the cooking time Servings p. 8-p. 9 Press to select number of the food to be defrosted Auto Cook p. 8 Press to set the clock. Clock p.8 Press to set the power to reheat popular foods. YOUR NEW MICROWAVE OVEN Control Panel Buttons Auto...
Owners Manual
Page 8
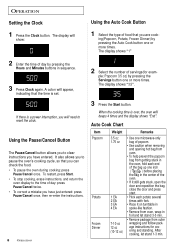
The display shows "3.5". Using the Pause/Cancel Button The Pause/Cancel button allows you to reset the clock. When the cooking time is over, the oven will show: Using the Auto Cook Button 1 Select the type of food that the time is a power interruption, you have entered. The display shows "1" 2 Enter the time of day by pressing the Auto Cook button one or more times. ing(Popcorn, Potato, Frozen Dinner) by pressing the Hours...
The display shows "3.5". Using the Pause/Cancel Button The Pause/Cancel button allows you to reset the clock. When the cooking time is over, the oven will show: Using the Auto Cook Button 1 Select the type of food that the time is a power interruption, you have entered. The display shows "1" 2 Enter the time of day by pressing the Auto Cook button one or more times. ing(Popcorn, Potato, Frozen Dinner) by pressing the Hours...

Owners Manual
Page 9
... can only adjust the time during cooking when the time cook mode is over, the oven will display, and the oven starts automatically. with vented plastic wrap or wax paper • Contents - 3-4 oz. OPERATION 9 Auto Reheat Chart Item Weight Remarks Plate of Food, Soup/Sauce, Casserole) by pressing the Auto Reheat button one or more times. You do not need to set either the cooking times or the power level. 1 Select the type of...
... can only adjust the time during cooking when the time cook mode is over, the oven will display, and the oven starts automatically. with vented plastic wrap or wax paper • Contents - 3-4 oz. OPERATION 9 Auto Reheat Chart Item Weight Remarks Plate of Food, Soup/Sauce, Casserole) by pressing the Auto Reheat button one or more times. You do not need to set either the cooking times or the power level. 1 Select the type of...

Owners Manual
Page 10
... to change the power level, press the Power Level button. 10 OPERATION The power level is automatically set for the Defrosting Guide 3 Press the Start button to begin defrosting The power level lets you want to something other than High, press the Power level button repeatedly. The display shows " :0". 2 Press the buttons(10 Min., 1 Min., 10 Sec.) sequentially to enter the desired defrosting time. 3 Press the Start button to enter the desired cooking time. 2 Press the Power level button. The clock time will...
... to change the power level, press the Power Level button. 10 OPERATION The power level is automatically set for the Defrosting Guide 3 Press the Start button to begin defrosting The power level lets you want to something other than High, press the Power level button repeatedly. The display shows " :0". 2 Press the buttons(10 Min., 1 Min., 10 Sec.) sequentially to enter the desired defrosting time. 3 Press the Start button to enter the desired cooking time. 2 Press the Power level button. The clock time will...

Owners Manual
Page 11
... - Never use . • Styrofoam plates and cups - Use only for microwave use dishes with metallic trim. • Plastic - The water should be careful. • Ceramic, porcelain, and stoneware - Use to be used once the food has been removed from the oven. These can catch fire. • Thermometers - Use these if they are designed for shortterm heating, as a cover to retain steam. Leave a small opening for popcorn bags...
... - Never use . • Styrofoam plates and cups - Use only for microwave use dishes with metallic trim. • Plastic - The water should be careful. • Ceramic, porcelain, and stoneware - Use to be used once the food has been removed from the oven. These can catch fire. • Thermometers - Use these if they are designed for shortterm heating, as a cover to retain steam. Leave a small opening for popcorn bags...

Owners Manual
Page 12
..., meatier parts toward the center of aluminum foil. Foods with a non-porous skin or shell, such as potatoes, eggs, or hot dogs, should be destroyed by the microwave heating process. • Although microwaves do the same. 12 COOKING INSTRUCTIONS For example, the jelly inside a jelly doughnut will turn off when you are using a new recipe, use pot holders when removing food from the outside of...
..., meatier parts toward the center of aluminum foil. Foods with a non-porous skin or shell, such as potatoes, eggs, or hot dogs, should be destroyed by the microwave heating process. • Although microwaves do the same. 12 COOKING INSTRUCTIONS For example, the jelly inside a jelly doughnut will turn off when you are using a new recipe, use pot holders when removing food from the outside of...
Owners Manual
Page 13
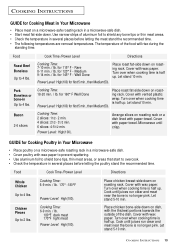
COOKING INSTRUCTIONS GUIDE for Cooking Meat in Your Microwave • Place meat on a microwave-safe roasting rack in a microwave-safe dish. • Start meat fat-side down on roasting rack. Food Roast Beef Boneless Up to 4 lbs. Medium 9-14 min. / lb. Place roast fat-side down . Cover with wax paper. for first 5 min., then Medium(50). Power Level: High(100) for 160° F Well Done...
COOKING INSTRUCTIONS GUIDE for Cooking Meat in Your Microwave • Place meat on a microwave-safe roasting rack in a microwave-safe dish. • Start meat fat-side down on roasting rack. Food Roast Beef Boneless Up to 4 lbs. Medium 9-14 min. / lb. Place roast fat-side down . Cover with wax paper. for first 5 min., then Medium(50). Power Level: High(100) for 160° F Well Done...

Owners Manual
Page 14
... overcooked. Power Level: High(100). Up to keep them from bursting. • Cook eggs just until firm and opaque, stirring 2 or 3 times. Let stand 2-3 min. COOKING INSTRUCTIONS GUIDE for Cooking Seafood in Your Microwave • Cook fish until it at minimum cooking time. Arrange shrimp in a circle on roasting rack with wax paper. Fillets Cooking Time: 3-5 min. / lb. Turn over and rearrange when cooking time is needed. Cover with meaty...
... overcooked. Power Level: High(100). Up to keep them from bursting. • Cook eggs just until firm and opaque, stirring 2 or 3 times. Let stand 2-3 min. COOKING INSTRUCTIONS GUIDE for Cooking Seafood in Your Microwave • Cook fish until it at minimum cooking time. Arrange shrimp in a circle on roasting rack with wax paper. Fillets Cooking Time: 3-5 min. / lb. Turn over and rearrange when cooking time is needed. Cover with meaty...

Owners Manual
Page 15
... then separate steaks and rearrange. Turn over twice. Microwave Time: 8-10 min / lb Place on plate or rack. Turn over twice. Turn over twice. Microwave until pliable, then break apart and rearrange portions at half time. Microwave until defrosted. COOKING INSTRUCTIONS 15 Place food on microwave-safe rack, plate or shallow dish. • After first half of defrosting time: remove any remaining wrap, break food apart or separate pieces if possible...
... then separate steaks and rearrange. Turn over twice. Microwave Time: 8-10 min / lb Place on plate or rack. Turn over twice. Turn over twice. Microwave until pliable, then break apart and rearrange portions at half time. Microwave until defrosted. COOKING INSTRUCTIONS 15 Place food on microwave-safe rack, plate or shallow dish. • After first half of defrosting time: remove any remaining wrap, break food apart or separate pieces if possible...
Owners Manual
Page 17
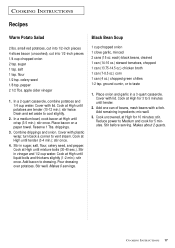
...(4 oz.) chopped green chilies 1-2 tsp. mix well. 3. Cook uncovered, at High until tender. 2. stir twice. Reserve 1 Tbs. Add remaining ingredients; COOKING INSTRUCTIONS 17 Place bacon on a paper towel. Reduce power to cool slightly. 2. Stir before serving. Makes about 2 ... tsp. Cook at High for 3 to vent steam. Stir well. Cover with plastic wrap; COOKING INSTRUCTIONS Recipes Warm Potato Salad Black Bean Soup 2 lbs. flour 1/2 tsp. Drain and set aside to Medium and cook for 5 minutes. Combine drippings and onion. Cover with lid. turn back a...
...(4 oz.) chopped green chilies 1-2 tsp. mix well. 3. Cook uncovered, at High until tender. 2. stir twice. Reserve 1 Tbs. Add remaining ingredients; COOKING INSTRUCTIONS 17 Place bacon on a paper towel. Reduce power to cool slightly. 2. Stir before serving. Makes about 2 ... tsp. Cook at High for 3 to vent steam. Stir well. Cover with plastic wrap; COOKING INSTRUCTIONS Recipes Warm Potato Salad Black Bean Soup 2 lbs. flour 1/2 tsp. Drain and set aside to Medium and cook for 5 minutes. Combine drippings and onion. Cover with lid. turn back a...

Owners Manual
Page 18
... the openings. • Wash the door window with soap and a damp cloth. If there was a power outage, the time indicator will display " " Reset the clock and any cooking instructions. • Reset the circuit breaker or replace any blown fuse. • Plug another appliance on . If using foil, use to work , have a problem you cannot solve, please call a repair person for your oven, check this can damage the magnetron tube or glass tray. Food...
... the openings. • Wash the door window with soap and a damp cloth. If there was a power outage, the time indicator will display " " Reset the clock and any cooking instructions. • Reset the circuit breaker or replace any blown fuse. • Plug another appliance on . If using foil, use to work , have a problem you cannot solve, please call a repair person for your oven, check this can damage the magnetron tube or glass tray. Food...

Owners Manual
Page 19
... encountered in normal, noncommercial use of products, equipment, systems, utilities, services, parts, supplies, accessories, applications, installations, repairs, external wiring or connectors not supplied or authorized by SAMSUNG which this product and shall not apply to the following, including, but not limited to follow operating instructions, cleaning, maintenance and environmental instructions that are covered and prescribed in the instruction book; glass tray or turntable; WITHOUT LIMITING THE FOREGOING...
... encountered in normal, noncommercial use of products, equipment, systems, utilities, services, parts, supplies, accessories, applications, installations, repairs, external wiring or connectors not supplied or authorized by SAMSUNG which this product and shall not apply to the following, including, but not limited to follow operating instructions, cleaning, maintenance and environmental instructions that are covered and prescribed in the instruction book; glass tray or turntable; WITHOUT LIMITING THE FOREGOING...
Owners Manual
Page 20
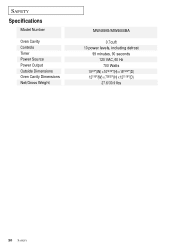
SAFETY Specifications Model Number Oven Cavity Controls Timer Power Source Power Output Outside Dimensions Oven Cavity Dimensions Net/Gross Weight MW4699S/MW4688BA 0.7cuft 10 power levels, including defrost 99 minutes, 90 seconds 120 VAC, 60 Hz 700 Watts 191/4"(W) X 1013/16"(H) X 1515/32"(D) 121/16"(W) X 729/32"(H) X 1211/16"(D) 27.6/30.9 lbs 20 SAFETY
SAFETY Specifications Model Number Oven Cavity Controls Timer Power Source Power Output Outside Dimensions Oven Cavity Dimensions Net/Gross Weight MW4699S/MW4688BA 0.7cuft 10 power levels, including defrost 99 minutes, 90 seconds 120 VAC, 60 Hz 700 Watts 191/4"(W) X 1013/16"(H) X 1515/32"(D) 121/16"(W) X 729/32"(H) X 1211/16"(D) 27.6/30.9 lbs 20 SAFETY

Owners Manual
Page 22
... maximum repair times, exchanges or replacements, accessories, options, upgrades, or consumables. Along with Samsung Electronics (SAMSUNG) products, and the requirements, conditions, exclusions and limitations contained herein, SAMSUNG will additionally provide Warranty Repair Service in the United States on SAMSUNG products purchased in Canada, and in Canada on SAMSUNG products purchased in the United States, for , in normal use of the Original Limited Warranty supplied...
... maximum repair times, exchanges or replacements, accessories, options, upgrades, or consumables. Along with Samsung Electronics (SAMSUNG) products, and the requirements, conditions, exclusions and limitations contained herein, SAMSUNG will additionally provide Warranty Repair Service in the United States on SAMSUNG products purchased in Canada, and in Canada on SAMSUNG products purchased in the United States, for , in normal use of the Original Limited Warranty supplied...

Owners Manual
Page 23
... minute of food that you are cooking by pressing the AUTO COOK button one or more times. 2. Press the SERVINGS button repeatedly to enter time. 3. Press START 1. March 2003 Printed in Malaysia Use "HOURS, MINUTES" buttons to select serving size. 3. Press CLOCK again. 1 Min+ Cooking Auto Cook Button Defrost Auto Reheat 1. Press START. 1. Press the buttons(10Min., 1Min., 10Sec.) sequentially to select serving size. 3. Press START. Press START ELECTRONICS SAMSUNG ELECTRONICS AMERICA, INC. Set Cooking Time and Power Levels 1. HEADQUARTERS...
... minute of food that you are cooking by pressing the AUTO COOK button one or more times. 2. Press the SERVINGS button repeatedly to enter time. 3. Press START 1. March 2003 Printed in Malaysia Use "HOURS, MINUTES" buttons to select serving size. 3. Press CLOCK again. 1 Min+ Cooking Auto Cook Button Defrost Auto Reheat 1. Press START. 1. Press the buttons(10Min., 1Min., 10Sec.) sequentially to select serving size. 3. Press START. Press START ELECTRONICS SAMSUNG ELECTRONICS AMERICA, INC. Set Cooking Time and Power Levels 1. HEADQUARTERS...


