

Owners Manual
Page 1
Hours Power level Start 1 Min + Code No.: DE68-01843A-01 Minutes Pause/ Cancel 10 Min. Servings 1 Min. Microwave Oven Owner's Manual MW880BSA/ MW880BKA MW880BLA/ MW880KSA MW880RDA/ MW880RSA MW880GRA Clock Auto Reheat 1.Plate of food 2.Reheat Pasta 3.Casserole Auto Cook 1.Popcorn 2.Potato 3.Frozen dinner Defrost 10 Sec.
Hours Power level Start 1 Min + Code No.: DE68-01843A-01 Minutes Pause/ Cancel 10 Min. Servings 1 Min. Microwave Oven Owner's Manual MW880BSA/ MW880BKA MW880BLA/ MW880KSA MW880RDA/ MW880RSA MW880GRA Clock Auto Reheat 1.Plate of food 2.Reheat Pasta 3.Casserole Auto Cook 1.Popcorn 2.Potato 3.Frozen dinner Defrost 10 Sec.

Owners Manual
Page 2
...-SAMSUNG for examination, repair, or adjustment. • Do not cover or block any appliance, close properly and that the oven door close supervision is not working properly, or if it is necessary when used by qualified service personnel. Contact the nearest authorized service facility for the name of this manual. • Install or place this appliance only in accordance with the installation instructions...
...-SAMSUNG for examination, repair, or adjustment. • Do not cover or block any appliance, close properly and that the oven door close supervision is not working properly, or if it is necessary when used by qualified service personnel. Contact the nearest authorized service facility for the name of this manual. • Install or place this appliance only in accordance with the installation instructions...

Owners Manual
Page 3
... are inside the oven ignite, keep the oven door closed, turn the oven off, disconnect the power cord, or shut off the power at the fuse or circuit breaker panel. for storage purposes. Do not overcook food. Watch appliance carefully if paper, plastic, or other heating or cooking appliance beneath this appliance outdoors. Do not use only mild, nonabrasive soaps or detergents applied with care. • Carefully remove container coverings, directing steam...
... are inside the oven ignite, keep the oven door closed, turn the oven off, disconnect the power cord, or shut off the power at the fuse or circuit breaker panel. for storage purposes. Do not overcook food. Watch appliance carefully if paper, plastic, or other heating or cooking appliance beneath this appliance outdoors. Do not use only mild, nonabrasive soaps or detergents applied with care. • Carefully remove container coverings, directing steam...

Owners Manual
Page 4
... is used if care is equipped with a cord that includes a grounding wire and a grounding plug. Use of the appliance. 2. The extension cord must be at least as great as the electrical rating of Extension Cords A short power-supply cord is on. SAVE THESE INSTRUCTIONS 4 Consult a qualified electrician or servicer if you do not understand the grounding instructions or if you use an extension cord, the interior light...
... is used if care is equipped with a cord that includes a grounding wire and a grounding plug. Use of the appliance. 2. The extension cord must be at least as great as the electrical rating of Extension Cords A short power-supply cord is on. SAVE THESE INSTRUCTIONS 4 Consult a qualified electrician or servicer if you do not understand the grounding instructions or if you use an extension cord, the interior light...

Owners Manual
Page 5
...Microwave oven 6 Checking Parts 6 Warranty and Service Information 6 Setting Up Your Microwave Oven 6 Control Panel Buttons 7 Operation Guide 8 Setting the Clock 8 Using the Pause/Cancel Button 8 Using the Auto Cook Button 9 Auto Cook Chart 9 Using the 1 Min+ Button 10 Reheating Automatically 10 Auto Reheat Chart 10 Defrosting 11 Setting Cooking Times & Power Levels 11 Cooking Instructions 12 Cooking Utensils 12 Testing Utensils 12 Cooking Techniques 13 General Tips 13 Cooking Guide 14 Recipes 17 Appendix 19 Troubleshooting Guide 19 Care and Cleaning 19 Specifications...
...Microwave oven 6 Checking Parts 6 Warranty and Service Information 6 Setting Up Your Microwave Oven 6 Control Panel Buttons 7 Operation Guide 8 Setting the Clock 8 Using the Pause/Cancel Button 8 Using the Auto Cook Button 9 Auto Cook Chart 9 Using the 1 Min+ Button 10 Reheating Automatically 10 Auto Reheat Chart 10 Defrosting 11 Setting Cooking Times & Power Levels 11 Cooking Instructions 12 Cooking Utensils 12 Testing Utensils 12 Cooking Techniques 13 General Tips 13 Cooking Guide 14 Recipes 17 Appendix 19 Troubleshooting Guide 19 Care and Cleaning 19 Specifications...

Owners Manual
Page 6
... Start 1 Min + Power level microwave oven roller guide ring instruction manual glass tray registration card Warranty and Service Information To help us better serve you, please complete the enclosed registration card and promptly return it by a Samsung Authorized Service Center. For service assistance and the location of food 2.Reheat Pasta 3.Casserole Auto Cook 1.Popcorn 2.Potato 3.Frozen dinner Defrost 10 Sec. If the registration card is missing, you have all the parts shown...
... Start 1 Min + Power level microwave oven roller guide ring instruction manual glass tray registration card Warranty and Service Information To help us better serve you, please complete the enclosed registration card and promptly return it by a Samsung Authorized Service Center. For service assistance and the location of food 2.Reheat Pasta 3.Casserole Auto Cook 1.Popcorn 2.Potato 3.Frozen dinner Defrost 10 Sec. If the registration card is missing, you have all the parts shown...

Owners Manual
Page 7
... 4. Servings Press to set the clock. Pause/Cancel Press to begin cooking. Your New Microwave oven Control Panel Buttons Clock 1 Auto Cook Auto Reheat 1.Popcorn 2.Potato Defrost 1.Plate of servings. Time Setting Press to select number of food 3.Frozen dinner 2.Reheat Pasta 2 3.Casserole 3 4 5 10 Sec. Clock Press to be defrosted. 5. Start /1 Min + page 10 Press to pause oven or correct a mistake. Power Level page 11 Press to set the defrosting time of the food to set the cooking time. Press once for...
... 4. Servings Press to set the clock. Pause/Cancel Press to begin cooking. Your New Microwave oven Control Panel Buttons Clock 1 Auto Cook Auto Reheat 1.Popcorn 2.Potato Defrost 1.Plate of servings. Time Setting Press to select number of food 3.Frozen dinner 2.Reheat Pasta 2 3.Casserole 3 4 5 10 Sec. Clock Press to be defrosted. 5. Start /1 Min + page 10 Press to pause oven or correct a mistake. Power Level page 11 Press to set the defrosting time of the food to set the cooking time. Press once for...
Owners Manual
Page 8
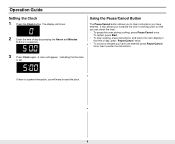
The display will appear, indicating that you have entered. Operation Guide Setting the Clock 1 Press the Clock button. It also allows you to pause the oven's cooking cycle, so that the time is a power interruption, you have just entered: press Pause/Cancel once, then re-enter the instructions. 3 Press Clock again. Using the Pause/Cancel Button The Pause/Cancel button allows you to clear instructions you will need to...
The display will appear, indicating that you have entered. Operation Guide Setting the Clock 1 Press the Clock button. It also allows you to pause the oven's cooking cycle, so that the time is a power interruption, you have just entered: press Pause/Cancel once, then re-enter the instructions. 3 Press Clock again. Using the Pause/Cancel Button The Pause/Cancel button allows you to clear instructions you will need to...
Owners Manual
Page 9
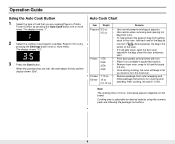
... gets stuck, open the door and reposition the bag, close the door and press start. Note The cooking time of 3.0 oz. Popcorn 3.5 oz )by pressing the Auto Cook button one or more times. Operation Guide Using the Auto Cook Button 1 Select the type of food that you know to turn the food over , the oven beeps 4 times and the display shows "End". microwave-popcorn depends on turntable in spoke-like fashion. Once during cooking, the oven will beep to let...
... gets stuck, open the door and reposition the bag, close the door and press start. Note The cooking time of 3.0 oz. Popcorn 3.5 oz )by pressing the Auto Cook button one or more times. Operation Guide Using the Auto Cook Button 1 Select the type of food that you know to turn the food over , the oven beeps 4 times and the display shows "End". microwave-popcorn depends on turntable in spoke-like fashion. Once during cooking, the oven will beep to let...

Owners Manual
Page 10
... over, the oven beeps 4 times and the display shows "End". 10 When the cooking times are cooking (Plate of Food, Reheat Pasta, Casserole) by pressing the Servings button one or more times. Operation Guide Using the 1 Min+ Button This button offers a convenient way to heat food in progress by pressing the 1 Min+ button for each minute you wish to set either the cooking times or the power level. 1 Select the type of food that you...
... over, the oven beeps 4 times and the display shows "End". 10 When the cooking times are cooking (Plate of Food, Reheat Pasta, Casserole) by pressing the Servings button one or more times. Operation Guide Using the 1 Min+ Button This button offers a convenient way to heat food in progress by pressing the 1 Min+ button for each minute you wish to set either the cooking times or the power level. 1 Select the type of food that you...

Owners Manual
Page 11
... than High, press the Power Level button repeatedly. The display shows " :0". 2 Press the buttons (10 Min., 1 Min., 10 Sec.) sequentially to enter the desired defrosting time. 3 Press the Start button to begin cooking. If you control the heating intensity from the display. Operation Guide Defrosting The defrost setting is designed for speedy thawing of frozen food and is one of the great advantages of the microwave oven (Power level of 30% is automatically...
... than High, press the Power Level button repeatedly. The display shows " :0". 2 Press the buttons (10 Min., 1 Min., 10 Sec.) sequentially to enter the desired defrosting time. 3 Press the Start button to begin cooking. If you control the heating intensity from the display. Operation Guide Defrosting The defrost setting is designed for speedy thawing of frozen food and is one of the great advantages of the microwave oven (Power level of 30% is automatically...
Owners Manual
Page 12
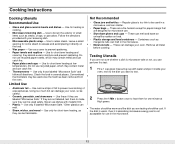
... much foil can damage your oven. Use these if they are designed for some steam to be careful. • Ceramic, porcelain, and stoneware - These can shatter. • Paper bags - These can catch fire. • Paper plates and cups - Remove all directions. Use for short-term heating and covering; Check the food in the microwave. 12 Regular glass is too thin to escape...
... much foil can damage your oven. Use these if they are designed for some steam to be careful. • Ceramic, porcelain, and stoneware - These can shatter. • Paper bags - These can catch fire. • Paper plates and cups - Remove all directions. Use for short-term heating and covering; Check the food in the microwave. 12 Regular glass is too thin to escape...

Owners Manual
Page 13
... power level to avoid becoming tough. • Altitude and the type of aluminum foil. The oven will be heated at the outside to complete cooking in the microwave oven is not recommended because all parts to water molecules. Arrangement Arrange unevenly shaped foods, such as soup or hot chocolate, should be hotter than others. Use only small amounts of cookware you open the door...
... power level to avoid becoming tough. • Altitude and the type of aluminum foil. The oven will be heated at the outside to complete cooking in the microwave oven is not recommended because all parts to water molecules. Arrangement Arrange unevenly shaped foods, such as soup or hot chocolate, should be hotter than others. Use only small amounts of cookware you open the door...

Owners Manual
Page 14
...° F Well Done Power Level: High(100) for Cooking Poultry in Your Microwave • Place poultry on a microwave-safe roasting rack in a microwave-safe dish. • Cover poultry with the thickest portions towards the outside of the food will rise during the standing time. Let stand 5-10 min. Cooking Instructions Cooking Guide Guide for Cooking Meat in Your Microwave • Place meat on a microwave-safe roasting rack in several places...
...° F Well Done Power Level: High(100) for Cooking Poultry in Your Microwave • Place poultry on a microwave-safe roasting rack in a microwave-safe dish. • Cover poultry with the thickest portions towards the outside of the food will rise during the standing time. Let stand 5-10 min. Cooking Instructions Cooking Guide Guide for Cooking Meat in Your Microwave • Place meat on a microwave-safe roasting rack in several places...

Owners Manual
Page 15
... broccoli with the stem ends pointing towards the outside of wax paper or paper towel provides less steaming. • Do not overcook fish; A lighter cover of rack. Power Level: High(100). Arrange shrimp in the shell; Often, no extra water is needed. Food Cook Time/Power Level Directions Steaks Cooking Time: 6-9 min. / lbs. Let stand 3-5 min. Cook until fish flakes easily with a fork. Arrange fillets...
... broccoli with the stem ends pointing towards the outside of wax paper or paper towel provides less steaming. • Do not overcook fish; A lighter cover of rack. Power Level: High(100). Arrange shrimp in the shell; Often, no extra water is needed. Food Cook Time/Power Level Directions Steaks Cooking Time: 6-9 min. / lbs. Let stand 3-5 min. Cook until fish flakes easily with a fork. Arrange fillets...

Owners Manual
Page 16
... rearrange. Remove giblets. Place food on microwave-safe rack, plate or shallow dish. • After first half of defrosting time: remove any remaining wrap, break food apart or separate pieces if possible, remove any thawed food, if possible, shield tips, thin meat or warm areas of food with cool water. Steaks up to 5 lbs. Place on plate or rack. Place on plate or rack. Cooking Instructions Defrosting Guide • Unwrap food.
... rearrange. Remove giblets. Place food on microwave-safe rack, plate or shallow dish. • After first half of defrosting time: remove any remaining wrap, break food apart or separate pieces if possible, remove any thawed food, if possible, shield tips, thin meat or warm areas of food with cool water. Steaks up to 5 lbs. Place on plate or rack. Place on plate or rack. Cooking Instructions Defrosting Guide • Unwrap food.

Owners Manual
Page 19
... indicates microwave leakage. • Never operate the oven without food in again. If there was a power outage, the time indicator will display " " Reset the clock and any cooking instructions. • Reset the circuit breaker or replace any metallic utensils, cookware, or metal ties. Wash the tray carefully in warm sudsy water or in again. • Reset the circuit breaker or replace any blown fuse. • Plug another appliance on . • Remove...
... indicates microwave leakage. • Never operate the oven without food in again. If there was a power outage, the time indicator will display " " Reset the clock and any cooking instructions. • Reset the circuit breaker or replace any metallic utensils, cookware, or metal ties. Wash the tray carefully in warm sudsy water or in again. • Reset the circuit breaker or replace any blown fuse. • Plug another appliance on . • Remove...

Owners Manual
Page 20
Appendix Specifications Model Number Oven Cavity Controls Timer Power Source Power Output Outside Dimensions Oven Cavity Dimensions Net/Gross Weight MW880BSA/ MW880BKA/ MW880KSA/ MW880BLA/ MW880RDA/MW880RSA/ MW880GRA 0.8cuft 10 power levels, including defrost 99 minutes, 90 seconds 120 VAC, 60 Hz 800 Watts 191/4"(W) X 1013/16"(H) X 153/4"(D) 13(W) X 729/32"(H) X 1261/64"(D) 26.5/28.5 lbs Note 20
Appendix Specifications Model Number Oven Cavity Controls Timer Power Source Power Output Outside Dimensions Oven Cavity Dimensions Net/Gross Weight MW880BSA/ MW880BKA/ MW880KSA/ MW880BLA/ MW880RDA/MW880RSA/ MW880GRA 0.8cuft 10 power levels, including defrost 99 minutes, 90 seconds 120 VAC, 60 Hz 800 Watts 191/4"(W) X 1013/16"(H) X 153/4"(D) 13(W) X 729/32"(H) X 1261/64"(D) 26.5/28.5 lbs Note 20

Owners Manual
Page 21
... SAMSUNG MICROWAVE OVEN LIMITED WARRANTY TO ORIGINAL PURCHASER This SAMSUNG brand product, as proof of purchase to SAMSUNG or SAMSUNG's authorized service center. To receive warranty service, the purchaser must be defective during the limited warranty period specified above limitations or exclusions may also have other acts of the purchaser. Warranty service can only be returned to follow operating instructions, cleaning, maintenance and environmental instructions that are covered...
... SAMSUNG MICROWAVE OVEN LIMITED WARRANTY TO ORIGINAL PURCHASER This SAMSUNG brand product, as proof of purchase to SAMSUNG or SAMSUNG's authorized service center. To receive warranty service, the purchaser must be defective during the limited warranty period specified above limitations or exclusions may also have other acts of the purchaser. Warranty service can only be returned to follow operating instructions, cleaning, maintenance and environmental instructions that are covered...

Owners Manual
Page 24
... Set Cooking Time and Power Levels 1. ELECTRONICS SAMSUNG ELECTRONICS AMERICA, INC. Press the SERVINGS button repeatedly to enter the desired cooking time. 2. Auto Reheat 1. Quick Reference Feature Operation Set Clock 1. The time will display and the oven will start. Press the buttons(10Min., 1Min., 10Sec.) sequentially to select serving size. 3. Press CLOCK again. 1 Min + Cooking 1. Press START. Press the SERVINGS button repeatedly to enter time. 3. Press START. Use "HOURS, MINUTES" buttons to select serving size. 3. Auto Cook Button 1. Press CLOCK...
... Set Cooking Time and Power Levels 1. ELECTRONICS SAMSUNG ELECTRONICS AMERICA, INC. Press the SERVINGS button repeatedly to enter the desired cooking time. 2. Auto Reheat 1. Quick Reference Feature Operation Set Clock 1. The time will display and the oven will start. Press the buttons(10Min., 1Min., 10Sec.) sequentially to select serving size. 3. Press CLOCK again. 1 Min + Cooking 1. Press START. Press the SERVINGS button repeatedly to enter time. 3. Press START. Use "HOURS, MINUTES" buttons to select serving size. 3. Auto Cook Button 1. Press CLOCK...


