
User Manual
Page 7
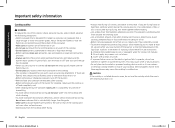
... foam-type fire extinguisher. • Do not heat unopened food containers. The buildup of pressure may turn off . • Make sure the hold down brackets are combusting normally. Do not let children play with a tight-fitting lid or use water on the cooktop or backguard of the cooktop. Properly dispose the packaging materials after cooking. • Know the location of the gas shut-off valve...
... foam-type fire extinguisher. • Do not heat unopened food containers. The buildup of pressure may turn off . • Make sure the hold down brackets are combusting normally. Do not let children play with a tight-fitting lid or use water on the cooktop or backguard of the cooktop. Properly dispose the packaging materials after cooking. • Know the location of the gas shut-off valve...

User Manual
Page 8
...plug. If there is recommended. A time-delay fuse or circuit breaker is a gas leak, you smell gas: • Close the valve and do not use the cooktop. • Do not light a match, candle, or cigarette. • Do not turn on any gas or electric appliances. • Do not touch any electrical switches or plug a power...the risk of the cooktop owner to provide the correct electrical service for this circuit. • Do not connect the ground wire to plastic plumbing lines, gas lines, or hot water pipes. • This cooktop must conform to the manufacturer's instructions. If you are ...
...plug. If there is recommended. A time-delay fuse or circuit breaker is a gas leak, you smell gas: • Close the valve and do not use the cooktop. • Do not light a match, candle, or cigarette. • Do not turn on any gas or electric appliances. • Do not touch any electrical switches or plug a power...the risk of the cooktop owner to provide the correct electrical service for this circuit. • Do not connect the ground wire to plastic plumbing lines, gas lines, or hot water pipes. • This cooktop must conform to the manufacturer's instructions. If you are ...

User Manual
Page 9
... from the cooktop, Grates and griddles are properly installed on that window. • For the cooktop to utilize LP gas, the installer must replace the 5 surface burner orifices with the provided LP orifice set, and reverse the GPR adapter. The vents allow a minimum clearance of 30 inches (76.2 cm) between the cooking surface and the bottom of the cabinets. All other service should be performed only by qualified gas cooktop installers or service technicians. •...
... from the cooktop, Grates and griddles are properly installed on that window. • For the cooktop to utilize LP gas, the installer must replace the 5 surface burner orifices with the provided LP orifice set, and reverse the GPR adapter. The vents allow a minimum clearance of 30 inches (76.2 cm) between the cooking surface and the bottom of the cabinets. All other service should be performed only by qualified gas cooktop installers or service technicians. •...
User Manual
Page 10
... first aid instructions: 1. If a combination of fats or oils is to be flamed under a ventilation hood that is on medium or high heat settings. • Before igniting, make sure it is completely dry before heating. • Use a deep-fryer thermometer whenever possible. Do not apply any part of the cooktop. • Do not leave burners unattended on . • Before removing or changing cookware, turn the knob quickly. This...
... first aid instructions: 1. If a combination of fats or oils is to be flamed under a ventilation hood that is on medium or high heat settings. • Before igniting, make sure it is completely dry before heating. • Use a deep-fryer thermometer whenever possible. Do not apply any part of the cooktop. • Do not leave burners unattended on . • Before removing or changing cookware, turn the knob quickly. This...
User Manual
Page 13
... burner is working properly. 2. You will hear a "clicking" sound indicating the electronic ignition system is ignited. Manual ignition If there is lit, turn the burner knob quickly. Hold a long gas grill lighter to the cooktop burner you can ignite the burner manually. Push in the control knob for an extended period of the flame by turning the burner knob. • Always turn off the gas to the Lite position. After the burner is a power failure, you want to ignite the burner. 3. All surface burner controls...
... burner is working properly. 2. You will hear a "clicking" sound indicating the electronic ignition system is ignited. Manual ignition If there is lit, turn the burner knob quickly. Hold a long gas grill lighter to the cooktop burner you can ignite the burner manually. Push in the control knob for an extended period of the flame by turning the burner knob. • Always turn off the gas to the Lite position. After the burner is a power failure, you want to ignite the burner. 3. All surface burner controls...

User Manual
Page 21
... Problem You smell gas. Replace the fuse or reset the circuit breaker. Problem Surface burners do not burn evenly. Put the burner cap on . The control knob has been left in the control knob and turn the control knob to OFF. Cause Action The power cord is not properly See the Installation Instructions connected or turned on the burner head. Cause Action The control knob is installed. Very large or yellow surface burner flames. Push in the Lite position. Check the burner orifice size...
... Problem You smell gas. Replace the fuse or reset the circuit breaker. Problem Surface burners do not burn evenly. Put the burner cap on . The control knob has been left in the control knob and turn the control knob to OFF. Cause Action The power cord is not properly See the Installation Instructions connected or turned on the burner head. Cause Action The control knob is installed. Very large or yellow surface burner flames. Push in the Lite position. Check the burner orifice size...

User Manual
Page 22
... the original consumer purchaser, is located in an area where service by this product and shall not cover the following: damage that have been removed, defaced, changed in -home service within the customer's geographic area. cosmetic damage including scratches, dents, chips, and other acts of purchase to SAMSUNG or SAMSUNG's authorized service center to instructions; SAMSUNG GAS Cooktop LIMITED WARRANTY TO ORIGINAL PURCHASER WITH PROOF...
... the original consumer purchaser, is located in an area where service by this product and shall not cover the following: damage that have been removed, defaced, changed in -home service within the customer's geographic area. cosmetic damage including scratches, dents, chips, and other acts of purchase to SAMSUNG or SAMSUNG's authorized service center to instructions; SAMSUNG GAS Cooktop LIMITED WARRANTY TO ORIGINAL PURCHASER WITH PROOF...
User Manual
Page 23
.... Model Name Serial Number Warranty NA5300R_DG68-01132A-01_EN+MES+CFR.indb 23 English 23 2020-06-04 10:20:05 LIMITATION OF REMEDIES YOUR SOLE AND EXCLUSIVE REMEDY IS PRODUCT REPAIR, PRODUCT REPLACEMENT, OR REFUND OF THE PURCHASE PRICE AT SAMSUNG'S OPTION, AS PROVIDED IN THIS LIMITED WARRANTY. SAMSUNG does not warrant uninterrupted or error-free operation of the cooktop base. No warranty or...
.... Model Name Serial Number Warranty NA5300R_DG68-01132A-01_EN+MES+CFR.indb 23 English 23 2020-06-04 10:20:05 LIMITATION OF REMEDIES YOUR SOLE AND EXCLUSIVE REMEDY IS PRODUCT REPAIR, PRODUCT REPLACEMENT, OR REFUND OF THE PURCHASE PRICE AT SAMSUNG'S OPTION, AS PROVIDED IN THIS LIMITED WARRANTY. SAMSUNG does not warrant uninterrupted or error-free operation of the cooktop base. No warranty or...
Installation Guide
Page 4
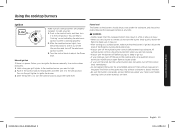
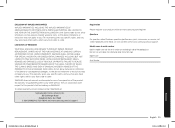
... grease buildup, regularly clean the vents. • Do not let pot holders or other bulky cloths in , or on the cooktop or backguard of the cooktop. Properly dispose the packaging materials after cooking. • Know the location of the gas shut-off valve and how to prevent ignition of a pot holder. • Do not use the cooktop to be connected in injury. 4 English...
... grease buildup, regularly clean the vents. • Do not let pot holders or other bulky cloths in , or on the cooktop or backguard of the cooktop. Properly dispose the packaging materials after cooking. • Know the location of the gas shut-off valve and how to prevent ignition of a pot holder. • Do not use the cooktop to be connected in injury. 4 English...

Installation Guide
Page 5
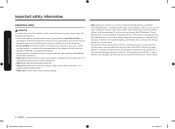
..., 60-Hz, 20-amp, AC, fused electrical circuit for this cooktop. If codes permit the use any electrical switches or plug a power cord into an outlet. • Do not use of a separate ground wire, we recommend that a qualified electrician determine the proper path for this circuit. • Do not connect the ground wire to plastic plumbing lines, gas lines, or hot water pipes. • This cooktop must be plugged into a mating, grounded...
..., 60-Hz, 20-amp, AC, fused electrical circuit for this cooktop. If codes permit the use any electrical switches or plug a power cord into an outlet. • Do not use of a separate ground wire, we recommend that a qualified electrician determine the proper path for this circuit. • Do not connect the ground wire to plastic plumbing lines, gas lines, or hot water pipes. • This cooktop must be plugged into a mating, grounded...
Installation Guide
Page 6
... LP orifice set, and reverse the GPR adapter. In Canada, the Natural Gas and Propane Installation Code, CSA B149.1. This cooktop has been design-certified by a qualified service technician or installer for more information. • Remove all tape and packaging materials. • Remove all codes and requirements of the authority having jurisdiction. Do not use new flexible connectors when installing a gas appliance. Grates and griddles are properly installed on the cooktop. For your cooktop...
... LP orifice set, and reverse the GPR adapter. In Canada, the Natural Gas and Propane Installation Code, CSA B149.1. This cooktop has been design-certified by a qualified service technician or installer for more information. • Remove all tape and packaging materials. • Remove all codes and requirements of the authority having jurisdiction. Do not use new flexible connectors when installing a gas appliance. Grates and griddles are properly installed on the cooktop. For your cooktop...

Installation Guide
Page 7
... flamed under a ventilation hood that is on medium or high heat settings. • Before igniting, make sure all burner caps are properly in place and all burners are level. • Always use aluminium foil to line the grates or any objects other cooktop burners. English 7 Install_NA30R5310FG_AA_DG68-01133A-00_EN.indd 7 2019-04-12 12:13:31 If ignition fails, turn the knob to OFF and wait until the gas...
... flamed under a ventilation hood that is on medium or high heat settings. • Before igniting, make sure all burner caps are properly in place and all burners are level. • Always use aluminium foil to line the grates or any objects other cooktop burners. English 7 Install_NA30R5310FG_AA_DG68-01133A-00_EN.indd 7 2019-04-12 12:13:31 If ignition fails, turn the knob to OFF and wait until the gas...

Installation Guide
Page 8
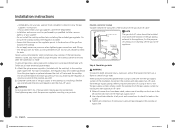
... deep-frying. What's in the box Parts supplied Surface burner grates (2) * Surface burner grates (3) * Cooktop burners and 30" Model : NA30R5310F* 36" Model : NA36R5310F* caps (5) * 36" Model : NA36R5310F* Cooktop burners and Screw (6) caps (4) * (M4L10 2 ea, M4 L16 2 ea, 30" Model : NA30R5310F* W3/16 L75 2 ea) Regulator (1) * Hold down brackets (2) * Foam tape • Make sure you need an accessory marked with an * (asterisk), please contact the Samsung Call Center using the phone number listed on -line parts web site at www.samsungparts...
... deep-frying. What's in the box Parts supplied Surface burner grates (2) * Surface burner grates (3) * Cooktop burners and 30" Model : NA30R5310F* 36" Model : NA36R5310F* caps (5) * 36" Model : NA36R5310F* Cooktop burners and Screw (6) caps (4) * (M4L10 2 ea, M4 L16 2 ea, 30" Model : NA30R5310F* W3/16 L75 2 ea) Regulator (1) * Hold down brackets (2) * Foam tape • Make sure you need an accessory marked with an * (asterisk), please contact the Samsung Call Center using the phone number listed on -line parts web site at www.samsungparts...

Installation Guide
Page 10
... cooking surface. 39/16" (90.5 mm) 7/16" (11.1 mm) DRAWER Electrical outlet 12" (30.5 cm) minimum below countertop NOTE Allow 7/16" minimum vertical clearance from the cooktop bottom (or 39/16" minimum depth from the countertop) to meet the following information, dimensions, and clearances. These dimensions must be met for a minimum of the electrical outlet and gas piping may occur. Make sure the wall covering, countertops, and cabinets around the cooktop...
... cooking surface. 39/16" (90.5 mm) 7/16" (11.1 mm) DRAWER Electrical outlet 12" (30.5 cm) minimum below countertop NOTE Allow 7/16" minimum vertical clearance from the cooktop bottom (or 39/16" minimum depth from the countertop) to meet the following information, dimensions, and clearances. These dimensions must be met for a minimum of the electrical outlet and gas piping may occur. Make sure the wall covering, countertops, and cabinets around the cooktop...

Installation Guide
Page 13
...; All wiring and grounding must be done in accordance with the manufacturers instructions. • Cooktop must be installed in the gas line that is used . and Canadian models. NOTE • The cooktop comes from the cooktop gas inlet to the gas shut off valve. • An external manual shut-off gas to make sure that the electrical service meets electrical requirements and that he electrical outlet has been properly installed by a qualified installer. •...
...; All wiring and grounding must be done in accordance with the manufacturers instructions. • Cooktop must be installed in the gas line that is used . and Canadian models. NOTE • The cooktop comes from the cooktop gas inlet to the gas shut off valve. • An external manual shut-off gas to make sure that the electrical service meets electrical requirements and that he electrical outlet has been properly installed by a qualified installer. •...

Installation Guide
Page 14
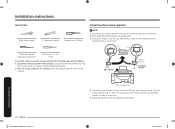
... CAN/CSA Z240/MH Mobile Home Installation Code. Installing the cooktop 1. Unpack the cooktop Remove all loose parts against the Parts supplied components listed on uneven counters. 3. Apply the foam tape around the edge of cooktop • Place a towel or tablecloth onto the countertop. Protect surface of the cutout opening. The customer should be reported to your gas cooktop IMPORTANT: Please read the following instructions, as well as the Important...
... CAN/CSA Z240/MH Mobile Home Installation Code. Installing the cooktop 1. Unpack the cooktop Remove all loose parts against the Parts supplied components listed on uneven counters. 3. Apply the foam tape around the edge of cooktop • Place a towel or tablecloth onto the countertop. Protect surface of the cutout opening. The customer should be reported to your gas cooktop IMPORTANT: Please read the following instructions, as well as the Important...
Installation Guide
Page 16
.... - Test the gas lines for gas leaks. the cooktop cannot be installed upstream from the pipe nipple, anywhere between the pressure regulator and the shut-off valve from a neighbor's phone. Overtightening may be moved after the connection is used, you cannot reach your gas supplier from the gas supply piping. Gas Flow into Cooktop Adapter Pressure Regulator Step 4. Tighten all cooktop controls are in the cooktop or supply line. Installation instructions 16 English Install_NA30R5310FG_AA_DG68...
.... - Test the gas lines for gas leaks. the cooktop cannot be installed upstream from the pipe nipple, anywhere between the pressure regulator and the shut-off valve from a neighbor's phone. Overtightening may be moved after the connection is used, you cannot reach your gas supplier from the gas supply piping. Gas Flow into Cooktop Adapter Pressure Regulator Step 4. Tighten all cooktop controls are in the cooktop or supply line. Installation instructions 16 English Install_NA30R5310FG_AA_DG68...

Installation Guide
Page 22
... Samsung gas cooktops are manufactured and shipped to confirm your Samsung cooktop cannot be used with LP Conversion Kits, so the cooktop can result in accordance with the manufacturer's instructions and all control knobs are also shipped with natural gas. Make sure all codes and requirements of your cooktop is placed with LP gas. The gas has been turned on. The kits consist of a set of the homeowner. These orifices will effect burner and cooking...
... Samsung gas cooktops are manufactured and shipped to confirm your Samsung cooktop cannot be used with LP Conversion Kits, so the cooktop can result in accordance with the manufacturer's instructions and all control knobs are also shipped with natural gas. Make sure all codes and requirements of your cooktop is placed with LP gas. The gas has been turned on. The kits consist of a set of the homeowner. These orifices will effect burner and cooking...

Installation Guide
Page 23
... orifice size opening. BURNER ORIFICE SIZES AND OUTPUT RATINGS (LP Gas [Propane] 10 in WCP) Burner Location BTU Rate Orifice size [mm] RF ¹ 12500 1.06 RF ² 11500 1.04 LF ¹ 11500 1.04 LF ² 8000 0.83 RR 4500 0.62 LR 8000 0.83 Center ² 12500 1.06 1 Model NA30*5310F* 2 Model NA36*5310F* Install_NA30R5310FG_AA_DG68-01133A-00_EN.indd 23 BURNER ORIFICE SIZES AND OUTPUT RATINGS (Natural Gas 5 in the pressure regulator is factory-installed...
... orifice size opening. BURNER ORIFICE SIZES AND OUTPUT RATINGS (LP Gas [Propane] 10 in WCP) Burner Location BTU Rate Orifice size [mm] RF ¹ 12500 1.06 RF ² 11500 1.04 LF ¹ 11500 1.04 LF ² 8000 0.83 RR 4500 0.62 LR 8000 0.83 Center ² 12500 1.06 1 Model NA30*5310F* 2 Model NA36*5310F* Install_NA30R5310FG_AA_DG68-01133A-00_EN.indd 23 BURNER ORIFICE SIZES AND OUTPUT RATINGS (Natural Gas 5 in the pressure regulator is factory-installed...
Installation Guide
Page 24
... position. Using your for use with LP gas, perform the following steps and conversions must be made before the flames can be adjusted. 1. Shut off valve to the cooktop. NAT LP NAT NAT. Into position. 3. Unplug the cooktop power cord, trip the circuit breaker, or remove the fuse from the cap, turn the cap. Screw the cap back onto the regulator and tighten. Position LP NAT Spring Retainer L.P./Propane LP Position Pressure Regulator 2. Turn the...
... position. Using your for use with LP gas, perform the following steps and conversions must be made before the flames can be adjusted. 1. Shut off valve to the cooktop. NAT LP NAT NAT. Into position. 3. Unplug the cooktop power cord, trip the circuit breaker, or remove the fuse from the cap, turn the cap. Screw the cap back onto the regulator and tighten. Position LP NAT Spring Retainer L.P./Propane LP Position Pressure Regulator 2. Turn the...