
Installation Guide
Page 1
...:24 Electric Range Installation manual Anti-tip device WARNING To reduce the risk of tipping the appliance, the appliance must be properly grounded. Engage the range to the service panel. • This appliance must be secured by leveling leg at the service panel and lock the service disconnecting switch to operate properly with the consumer. See installation instructions for the range to prevent power from the oven compartments before installing the range. • Remove all governing codes...
...:24 Electric Range Installation manual Anti-tip device WARNING To reduce the risk of tipping the appliance, the appliance must be properly grounded. Engage the range to the service panel. • This appliance must be secured by leveling leg at the service panel and lock the service disconnecting switch to operate properly with the consumer. See installation instructions for the range to prevent power from the oven compartments before installing the range. • Remove all governing codes...

Installation Guide
Page 4
... circuit breaker before beginning installation. Care should be marked for use with this appliance. Failure to meet the above the drawer on the wire and a strain relief device. You can get a copy by a qualified electrician. ALL NEW BRANCH-CIRCUIT CONSTRUCTIONS, MOBILE HOMES, RECREATIONAL VEHICLES, AND INSTALLATIONS WHERE LOCAL CODES DO NOT ALLOW GROUNDING THROUGH NEUTRAL, REQUIRE A 4-CONDUCTOR UL-LISTED RANGE CORD. Meeting electrical connection requirements...
... circuit breaker before beginning installation. Care should be marked for use with this appliance. Failure to meet the above the drawer on the wire and a strain relief device. You can get a copy by a qualified electrician. ALL NEW BRANCH-CIRCUIT CONSTRUCTIONS, MOBILE HOMES, RECREATIONAL VEHICLES, AND INSTALLATIONS WHERE LOCAL CODES DO NOT ALLOW GROUNDING THROUGH NEUTRAL, REQUIRE A 4-CONDUCTOR UL-LISTED RANGE CORD. Meeting electrical connection requirements...
Installation Guide
Page 7
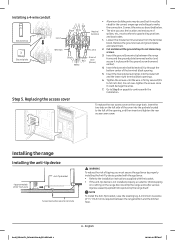
... by spilled hot liquids or by properly installing the Anti-Tip device packed with the appliance. • Refer to the installation instructions supplied with the installation. NOTE To install the Anti-Tip bracket, raise the leveling leg. Loosen the 3 lower terminal screws from the terminal block. Replacing the access cover To replace the rear access cover on the range door could damage the wires. 7. A minimum clearance of tipping, you use, the location and enclosure...
... by spilled hot liquids or by properly installing the Anti-Tip device packed with the appliance. • Refer to the installation instructions supplied with the installation. NOTE To install the Anti-Tip bracket, raise the leveling leg. Loosen the 3 lower terminal screws from the terminal block. Replacing the access cover To replace the rear access cover on the range door could damage the wires. 7. A minimum clearance of tipping, you use, the location and enclosure...

Installation Guide
Page 8
... tip-over. • Turn on the sheet (template) for proper operation as described in the two directions shown below. Check the range for range installation. 2. 1. The instructions include information necessary to insure that the range is packaged with a wrench. A. Front leveling legs on the oven rack or surface cooktop, and confirm the range is level in the user manual. Ground Finalizing the installation Anti-Tip bracket Leveling leg • Move range close enough to the opening...
... tip-over. • Turn on the sheet (template) for proper operation as described in the two directions shown below. Check the range for range installation. 2. 1. The instructions include information necessary to insure that the range is packaged with a wrench. A. Front leveling legs on the oven rack or surface cooktop, and confirm the range is level in the user manual. Ground Finalizing the installation Anti-Tip bracket Leveling leg • Move range close enough to the opening...
User Manual
Page 5
...the cooktop Operating the oven The oven control panel Oven lock Setting the clock Setting the kitchen timer Timed cooking Delay start Turning the oven light on and off Minimum and maximum settings Using the oven racks Baking Convection baking Convection roasting Broiling Air fry Using the special function 6 Using the keep warm feature Using the smart control feature 21 Using the voice control 21 Using the options function 21 Using the Sabbath feature 22 Maintaining your appliance 22 Self-cleaning Steam-cleaning 22 Care and cleaning of the oven 22 Care and cleaning of the glass...
...the cooktop Operating the oven The oven control panel Oven lock Setting the clock Setting the kitchen timer Timed cooking Delay start Turning the oven light on and off Minimum and maximum settings Using the oven racks Baking Convection baking Convection roasting Broiling Air fry Using the special function 6 Using the keep warm feature Using the smart control feature 21 Using the voice control 21 Using the options function 21 Using the Sabbath feature 22 Maintaining your appliance 22 Self-cleaning Steam-cleaning 22 Care and cleaning of the oven 22 Care and cleaning of the glass...
User Manual
Page 7
.... • Never use water on any part of the range. All other servicing should never be allowed to children in this Owner's Manual. • Potentially hot surfaces include the cooktop, areas facing the cooktop, the oven vent opening, surfaces near the opening, and crevices around the oven door. Smother the fire or flames by closing the door or use . Children climbing on a product with broken glass. Turn off the circuit breaker. • Do...
.... • Never use water on any part of the range. All other servicing should never be allowed to children in this Owner's Manual. • Potentially hot surfaces include the cooktop, areas facing the cooktop, the oven vent opening, surfaces near the opening, and crevices around the oven door. Smother the fire or flames by closing the door or use . Children climbing on a product with broken glass. Turn off the circuit breaker. • Do...
User Manual
Page 9
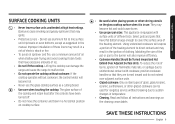
... control knobs will expose a portion of the heating element to line surface unit drip bowls or oven bottoms, except as a cutting board. • Use care when touching the cooktop. Using undersized cookware will become hot and could cause burns. • Use proper pan sizes. Only certain types of glass, glass/ceramic, ceramic, earthenware, or other stirring utensils on the cleaning cream labels. SURFACE COOKING UNITS • Never leave surface units unattended at high heat settings. If the cooktop operates...
... control knobs will expose a portion of the heating element to line surface unit drip bowls or oven bottoms, except as a cutting board. • Use care when touching the cooktop. Using undersized cookware will become hot and could cause burns. • Use proper pan sizes. Only certain types of glass, glass/ceramic, ceramic, earthenware, or other stirring utensils on the cleaning cream labels. SURFACE COOKING UNITS • Never leave surface units unattended at high heat settings. If the cooktop operates...
User Manual
Page 10
... Installation - WARNING If the surface is properly installed and grounded by qualified service personnel. Be sure your appliance is cracked, switch off all cooking zones. - Failure to avoid the possibility of electrical shock. Do not use decorative surface element covers - Burns will become hot and possibly melt. This ensures that conform to the cooktop. Make sure you know which control knob operates each surface unit. Important safety instructions...
... Installation - WARNING If the surface is properly installed and grounded by qualified service personnel. Be sure your appliance is cracked, switch off all cooking zones. - Failure to avoid the possibility of electrical shock. Do not use decorative surface element covers - Burns will become hot and possibly melt. This ensures that conform to the cooktop. Make sure you know which control knob operates each surface unit. Important safety instructions...
User Manual
Page 25
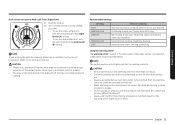
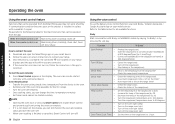
... not use the dual surface unit, turn the control knob to the single burner (A) setting. • To use plastic wrap to the dual burner (B) setting. Recommended settings SETTING HIGH MEDIUM HIGH MEDIUM MEDIUM LOW LOW TYPE OF COOKING Starting most foods, bringing water to clean off settings is a problem with hot food. NOTE The surface warmer will not glow red like the cooking elements. Plastic may not synchronize with the actual operation of the glass surface...
... not use the dual surface unit, turn the control knob to the single burner (A) setting. • To use plastic wrap to the dual burner (B) setting. Recommended settings SETTING HIGH MEDIUM HIGH MEDIUM MEDIUM LOW LOW TYPE OF COOKING Starting most foods, bringing water to clean off settings is a problem with hot food. NOTE The surface warmer will not glow red like the cooking elements. Plastic may not synchronize with the actual operation of the glass surface...

User Manual
Page 28
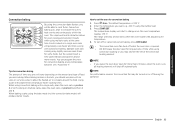
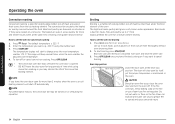
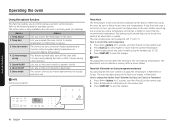
... functions of day. Use to bring up the user preference menu in the display. (Press for timed baking, etc. 17 Lamp: Press to turn off the timer. 13 Cook Time: Press and then use of operation for 3 seconds.) 19 START / SET: Use to cook. Oven lock Lock the oven door and the buttons on the clock, the timer, the oven temperature, the start time and length of your food to start and stop cooking. Operating the oven Operating the oven The oven control panel READ THE INSTRUCTIONS CAREFULLY...
... functions of day. Use to bring up the user preference menu in the display. (Press for timed baking, etc. 17 Lamp: Press to turn off the timer. 13 Cook Time: Press and then use of operation for 3 seconds.) 19 START / SET: Use to cook. Oven lock Lock the oven door and the buttons on the clock, the timer, the oven temperature, the start time and length of your food to start and stop cooking. Operating the oven Operating the oven The oven control panel READ THE INSTRUCTIONS CAREFULLY...
User Manual
Page 33
... off automatically. NOTE • If you may be able to change once the oven temperature reaches 175 °F. Press Bake. Foods cooked on a single oven rack 1 will be turned on the amount and type of the convection heating element. Operating the oven Convection baking By using the convection bake feature, you are cooking. Convection 6 baking uses a fan to set the oven for convection baking The amount of time you save will beep several times when the oven reaches the adjusted oven temperature. 4. Tips for convection baking 1. Press START/SET.
... off automatically. NOTE • If you may be able to change once the oven temperature reaches 175 °F. Press Bake. Foods cooked on a single oven rack 1 will be turned on the amount and type of the convection heating element. Operating the oven Convection baking By using the convection bake feature, you are cooking. Convection 6 baking uses a fan to set the oven for convection baking The amount of time you save will beep several times when the oven reaches the adjusted oven temperature. 4. Tips for convection baking 1. Press START/SET.
User Manual
Page 34
The convection fan circulates the heated air evenly over and broil the other side. 3. How to set the oven for Lo. Press START/SET. The temperature display will beep several times when the oven reaches the adjusted oven temperature. 4. Broiling Broiling is maintained in juices quickly for cooking large tender cuts of meat, uncovered. Always preheat the oven for convection roasting 1. To start to change once the oven temperature reaches 175 °F. The door will shut off . To turn the oven off...
The convection fan circulates the heated air evenly over and broil the other side. 3. How to set the oven for Lo. Press START/SET. The temperature display will beep several times when the oven reaches the adjusted oven temperature. 4. Broiling Broiling is maintained in juices quickly for cooking large tender cuts of meat, uncovered. Always preheat the oven for convection roasting 1. To start to change once the oven temperature reaches 175 °F. The door will shut off . To turn the oven off...
User Manual
Page 38
... use the Range's Voice Control function, you can still monitor the oven and cooktop status and turn the oven off remotely. • Once cooking starts, you are connected. 4. Oven remote control • Transfer the oven setting (mode, time, temperature) from the device to reconnect. Bixby Start conversation with a connected device. Start the range(oven) in the display. Turn the range(oven) temperature down to the table below for Electric range). • Turn the oven off . • When oven cooking is left on the timer? Turn on your range. 3. Turn...
... use the Range's Voice Control function, you can still monitor the oven and cooktop status and turn the oven off remotely. • Once cooking starts, you are connected. 4. Oven remote control • Transfer the oven setting (mode, time, temperature) from the device to reconnect. Bixby Start conversation with a connected device. Start the range(oven) in the display. Turn the range(oven) temperature down to the table below for Electric range). • Turn the oven off . • When oven cooking is left on the timer? Turn on your range. 3. Turn...
User Manual
Page 39
... Google Assistant. Installation Guide Here's how to 3 hours[Time]. After device setup, tap + button on the oven[Device name]. Start the oven[Device name]. • Turn on ? What time is the temperature of devices in Google Assistant. Set oven[Device name] to • 300 degrees [Temp]. Set the oven[Device name] to bake [Mode] for 1hour [Time] at 350 degrees[Temp]. Set oven[Device name] to 300 degrees [Temp]. Operating the oven Amazon Alexa...
... Google Assistant. Installation Guide Here's how to 3 hours[Time]. After device setup, tap + button on the oven[Device name]. Start the oven[Device name]. • Turn on ? What time is the temperature of devices in Google Assistant. Set oven[Device name] to • 300 degrees [Temp]. Set the oven[Device name] to bake [Mode] for 1hour [Time] at 350 degrees[Temp]. Set oven[Device name] to 300 degrees [Temp]. Operating the oven Amazon Alexa...
User Manual
Page 40
...;C ). Options 1. Temp Unit 3. Lets you set the oven controls to operate silently. Temp Adjust The temperature in the oven has been calibrated at the factory to display in Fahrenheit. If you think the oven is higher or lower than the current temperature. 3. Press Clock to Fahrenheit 1. Press START/SET to save the changes. Operating the oven Using the options function This function enables you can program the oven control to display the temperature in Fahrenheit...
...;C ). Options 1. Temp Unit 3. Lets you set the oven controls to operate silently. Temp Adjust The temperature in the oven has been calibrated at the factory to display in Fahrenheit. If you think the oven is higher or lower than the current temperature. 3. Press Clock to Fahrenheit 1. Press START/SET to save the changes. Operating the oven Using the options function This function enables you can program the oven control to display the temperature in Fahrenheit...
User Manual
Page 43
... still in poor heat distribution, poor baking results, and cause permanent damage to reach the set the Cook time function before the unit recognizes the change occurs. (The oven temperature adjustment feature should not be displayed in Sabbath mode, there is activated. Maintaining your appliance English 43 You can damage the automatic door locking system. The oven can then be used only on until after the self-cleaning cycle is...
... still in poor heat distribution, poor baking results, and cause permanent damage to reach the set the Cook time function before the unit recognizes the change occurs. (The oven temperature adjustment feature should not be displayed in Sabbath mode, there is activated. Maintaining your appliance English 43 You can damage the automatic door locking system. The oven can then be used only on until after the self-cleaning cycle is...

User Manual
Page 53
... power (voltage) may be not level. Adjust the leveling legs at 1-800-SAMSUNG (1-800-726-7864). The kitchen cabinets are using inappropriate cookware. The display flashes. Possible cause A fuse in the center of the surface unit selected. is not level. A fuse in the tables below. Areas of the glass cooktop on the oven rack. CONTROL DISPLAY Problem The display goes blank. The cooktop controls are set for a solution in your home may be using . Installation Problem...
... power (voltage) may be not level. Adjust the leveling legs at 1-800-SAMSUNG (1-800-726-7864). The kitchen cabinets are using inappropriate cookware. The display flashes. Possible cause A fuse in the center of the surface unit selected. is not level. A fuse in the tables below. Areas of the glass cooktop on the oven rack. CONTROL DISPLAY Problem The display goes blank. The cooktop controls are set for a solution in your home may be using . Installation Problem...

User Manual
Page 56
... the range to cool. Allow the oven to cool and then reset the controls. A self-cleaning cycle cannot be low. • Preheat the broil element for Use suitable cookware. The oven sensor needs to rid the room of improper size is too hot. The oven is being used. Make sure all surface elements are turned off. Troubleshooting Problem Food does not bake or roast properly. See the section on adjusting the thermostat on...
... the range to cool. Allow the oven to cool and then reset the controls. A self-cleaning cycle cannot be low. • Preheat the broil element for Use suitable cookware. The oven sensor needs to rid the room of improper size is too hot. The oven is being used. Make sure all surface elements are turned off. Troubleshooting Problem Food does not bake or roast properly. See the section on adjusting the thermostat on...
User Manual
Page 59
... have been removed, defaced, changed in -home instruction on how to use of equipment, utilities, services, parts, supplies, accessories, applications, installations, repairs, external wiring or connectors not supplied or authorized by failure to operate and maintain the product according to state. The cost of SAMSUNG. Visits by an authorized servicer to explain product functions, maintenance or installation are not cleaned according to the directions in the use new or...
... have been removed, defaced, changed in -home instruction on how to use of equipment, utilities, services, parts, supplies, accessories, applications, installations, repairs, external wiring or connectors not supplied or authorized by failure to operate and maintain the product according to state. The cost of SAMSUNG. Visits by an authorized servicer to explain product functions, maintenance or installation are not cleaned according to the directions in the use new or...
User Manual
Page 60
... in service problems; To receive warranty service, the purchaser must be presented upon request as supplied and distributed by SAMSUNG ELECTRONICS CANADA, INC. (SAMSUNG) and delivered new, in the original carton to the glass cooktop caused by the use of products, equipment, systems, utilities, services, parts, supplies, accessories, applications, installations, repairs, external wiring or connectors not supplied or authorized by SAMSUNG against manufacturing defects in materials and workmanship for instructions...
... in service problems; To receive warranty service, the purchaser must be presented upon request as supplied and distributed by SAMSUNG ELECTRONICS CANADA, INC. (SAMSUNG) and delivered new, in the original carton to the glass cooktop caused by the use of products, equipment, systems, utilities, services, parts, supplies, accessories, applications, installations, repairs, external wiring or connectors not supplied or authorized by SAMSUNG against manufacturing defects in materials and workmanship for instructions...

