
User Manual
Page 2
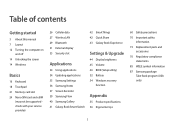
... Touchpad 21 Memory card slot 24 Nano-SIM card and eSIM (may not be supported check with your service provider) 26 Cellular data 27 Wireless LAN 29 Bluetooth 31 External display 33 Security slot Applications 34 Using applications 34 Updating applications 35 Samsung Settings 36 Samsung Notes 37 Screen Recorder 39 Samsung Flow 40 Samsung Gallery 41 Galaxy Book Smart Switch 42 SmartThings 42 Quick Share 43 Galaxy Book Experience Settings & Upgrade 44 Display brightness 45 Volume 46 BIOS (Setup utility) 52 Battery 54 Windows recovery function...
... Touchpad 21 Memory card slot 24 Nano-SIM card and eSIM (may not be supported check with your service provider) 26 Cellular data 27 Wireless LAN 29 Bluetooth 31 External display 33 Security slot Applications 34 Using applications 34 Updating applications 35 Samsung Settings 36 Samsung Notes 37 Screen Recorder 39 Samsung Flow 40 Samsung Gallery 41 Galaxy Book Smart Switch 42 SmartThings 42 Quick Share 43 Galaxy Book Experience Settings & Upgrade 44 Display brightness 45 Volume 46 BIOS (Setup utility) 52 Battery 54 Windows recovery function...
User Manual
Page 3
... those of the representative model of the manual, refer to the Samsung website, www.samsung.com. 3 Note that the computer environment referred to in this manual may not be provided or may not be subject to upgrades. Getting started About this manual before using the touchpad and mouse. • Images and screenshots are based on the computer's default settings and the Windows 10 operating system.
... those of the representative model of the manual, refer to the Samsung website, www.samsung.com. 3 Note that the computer environment referred to in this manual may not be provided or may not be subject to upgrades. Getting started About this manual before using the touchpad and mouse. • Images and screenshots are based on the computer's default settings and the Windows 10 operating system.
User Manual
Page 4
... retrieval system. Copyright Copyright © 2021 Samsung Electronics Co., Ltd. No part of this manual may be changed without prior notice due to carry out an instruction. For example, "select Settings → Devices" indicates that could cause injury to yourself or others Caution: situations that you should select Settings and then Devices. Getting started Instructional icons and expressions Warning: situations that could...
... retrieval system. Copyright Copyright © 2021 Samsung Electronics Co., Ltd. No part of this manual may be changed without prior notice due to carry out an instruction. For example, "select Settings → Devices" indicates that could cause injury to yourself or others Caution: situations that you should select Settings and then Devices. Getting started Instructional icons and expressions Warning: situations that could...
User Manual
Page 9
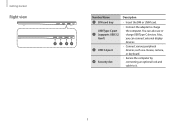
Also, you can also use or charge USB Type-C devices. Getting started Right view 1 2 34 Number/Name SIM card tray USB Type-C port (supports USB 3.2 Gen1) USB 3.2 port Security slot Description • Insert the SIM or USIM card. • Connect the adapter to it. 9 You can connect external display devices. • Connect various peripheral devices, such as a mouse, camera, or keyboard. • Secure the computer by connecting an optional lock and cable to charge the computer.
Also, you can also use or charge USB Type-C devices. Getting started Right view 1 2 34 Number/Name SIM card tray USB Type-C port (supports USB 3.2 Gen1) USB 3.2 port Security slot Description • Insert the SIM or USIM card. • Connect the adapter to it. 9 You can connect external display devices. • Connect various peripheral devices, such as a mouse, camera, or keyboard. • Secure the computer by connecting an optional lock and cable to charge the computer.
User Manual
Page 10
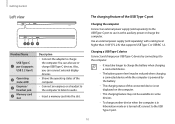
... external power supply (sold separately) to the USB Type-C port to the USB Type-C port. 10 The charging feature of the computer. • Connect an earpiece or a headset to the computer to listen to charge the computer. Also, you can also use it as the auxiliary power or charge the computer. Getting started Left view 12 3 4 Number/Name USB Type-C port (supports USB 3.2 Gen1) Operating status LED Earpiece/ Headset jack Memory card slot Description • Connect the adapter to audio...
... external power supply (sold separately) to the USB Type-C port to the USB Type-C port. 10 The charging feature of the computer. • Connect an earpiece or a headset to the computer to listen to charge the computer. Also, you can also use it as the auxiliary power or charge the computer. Getting started Left view 12 3 4 Number/Name USB Type-C port (supports USB 3.2 Gen1) Operating status LED Earpiece/ Headset jack Memory card slot Description • Connect the adapter to audio...

User Manual
Page 11
... model name, serial number, and various logos will be displayed anymore. If the case on the bottom of the device is emitted from the speakers. 2 3 LTE & 5G antenna • Transmits and receives radio waves. Getting started Bottom view 3 2 3 Number/Name Description • Provides power to the computer when not connected to an adapter. 1 Internal • To remove or replace the internal battery battery, take it to a Samsung Service...
... model name, serial number, and various logos will be displayed anymore. If the case on the bottom of the device is emitted from the speakers. 2 3 LTE & 5G antenna • Transmits and receives radio waves. Getting started Bottom view 3 2 3 Number/Name Description • Provides power to the computer when not connected to an adapter. 1 Internal • To remove or replace the internal battery battery, take it to a Samsung Service...
User Manual
Page 15
... wireless network options or adjust the volume and screen brightness via quick actions in the action center by selecting the Start button System → Notifications & actions. • Select Expand or Collapse to expand or minimize the action center menu and select the feature you want to change after the Windows Settings screen appears. You can also configure the settings from the Control Panel like previous OS versions. Select the Start button...
... wireless network options or adjust the volume and screen brightness via quick actions in the action center by selecting the Start button System → Notifications & actions. • Select Expand or Collapse to expand or minimize the action center menu and select the feature you want to change after the Windows Settings screen appears. You can also configure the settings from the Control Panel like previous OS versions. Select the Start button...
User Manual
Page 16
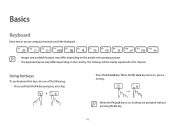
Basics Keyboard Enter text or access computer functions with the keyboard. • Images and available features may differ depending on the model and operating system. • The keyboard layout may differ depending on , press a hot key. The hot keys will be mainly explained in this manual. Using hot keys To use keyboard hot keys, do one of the following: • Press and hold the Fn key and press a hot key. • Press the Fn Lock key. When the Fn Lock key turns on the country. When the Fn Lock key is on, hot keys are activated without pressing the Fn key. 16
Basics Keyboard Enter text or access computer functions with the keyboard. • Images and available features may differ depending on the model and operating system. • The keyboard layout may differ depending on , press a hot key. The hot keys will be mainly explained in this manual. Using hot keys To use keyboard hot keys, do one of the following: • Press and hold the Fn key and press a hot key. • Press the Fn Lock key. When the Fn Lock key turns on the country. When the Fn Lock key is on, hot keys are activated without pressing the Fn key. 16
User Manual
Page 17
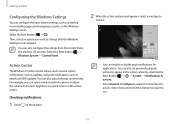
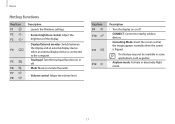
...; Launch the Windows settings. • Screen brightness control: Adjust the brightness of the display. • Display/External monitor: Switch between the display and an external display device when an external display device is connected to nearby wireless devices. • Consulting Mode: Invert the screen so that the image appears normally when the screen is flipped. This feature may not be available in some applications, such as games. • Airplane mode: Activate or deactivate flight mode. 17 Key/Icon F9...
...; Launch the Windows settings. • Screen brightness control: Adjust the brightness of the display. • Display/External monitor: Switch between the display and an external display device when an external display device is connected to nearby wireless devices. • Consulting Mode: Invert the screen so that the image appears normally when the screen is flipped. This feature may not be available in some applications, such as games. • Airplane mode: Activate or deactivate flight mode. 17 Key/Icon F9...
User Manual
Page 31
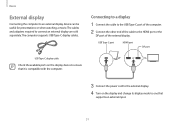
... it is compatible with the computer. 3 Connect the power cord to the external display. 4 Turn on the display and change its display mode to the HDMI port or the DP port of the cable to one that supports an external input. 31 Basics External display Connecting the computer to connect an external display are sold separately. The computer supports USB Type-C display cables. The cables and adapters required to an external display device can be useful for presentations or when watching a movie.
... it is compatible with the computer. 3 Connect the power cord to the external display. 4 Turn on the display and change its display mode to the HDMI port or the DP port of the cable to one that supports an external input. 31 Basics External display Connecting the computer to connect an external display are sold separately. The computer supports USB Type-C display cables. The cables and adapters required to an external display device can be useful for presentations or when watching a movie.
User Manual
Page 32
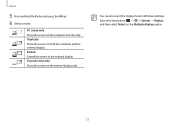
Extend Extend the screen to the external display. Basics 5 Press and hold the Fn key and press the F4 key. 6 Select a mode. Second screen only Show the screen on both the computer and the external display. You can also select the display mode in Windows settings. Duplicate Show the screen on the external display only. PC screen only Show the screen on the Multiple displays option. 32 Select the Start button System → Display, and then select Detect on the computer monitor only.
Extend Extend the screen to the external display. Basics 5 Press and hold the Fn key and press the F4 key. 6 Select a mode. Second screen only Show the screen on both the computer and the external display. You can also select the display mode in Windows settings. Duplicate Show the screen on the external display only. PC screen only Show the screen on the Multiple displays option. 32 Select the Start button System → Display, and then select Detect on the computer monitor only.
User Manual
Page 34
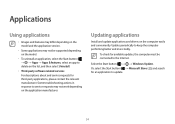
... app to delete on the list, and then select Uninstall. • Third-party software related services For descriptions about and service requests for an application to update. 34 Select the Start button Windows Update. Or, select the Start button ( ) → Microsoft Store ( ) and search for third-party applications, please contact the relevant manufacturer. Updating applications Install and update applications and drivers on the computer easily...
... app to delete on the list, and then select Uninstall. • Third-party software related services For descriptions about and service requests for an application to update. 34 Select the Start button Windows Update. Or, select the Start button ( ) → Microsoft Store ( ) and search for third-party applications, please contact the relevant manufacturer. Updating applications Install and update applications and drivers on the computer easily...

User Manual
Page 35
Menu Connections Display Advanced features Battery About device Description • Set connection settings, such as the Bluetooth connection. • Set the appropriate color for the user environment and related settings. • Set microphone settings. • Set the maximum battery charge level to configure the corresponding function. Applications Samsung Settings Configure the Samsung integrated settings and view additional information about your device's information. • View the Samsung legal information, the open source licence announcement, and the safety information. ...
Menu Connections Display Advanced features Battery About device Description • Set connection settings, such as the Bluetooth connection. • Set the appropriate color for the user environment and related settings. • Set microphone settings. • Set the maximum battery charge level to configure the corresponding function. Applications Samsung Settings Configure the Samsung integrated settings and view additional information about your device's information. • View the Samsung legal information, the open source licence announcement, and the safety information. ...

User Manual
Page 44
... the display screen, press and hold the Fn key and press the F3 key. Brightness adjustment bar • The display screen is automatically set to reduce eye strain and save power. When necessary, the screen brightness is connected. The display screen automatically becomes dimmer when the adapter is disconnected. If you manually adjusted the brightness, the brightness will not change. • The computer has an automatic screen brightness adjustment to the desired brightness. Settings & Upgrade Display brightness Adjust the display brightness to...
... the display screen, press and hold the Fn key and press the F3 key. Brightness adjustment bar • The display screen is automatically set to reduce eye strain and save power. When necessary, the screen brightness is connected. The display screen automatically becomes dimmer when the adapter is disconnected. If you manually adjusted the brightness, the brightness will not change. • The computer has an automatic screen brightness adjustment to the desired brightness. Settings & Upgrade Display brightness Adjust the display brightness to...
User Manual
Page 47
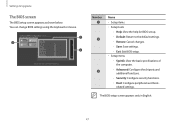
... the default settings. - Help: View the help for BIOS set up. - Advanced: Configure the chipsets and additional functions. - Security: Configure security functions. - You can change BIOS settings using the keyboard or mouse. Exit: Exit BIOS setup. • Setup menu - related settings. The BIOS setup screen appears only in English. 47 Settings & Upgrade The BIOS screen The BIOS setup screen appears as shown below. Save: Save settings. - Boot: Configure peripherals and boot- Number Name • Setup items • Setup tools - SysInfo: View the basic specifications of...
... the default settings. - Help: View the help for BIOS set up. - Advanced: Configure the chipsets and additional functions. - Security: Configure security functions. - You can change BIOS settings using the keyboard or mouse. Exit: Exit BIOS setup. • Setup menu - related settings. The BIOS setup screen appears only in English. 47 Settings & Upgrade The BIOS screen The BIOS setup screen appears as shown below. Save: Save settings. - Boot: Configure peripherals and boot- Number Name • Setup items • Setup tools - SysInfo: View the basic specifications of...
User Manual
Page 50
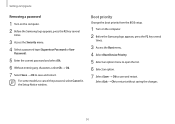
... an option menu to open the list. 6 Select an option. 7 Select Save → Ok to save and restart. Select Exit → Ok to cancel the password, select Cancel in the Setup Notice window. For some models, to restart without saving the changes. 50 Settings & Upgrade Removing a password 1 Turn on the computer. 2 Before the Samsung logo appears, press the F2 key several times. 3 Access the Security menu. 4 Select a password type (Supervisor Password or User Password). 5 Enter...
... an option menu to open the list. 6 Select an option. 7 Select Save → Ok to save and restart. Select Exit → Ok to cancel the password, select Cancel in the Setup Notice window. For some models, to restart without saving the changes. 50 Settings & Upgrade Removing a password 1 Turn on the computer. 2 Before the Samsung logo appears, press the F2 key several times. 3 Access the Security menu. 4 Select a password type (Supervisor Password or User Password). 5 Enter...
User Manual
Page 71
... type recommended by the manufacturer. There is a danger of explosion if the CMOS battery is turned off, a small amount of electrical current still flows through the computer. Dispose of batteries according to the manufacturers instructions. Appendix • Ensure that the fan vents on the bottom of the casing are clear at all power cables, remove the battery and modem cables from surrounding light and bright...
... type recommended by the manufacturer. There is a danger of explosion if the CMOS battery is turned off, a small amount of electrical current still flows through the computer. Dispose of batteries according to the manufacturers instructions. Appendix • Ensure that the fan vents on the bottom of the casing are clear at all power cables, remove the battery and modem cables from surrounding light and bright...
User Manual
Page 72
... or smoke is damaged. - Operating instructions 1 When installing and operating devices please refer to operate with the equipment specified in the user manual. 2 Devices can cause discomfort or eventually a burn. 72 Liquid has been spilled into the computer. - The computer was dropped or the casing is present). The surface temperature of devices should be switched off and the battery removed. Appendix • Unplug...
... or smoke is damaged. - Operating instructions 1 When installing and operating devices please refer to operate with the equipment specified in the user manual. 2 Devices can cause discomfort or eventually a burn. 72 Liquid has been spilled into the computer. - The computer was dropped or the casing is present). The surface temperature of devices should be switched off and the battery removed. Appendix • Unplug...

User Manual
Page 73
... care areas of old batteries. DISPOSE OF USED BATTERIES ACCORDING TO THE INSTRUCTIONS. 73 Battery disposal Do not put rechargeable batteries or products powered by manufacturer. Do not use this product in the garbage. THERE IS RISK OF EXPLOSION IF BATTERY IS REPLACED BY AN INCORRECT TYPE. Appendix Replacement parts and accessories Use only replacement parts and accessories recommended by non-removable rechargeable batteries in areas classified as...
... care areas of old batteries. DISPOSE OF USED BATTERIES ACCORDING TO THE INSTRUCTIONS. 73 Battery disposal Do not put rechargeable batteries or products powered by manufacturer. Do not use this product in the garbage. THERE IS RISK OF EXPLOSION IF BATTERY IS REPLACED BY AN INCORRECT TYPE. Appendix Replacement parts and accessories Use only replacement parts and accessories recommended by non-removable rechargeable batteries in areas classified as...

User Manual
Page 88
Rev. 1.0 www.samsung.com English. 07/2021. Some content may differ from the computer depending on the region, service provider, software version, or computer model, and is subject to change without prior notice.
Rev. 1.0 www.samsung.com English. 07/2021. Some content may differ from the computer depending on the region, service provider, software version, or computer model, and is subject to change without prior notice.

