

User Manual
Page 2
... Memory card slot 29 External display 31 Security slot Apps and features 32 Using apps 33 Samsung Account 34 Samsung Settings 35 Samsung Notes 36 Samsung Update 37 Samsung Flow 37 Samsung Studio 38 Samsung Gallery 39 Samsung Care+ 40 Samsung Device Care 42 Samsung Pass 43 Bixby 44 Galaxy Book Smart Switch 45 Galaxy Book Experience 46 Online Support(S Service) 2 47 Screen Recorder 48 Second Screen 49 SmartThings 50 Quick Share 50 Quick Search Settings & Upgrade 51 Display brightness 53 Volume 54 BIOS (Setup utility) 61 Battery Troubleshooting...
... Memory card slot 29 External display 31 Security slot Apps and features 32 Using apps 33 Samsung Account 34 Samsung Settings 35 Samsung Notes 36 Samsung Update 37 Samsung Flow 37 Samsung Studio 38 Samsung Gallery 39 Samsung Care+ 40 Samsung Device Care 42 Samsung Pass 43 Bixby 44 Galaxy Book Smart Switch 45 Galaxy Book Experience 46 Online Support(S Service) 2 47 Screen Recorder 48 Second Screen 49 SmartThings 50 Quick Share 50 Quick Search Settings & Upgrade 51 Display brightness 53 Volume 54 BIOS (Setup utility) 61 Battery Troubleshooting...
User Manual
Page 7
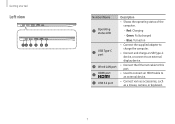
Getting started Left view 12 3 4 5 2 Number/Name 1 Operating status LED 2 USB Type-C port 3 Wired LAN port 4 HDMI port 5 USB 3.2 port Description • Shows the operating status of the computer. ‒ Red: Charging ‒ Green: Fully charged ‒ Blue: Turned on • Connect the supplied adapter to charge the computer. • Connect and charge a USB Type-C device, or connect to an external display device. • Connect the Ethernet cable to this port. • Used to connect an HDMI cable to an external device. • Connect various accessories, such as a mouse, camera, or...
Getting started Left view 12 3 4 5 2 Number/Name 1 Operating status LED 2 USB Type-C port 3 Wired LAN port 4 HDMI port 5 USB 3.2 port Description • Shows the operating status of the computer. ‒ Red: Charging ‒ Green: Fully charged ‒ Blue: Turned on • Connect the supplied adapter to charge the computer. • Connect and charge a USB Type-C device, or connect to an external display device. • Connect the Ethernet cable to this port. • Used to connect an HDMI cable to an external device. • Connect various accessories, such as a mouse, camera, or...
User Manual
Page 8
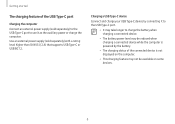
Use an external power supply (sold separately) to the USB Type-C port to use it to the USB Type-C port. • It may take longer to charge the battery when charging a connected device. • The battery power level may be available on some devices. 8 Getting started The charging feature of the connected device is not displayed on the computer. • This charging feature may not be reduced when charging a connected device while the computer is powered by the battery. •...
Use an external power supply (sold separately) to the USB Type-C port to use it to the USB Type-C port. • It may take longer to charge the battery when charging a connected device. • The battery power level may be available on some devices. 8 Getting started The charging feature of the connected device is not displayed on the computer. • This charging feature may not be reduced when charging a connected device while the computer is powered by the battery. •...

User Manual
Page 9
... a Samsung Service Center. 9 Getting started Bottom view 3 Number/Name Description • Sucks in outside air and discharges heat generated inside the computer 1 through these holes. 1 Fan vents • If the vents are blocked the computer may be displayed anymore. You will not be dangerous. 2 • Provides power to the computer 3 when not connected to an adapter. 2 Internal battery • To remove or replace...
... a Samsung Service Center. 9 Getting started Bottom view 3 Number/Name Description • Sucks in outside air and discharges heat generated inside the computer 1 through these holes. 1 Fan vents • If the vents are blocked the computer may be displayed anymore. You will not be dangerous. 2 • Provides power to the computer 3 when not connected to an adapter. 2 Internal battery • To remove or replace...

User Manual
Page 12
...; Windows Tools → Control Panel. 12 If the account has a password, enter the password to log in after the Settings window screen appears. Getting started Unlocking the screen To unlock the lock screen, do one of the following: • Mouse: Click the lock screen. • Keyboard: Press any key. • Touchpad: Tap the touchpad. Then, select an option you want to control a computer. • Images and available features may differ depending on the model and operating...
...; Windows Tools → Control Panel. 12 If the account has a password, enter the password to log in after the Settings window screen appears. Getting started Unlocking the screen To unlock the lock screen, do one of the following: • Mouse: Click the lock screen. • Keyboard: Press any key. • Touchpad: Tap the touchpad. Then, select an option you want to control a computer. • Images and available features may differ depending on the model and operating...

User Manual
Page 14
... an external display device is connected to prevent recording. • Performance mode: Change the system's performance mode. • Fn Lock: Lock the Fn key so that hot keys can be used without pressing the Fn key. If the hot keys do not work properly, install the Samsung Settings app. 14 Basics Hot key functions Key/Icon F1 F2 F3 F4 F5 F6 F7 F8 Description • Samsung Settings: Open the Samsung Settings app. • Screen brightness control: Adjust the brightness of the camera and the microphone...
... an external display device is connected to prevent recording. • Performance mode: Change the system's performance mode. • Fn Lock: Lock the Fn key so that hot keys can be used without pressing the Fn key. If the hot keys do not work properly, install the Samsung Settings app. 14 Basics Hot key functions Key/Icon F1 F2 F3 F4 F5 F6 F7 F8 Description • Samsung Settings: Open the Samsung Settings app. • Screen brightness control: Adjust the brightness of the camera and the microphone...
User Manual
Page 25
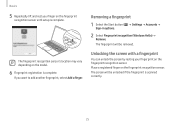
... screen will be unlocked if the fingerprint is complete. Place a registered finger on the fingerprint recognition sensor. The fingerprint will be removed. Removing a fingerprint 1 Select the Start button ( ) → Settings → Accounts → Sign-in options. 2 Select Fingerprint recognition (Windows Hello) → Remove. Basics 5 Repeatedly lift and rest your fingerprint on the fingerprint recognition sensor. The fingerprint recognition sensor's location may...
... screen will be unlocked if the fingerprint is complete. Place a registered finger on the fingerprint recognition sensor. The fingerprint will be removed. Removing a fingerprint 1 Select the Start button ( ) → Settings → Accounts → Sign-in options. 2 Select Fingerprint recognition (Windows Hello) → Remove. Basics 5 Repeatedly lift and rest your fingerprint on the fingerprint recognition sensor. The fingerprint recognition sensor's location may...

User Manual
Page 30
... Start button ( ) → Settings → System → Display → Multiple displays and select Detect next to one that supports an external input. 5 Press and hold the Fn key and press the F4 key. 6 Select a mode. Duplicate Show the screen on the external display only. Second screen only Show the screen on both the computer and the external display. Basics 3 Connect the power cord to the external display. 4 Turn on the display and change its display mode...
... Start button ( ) → Settings → System → Display → Multiple displays and select Detect next to one that supports an external input. 5 Press and hold the Fn key and press the F4 key. 6 Select a mode. Duplicate Show the screen on the external display only. Second screen only Show the screen on both the computer and the external display. Basics 3 Connect the power cord to the external display. 4 Turn on the display and change its display mode...

User Manual
Page 32
Apps and features Using apps • Images and features may differ depending on the model and the app version. • Some apps may not work depending on the model. • Apps that are provided by Samsung can be supported depending on the app manufacturer. 32 Some troubleshooting actions in response to service requests may not be installed from Samsung Update. • Third-party software related apps For descriptions about and service requests for third-party apps, please contact the relevant manufacturer.
Apps and features Using apps • Images and features may differ depending on the model and the app version. • Some apps may not work depending on the model. • Apps that are provided by Samsung can be supported depending on the app manufacturer. 32 Some troubleshooting actions in response to service requests may not be installed from Samsung Update. • Third-party software related apps For descriptions about and service requests for third-party apps, please contact the relevant manufacturer.

User Manual
Page 33
... of services that are provided through computers, mobile devices, TVs, and the Samsung website. To check the list of your Samsung account, your data which is related to your computer. If you do not have a Samsung account, select Create account. Finding your ID and resetting your password If you forget your password after you enter the required information. Select the Start button ( ) →...
... of services that are provided through computers, mobile devices, TVs, and the Samsung website. To check the list of your Samsung account, your data which is related to your computer. If you do not have a Samsung account, select Create account. Finding your ID and resetting your password If you forget your password after you enter the required information. Select the Start button ( ) →...
User Manual
Page 34
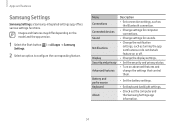
... the Samsung Settings app information. 34 Menu Connections Connected devices Sound Notifications Display Security and privacy Advanced features Battery and performance Keyboard About Description • Set connection settings, such as the Bluetooth connection. • Change settings for computer connections. • Change settings for sounds. • Change the notification settings, such as turning the app notifications or do not disturb feature on or off. • Change the display settings. • Set the security and privacy status. • Turn on the model...
... the Samsung Settings app information. 34 Menu Connections Connected devices Sound Notifications Display Security and privacy Advanced features Battery and performance Keyboard About Description • Set connection settings, such as the Bluetooth connection. • Change settings for computer connections. • Change settings for sounds. • Change the notification settings, such as turning the app notifications or do not disturb feature on or off. • Change the display settings. • Set the security and privacy status. • Turn on the model...

User Manual
Page 36
... for the first time. 3 Select Update all. Keep the computer performing better and more stably with this app can search for or download the BIOS, drivers, and apps over the internet. Apps and features Samsung Update Install and update Samsung apps and drivers on the model and the app version. 1 Select the Start button ( ) → All apps → Samsung Update. 2 Read and agree to the User Agreement.
... for the first time. 3 Select Update all. Keep the computer performing better and more stably with this app can search for or download the BIOS, drivers, and apps over the internet. Apps and features Samsung Update Install and update Samsung apps and drivers on the model and the app version. 1 Select the Start button ( ) → All apps → Samsung Update. 2 Read and agree to the User Agreement.
User Manual
Page 48
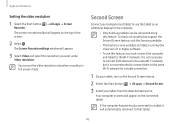
... the Second Screen feature. 2 Select the Start button ( ) → All apps → Second Screen. 3 Select your tablet, turn on tablets running One UI version 3.1 or higher software. • To use the tablet as an additional display for the computer. • Only Samsung tablets can set the video resolution only when recording in full screen mode. Apps and features Setting the video resolution 1 Select the Start button ( ) →...
... the Second Screen feature. 2 Select the Start button ( ) → All apps → Second Screen. 3 Select your tablet, turn on tablets running One UI version 3.1 or higher software. • To use the tablet as an additional display for the computer. • Only Samsung tablets can set the video resolution only when recording in full screen mode. Apps and features Setting the video resolution 1 Select the Start button ( ) →...

User Manual
Page 51
Settings & Upgrade Display brightness Adjust the display brightness to the brightest level when the adapter is connected. Brightness adjustment bar The display screen is disconnected. 51 The display screen automatically becomes dimmer when the adapter is automatically set to reduce eye strain and save power. Controlling brightness using the keyboard • To dim the display screen, press and hold the Fn key and press the F2 key. • To brighten the display screen, press and hold the Fn key and...
Settings & Upgrade Display brightness Adjust the display brightness to the brightest level when the adapter is connected. Brightness adjustment bar The display screen is disconnected. 51 The display screen automatically becomes dimmer when the adapter is automatically set to reduce eye strain and save power. Controlling brightness using the keyboard • To dim the display screen, press and hold the Fn key and press the F2 key. • To brighten the display screen, press and hold the Fn key and...

User Manual
Page 55
... change BIOS settings using the keyboard or mouse. 1 3 2 Number 1 2 3 Name • Setup items • Setup tools ‒ Help: Get help with the BIOS setup. ‒ Default: Return to the default settings. ‒ Restore: Cancel changes. ‒ Save: Save settings. ‒ Exit: Exit BIOS setup. • Setup menu ‒ SysInfo: Check the computer's specifications. ‒ Advanced: Configure the chipsets and additional functions. ‒ Security: Configure security functions. ‒ Boot: Configure accessories and boot- Settings & Upgrade The BIOS screen The BIOS setup screen...
... change BIOS settings using the keyboard or mouse. 1 3 2 Number 1 2 3 Name • Setup items • Setup tools ‒ Help: Get help with the BIOS setup. ‒ Default: Return to the default settings. ‒ Restore: Cancel changes. ‒ Save: Save settings. ‒ Exit: Exit BIOS setup. • Setup menu ‒ SysInfo: Check the computer's specifications. ‒ Advanced: Configure the chipsets and additional functions. ‒ Security: Configure security functions. ‒ Boot: Configure accessories and boot- Settings & Upgrade The BIOS screen The BIOS setup screen...

User Manual
Page 56
... disabled. Settings & Upgrade Boot password Setting a password with the BIOS enhances protection against viruses and hacking attacks. • Do not forget your password or expose it to access the hard disk drive (HDD) from the Samsung Service Center. This password will also be supported, depending on the computer or entering the BIOS setup. • User Password (low security level): This password is required to others. • If you forget the User Password, disable the Supervisor Password, and the User Password...
... disabled. Settings & Upgrade Boot password Setting a password with the BIOS enhances protection against viruses and hacking attacks. • Do not forget your password or expose it to access the hard disk drive (HDD) from the Samsung Service Center. This password will also be supported, depending on the computer or entering the BIOS setup. • User Password (low security level): This password is required to others. • If you forget the User Password, disable the Supervisor Password, and the User Password...
User Manual
Page 57
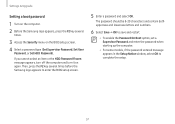
... and turn it on the BIOS setup screen. 4 Select a password type (Set Supervisor Password, Set User Password, or Set HDD Password). The password should be 8-20 characters and contain both uppercase and lowercase letters and numbers. 6 Select Save → OK to save and restart. • To enable the Password On Boot option, set a Supervisor Password and enter the password when starting up the computer. • For some models, if the password entered message appears in the Setup Notice window, select...
... and turn it on the BIOS setup screen. 4 Select a password type (Set Supervisor Password, Set User Password, or Set HDD Password). The password should be 8-20 characters and contain both uppercase and lowercase letters and numbers. 6 Select Save → OK to save and restart. • To enable the Password On Boot option, set a Supervisor Password and enter the password when starting up the computer. • For some models, if the password entered message appears in the Setup Notice window, select...

User Manual
Page 58
... Security menu on the BIOS setup screen. 4 Select Boot Device Priority. 5 Select an option menu to open the list. 6 Select an option. 7 Select Save → OK to save and restart. Settings & Upgrade Removing a password 1 Turn on the computer. 2 Before the Samsung logo appears, press the F2 key several times. 3 Access the Boot menu on the BIOS setup screen. 4 Select a password type (Set Supervisor Password, Set User Password, or Set HDD Password). 5 Enter the current password next to Enter Current Password. 6 Do not enter any characters next to Create New Password, Confirm New Password and...
... Security menu on the BIOS setup screen. 4 Select Boot Device Priority. 5 Select an option menu to open the list. 6 Select an option. 7 Select Save → OK to save and restart. Settings & Upgrade Removing a password 1 Turn on the computer. 2 Before the Samsung logo appears, press the F2 key several times. 3 Access the Boot menu on the BIOS setup screen. 4 Select a password type (Set Supervisor Password, Set User Password, or Set HDD Password). 5 Enter the current password next to Enter Current Password. 6 Do not enter any characters next to Create New Password, Confirm New Password and...
User Manual
Page 74
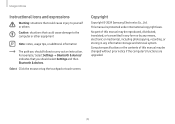
... the mouse or tap the touchpad or touch screen. This manual is protected under international copyright laws. For example, "select Settings → Bluetooth & devices" indicates that could cause damage to the computer or other equipment Note: notes, usage tips, or additional information The path you should follow to carry out an instruction. Computer specifications or the contents of this manual may be changed without...
... the mouse or tap the touchpad or touch screen. This manual is protected under international copyright laws. For example, "select Settings → Bluetooth & devices" indicates that could cause damage to the computer or other equipment Note: notes, usage tips, or additional information The path you should follow to carry out an instruction. Computer specifications or the contents of this manual may be changed without...

User Manual
Page 110
www.samsung.com English. 02/2024. Rev. 1.1 Some content may differ from the computer depending on the region, service provider, software version, or computer model, and is subject to change without prior notice.
www.samsung.com English. 02/2024. Rev. 1.1 Some content may differ from the computer depending on the region, service provider, software version, or computer model, and is subject to change without prior notice.

