
User Manual
Page 2
... the camera driver Before connecting the camera to a PC, via the USB cable, you use the supplied USB cable to connect the camera to turn it (e.g. Check [Removable Disk] Open Windows EXPLORER and search for a trip or an important event) to your PC, be damaged. for [Removable Disk]. (p.72) ƀ If you will need to the use it on the memory card to avoid disappointment. Instructions ƅ Use this camera in this manual in a safe place. ƀ Specifications...
... the camera driver Before connecting the camera to a PC, via the USB cable, you use the supplied USB cable to connect the camera to turn it (e.g. Check [Removable Disk] Open Windows EXPLORER and search for a trip or an important event) to your PC, be damaged. for [Removable Disk]. (p.72) ƀ If you will need to the use it on the memory card to avoid disappointment. Instructions ƅ Use this camera in this manual in a safe place. ƀ Specifications...
User Manual
Page 4
... the flash after using the memory card 13 RECORDING ƀWhen Using the Camera for the First Time : Attaching the lens cap 15 ƀWhen Using the Camera for the First Time : Smart button 16 ƀWhen Using the Camera for the First Time : Setting up the Date / Time and LanguageŊ17 ƀLCD monitor indicator ŊŊŊŊŊ18 ƀStarting the recording mode ŊŊ19 ƅHow to use the AUTO mode...
... the flash after using the memory card 13 RECORDING ƀWhen Using the Camera for the First Time : Attaching the lens cap 15 ƀWhen Using the Camera for the First Time : Smart button 16 ƀWhen Using the Camera for the First Time : Setting up the Date / Time and LanguageŊ17 ƀLCD monitor indicator ŊŊŊŊŊ18 ƀStarting the recording mode ŊŊ19 ƅHow to use the AUTO mode...
User Manual
Page 5
... a service centreŊ64 ƀSpecifications 66 ƀSetup menu 54 ƅOSD set 56 ƅFile name 56 ƅLanguage 57 ƅSetting up the Date / Time / Date type Ŋ57 ƅImprinting the recording date ŊŊ57 ƅLCD brightness 57 ƅAuto Focus lamp 58 ƅAuto power off 58 ƅQuick view 58 ƅStart up image 58 ƅSound Volume 59 ƅOperation Sound 59 ƅStart up sound 59 ƅShutter sound 59 SOFTWARE...
... a service centreŊ64 ƀSpecifications 66 ƀSetup menu 54 ƅOSD set 56 ƅFile name 56 ƅLanguage 57 ƅSetting up the Date / Time / Date type Ŋ57 ƅImprinting the recording date ŊŊ57 ƅLCD brightness 57 ƅAuto Focus lamp 58 ƅAuto power off 58 ƅQuick view 58 ƅStart up image 58 ƅSound Volume 59 ƅOperation Sound 59 ƅStart up sound 59 ƅShutter sound 59 SOFTWARE...

User Manual
Page 10
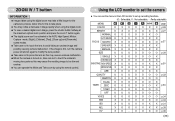
...; Self-timer lamp Icon Status Description - Blinking - You can still manually configure all functions except the aperture value and shutter speed. ƀ ASM mode You can select the desired working mode by using the mode dial located on (LCD monitor turns off) When the USB cable is connected to a PC (LCD monitor turns off When the printer is printing The lamp blinks When the AF activates The lamp lights (The subject is in focus) The lamp blinks...
...; Self-timer lamp Icon Status Description - Blinking - You can still manually configure all functions except the aperture value and shutter speed. ƀ ASM mode You can select the desired working mode by using the mode dial located on (LCD monitor turns off) When the USB cable is connected to a PC (LCD monitor turns off When the printer is printing The lamp blinks When the AF activates The lamp lights (The subject is in focus) The lamp blinks...
User Manual
Page 20
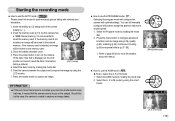
... image by rotating the mode dial. 2. Select the ASM mode by using the smart button. Select the A, S or M mode by rotating the mode dial. 6. Select the Auto mode by using the LCD monitor. 7. Should this camera has a 19MB internal memory, it means that is incorrect, reset the date / time before [AUTO mode] taking note of the correct polarity (+ / -). 2. Press the menu button to configure advanced functions such as image size (p.29), quality (p.32), metering (p.30), continuous shooting...
... image by rotating the mode dial. 2. Select the ASM mode by using the smart button. Select the A, S or M mode by rotating the mode dial. 6. Select the Auto mode by using the LCD monitor. 7. Should this camera has a 19MB internal memory, it means that is incorrect, reset the date / time before [AUTO mode] taking note of the correct polarity (+ / -). 2. Press the menu button to configure advanced functions such as image size (p.29), quality (p.32), metering (p.30), continuous shooting...
User Manual
Page 24
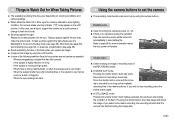
... the auto focus system may not perform as expected. - Things to Watch Out for as long as the available recording time in the memory allows. Taking a picture against the sun may appear on a solid surface or change to flash shot mode. ƅ Shooting against the light, please use a tripod, support the camera on the LCD monitor. If the subject is moving at high speed. - Shutter button ƀ Used for taking an image or recording...
... the auto focus system may not perform as expected. - Things to Watch Out for as long as the available recording time in the memory allows. Taking a picture against the sun may appear on a solid surface or change to flash shot mode. ƅ Shooting against the light, please use a tripod, support the camera on the LCD monitor. If the subject is moving at high speed. - Shutter button ƀ Used for taking an image or recording...
User Manual
Page 26
... shutter button halfway at the maximum optical zoom position and press the zoom T button again. ƀ The digital zoom can operate the Wide and Tele zoom by using the remote control. Allow time for this may take place. ƀ You may notice a decrease in the ASR, High Speed, Motion Capture mode, [Night], [Children], [Text], [Close up recording functions. (O : Selectable, X : Not selectable, - : Partly selectable) MENU ASM page COLOR O X X X X X X p.26 BRIGHT O X X X X X X p.27 NORMAL O O O O O X O AUTO MACRO O X X O X X X FOCUS MACRO...
... shutter button halfway at the maximum optical zoom position and press the zoom T button again. ƀ The digital zoom can operate the Wide and Tele zoom by using the remote control. Allow time for this may take place. ƀ You may notice a decrease in the ASR, High Speed, Motion Capture mode, [Night], [Children], [Text], [Close up recording functions. (O : Selectable, X : Not selectable, - : Partly selectable) MENU ASM page COLOR O X X X X X X p.26 BRIGHT O X X X X X X p.27 NORMAL O O O O O X O AUTO MACRO O X X O X X X FOCUS MACRO...
User Manual
Page 29
... careful when using the ASR, Continuous shot, High Speed Continuous shot, Motion Capture, AEB, Movie clip mode and Still image mode (except the NIGHT, PORTRAIT and CHILDREN mode), the flash will reduce the life of the battery. ƀ Under normal operating conditions the charging time for example, in very dark conditions, use the manual focus in the program mode and ASM mode. ƀ How to set the manual focus To set to manual focus, touch the button and...
... careful when using the ASR, Continuous shot, High Speed Continuous shot, Motion Capture, AEB, Movie clip mode and Still image mode (except the NIGHT, PORTRAIT and CHILDREN mode), the flash will reduce the life of the battery. ƀ Under normal operating conditions the charging time for example, in very dark conditions, use the manual focus in the program mode and ASM mode. ƀ How to set the manual focus To set to manual focus, touch the button and...
User Manual
Page 30
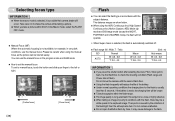
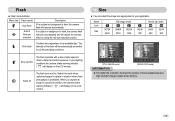
... The flash operates with a slow shutter speed to suit the prevailing conditions. In poor lighting conditions the camera shake warning indicator ( ) will display on the LCD monitor. Size ƅ You can select the image size appropriate for your application. Flash ƀ Flash mode indicator Menu tab Flash mode Auto flash Auto & Red eye reduction Description If the subject or background is dark, the camera flash will work automatically and will reduce the red-eye effect by using the red-eye reduction function. The...
... The flash operates with a slow shutter speed to suit the prevailing conditions. In poor lighting conditions the camera shake warning indicator ( ) will display on the LCD monitor. Size ƅ You can select the image size appropriate for your application. Flash ƀ Flash mode indicator Menu tab Flash mode Auto flash Auto & Red eye reduction Description If the subject or background is dark, the camera flash will work automatically and will reduce the red-eye effect by using the red-eye reduction function. The...
User Manual
Page 43
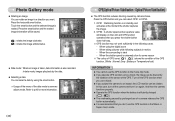
... : A shutter speed and an aperture value will be shaken. Photo Gallery mode ƀ Rotating an image You can rotate an image to p.40 for some reason ż The colour of OPS icons( 1 , 2 ) shows the condition of the OPS function. (White : Normal; Press the OPS button and you operate OPS function using the digital zoom - OPS1 : Stabilising function is recommended that you subject the camera to an impact, the LCD monitor can be saved. 100...
... : A shutter speed and an aperture value will be shaken. Photo Gallery mode ƀ Rotating an image You can rotate an image to p.40 for some reason ż The colour of OPS icons( 1 , 2 ) shows the condition of the OPS function. (White : Normal; Press the OPS button and you operate OPS function using the digital zoom - OPS1 : Stabilising function is recommended that you subject the camera to an impact, the LCD monitor can be saved. 100...
User Manual
Page 49
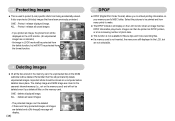
... function is not available for Movie clips and Voice recording files. ƅ If a memory card is used to protect (Lock) specific shots from the format function. ISO:100 Av:F4.1 Tv:1/10 FLASH:OFF 3072X2304 2006.07.01 ONE ALL -LQ\" Deleting images ƅ Of all images are deleted and a [No Image!] message will display. Ś48ś ONE ALL DPOF ƅ DPOF (Digital Print Order Format) allows you to make. ƅ The DPOF indicator will be deleted. Protecting images...
... function is not available for Movie clips and Voice recording files. ƅ If a memory card is used to protect (Lock) specific shots from the format function. ISO:100 Av:F4.1 Tv:1/10 FLASH:OFF 3072X2304 2006.07.01 ONE ALL -LQ\" Deleting images ƅ Of all images are deleted and a [No Image!] message will display. Ś48ś ONE ALL DPOF ƅ DPOF (Digital Print Order Format) allows you to make. ƅ The DPOF indicator will be deleted. Protecting images...
User Manual
Page 50
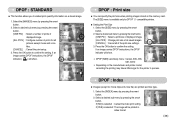
... print setup. 3. Select the [IMAGES] menu by pressing the smart NO button. Cancel ż DPOF [SIZE] secondary menu : Cancel, 3X5, 4X6, 5X7, 8X10 ż Depending on the memory card. DPOF : Index ƅ Images (except for DPOF 1.1 compatible printers. ƀ Setting the Print Size 1. Select the [SIZE] menu by pressing the smart button. [ONE PIC] : Select a print size of displayed image. [ALL PICS] : Change print size of the print size settings. 3. ISO:100 Av:F4.1 [ONE PIC] : Select a number of prints of Tv:1/10 FLASH:OFF displayed image...
... print setup. 3. Select the [IMAGES] menu by pressing the smart NO button. Cancel ż DPOF [SIZE] secondary menu : Cancel, 3X5, 4X6, 5X7, 8X10 ż Depending on the memory card. DPOF : Index ƅ Images (except for DPOF 1.1 compatible printers. ƀ Setting the Print Size 1. Select the [SIZE] menu by pressing the smart button. [ONE PIC] : Select a print size of displayed image. [ALL PICS] : Change print size of the print size settings. 3. ISO:100 Av:F4.1 [ONE PIC] : Select a number of prints of Tv:1/10 FLASH:OFF displayed image...
User Manual
Page 57
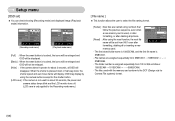
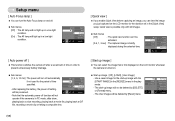
... power and camera status lamps blink and the LCD monitor turns off. (LCD save ] : If the camera is not used for about 3 seconds, all OSD will be set ] ƅ You can check shooting (Recording mode) and displayed image (Play back mode) information. The files used , or after formatting, or after Ȗ File Language Date&Time Exit:BACK formatting, deleting all pictures. [Reset] : After using numbers that follow the previous sequence, even when Series Reset OSD Set OSD Set a new memory card is SNB10001. - Setup menu [OSD set from...
... power and camera status lamps blink and the LCD monitor turns off. (LCD save ] : If the camera is not used for about 3 seconds, all OSD will be set ] ƅ You can check shooting (Recording mode) and displayed image (Play back mode) information. The files used , or after formatting, or after Ȗ File Language Date&Time Exit:BACK formatting, deleting all pictures. [Reset] : After using numbers that follow the previous sequence, even when Series Reset OSD Set OSD Set a new memory card is SNB10001. - Setup menu [OSD set from...
User Manual
Page 59
The start -up in a low light condition. After replacing the battery, the power off setting Quick View will be deleted by [Reset] menu. Note that is first displayed on and off. ƀ Sub menus [Off] : The AF lamp will not light up in PC mode, slide show, playing back a voice recording, playing back a movie file, playing back a GIF file, recording a movie clip or taking a composite shot. [ Start up image : [Off], [LOGO], [User Image] - Off Ȗ LOGO User image Start Image Sound Volume BEEP Sound Start Sound Shutter Sound Exit:BACK Ś...
The start -up in a low light condition. After replacing the battery, the power off setting Quick View will be deleted by [Reset] menu. Note that is first displayed on and off. ƀ Sub menus [Off] : The AF lamp will not light up in PC mode, slide show, playing back a voice recording, playing back a movie file, playing back a GIF file, recording a movie clip or taking a composite shot. [ Start up image : [Off], [LOGO], [User Image] - Off Ȗ LOGO User image Start Image Sound Volume BEEP Sound Start Sound Shutter Sound Exit:BACK Ś...

User Manual
Page 61
... delete any unnecessary files in the internal memory to free up space before inserting the memory card into the camera. ƀ When you move the images that are copied to an external monitor ƀ Using the USB cable with Cradle (Optional) : Connect the camera and the cradle. sound NTSC PAL Ȗ Format Copy to avoid duplication of the file name. - Video White - Setup menu [ Copy To Card ] ƅ This enables you to copy image files, movie clips and voice recording files...
... delete any unnecessary files in the internal memory to free up space before inserting the memory card into the camera. ƀ When you move the images that are copied to an external monitor ƀ Using the USB cable with Cradle (Optional) : Connect the camera and the cradle. sound NTSC PAL Ȗ Format Copy to avoid duplication of the file name. - Video White - Setup menu [ Copy To Card ] ƅ This enables you to copy image files, movie clips and voice recording files...
User Manual
Page 66
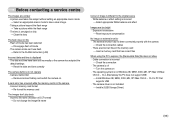
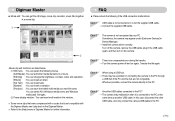
... [Removable Disk] file does not show ϏCable connection is incorrect Ɗ Check the connection ϏThe camera is off mode ϏThe camera mode can't use flash Ɗ Refer to the FLASH instruction (p.28) Incorrect date and time is displayed ϏThe date and time have been set incorrectly or the camera has adopted the default settings Ɗ Reset the date and time correctly The camera buttons do not operate ϏCamera malfunction Ɗ Remove/re-insert battery and switch the camera on A card error...
... [Removable Disk] file does not show ϏCable connection is incorrect Ɗ Check the connection ϏThe camera is off mode ϏThe camera mode can't use flash Ɗ Refer to the FLASH instruction (p.28) Incorrect date and time is displayed ϏThe date and time have been set incorrectly or the camera has adopted the default settings Ɗ Reset the date and time correctly The camera buttons do not operate ϏCamera malfunction Ɗ Remove/re-insert battery and switch the camera on A card error...
User Manual
Page 69
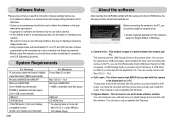
... manual, you should first install the camera driver. żScreen Captures illustrated on this manual is the all or part of either the software or the user manual be reproduced. ҟCopyrights for software are licensed only for use with a camera. ҟIn the unlikely event of a manufacturing fault, we will repair or exchange your digital images and movie files with this codec. You can download, view, edit and save your camera...
... manual, you should first install the camera driver. żScreen Captures illustrated on this manual is the all or part of either the software or the user manual be reproduced. ҟCopyrights for software are licensed only for use with a camera. ҟIn the unlikely event of a manufacturing fault, we will repair or exchange your digital images and movie files with this codec. You can download, view, edit and save your camera...
User Manual
Page 70
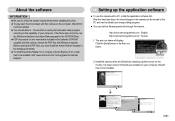
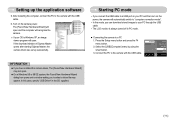
... internet. Setting up the application software ƅ To use this camera. Install the camera driver and DirectX by an image editing program. ƅ You can be edited by selecting a button shown on your computer. Search the PDF files with a PC, install the application software first. Visit "www.microsoft.com" and upgrade the Internet Explorer. The auto run frame will display. Before opening the PDF files, you must be installed. ƀ...
... internet. Setting up the application software ƅ To use this camera. Install the camera driver and DirectX by an image editing program. ƅ You can be edited by selecting a button shown on your computer. Search the PDF files with a PC, install the application software first. Visit "www.microsoft.com" and upgrade the Internet Explorer. The auto run frame will display. Before opening the PDF files, you must be installed. ƀ...
User Manual
Page 72
... the Setup menu button and press the F4 menu button. 2. Computer Printer Ȗ Format Copy to select a driver file may not open . Turn on the power, the camera will open . ƀ On a Windows 98 or 98 SE system, the Found New Hardware Wizard dialog box opens and a window asking you to Card Video Out USB Reset Exit:BACK Ś71ś Setting up successfully. After restarting the computer, connect the PC to the camera with the USB cable. 6. Connect...
... the Setup menu button and press the F4 menu button. 2. Computer Printer Ȗ Format Copy to select a driver file may not open . Turn on the power, the camera will open . ƀ On a Windows 98 or 98 SE system, the Found New Hardware Wizard dialog box opens and a window asking you to Card Video Out USB Reset Exit:BACK Ś71ś Setting up successfully. After restarting the computer, connect the PC to the camera with the USB cable. 6. Connect...
User Manual
Page 78
..., Windows media (wmv) and Windows media (asf) file types. ڢFrame display window : You can save the edited multi media as another USB cable. Sometimes, the camera may be a problem in this case, disconnect the other USB cables connected to the PC? Ɗ The camera may malfunction when it is connected to the PC. Ś77ś Movie clip edit functions are not compatible. Case 4 When using a USB...
..., Windows media (wmv) and Windows media (asf) file types. ڢFrame display window : You can save the edited multi media as another USB cable. Sometimes, the camera may be a problem in this case, disconnect the other USB cables connected to the PC? Ɗ The camera may malfunction when it is connected to the PC. Ś77ś Movie clip edit functions are not compatible. Case 4 When using a USB...


