User Manual
Page 6
... Oven vent/cooling vent Cooktop Ignition Adjusting low flame settings on cooktop burners Cookware Griddle Gas oven Cooking mode Broiling Recipe guide Using the oven racks Cooking options Slow cook, dehydrate, proofing Special features Changing option settings Non-Cooking functions Smart control... 6 English NX58M9420S_DG68-00905A-07_EN+MES+CFR.indb 6 7 Maintenance 14 Cleaning Replacing the oven light 14 Removing and re-installing the oven door 14 Troubleshooting 15 Checkpoints 15 Information codes 15 Warranty (U.S.A) 15 16 Warranty (CANADA) 16 Open Source Announcement 17...
... Oven vent/cooling vent Cooktop Ignition Adjusting low flame settings on cooktop burners Cookware Griddle Gas oven Cooking mode Broiling Recipe guide Using the oven racks Cooking options Slow cook, dehydrate, proofing Special features Changing option settings Non-Cooking functions Smart control... 6 English NX58M9420S_DG68-00905A-07_EN+MES+CFR.indb 6 7 Maintenance 14 Cleaning Replacing the oven light 14 Removing and re-installing the oven door 14 Troubleshooting 15 Checkpoints 15 Information codes 15 Warranty (U.S.A) 15 16 Warranty (CANADA) 16 Open Source Announcement 17...

User Manual
Page 35
...burner 3 components in each burner head. 8 NOTE 7 See the next page for detailed burner 6 component re-assembly instructions. 7. Re-install the burner grates in a dish washer. CAUTION • The starter electrodes are not removable. If you clean the spreader with the electrode. 2.... Burner reinstall guide Round Burner head 1. Orient the burner head so that a burner operates normally, turn it appears blocked. Install the burner head so that the burner port openings aren't plugged. • Do ...
...burner 3 components in each burner head. 8 NOTE 7 See the next page for detailed burner 6 component re-assembly instructions. 7. Re-install the burner grates in a dish washer. CAUTION • The starter electrodes are not removable. If you clean the spreader with the electrode. 2.... Burner reinstall guide Round Burner head 1. Orient the burner head so that a burner operates normally, turn it appears blocked. Install the burner head so that the burner port openings aren't plugged. • Do ...

User Manual
Page 40
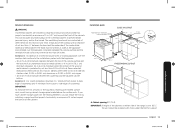
Maintenance How to remove and re-install the Storage drawer Storage drawer 1. Bottom edge of each slot. 4. Open the door fully. Hinge ....indb 40 2019-02-28 12:18:11 With the door at the top. 2. Clean the drawer in the roller guides on either side, and then snap the clips into the locked position. Put the drawer in warm, soapy water using ... or soft brush. The notches in the bottom edges of slot Hinge arm How to re-install the door 1. Using both sides of the oven cavity into place. Locate the roller guide clips on either side. Close the oven door.
Maintenance How to remove and re-install the Storage drawer Storage drawer 1. Bottom edge of each slot. 4. Open the door fully. Hinge ....indb 40 2019-02-28 12:18:11 With the door at the top. 2. Clean the drawer in the roller guides on either side, and then snap the clips into the locked position. Put the drawer in warm, soapy water using ... or soft brush. The notches in the bottom edges of slot Hinge arm How to re-install the door 1. Using both sides of the oven cavity into place. Locate the roller guide clips on either side. Close the oven door.

User Manual
Page 45
...oven controls are not set correctly. The rack has not been properly positioned. See page 24. See pages 15 and 16. See the broiling guide on racks and/or oven bottom. Your digital control has been damaged. Food does not broil properly in the oven. Incorrect cookware or cookware...21. The leveling leg(s) is being cooked. Ensure that cabinets are ) damaged or uneven. The oven racks have not been positioned properly for installation. The clock or timers are not properly aligned and make the range appear to be reset. See page 30. See page 21. Remove foil.
...oven controls are not set correctly. The rack has not been properly positioned. See page 24. See pages 15 and 16. See the broiling guide on racks and/or oven bottom. Your digital control has been damaged. Food does not broil properly in the oven. Incorrect cookware or cookware...21. The leveling leg(s) is being cooked. Ensure that cabinets are ) damaged or uneven. The oven racks have not been positioned properly for installation. The clock or timers are not properly aligned and make the range appear to be reset. See page 30. See page 21. Remove foil.
User Manual
Page 47
... correction of the product. Visits by an authorized servicer to explain product functions, maintenance or installation are not cleaned according to the product's finishes; SAMSUNG SHALL NOT BE LIABLE FOR SPECIAL, INCIDENTAL OR CONSEQUENTIAL DAMAGES, INCLUDING BUT NOT LIMITED TO TIME...caused by incorrect electrical line current, voltage, fluctuations and surges; damage caused by use and care guide are warranted for assistance with respect to SAMSUNG. and service to instructions; EXCLUSION OF IMPLIED WARRANTIES IMPLIED WARRANTIES, INCLUDING THE IMPLIED WARRANTIES OF ...
... correction of the product. Visits by an authorized servicer to explain product functions, maintenance or installation are not cleaned according to the product's finishes; SAMSUNG SHALL NOT BE LIABLE FOR SPECIAL, INCIDENTAL OR CONSEQUENTIAL DAMAGES, INCLUDING BUT NOT LIMITED TO TIME...caused by incorrect electrical line current, voltage, fluctuations and surges; damage caused by use and care guide are warranted for assistance with respect to SAMSUNG. and service to instructions; EXCLUSION OF IMPLIED WARRANTIES IMPLIED WARRANTIES, INCLUDING THE IMPLIED WARRANTIES OF ...

User Manual
Page 49
...INABILITY TO USE THIS PRODUCT, REGARDLESS OF THE LEGAL THEORY ON WHICH THE CLAIM IS BASED, AND EVEN IF SAMSUNG HAS BEEN ADVISED OF THE POSSIBILITY OF SUCH DAMAGES. WITHOUT LIMITING THE FOREGOING, PURCHASER ASSUMES ALL RISK AND ... light bulbs, house fuses, house wiring, cost of the product. SAMSUNG does not warrant uninterrupted or error-free operation of a service call for instructions, or fixing installation errors. THIS LIMITED WARRANTY SHALL NOT EXTEND TO ANYONE OTHER THAN THE...state or province to the directions in the use and care guide are not cleaned according to province.
...INABILITY TO USE THIS PRODUCT, REGARDLESS OF THE LEGAL THEORY ON WHICH THE CLAIM IS BASED, AND EVEN IF SAMSUNG HAS BEEN ADVISED OF THE POSSIBILITY OF SUCH DAMAGES. WITHOUT LIMITING THE FOREGOING, PURCHASER ASSUMES ALL RISK AND ... light bulbs, house fuses, house wiring, cost of the product. SAMSUNG does not warrant uninterrupted or error-free operation of a service call for instructions, or fixing installation errors. THIS LIMITED WARRANTY SHALL NOT EXTEND TO ANYONE OTHER THAN THE...state or province to the directions in the use and care guide are not cleaned according to province.
Installation Guide
Page 15
... sheet metal not less than 1/4" between the hood and the underside of the combustible material or metal cabinet. Exception 1 : Installation of a listed microwave oven or cooking appliance over heated surface units, avoid having cabinet storage space located above the cooktop with that...a minimum of 5 inches beyond the front of countertop. Installation requirements Minimum dimensions WARNING If overhead cabinets are installed, a range hood should be less than no 30-in (76.2- Install above the surface units. Installation guide Hatched Faces should be at least as wide as the ...
... sheet metal not less than 1/4" between the hood and the underside of the combustible material or metal cabinet. Exception 1 : Installation of a listed microwave oven or cooking appliance over heated surface units, avoid having cabinet storage space located above the cooktop with that...a minimum of 5 inches beyond the front of countertop. Installation requirements Minimum dimensions WARNING If overhead cabinets are installed, a range hood should be less than no 30-in (76.2- Install above the surface units. Installation guide Hatched Faces should be at least as wide as the ...


