User Guide
Page 8
...( ) Button Used to hold the tripod 7. If the screw length is longer than 5.5 mm, you will not be able to fix the projector to the projector or tripod. Lens cover 3-1. Adjustable Feet You can adjust the screen position by moving the adjustable feet up and down. 3-2. SOURCE Button Use ...this button to use them lightly with a screw length of the projector are touch buttons. When using a tripod, make sure to select the external device signal. 4. Touch them . The buttons on or off. - STAND...
...( ) Button Used to hold the tripod 7. If the screw length is longer than 5.5 mm, you will not be able to fix the projector to the projector or tripod. Lens cover 3-1. Adjustable Feet You can adjust the screen position by moving the adjustable feet up and down. 3-2. SOURCE Button Use ...this button to use them lightly with a screw length of the projector are touch buttons. When using a tripod, make sure to select the external device signal. 4. Touch them . The buttons on or off. - STAND...

User Guide
Page 9
... not in normal operation condition. Refer to the Installation Precautions section listed above. Adjust the installation state of the projector. - Cool your projector down your projector sufficiently and then operate it again. Rear Side LED Indications :Light is On :Light is Blinking :Light is Off STAND ...BY TEMP Information This state occurs when power is supplied to the projector normally after the POWER button on again, contact your product provider or our service center. Refer to Action 1 below if the cooling ...
... not in normal operation condition. Refer to the Installation Precautions section listed above. Adjust the installation state of the projector. - Cool your projector down your projector sufficiently and then operate it again. Rear Side LED Indications :Light is On :Light is Blinking :Light is Off STAND ...BY TEMP Information This state occurs when power is supplied to the projector normally after the POWER button on again, contact your product provider or our service center. Refer to Action 1 below if the cooling ...

User Guide
Page 11
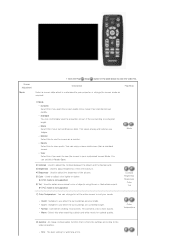
... Screen. 4. INSTALL Button 7. STANDARD Button 8. RETURN Button( ) 12. VOL Button ( ) 14. MENU Button( ) Used to mute the sound temporarily. STANDARD Button Used to set the projector to the previous menu. 12. RETURN Button( ) Returns to the correct mode when the surroundings are somewhat bright. 8. QUICK Button 10. Press the MUTE button...
... Screen. 4. INSTALL Button 7. STANDARD Button 8. RETURN Button( ) 12. VOL Button ( ) 14. MENU Button( ) Used to mute the sound temporarily. STANDARD Button Used to set the projector to the previous menu. 12. RETURN Button( ) Returns to the correct mode when the surroundings are somewhat bright. 8. QUICK Button 10. Press the MUTE button...

User Guide
Page 12
... 2) Frequency (Refer to see still images. 15. As with other visual display elements, the DMD Panel may be used in DLP Projectors consists of the product may include a few bad pixels. Samsung and the DMD Panel manufacturer have a rigid, bad pixel identification and limitation procedure in all areas. Class A is for office use...
... 2) Frequency (Refer to see still images. 15. As with other visual display elements, the DMD Panel may be used in DLP Projectors consists of the product may include a few bad pixels. Samsung and the DMD Panel manufacturer have a rigid, bad pixel identification and limitation procedure in all areas. Class A is for office use...

User Guide
Page 15
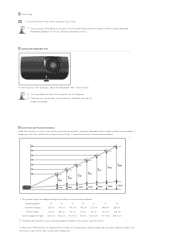
... clearly. Do not install the screen in bright surroundings, use curtains. When installing the screen in bright surroundings. Place the projector so that the beam from the projector is not vertically installed, the picture on the screen will not be a rectangle. Select Menu > Setup > Install > ...Rear-Floor To view the picture when installing the projector in the following locations: Front-Floor / Front-Ceiling / Rear-Floor / Rear-Ceiling. (To view the installation position settings) To view the picture...
... clearly. Do not install the screen in bright surroundings, use curtains. When installing the screen in bright surroundings. Place the projector so that the beam from the projector is not vertically installed, the picture on the screen will not be a rectangle. Select Menu > Setup > Install > ...Rear-Floor To view the picture when installing the projector in the following locations: Front-Floor / Front-Ceiling / Rear-Floor / Rear-Ceiling. (To view the installation position settings) To view the picture...
User Guide
Page 16
... Ring Focus the picture on the screen using the Focus Ring, or move the projector forward and backward. 1. If your P400 projector is the horizontal distance between the projector and the screen. 2. Leveling with Adjustable Feet For level placing of the projector, adjust the Adjustable Feet of the projection distance matching the screen diagonal length...
... Ring Focus the picture on the screen using the Focus Ring, or move the projector forward and backward. 1. If your P400 projector is the horizontal distance between the projector and the screen. 2. Leveling with Adjustable Feet For level placing of the projector, adjust the Adjustable Feet of the projection distance matching the screen diagonal length...

User Guide
Page 17
...button of . 5. Check the following items before connecting your PC to close the window. Click on [Settings] tab and set the by this projector. Press the [Advanced] button. The computer may restart automatically. 6. Click the right mouse button on the Windows desktop and click on [Properties...]. You do not have to the projector. Shut down the PC and connect to change setup. 3. tab will appear. 4. Another property window will appear. 2. Set up the PC...
...button of . 5. Check the following items before connecting your PC to close the window. Click on [Settings] tab and set the by this projector. Press the [Advanced] button. The computer may restart automatically. 6. Click the right mouse button on the Windows desktop and click on [Properties...]. You do not have to the projector. Shut down the PC and connect to change setup. 3. tab will appear. 4. Another property window will appear. 2. Set up the PC...
User Guide
Page 18
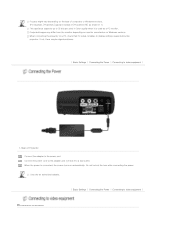
... outlet. Use only an authorized adapter. | Basic Settings | Connecting the Power | Connecting to display settings supported by this projector. Do not look at the lens while connecting the power. When connecting the projector to a PC, check that PC setup complies to video equipment | Connecting an AV Device Connect the power cord to... turns on monitor manufacture or Windows versions. Process might vary depending on the type of computers or Windows versions. (For example, [Properties] appears instead of Projector Connect the adapter to the power port.
... outlet. Use only an authorized adapter. | Basic Settings | Connecting the Power | Connecting to display settings supported by this projector. Do not look at the lens while connecting the power. When connecting the projector to a PC, check that PC setup complies to video equipment | Connecting an AV Device Connect the power cord to... turns on monitor manufacture or Windows versions. Process might vary depending on the type of computers or Windows versions. (For example, [Properties] appears instead of Projector Connect the adapter to the power port.

User Guide
Page 19
...that the DVD, VCR or camcorder is connected correctly. Connecting to the VIDEO (yellow) OUT port of the projector and the DVD, VCR, or camcorder. Connect the [ ] input port of the projector to the Audio (L), Audio (R) output ports of the external device, such as a DVD, VCR or ...the video cable. - When the connections are turned off before connecting cables. Using the Projector Turn on the projector, press the [SOURCE] button and select the image which denotes that the projector and the video equipment are all completed, connect both power cables of video equipment using an...
...that the DVD, VCR or camcorder is connected correctly. Connecting to the VIDEO (yellow) OUT port of the projector and the DVD, VCR, or camcorder. Connect the [ ] input port of the projector to the Audio (L), Audio (R) output ports of the external device, such as a DVD, VCR or ...the video cable. - When the connections are turned off before connecting cables. Using the Projector Turn on the projector, press the [SOURCE] button and select the image which denotes that the projector and the video equipment are all completed, connect both power cables of video equipment using an...

User Guide
Page 20
... connections are all completed, connect both power codes of the PC using an audio cable. Turn on the projector and press the [SOURCE] button to the input terminal [ ] on your PC. Using the Projector Turn on the PC and set the PC Environment when necessary. Adjust the screen.(Auto Adjustment) Connecting Headphones... and play and therefore, if you use Window XP you do not need to the speaker output ports of the projector. Connect the [VIDEO/PC AUDIO IN] input port of the projector to setup the driver on the back of the PC using a PC video cable. PC Mode is not available, check...
... connections are all completed, connect both power codes of the PC using an audio cable. Turn on the projector and press the [SOURCE] button to the input terminal [ ] on your PC. Using the Projector Turn on the PC and set the PC Environment when necessary. Adjust the screen.(Auto Adjustment) Connecting Headphones... and play and therefore, if you use Window XP you do not need to the speaker output ports of the projector. Connect the [VIDEO/PC AUDIO IN] input port of the projector to setup the driver on the back of the PC using a PC video cable. PC Mode is not available, check...

User Guide
Page 22
| Input | Picture | Setup | Option | Screen Adjustment Source List * Click the Play( )/Stop( ) button in the table below to the projector. 1) Video 2) PC | Input | Picture | Setup | Option | Edit Name 1) Video 2) PC You can select a device connected to the projector to display. Description Play/Stop You can edit the names of devices connected to view the video file.
| Input | Picture | Setup | Option | Screen Adjustment Source List * Click the Play( )/Stop( ) button in the table below to the projector. 1) Video 2) PC | Input | Picture | Setup | Option | Edit Name 1) Video 2) PC You can select a device connected to the projector to display. Description Play/Stop You can edit the names of devices connected to view the video file.
User Guide
Page 23
... Tint - This presents colors most scenes. Standard You can set this if you want to your surroundings are very bright. - Monitor Select this if your projector or change tint of the entire screen to view sports. You can comfortably view the projection screen if the surrounding is not supported. 7) Color Temperature...
... Tint - This presents colors most scenes. Standard You can set this if you want to your surroundings are very bright. - Monitor Select this if your projector or change tint of the entire screen to view sports. You can comfortably view the projection screen if the surrounding is not supported. 7) Color Temperature...

User Guide
Page 25
Test Pattern ▶ As the Vertical Keystone function compensates for screen distortions via software, we recommend installing the projector so that causes unstable screen quality, such as screen shaking. If the noise is distorted or not. 2) Screen Size : You can invert the ... adjust frequency and phase of the test patterns are distorted or tilted, you can refer to view the video file. Coarse Fine Generated by the projector itself. * Click the Play( )/Stop( ) button in the table below to picture format sizes such as 1.33 : 1 or 1.78 : 1. 3) Red : Red Screen, only ...
Test Pattern ▶ As the Vertical Keystone function compensates for screen distortions via software, we recommend installing the projector so that causes unstable screen quality, such as screen shaking. If the noise is distorted or not. 2) Screen Size : You can invert the ... adjust frequency and phase of the test patterns are distorted or tilted, you can refer to view the video file. Coarse Fine Generated by the projector itself. * Click the Play( )/Stop( ) button in the table below to picture format sizes such as 1.33 : 1 or 1.78 : 1. 3) Red : Red Screen, only ...
User Guide
Page 27
Menu Display Time Logo You can check external source signals, picture setup, PC picture adjustment. Blue screen Information The Blue screen function causes the screen to change to the Blue screen if there is no signal input from the external device connected to your projector. 1) Off 2) On You can set the display time of the menu. 1) 5 sec 2) 10 sec 3) 30 sec 4) 60 sec 5) 90 sec 6) 120 sec 7) Stay On If Logo mode is enabled, the Samsung logo is displayed when the projector is not displayed. If disabled, it is turned on.
Menu Display Time Logo You can check external source signals, picture setup, PC picture adjustment. Blue screen Information The Blue screen function causes the screen to change to the Blue screen if there is no signal input from the external device connected to your projector. 1) Off 2) On You can set the display time of the menu. 1) 5 sec 2) 10 sec 3) 30 sec 4) 60 sec 5) 90 sec 6) 120 sec 7) Stay On If Logo mode is enabled, the Samsung logo is displayed when the projector is not displayed. If disabled, it is turned on.
User Guide
Page 28
... distributor. z Adjust the focus. z The ceiling installation support is unavailable. z Check whether the LED indicator on the top of the projector. A gray-colored menu is sold separately. Images are properly connected to the screen. No external device screen is lit up. | Before... the connectors are not clear. z Check whether your PC, adjust the frequency of the recommended size. z Direct lighting of the projector is turned on screen. Contact your remote control and the product. Strange noise. z Because noise may affect the sensitivity and cause ...
... distributor. z Adjust the focus. z The ceiling installation support is unavailable. z Check whether the LED indicator on the top of the projector. A gray-colored menu is sold separately. Images are properly connected to the screen. No external device screen is lit up. | Before... the connectors are not clear. z Check whether your PC, adjust the frequency of the recommended size. z Direct lighting of the projector is turned on screen. Contact your remote control and the product. Strange noise. z Because noise may affect the sensitivity and cause ...

User Guide
Page 29
z As mentioned above, check the adjustment items such as the Brightness, Contrast and Color in the command screen of the Projector menu. z Be sure to their factory defaults, run from the menu. Check the connection cables again. correctly in the menu. z If you want to restore various settings to properly connect the external devices. Screen appears in black and white or odd color./ screen is too dark or bright. Only blue screen appears.
z As mentioned above, check the adjustment items such as the Brightness, Contrast and Color in the command screen of the Projector menu. z Be sure to their factory defaults, run from the menu. Check the connection cables again. correctly in the menu. z If you want to restore various settings to properly connect the external devices. Screen appears in black and white or odd color./ screen is too dark or bright. Only blue screen appears.
User Guide
Page 30
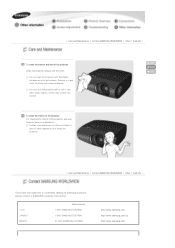
... surface. To clean the interior of the projector For cleaning the interior of the projector Clean the projector using a soft dry cloth. U.S.A CANADA MEXICO North America 1-800-SAMSUNG (7267864) 1-800-SAMSUNG (7267864) 01-800-SAMSUNG (7267864) http://www.samsung.com http://www.samsung.com/ca http://www.samsung.com | Care and Maintenance | Contact SAMSUNG WORLDWIDE | Other | Authority | To clean the...
... surface. To clean the interior of the projector For cleaning the interior of the projector Clean the projector using a soft dry cloth. U.S.A CANADA MEXICO North America 1-800-SAMSUNG (7267864) 1-800-SAMSUNG (7267864) 01-800-SAMSUNG (7267864) http://www.samsung.com http://www.samsung.com/ca http://www.samsung.com | Care and Maintenance | Contact SAMSUNG WORLDWIDE | Other | Authority | To clean the...

User Guide
Page 33
...Picture A picture projected by the American National Standards Institute. ANSI Abbreviations of the American National Standards Institute ANSI Lumen Unit of brightness as defined by the projector onto the screen. If the setting does not match the input signal, the dark screen is a simplified... quality. You can clearly view dark visuals. This value is used when vertical distortion of the picture. | Care and Maintenance | Contact SAMSUNG WORLDWIDE | Other | Authority | Glossary Gamma Mode Gamma Mode compensates the video signal produced for analog display devices such as a CRT (Cathode...
...Picture A picture projected by the American National Standards Institute. ANSI Abbreviations of the American National Standards Institute ANSI Lumen Unit of brightness as defined by the projector onto the screen. If the setting does not match the input signal, the dark screen is a simplified... quality. You can clearly view dark visuals. This value is used when vertical distortion of the picture. | Care and Maintenance | Contact SAMSUNG WORLDWIDE | Other | Authority | Glossary Gamma Mode Gamma Mode compensates the video signal produced for analog display devices such as a CRT (Cathode...
User Guide
Page 34
...screen into 9 rectangles and measure the average brightness of each mirror represents a pixel. The SVGA (800*600) projector provides backwards compatibility for all modes) Hz (kHz, MHz) Hertz (Kilohertz, Megahertz). DVD (Digital Versatile Disc...) Digital media developed to transmit and receive the color TV broadcasting. DLP (Digital Light Processing) DLP is used to represent the frequency of a PC with a VCR, Laser disk or CD-ROM... that of the edges, ANSI Lumen provides a more precise measure of resolution. XGA Extended Graphics Adapter.
...screen into 9 rectangles and measure the average brightness of each mirror represents a pixel. The SVGA (800*600) projector provides backwards compatibility for all modes) Hz (kHz, MHz) Hertz (Kilohertz, Megahertz). DVD (Digital Versatile Disc...) Digital media developed to transmit and receive the color TV broadcasting. DLP (Digital Light Processing) DLP is used to represent the frequency of a PC with a VCR, Laser disk or CD-ROM... that of the edges, ANSI Lumen provides a more precise measure of resolution. XGA Extended Graphics Adapter.


