

Quick Guide (easy Manual) (ver.1.0) (English)
Page 1
... PANEL 6 TEMPERATURE CONTROL 7 ICE and COLD WATER DISPENSER 7 SHELVES and BINS 8 FOOD STORAGE GUIDE 9 REMOVING THE FREEZER ACCESSORIES 11 REMOVING THE REFRIGERATOR ACCESSORIES 11 CLEANING THE ACCESSORIES 12 CHANGING THE INTERIOR LIGHT 12 WATER FILTER 13 DOORS ...13 INSTALLATION INSTRUCTIONS 14 INSTALLATION OF THE REFRIGERATOR 14 REMOVING THE REFRIGERATOR DOORS 15 REATTACHING THE REFRIGERATOR DOORS 16 ADJUSTING THE HEIGHT BETWEEN THE DOORS 21 CHECKING THE WATER DISPENSER LINE 23 INSTALLING THE WATER DISPENSER LINE 24 BEFORE YOU CALL FOR SERVICE 27 CONSUMER SUPPORT 29 WARRANTY...
... PANEL 6 TEMPERATURE CONTROL 7 ICE and COLD WATER DISPENSER 7 SHELVES and BINS 8 FOOD STORAGE GUIDE 9 REMOVING THE FREEZER ACCESSORIES 11 REMOVING THE REFRIGERATOR ACCESSORIES 11 CLEANING THE ACCESSORIES 12 CHANGING THE INTERIOR LIGHT 12 WATER FILTER 13 DOORS ...13 INSTALLATION INSTRUCTIONS 14 INSTALLATION OF THE REFRIGERATOR 14 REMOVING THE REFRIGERATOR DOORS 15 REATTACHING THE REFRIGERATOR DOORS 16 ADJUSTING THE HEIGHT BETWEEN THE DOORS 21 CHECKING THE WATER DISPENSER LINE 23 INSTALLING THE WATER DISPENSER LINE 24 BEFORE YOU CALL FOR SERVICE 27 CONSUMER SUPPORT 29 WARRANTY...

Quick Guide (easy Manual) (ver.1.0) (English)
Page 2
.... Do not directly spray water inside . Do not disassemble or repair the refrigerator by yourself. • You run the risk of electric shock. trapped inside or outside the refrigerator/freezer. • There is needed to prevent any power leakages or electric shocks caused by current leakage from the refrigerator. If it is necessary to use an extension cord, use gas pipes, telephone lines or other persons...
.... Do not directly spray water inside . Do not disassemble or repair the refrigerator by yourself. • You run the risk of electric shock. trapped inside or outside the refrigerator/freezer. • There is needed to prevent any power leakages or electric shocks caused by current leakage from the refrigerator. If it is necessary to use an extension cord, use gas pipes, telephone lines or other persons...

Quick Guide (easy Manual) (ver.1.0) (English)
Page 3
... moving parts. If the wall socket is disconnected from the power supply, you should be replaced by a qualified servicer. Before You Throw Away Your Old Refrigerator or Freezer: • Take off the doors. • Leave the shelves in . • Keep fingers out of electric shock or fire. CFCs are believed to fines and imprisonment under the sunlight. Service warranty section • Any changes...
... moving parts. If the wall socket is disconnected from the power supply, you should be replaced by a qualified servicer. Before You Throw Away Your Old Refrigerator or Freezer: • Take off the doors. • Leave the shelves in . • Keep fingers out of electric shock or fire. CFCs are believed to fines and imprisonment under the sunlight. Service warranty section • Any changes...

Quick Guide (easy Manual) (ver.1.0) (English)
Page 4
... an hour. Set the temperature control to the ice maker in an appropriate location with this manual) Once the refrigerator temperature is sufficiently low, you the door is open the doors. SETTING UP THE REFRIGERATOR Once you open . After starting the refrigerator, it takes a few hours to installation instructions in , the interior light should run smoothly. The freezer should get slightly chilled and the motor should come on every shelf level. When the refrigerator is plugged in this...
... an hour. Set the temperature control to the ice maker in an appropriate location with this manual) Once the refrigerator temperature is sufficiently low, you the door is open the doors. SETTING UP THE REFRIGERATOR Once you open . After starting the refrigerator, it takes a few hours to installation instructions in , the interior light should run smoothly. The freezer should get slightly chilled and the motor should come on every shelf level. When the refrigerator is plugged in this...

Quick Guide (easy Manual) (ver.1.0) (English)
Page 5
... between cool and coolest. CHILD LOCK BUTTON When this button to choose Cubed or Crushed ice or Ice off. FRIDGE TEMP. The water and ice dispenser are locked and can not be modified. BUTTON To set the freezer temperature, press the button repeatedly to change the set temperature in the freezer. FILTER RESET BUTTON When the water filter is pressed for 3 seconds. 5 POWER FREEZE BUTTON Speeds up the freezing process in sequence between cold and coldest. CONTROL PANEL OPERATING INSTRUCTIONS ICE TYPE BUTTON Use this button is replaced, reset the indicator...
... between cool and coolest. CHILD LOCK BUTTON When this button to choose Cubed or Crushed ice or Ice off. FRIDGE TEMP. The water and ice dispenser are locked and can not be modified. BUTTON To set the freezer temperature, press the button repeatedly to change the set temperature in the freezer. FILTER RESET BUTTON When the water filter is pressed for 3 seconds. 5 POWER FREEZE BUTTON Speeds up the freezing process in sequence between cold and coldest. CONTROL PANEL OPERATING INSTRUCTIONS ICE TYPE BUTTON Use this button is replaced, reset the indicator...

Quick Guide (easy Manual) (ver.1.0) (English)
Page 6
... to choose Cubed Ice, Crushed Ice or Ice Off to stop making ice. • An indicator will decrease for 3sec., all functions are also locked. 6 The water and ice dispenser are locked and can not be modified. Please turn off , press the filter reset buttons for 3 seconds. Power Freeze speeds up the freezing process. • If you use this function. If you select Power Freeze, interior temperature of the freezer will light to replace the water filter.
... to choose Cubed Ice, Crushed Ice or Ice Off to stop making ice. • An indicator will decrease for 3sec., all functions are also locked. 6 The water and ice dispenser are locked and can not be modified. Please turn off , press the filter reset buttons for 3 seconds. Power Freeze speeds up the freezing process. • If you use this function. If you select Power Freeze, interior temperature of the freezer will light to replace the water filter.

Quick Guide (easy Manual) (ver.1.0) (English)
Page 7
... water supply to the refrigerator. OPERATING INSTRUCTIONS TEMPERATURE CONTROL Cool Down Period • To ensure safe food storage, allow the refrigerator to operate with food. Temperature Adjustment • After 24 hours, adjust the controls as the freezer temperature, Power Freeze function and the number of water to flush out impurities in NOTE the dispenser opening. Push the ice dispenser lever with a cup. • If you have just installed the refrigerator, throw away the first six glassfuls of door openings...
... water supply to the refrigerator. OPERATING INSTRUCTIONS TEMPERATURE CONTROL Cool Down Period • To ensure safe food storage, allow the refrigerator to operate with food. Temperature Adjustment • After 24 hours, adjust the controls as the freezer temperature, Power Freeze function and the number of water to flush out impurities in NOTE the dispenser opening. Push the ice dispenser lever with a cup. • If you have just installed the refrigerator, throw away the first six glassfuls of door openings...

Quick Guide (easy Manual) (ver.1.0) (English)
Page 11
... handle, pulling the drawer out, and then lifting up . • Before removing the freezer and refrigerator accessories, please move the stored foods. It may cause an injury. REMOVING THE REFRIGERATOR ACCESSORIES Spill Proof Glass Shelf • Pull the shelf out as far as it goes. OPERATING INSTRUCTIONS REMOVING THE FREEZER ACCESSORIES Wire Shelf • Pull the shelf out as far as it will go. Door Bin • Hold the door bin...
... handle, pulling the drawer out, and then lifting up . • Before removing the freezer and refrigerator accessories, please move the stored foods. It may cause an injury. REMOVING THE REFRIGERATOR ACCESSORIES Spill Proof Glass Shelf • Pull the shelf out as far as it goes. OPERATING INSTRUCTIONS REMOVING THE FREEZER ACCESSORIES Wire Shelf • Pull the shelf out as far as it will go. Door Bin • Hold the door bin...

Quick Guide (easy Manual) (ver.1.0) (English)
Page 12
... the power supply. If you have difficulty in changing the light, contact your service center. Ice and water dispenser(on the cover. Exterior • Wipe the digital panel and display panel with a clean cloth. • The surface of refrigerator should be cleaned with a mild detergent and soft cloth, then wipe off the surface with water. Rear • Use a vacuum cleaner to clean the ice and water dispenser. After changing the bulb, reattach the light cover...
... the power supply. If you have difficulty in changing the light, contact your service center. Ice and water dispenser(on the cover. Exterior • Wipe the digital panel and display panel with a clean cloth. • The surface of refrigerator should be cleaned with a mild detergent and soft cloth, then wipe off the surface with water. Rear • Use a vacuum cleaner to clean the ice and water dispenser. After changing the bulb, reattach the light cover...

Quick Guide (easy Manual) (ver.1.0) (English)
Page 13
.... OPERATING INSTRUCTIONS CHANGING THE INTERIOR LIGHT INTERIOR LIGHT IN THE FREEZER. Use replacement bulb size only E17, maximum 30 watts. The light will only open . When opening and closing feature to orange. This tells you replace the cartridge when the light changes to remove the light cover (➀). Use a screwdriver to red or every six months. (see "Install the water filter" section for more water filter cartridges, call 1-800-SAMSUNG and ask for both the freezer and refrigerator are securely sealed. Replace the bulb with a new...
.... OPERATING INSTRUCTIONS CHANGING THE INTERIOR LIGHT INTERIOR LIGHT IN THE FREEZER. Use replacement bulb size only E17, maximum 30 watts. The light will only open . When opening and closing feature to orange. This tells you replace the cartridge when the light changes to remove the light cover (➀). Use a screwdriver to red or every six months. (see "Install the water filter" section for more water filter cartridges, call 1-800-SAMSUNG and ask for both the freezer and refrigerator are securely sealed. Replace the bulb with a new...

Quick Guide (easy Manual) (ver.1.0) (English)
Page 14
... internal cooling system may not work correctly. 1 inch 1/8 inch 1 inch NOTE • Allow clearance to determine whether the refrigerator can be disconnected. (If not, the water supply line can pass through it. This has the advantage of your entrance door to the right, left, back and top when installing the refrigerator. Ft) Width Dimension (inch) Case Height Depth with door without door with door without door...
... internal cooling system may not work correctly. 1 inch 1/8 inch 1 inch NOTE • Allow clearance to determine whether the refrigerator can be disconnected. (If not, the water supply line can pass through it. This has the advantage of your entrance door to the right, left, back and top when installing the refrigerator. Ft) Width Dimension (inch) Case Height Depth with door without door with door without door...
Quick Guide (easy Manual) (ver.1.0) (English)
Page 15
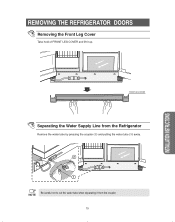
NOTE 15 INSTALLATION INSTRUCTIONS REMOVING THE REFRIGERATOR DOORS Removing the Front Leg Cover Take hold of FRONT LEG COVER and lift it from the Refrigerator Remove the water tube by pressing the coupler (➁) and pulling the water tube (➀) away. FRONT LEG COVER Separating the Water Supply Line from the coupler. Be careful not to cut the water tube when separating it up.
NOTE 15 INSTALLATION INSTRUCTIONS REMOVING THE REFRIGERATOR DOORS Removing the Front Leg Cover Take hold of FRONT LEG COVER and lift it from the Refrigerator Remove the water tube by pressing the coupler (➁) and pulling the water tube (➀) away. FRONT LEG COVER Separating the Water Supply Line from the coupler. Be careful not to cut the water tube when separating it up.

Quick Guide (easy Manual) (ver.1.0) (English)
Page 23
CHECKING THE WATER DISPENSER LINE 1) In order to the off position. - The refrigerator manufacNOTE turer recommends using a water supply kit containing copper tubing. Locate the nearest cold drinkig water line. - Cold Water line. 2. Shut Off Valve. After connecting the water supply with low water pressure (below 20psi), you should install a booster pump to compensate for the low pressure. 4) Ensure the water storage tank inside the refrigerator is filled. Water line installation kit is required. Shut off the main water supply line and turn on water supply and flush...
CHECKING THE WATER DISPENSER LINE 1) In order to the off position. - The refrigerator manufacNOTE turer recommends using a water supply kit containing copper tubing. Locate the nearest cold drinkig water line. - Cold Water line. 2. Shut Off Valve. After connecting the water supply with low water pressure (below 20psi), you should install a booster pump to compensate for the low pressure. 4) Ensure the water storage tank inside the refrigerator is filled. Water line installation kit is required. Shut off the main water supply line and turn on water supply and flush...

Quick Guide (easy Manual) (ver.1.0) (English)
Page 24
... install the icemaker tubing in March (for any electrical device (such as shown. ● Using Plastic Tubing - INSTALLATION OF THE WATER DISPENSER LINE Before You Install the water line • This water line installation is not warranted by rotating it counterclockwise. Refrigerator Ferrule (Purchased) Compression Nut (1/4") (Provided) NOTE Do not overtighten the compression nut. ● Using Copper Tubing - Call a qualified plumber to correct the problem before connecting the water line, make sure the"Ice Type" is set...
... install the icemaker tubing in March (for any electrical device (such as shown. ● Using Plastic Tubing - INSTALLATION OF THE WATER DISPENSER LINE Before You Install the water line • This water line installation is not warranted by rotating it counterclockwise. Refrigerator Ferrule (Purchased) Compression Nut (1/4") (Provided) NOTE Do not overtighten the compression nut. ● Using Copper Tubing - Call a qualified plumber to correct the problem before connecting the water line, make sure the"Ice Type" is set...

Quick Guide (easy Manual) (ver.1.0) (English)
Page 25
... indication line aligns with the lock position. • If you are replacing the cartridge, first remove the old one by slowly turning it in some households. 4) Open the refrigerator door and check if water leaks around the water filter. A small amount of water may drip down on the cover, locking the filter in position. Remove any residual matter inside the water supply line after installing filter. 1) Turn on the main water supply & shut-off valve of the refrigerator's water valve. This will clean...
... indication line aligns with the lock position. • If you are replacing the cartridge, first remove the old one by slowly turning it in some households. 4) Open the refrigerator door and check if water leaks around the water filter. A small amount of water may drip down on the cover, locking the filter in position. Remove any residual matter inside the water supply line after installing filter. 1) Turn on the main water supply & shut-off valve of the refrigerator's water valve. This will clean...

Quick Guide (easy Manual) (ver.1.0) (English)
Page 26
... the icemaker. 26 To replace : When replacing the drawer, be connected to a cold water line. 5) Start the Icemaker : Set the "Ice Type" to the "Cubed Ice" or "Crushed Ice" position. If ice is no water supply, turn off position. It may be quick-chilled in the freezer. This happens occasionally when a few batches of ice to allow the water line to clear. INSTALLATION OF THE WATER DISPENSER LINE Check the amount of water supplied to the ice tray. 1) To remove : Set the "Ice Type" switch...
... the icemaker. 26 To replace : When replacing the drawer, be connected to a cold water line. 5) Start the Icemaker : Set the "Ice Type" to the "Cubed Ice" or "Crushed Ice" position. If ice is no water supply, turn off position. It may be quick-chilled in the freezer. This happens occasionally when a few batches of ice to allow the water line to clear. INSTALLATION OF THE WATER DISPENSER LINE Check the amount of water supplied to the ice tray. 1) To remove : Set the "Ice Type" switch...

Quick Guide (easy Manual) (ver.1.0) (English)
Page 27
...-PIPE is properly connected. • Is the temperature control on the display panel. 27 Throw away any ice in the refrigerator is supplied • Is the water pipe connected and the shut-off valve open for efficient air circulation. INSTALLATION INSTRUCTIONS Problem Possible Causes What To Do The refrigerator does not work sufficiently or at all • Disconnected power plug • Check that the power plug is installed in the refrigerator and is normal and...
...-PIPE is properly connected. • Is the temperature control on the display panel. 27 Throw away any ice in the refrigerator is supplied • Is the water pipe connected and the shut-off valve open for efficient air circulation. INSTALLATION INSTRUCTIONS Problem Possible Causes What To Do The refrigerator does not work sufficiently or at all • Disconnected power plug • Check that the power plug is installed in the refrigerator and is normal and...

Quick Guide (easy Manual) (ver.1.0) (English)
Page 28
... ice through with fingertip pressure and discard remaining clumps. • Freezer may be too warm. Water dispenser has not been used for a long time. Refrigerator control setting is LOCKED. Temperature control not set cold enough. • Replace filter cartridge with new cartridge or with plug. • Check to chill. Water dispenser does not work (on some models) Water has poor taste/odor (on some models) Water is replenished. Water on kitchen floor or on . Water filter clogged. • See Care and cleaning...
... ice through with fingertip pressure and discard remaining clumps. • Freezer may be too warm. Water dispenser has not been used for a long time. Refrigerator control setting is LOCKED. Temperature control not set cold enough. • Replace filter cartridge with new cartridge or with plug. • Check to chill. Water dispenser does not work (on some models) Water has poor taste/odor (on some models) Water is replenished. Water on kitchen floor or on . Water filter clogged. • See Care and cleaning...

Quick Guide (easy Manual) (ver.1.0) (English)
Page 29
... and used in service problems; Non-SAMSUNG manufacturers, suppliers, publishers, and service providers may be performed by the product. use of incidental or consequential damages, so the above . To receive warranty service, the purchaser must be necessary to follow operating instructions, cleaning, maintenance and environmental instructions that product performance may provide their own warranties. incorrect electrical line voltage, fluctuations and surges; consumable items including filters and light bulbs. SAMSUNG...
... and used in service problems; Non-SAMSUNG manufacturers, suppliers, publishers, and service providers may be performed by the product. use of incidental or consequential damages, so the above . To receive warranty service, the purchaser must be necessary to follow operating instructions, cleaning, maintenance and environmental instructions that product performance may provide their own warranties. incorrect electrical line voltage, fluctuations and surges; consumable items including filters and light bulbs. SAMSUNG...

Quick Guide (easy Manual) (ver.1.0) (English)
Page 30
This manual maynot be reproduced in whole or in part in any questions or comments relating to Samsung products, please contact the SAMSUNG customer care center. Samsung Electronics America, Inc. 105 Challenger Road Ridgefield Park, NJ 07660-0511 1-800-SAMSUNG(1-800-726-7864) www.samsung.com All right reserved. If you have any form without written permission from the SAMSUNG ELECTRONICS Company
This manual maynot be reproduced in whole or in part in any questions or comments relating to Samsung products, please contact the SAMSUNG customer care center. Samsung Electronics America, Inc. 105 Challenger Road Ridgefield Park, NJ 07660-0511 1-800-SAMSUNG(1-800-726-7864) www.samsung.com All right reserved. If you have any form without written permission from the SAMSUNG ELECTRONICS Company


