

User Manual (ENGLISH)
Page 9
...;cran LCD (voir page 26) 11. Remote Sensor 8. LIGHT (PLAY/STILL) (see page 68) 2. TAPE EJECT (see page 54) 6. ENGLISH FRANÇAIS Getting to Know Your Camcorder Familiarisez-vous avec le caméscope Front View Vue avant 2. CUSTOM 12. Viseur électronique 8. EASY EASY fonctionne en mode Caméscope. 13. LENS 9. DATE/TIME (STOP) DATE/TIME works in CAMERA mode. (see page 42) STOP works in PLAYER mode. REC SEARCH (REW) REC SEARCH...
...;cran LCD (voir page 26) 11. Remote Sensor 8. LIGHT (PLAY/STILL) (see page 68) 2. TAPE EJECT (see page 54) 6. ENGLISH FRANÇAIS Getting to Know Your Camcorder Familiarisez-vous avec le caméscope Front View Vue avant 2. CUSTOM 12. Viseur électronique 8. EASY EASY fonctionne en mode Caméscope. 13. LENS 9. DATE/TIME (STOP) DATE/TIME works in CAMERA mode. (see page 42) STOP works in PLAYER mode. REC SEARCH (REW) REC SEARCH...

User Manual (ENGLISH)
Page 43
.... Appuyez sur ENTER. Press ENTER after setting the minute and the clock setting screen will then be reset will blink. Notes: I Open the LCD Screen and adjust it means the installed LITHIUM BATTERY is discharged. (see page 18) I If your recording. I Pour enregistrer la date et l'heure, appuyez deux fois sur la touche DATE/TIME. 4. Press the START/STOP button to record the DATE/TIME on à obtenir la meilleure...
.... Appuyez sur ENTER. Press ENTER after setting the minute and the clock setting screen will then be reset will blink. Notes: I Open the LCD Screen and adjust it means the installed LITHIUM BATTERY is discharged. (see page 18) I If your recording. I Pour enregistrer la date et l'heure, appuyez deux fois sur la touche DATE/TIME. 4. Press the START/STOP button to record the DATE/TIME on à obtenir la meilleure...

User Manual (ENGLISH)
Page 53
... a compatible color system. (see a tape; Connecting to a TV which has no Audio and Video input jack ✤ You can connect your camcorder to a TV which has an Audio and Video input jack ✤ Use the Audio/Video cable supplied with TV ✤ It is practical to view a tape using the LCD Screen in PLAYER mode only. ✤ There are two ways to see page 63) Connecting to a TV through a VCR. I The yellow plug: Video I blanc: audio (gauche...
... a compatible color system. (see a tape; Connecting to a TV which has no Audio and Video input jack ✤ You can connect your camcorder to a TV which has an Audio and Video input jack ✤ Use the Audio/Video cable supplied with TV ✤ It is practical to view a tape using the LCD Screen in PLAYER mode only. ✤ There are two ways to see page 63) Connecting to a TV through a VCR. I The yellow plug: Video I blanc: audio (gauche...

User Manual (ENGLISH)
Page 60
...ône USB Media 2.0 sur le bureau Windows. C:\Programfiles\Samsung\ USB Media 2.0 I Le guide de l'utilisateur de USB Media 2.0 est inclus dans le CD d'accompagnement sous le format Portable Document Format (PDF) de Adobe. Le PC détecte un nouveau matériel et installe automatiquement un pilote. 7. PC finds the new hardware and installs the driver automatically. 6. 7. The user's manual can be viewed using Acrobat Reader software, which is...
...ône USB Media 2.0 sur le bureau Windows. C:\Programfiles\Samsung\ USB Media 2.0 I Le guide de l'utilisateur de USB Media 2.0 est inclus dans le CD d'accompagnement sous le format Portable Document Format (PDF) de Adobe. Le PC détecte un nouveau matériel et installe automatiquement un pilote. 7. PC finds the new hardware and installs the driver automatically. 6. 7. The user's manual can be viewed using Acrobat Reader software, which is...

User Manual (ENGLISH)
Page 45
... power switch en modo D/TITLE COLOR ..WHITE CAMERA. Press ENTER. Notes: I Then, the title list will return to select the appropriate language. C.RESET 0:00:00 DEMO OFF I El titulo se mueve horizontalmente de derecha a izquierda 10 segundos tras activarlo. I You may select languages among OFF, AUTO-10S, and CONTINUE. 5. Notas: I Abra el LCD Screen y ajustelo a su EXIT: MENU gusto. 2. I Open the LCD Screen and adjust it to CAMERA mode...
... power switch en modo D/TITLE COLOR ..WHITE CAMERA. Press ENTER. Notes: I Then, the title list will return to select the appropriate language. C.RESET 0:00:00 DEMO OFF I El titulo se mueve horizontalmente de derecha a izquierda 10 segundos tras activarlo. I You may select languages among OFF, AUTO-10S, and CONTINUE. 5. Notas: I Abra el LCD Screen y ajustelo a su EXIT: MENU gusto. 2. I Open the LCD Screen and adjust it to CAMERA mode...

User Manual (ENGLISH)
Page 3
...810-20) GROUNDING CONDUCTORS (NEC SECTION 810-21) GROUND CLAMPS POWER SERVICE GROUNDING ELECTRODE SYSTEM (NEC ART 250, PART H) NEC NATIONAL ELECTRICAL CODE If the plug still fails to fit, contact your CAMCORDER on a bed, sofa, rug, or other similar surface: ...type of antenna-discharge unit, connection to the operating instructions. 11. Notices and Safety Instructions ENGLISH 9. VENTILATION: Slots and openings in wire to an antenna discharge unit, size of grounding to conductors, location of power supply at your home, consult your outlet. POWER-CORD PROTECTION: Power-supply cords ...
...810-20) GROUNDING CONDUCTORS (NEC SECTION 810-21) GROUND CLAMPS POWER SERVICE GROUNDING ELECTRODE SYSTEM (NEC ART 250, PART H) NEC NATIONAL ELECTRICAL CODE If the plug still fails to fit, contact your CAMCORDER on a bed, sofa, rug, or other similar surface: ...type of antenna-discharge unit, connection to the operating instructions. 11. Notices and Safety Instructions ENGLISH 9. VENTILATION: Slots and openings in wire to an antenna discharge unit, size of grounding to conductors, location of power supply at your home, consult your outlet. POWER-CORD PROTECTION: Power-supply cords ...
User Manual (ENGLISH)
Page 6
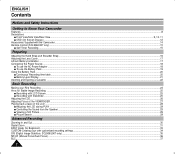
... Lens Cover ...17 Lithium Battery Installation ...17 Connecting the Power Source...18 s To use the AC Power Adapter ...18 s To use the Battery Pack ...19 Using the Battery Pack...20 s Continuous Recording time table ...20 s Battery Level Display...21 Inserting and Ejecting a Cassette ...22 Basic Recording Making your First Recording ...23 Hints for Stable Image Recording ...25 s Recording with LCD Screen...25 s Recording with Viewfinder...25 Adjusting the LCD...26 Adjusting Focus of the VIEWFINDER ...27 Playing back a tape on the LCD ...28 s Adjusting the LCD...
... Lens Cover ...17 Lithium Battery Installation ...17 Connecting the Power Source...18 s To use the AC Power Adapter ...18 s To use the Battery Pack ...19 Using the Battery Pack...20 s Continuous Recording time table ...20 s Battery Level Display...21 Inserting and Ejecting a Cassette ...22 Basic Recording Making your First Recording ...23 Hints for Stable Image Recording ...25 s Recording with LCD Screen...25 s Recording with Viewfinder...25 Adjusting the LCD...26 Adjusting Focus of the VIEWFINDER ...27 Playing back a tape on the LCD ...28 s Adjusting the LCD...

User Manual (ENGLISH)
Page 10
..., the date/time indicator flashes about 5 seconds when you are not operating it. ✤ When your camcorder is in CAMERA mode, if it . ✤ When the battery reaches the end of its life, please contact your local dealer. When this occurs, replace the lithium battery with as chemical waste. The batteries have to use the viewfinder instead of the LCD when recording for more battery power...
..., the date/time indicator flashes about 5 seconds when you are not operating it. ✤ When your camcorder is in CAMERA mode, if it . ✤ When the battery reaches the end of its life, please contact your local dealer. When this occurs, replace the lithium battery with as chemical waste. The batteries have to use the viewfinder instead of the LCD when recording for more battery power...

User Manual (ENGLISH)
Page 13
...8. VIDEO LIGHT (SCL906/L907 only) 9 LIGHT works in CAMERA mode. (SCL906/L907 only) The built-in CAMERA mode. 12. CUSTOM 12. CUSTOM CUSTOM works in video light turns on when LIGHT is pressed. REC SEARCH (REW) 3. Lens (see page 54) PLAY/STILL works in CAMERA mode. 13. LIGHT (PLAY/STILL) (see page 68) 2. It enables recording in CAMERA mode. 9. MIC MIC works in low-light conditions. 4. Getting to Know Your Camcorder Front View ENGLISH 2. LIGHT (PLAY/STILL) 6. TAPE EJECT 13. VIDEO LIGHT 1. Remote Sensor 8. MIC 1. REC SEARCH (FF) 5. DATE/TIME (STOP...
...8. VIDEO LIGHT (SCL906/L907 only) 9 LIGHT works in CAMERA mode. (SCL906/L907 only) The built-in CAMERA mode. 12. CUSTOM 12. CUSTOM CUSTOM works in video light turns on when LIGHT is pressed. REC SEARCH (REW) 3. Lens (see page 54) PLAY/STILL works in CAMERA mode. 13. LIGHT (PLAY/STILL) (see page 68) 2. It enables recording in CAMERA mode. 9. MIC MIC works in low-light conditions. 4. Getting to Know Your Camcorder Front View ENGLISH 2. LIGHT (PLAY/STILL) 6. TAPE EJECT 13. VIDEO LIGHT 1. Remote Sensor 8. MIC 1. REC SEARCH (FF) 5. DATE/TIME (STOP...

User Manual (ENGLISH)
Page 16
... 36) Indicates manual focus is on /off. ✤ The TITLE, DATE/TIME, EASY and CUSTOM functions can turn the OSD on/off . ✤ The OSD is activated g. Auto Focus is activated. e. f. Program AE (see page 21) Indicates the power left in the battery. ( ) d. l VOLUME w 12 Battery level (see page 38) Indicates Program AE mode is displayed in PLAYER mode r q c Hi8 PLAY p 0:00:25 o Z.RTN u TITLE SEPIA v TAPE! i. DIS...
... 36) Indicates manual focus is on /off. ✤ The TITLE, DATE/TIME, EASY and CUSTOM functions can turn the OSD on/off . ✤ The OSD is activated g. Auto Focus is activated. e. f. Program AE (see page 21) Indicates the power left in the battery. ( ) d. l VOLUME w 12 Battery level (see page 38) Indicates Program AE mode is displayed in PLAYER mode r q c Hi8 PLAY p 0:00:25 o Z.RTN u TITLE SEPIA v TAPE! i. DIS...

User Manual (ENGLISH)
Page 38
... s The CUSTOM function only operates in the camera (providing a good lithium battery has been installed). MENU LCD ADJUST DIS OFF D.ZOOM OFF WHITE BAL ..........AUTO DISPLAY ON LANGUAGE..........ENGLISH WL REMOCON ....ON NEXT: MENU MENU CUSTOM SET CLOCK SET TITLE SET TITLE OFF D/TITLE COLOR..WHITE C.RESET 0:00:00 DEMO OFF Example: When the CUSTOM SET is highlighted. 4. To switch Custom off, press the CUSTOM button once. EXIT: MENU CUSTOM SETTING DIS ON D.ZOOM ON WHITE BAL ........OUTDOOR DATE/TIME ..........DATE/TIME TITLE CONTINUE...
... s The CUSTOM function only operates in the camera (providing a good lithium battery has been installed). MENU LCD ADJUST DIS OFF D.ZOOM OFF WHITE BAL ..........AUTO DISPLAY ON LANGUAGE..........ENGLISH WL REMOCON ....ON NEXT: MENU MENU CUSTOM SET CLOCK SET TITLE SET TITLE OFF D/TITLE COLOR..WHITE C.RESET 0:00:00 DEMO OFF Example: When the CUSTOM SET is highlighted. 4. To switch Custom off, press the CUSTOM button once. EXIT: MENU CUSTOM SETTING DIS ON D.ZOOM ON WHITE BAL ........OUTDOOR DATE/TIME ..........DATE/TIME TITLE CONTINUE...
User Manual (ENGLISH)
Page 47
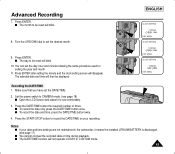
...: MENU Recording the DATE/TIME 1. Press the DATE/TIME button the required number of times. Press ENTER. Set the power switch to see page 17) s You cannot conceal the recorded date or time during playback. s To record the date and time, press the DATE/TIME button twice. 4. You can set the DATE/TIME. 2. Notes: s If your recording. s The day to be reset will not operate in the camcorder, it to CAMERA mode. (see page 18) s Open the LCD Screen and adjust it means the installed LITHIUM BATTERY...
...: MENU Recording the DATE/TIME 1. Press the DATE/TIME button the required number of times. Press ENTER. Set the power switch to see page 17) s You cannot conceal the recorded date or time during playback. s To record the date and time, press the DATE/TIME button twice. 4. You can set the DATE/TIME. 2. Notes: s If your recording. s The day to be reset will not operate in the camcorder, it to CAMERA mode. (see page 18) s Open the LCD Screen and adjust it means the installed LITHIUM BATTERY...
User Manual (ENGLISH)
Page 49
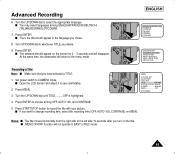
... will disappear. Set power switch to see comfortably. 2. s The selected title will appear on the screen for 2 ~ 3 seconds and will appear in EASY or REC mode. 45 At the same time, the camcorder will not operate in the language you chose. 8. s Open the LCD Screen and adjust it to CAMERA mode. s MENU ON/OFF function will return to change recording time, select title recording time (OFF, AUTO-10S, CONTINUE) on the title. ENGLISH ENGLISH [HAVING FUN...
... will disappear. Set power switch to see comfortably. 2. s The selected title will appear on the screen for 2 ~ 3 seconds and will appear in EASY or REC mode. 45 At the same time, the camcorder will not operate in the language you chose. 8. s Open the LCD Screen and adjust it to CAMERA mode. s MENU ON/OFF function will return to change recording time, select title recording time (OFF, AUTO-10S, CONTINUE) on the title. ENGLISH ENGLISH [HAVING FUN...
User Manual (ENGLISH)
Page 57
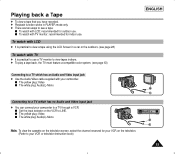
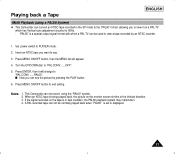
.... (Refer to your camcorder to a TV through a VCR. s The yellow plug: Video s The white plug: Audio(L)-Mono ENGLISH Connecting to a TV which has an Audio and Video input jack ✤ Use the Audio/Video cable supplied with your VCR on the VCR to LINE. s To watch with TV monitor: recommended for outdoor use. s To watch with LCD: recommended for indoor use. Playing back a Tape ✤ To view a tape that you have recorded. ✤ Playback function works in a car or...
.... (Refer to your camcorder to a TV through a VCR. s The yellow plug: Video s The white plug: Audio(L)-Mono ENGLISH Connecting to a TV which has an Audio and Video input jack ✤ Use the Audio/Video cable supplied with your VCR on the VCR to LINE. s To watch with TV monitor: recommended for outdoor use. s To watch with LCD: recommended for indoor use. Playing back a Tape ✤ To view a tape that you have recorded. ✤ Playback function works in a car or...
User Manual (ENGLISH)
Page 61
... MENU list will change to view a tape recorded by pressing the PLAY button. 6. s Now you can not be used to "PAL CONV. ......PAL60". "PAL60" is in the Vertical direction. 3. Press MENU ON/OFF button to "PAL CONV. ......OFF". 5. If the signal recorded on the monitor screen shrinks in bad condition, the PAL60 playback system may malfunction. 4. Set power switch to see the picture by an NTSC recorder. 1. This Camcorder can not record using...
... MENU list will change to view a tape recorded by pressing the PLAY button. 6. s Now you can not be used to "PAL CONV. ......PAL60". "PAL60" is in the Vertical direction. 3. Press MENU ON/OFF button to "PAL CONV. ......OFF". 5. If the signal recorded on the monitor screen shrinks in bad condition, the PAL60 playback system may malfunction. 4. Set power switch to see the picture by an NTSC recorder. 1. This Camcorder can not record using...

User Manual (ENGLISH)
Page 69
.../Stop does not operate while shooting. Troubleshooting Checking ✤ If you run into any x A mechanical fault might have occurred. (see page 64) The DATE/TIME indicator flashes more than 2 times when you to solve the problem, take a note of: s The model and serial number marked on the cassette. (see page 17) The playback picture is poor. s Your warranty, if applicable. ✤ Then contact your nearest Samsung authorized service...
.../Stop does not operate while shooting. Troubleshooting Checking ✤ If you run into any x A mechanical fault might have occurred. (see page 64) The DATE/TIME indicator flashes more than 2 times when you to solve the problem, take a note of: s The model and serial number marked on the cassette. (see page 17) The playback picture is poor. s Your warranty, if applicable. ✤ Then contact your nearest Samsung authorized service...

User Manual (ENGLISH)
Page 72
.... Illumination LCD Screen Size/Picture cell Method Connectors Video out Audio out External mic General Power requirement Power consumption *Recording, LCD ON Built-in mic Built-in speaker Operating temperature Dimension (WxHxD) Weight SCL901/L906/L907 Video: 2 rotary heads Helical scanning FM Audio: FM monaural system NTSC color, EIA standard Hi8 or 8mm SP: 14.345 mm/sec Record: SP only Playback: SP only P6-120: 120 min. CCD (Charge Coupled Device) 22x 3.6~79...
.... Illumination LCD Screen Size/Picture cell Method Connectors Video out Audio out External mic General Power requirement Power consumption *Recording, LCD ON Built-in mic Built-in speaker Operating temperature Dimension (WxHxD) Weight SCL901/L906/L907 Video: 2 rotary heads Helical scanning FM Audio: FM monaural system NTSC color, EIA standard Hi8 or 8mm SP: 14.345 mm/sec Record: SP only Playback: SP only P6-120: 120 min. CCD (Charge Coupled Device) 22x 3.6~79...
User Manual (user Manual) (English, French)
Page 53
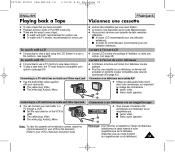
... une cassette ✤ To view a tape that you have recorded. ✤ Playback function works in a car or the outdoors. (see page 28) To watch with TV ✤ It is practical to view a tape using the LCD Screen in PLAYER mode only. ✤ There are two ways to see page 63) Connecting to a TV which has no Audio and Video input jack ✤ You can connect your VCR or television instruction book...
... une cassette ✤ To view a tape that you have recorded. ✤ Playback function works in a car or the outdoors. (see page 28) To watch with TV ✤ It is practical to view a tape using the LCD Screen in PLAYER mode only. ✤ There are two ways to see page 63) Connecting to a TV which has no Audio and Video input jack ✤ You can connect your VCR or television instruction book...

User Manual (user Manual) (ver.1.0) (English, Spanish)
Page 3
...) GROUND CLAMPS POWER SERVICE GROUNDING ELECTRODE SYSTEM (NEC ART 250, PART H) NEC NATIONAL ELECTRICAL CODE ENGLISH Notices and Safety Instructions 9. POWER SOURCES: The CAMCORDER should not be operated from the type of the National Electrical Code, ANSI/NFPA No. 70-1984, provides information with either a polarized 2-wire AC line plug (a plug having one blade wider than the other) or a 3-wire grounding type plug, a plug having a third...
...) GROUND CLAMPS POWER SERVICE GROUNDING ELECTRODE SYSTEM (NEC ART 250, PART H) NEC NATIONAL ELECTRICAL CODE ENGLISH Notices and Safety Instructions 9. POWER SOURCES: The CAMCORDER should not be operated from the type of the National Electrical Code, ANSI/NFPA No. 70-1984, provides information with either a polarized 2-wire AC line plug (a plug having one blade wider than the other) or a 3-wire grounding type plug, a plug having a third...

User Manual (user Manual) (ver.1.0) (English, Spanish)
Page 49
... MENU. La funcion MENU ON/OFF no funcionara en modos EASY o REC. 45 s The selected title will not operate in the language you desire. 9. OFF se subraye. 4. Grabar un titulo MENU CUSTOM SET CLOCK SET TITLE SET TITLE CONTINUE D/TITLE COLOR ..WHITE C.RESET 0:00:00 DEMO OFF Nota: s Asegurese de haber seleccionado TITLE. 1. Press ENTER to change recording time, select title recording time (OFF, AUTO-10S, CONTINUE) on the screen...
... MENU. La funcion MENU ON/OFF no funcionara en modos EASY o REC. 45 s The selected title will not operate in the language you desire. 9. OFF se subraye. 4. Grabar un titulo MENU CUSTOM SET CLOCK SET TITLE SET TITLE CONTINUE D/TITLE COLOR ..WHITE C.RESET 0:00:00 DEMO OFF Nota: s Asegurese de haber seleccionado TITLE. 1. Press ENTER to change recording time, select title recording time (OFF, AUTO-10S, CONTINUE) on the screen...


