

Owners Instructions
Page 20
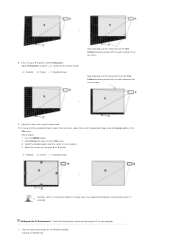
...picture (which is nearest to '0' and place the zoom knob right in the middle of the Test Pattern 6. In this case, adjust the projector's angle so that of the Test Pattern. (Setup → Test Pattern → Crosshatch) 5. C : Projected image Set the values of the H-Keystone and... the V-Keystone to the projector) meets that the entire screen area can be displayed. Screen Crosshatch Test Pattern ① A virtual vertical line made on the projector's installation height. The V-Keystone menu will be covered.) 7. Adjust the location of ...
...picture (which is nearest to '0' and place the zoom knob right in the middle of the Test Pattern 6. In this case, adjust the projector's angle so that of the Test Pattern. (Setup → Test Pattern → Crosshatch) 5. C : Projected image Set the values of the H-Keystone and... the V-Keystone to the projector) meets that the entire screen area can be displayed. Screen Crosshatch Test Pattern ① A virtual vertical line made on the projector's installation height. The V-Keystone menu will be covered.) 7. Adjust the location of ...
Owners Instructions
Page 21
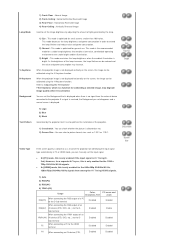
... select an area to select H-Keystone. Setting up the PC Environment - C : Projected image Keep adjusting until the horizontal line on the Test Pattern becomes parallel with the outer vertical line on to adjust: 1. How to the Size menu. 3. C : Projected image → Keystone..., which is a feature to your projector. 1. Keep adjusting until the vertical line on the Test Pattern becomes parallel with the outer horizontal line on the screen. → 9. → 8. button on [Properties]. Select Picture to move on the...
... select an area to select H-Keystone. Setting up the PC Environment - C : Projected image Keep adjusting until the horizontal line on the Test Pattern becomes parallel with the outer vertical line on to adjust: 1. How to the Size menu. 3. C : Projected image → Keystone..., which is a feature to your projector. 1. Keep adjusting until the vertical line on the Test Pattern becomes parallel with the outer horizontal line on the screen. → 9. → 8. button on [Properties]. Select Picture to move on the...
Owners Instructions
Page 33
...operating environment even under bright ambient illumination. 3) Bright : This mode maximizes the lamp brightness when the ambient illumination is bright. Eco Normal Bright Test Pattern 1) Logo 2) Blue 3) Black Generated by the lamp. Refer to 'Adjusting the H-Keystone' ▶The Keystone, which is a function...screen, the image can be calibrated using the H-Keystone function. This mode decreases the lamp brightness and power consumption in PC or HDMI mode, you set disappears and a normal screen is displayed. V-Keystone H-Keystone Background 1) Eco : This mode is optimized for ...
...operating environment even under bright ambient illumination. 3) Bright : This mode maximizes the lamp brightness when the ambient illumination is bright. Eco Normal Bright Test Pattern 1) Logo 2) Blue 3) Black Generated by the lamp. Refer to 'Adjusting the H-Keystone' ▶The Keystone, which is a function...screen, the image can be calibrated using the H-Keystone function. This mode decreases the lamp brightness and power consumption in PC or HDMI mode, you set disappears and a normal screen is displayed. V-Keystone H-Keystone Background 1) Eco : This mode is optimized for ...