
Quick Guide Ver.1.0 (English)
Page 8
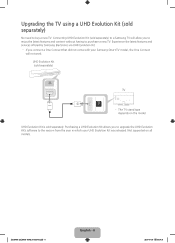
... via UHD Evolution Kit. ‐‐ If you to upgrade the UHD Evolution Kit's software to the version from the year in which your Samsung Smart TV model, the One Connect will allow you to enjoy the latest features and content without having to buy a new TV. Connecting UHD ...Evolution Kit (sold separately. Upgrading the TV using a UHD Evolution Kit (sold separately) TV ‐‐ The TV stand type depends on all models. [HU6900-ZA]BN68-06501A-01ENG.indb 8 English - 8 2014-07-10 10:19:33 UHD Evolution Kit (sold separately) No need...
... via UHD Evolution Kit. ‐‐ If you to upgrade the UHD Evolution Kit's software to the version from the year in which your Samsung Smart TV model, the One Connect will allow you to enjoy the latest features and content without having to buy a new TV. Connecting UHD ...Evolution Kit (sold separately. Upgrading the TV using a UHD Evolution Kit (sold separately) TV ‐‐ The TV stand type depends on all models. [HU6900-ZA]BN68-06501A-01ENG.indb 8 English - 8 2014-07-10 10:19:33 UHD Evolution Kit (sold separately) No need...
Quick Guide Ver.1.0 (English)
Page 22
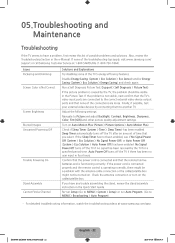
... connecting them to MENU > Broadcasting > Auto Program). ‐‐ For detailed troubleshooting information, watch the troubleshooting videos at 1-800-SAMSUNG (1-800-726-7864). If the Sleep Timer has not been enabled, see if No Signal Power Off (System > Eco Solution ...> Energy Saving) and check again. 05.Troubleshooting and Maintenance Troubleshooting If the TV seems to have any trouble assembling the stand, review the stand assembly instruction in the Quick Start Guide. Adjust the following settings: Navigate to Picture and adjust Backlight, Contrast, Brightness, Sharpness...
... connecting them to MENU > Broadcasting > Auto Program). ‐‐ For detailed troubleshooting information, watch the troubleshooting videos at 1-800-SAMSUNG (1-800-726-7864). If the Sleep Timer has not been enabled, see if No Signal Power Off (System > Eco Solution ...> Energy Saving) and check again. 05.Troubleshooting and Maintenance Troubleshooting If the TV seems to have any trouble assembling the stand, review the stand assembly instruction in the Quick Start Guide. Adjust the following settings: Navigate to Picture and adjust Backlight, Contrast, Brightness, Sharpness...
Quick Guide Ver.1.0 (English)
Page 29
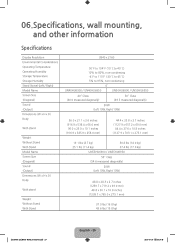
... Resolution Environmental Considerations Operating Temperature Operating Humidity Storage Temperature Storage Humidity Stand Swivel (Left / Right) Model Name Screen Size (Diagonal) Sound (Output) Dimensions (W x H x D) Body With stand Weight Without Stand With Stand Model Name Screen Size (Diagonal) Sound (Output) Dimensions (W x H x D) Body With stand Weight Without Stand With Stand 3840 x 2160 50°F to 104°F (10°C to...
... Resolution Environmental Considerations Operating Temperature Operating Humidity Storage Temperature Storage Humidity Stand Swivel (Left / Right) Model Name Screen Size (Diagonal) Sound (Output) Dimensions (W x H x D) Body With stand Weight Without Stand With Stand Model Name Screen Size (Diagonal) Sound (Output) Dimensions (W x H x D) Body With stand Weight Without Stand With Stand 3840 x 2160 50°F to 104°F (10°C to...
Quick Guide Ver.1.0 (English)
Page 33
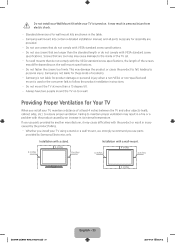
...standard length or do not comply with the product caused by the product falling. ‐‐ Whether you install your TV using a stand or a wall-mount, we strongly recommend you install your TV is used or the consumer fails to follow the product installation instructions. ...accidents. ‐‐ Samsung is not liable for wall mount kits are shown in its internal temperature. Providing Proper Ventilation for assembly are too long may differ depending on the wall mount specifications. ‐‐ Do not fasten the screws too firmly. Installation with a stand. 4 inches 4 ...
...standard length or do not comply with the product caused by the product falling. ‐‐ Whether you install your TV using a stand or a wall-mount, we strongly recommend you install your TV is used or the consumer fails to follow the product installation instructions. ...accidents. ‐‐ Samsung is not liable for wall mount kits are shown in its internal temperature. Providing Proper Ventilation for assembly are too long may differ depending on the wall mount specifications. ‐‐ Do not fasten the screws too firmly. Installation with a stand. 4 inches 4 ...
Installation Guide Ver.1.0 (English)
Page 1
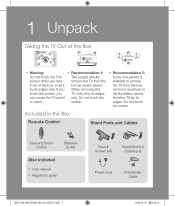
... TV SEARCH KEYPAD SOURCE VOL VOICE CH RETURN EXIT SMART HUB GUIDE CH.LIST 3D MTS CC P.SIZE MENU INFO Stand Parts and Cables Samsung Smart Control Batteries (2 AA) Base & Screws (x6) Stand Mount & Screws (x4) Also included •• User manual •• Regulatory guide Power Cord IR Extender Cable [HU7000-QSG...
... TV SEARCH KEYPAD SOURCE VOL VOICE CH RETURN EXIT SMART HUB GUIDE CH.LIST 3D MTS CC P.SIZE MENU INFO Stand Parts and Cables Samsung Smart Control Batteries (2 AA) Base & Screws (x6) Stand Mount & Screws (x4) Also included •• User manual •• Regulatory guide Power Cord IR Extender Cable [HU7000-QSG...
Installation Guide Ver.1.0 (English)
Page 2
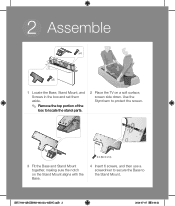
Use the Styrofoam to the Stand Mount. [HU7000-QSG]BN68-06162A-01ENG.indb 2 2014-07-07 3:00:21 2 Assemble x4 x6 1 Locate the Base, Stand Mount, and Screws in the box and set them aside. ✎✎ Remove the top portion of the box to locate the stand parts. 2 Place the TV on the Stand Mount aligns with the Base. 4 Insert 6 screws, and then use a screwdriver to secure the Base to protect the screen. X 6 (M4 X L12) 3 Fit the Base and Stand Mount together, making sure the notch on a soft surface, screen side down.
Use the Styrofoam to the Stand Mount. [HU7000-QSG]BN68-06162A-01ENG.indb 2 2014-07-07 3:00:21 2 Assemble x4 x6 1 Locate the Base, Stand Mount, and Screws in the box and set them aside. ✎✎ Remove the top portion of the box to locate the stand parts. 2 Place the TV on the Stand Mount aligns with the Base. 4 Insert 6 screws, and then use a screwdriver to secure the Base to protect the screen. X 6 (M4 X L12) 3 Fit the Base and Stand Mount together, making sure the notch on a soft surface, screen side down.
Installation Guide Ver.1.0 (English)
Page 3
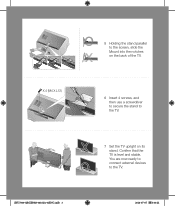
You are now ready to connect external devices to the TV. 7 Set the TV upright on its stand. Confirm that the TV is level and stable. X 4 (M4 X L12) [HU7000-QSG]BN68-06162A-01ENG.indb 3 5 Holding the stand parallel to the screen, slide the Mount into the notches on the back of the TV. 6 Insert 4 screws, and then use a screwdriver to secure the stand to the TV. 2014-07-07 3:00:22
You are now ready to connect external devices to the TV. 7 Set the TV upright on its stand. Confirm that the TV is level and stable. X 4 (M4 X L12) [HU7000-QSG]BN68-06162A-01ENG.indb 3 5 Holding the stand parallel to the screen, slide the Mount into the notches on the back of the TV. 6 Insert 4 screws, and then use a screwdriver to secure the stand to the TV. 2014-07-07 3:00:22
Installation Guide Ver.1.0 (English)
Page 10
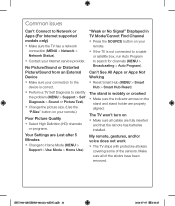
...-06162A-01ENG.indb 10 2014-07-07 3:00:25 Make sure all cables are fully inserted and that the remote has batteries installed. The stand is wobbly or crooked •• Make sure the indicator arrows on your connection to the device is not connected to a cable or ... the problem (MENU > Support > Self Diagnosis > Sound or Picture Test). •• Change the picture size. (Use the "P.Size" button on the stand and stand holder are Lost after 5 Minutes •• Change to search for channels (MENU > Broadcasting > Auto Program). No Picture/Sound or Distorted Picture/Sound from ...
...-06162A-01ENG.indb 10 2014-07-07 3:00:25 Make sure all cables are fully inserted and that the remote has batteries installed. The stand is wobbly or crooked •• Make sure the indicator arrows on your connection to the device is not connected to a cable or ... the problem (MENU > Support > Self Diagnosis > Sound or Picture Test). •• Change the picture size. (Use the "P.Size" button on the stand and stand holder are Lost after 5 Minutes •• Change to search for channels (MENU > Broadcasting > Auto Program). No Picture/Sound or Distorted Picture/Sound from ...


