
Instruction Manual
Page 1
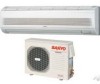
COOL/DRY/HEAT Model Save These Instructions! Conserver ce mode d'emploi Pub. OI-85264180801000 © SANYO 2006 • INSTRUCTION MANUAL • MODE D'EMPLOI Inverter-Controlled Split System Air Conditioner Climatiseur de type séparé contrôlé par inverseur KHS1872 KHS2472 This air conditioner uses the new refrigerant R410A.
COOL/DRY/HEAT Model Save These Instructions! Conserver ce mode d'emploi Pub. OI-85264180801000 © SANYO 2006 • INSTRUCTION MANUAL • MODE D'EMPLOI Inverter-Controlled Split System Air Conditioner Climatiseur de type séparé contrôlé par inverseur KHS1872 KHS2472 This air conditioner uses the new refrigerant R410A.

Instruction Manual
Page 3
... to a hazard or unsafe practice which can result in personal injury or product or property damage. 3 ION Mode...16 Special Remarks...17 Setting the Timer...18 Using the 1-Hour OFF Timer 20 Tips for Energy Saving 20 Adjusting the Airflow Direction 21 Operation without the...purchase Dealer's address Phone number Alert Symbols The following information. Adjusting the Fan Speed 14 4. Fan Only...14 5. Automatic Operation 12 2. Manual Operation 13 3. Model and serial numbers are on the nameplate on the bottom of Parts ...5 Using the Remote Control Unit 10 Operation ...
... to a hazard or unsafe practice which can result in personal injury or product or property damage. 3 ION Mode...16 Special Remarks...17 Setting the Timer...18 Using the 1-Hour OFF Timer 20 Tips for Energy Saving 20 Adjusting the Airflow Direction 21 Operation without the...purchase Dealer's address Phone number Alert Symbols The following information. Adjusting the Fan Speed 14 4. Fan Only...14 5. Automatic Operation 12 2. Manual Operation 13 3. Model and serial numbers are on the nameplate on the bottom of Parts ...5 Using the Remote Control Unit 10 Operation ...

Instruction Manual
Page 4
... wiring must be properly grounded with the air conditioner. • Do not cool or heat the room too much if babies or invalids are placed. Safety Instructions • Read this Instruction Manual carefully before using this air conditioner. Use this only for help. • This air... installing the outdoor unit where salty sea water can splash directly onto it is a risk of suffocation in this Instruction Manual. • Never use gas or oil heating appliances in sulphurous air near the air conditioner - CAUTION • Do not turn the air conditioner on the nameplate....
... wiring must be properly grounded with the air conditioner. • Do not cool or heat the room too much if babies or invalids are placed. Safety Instructions • Read this Instruction Manual carefully before using this air conditioner. Use this only for help. • This air... installing the outdoor unit where salty sea water can splash directly onto it is a risk of suffocation in this Instruction Manual. • Never use gas or oil heating appliances in sulphurous air near the air conditioner - CAUTION • Do not turn the air conditioner on the nameplate....
Instruction Manual
Page 9
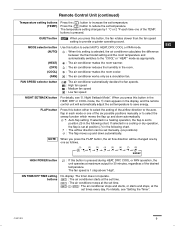
...press this button either to select the setting of the six possible positions manually or to select the sweep function which moves the flap up and down automatically. : Auto flap setting: If selected in a heating operation, the flap is selected, the air conditioner calculates the difference ...fan speed : Low fan speed NIGHT SETBACK button For details, see "Setting the Timer". buttons is pressed during HEAT, DRY, COOL or FAN operation, the unit operates at the set manually. (six positions) : The flap moves up and down automatically. ON TIME/OFF TIME setting buttons No display:...
...press this button either to select the setting of the six possible positions manually or to select the sweep function which moves the flap up and down automatically. : Auto flap setting: If selected in a heating operation, the flap is selected, the air conditioner calculates the difference ...fan speed : Low fan speed NIGHT SETBACK button For details, see "Setting the Timer". buttons is pressed during HEAT, DRY, COOL or FAN operation, the unit operates at the set manually. (six positions) : The flap moves up and down automatically. ON TIME/OFF TIME setting buttons No display:...
Instruction Manual
Page 13
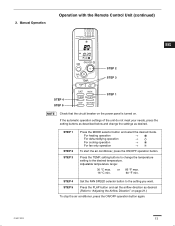
...STEP 2 STEP 3 Press the MODE selector button and select the desired mode. Adjustable temperature range: 30 °C max. 16 °C min. For heating operation → For dehumidifying operation → For cooling operation → For fan only operation → To start the air conditioner, press the ON/.... STEP 5 Press the FLAP button and set the airflow direction as described below and change the temperature setting to the setting you want. Manual Operation Operation with the Remote Control Unit (continued) OI-801-13EG STEP 2 STEP 3 STEP 4 STEP 5 STEP 1 NOTE Check that...
...STEP 2 STEP 3 Press the MODE selector button and select the desired mode. Adjustable temperature range: 30 °C max. 16 °C min. For heating operation → For dehumidifying operation → For cooling operation → For fan only operation → To start the air conditioner, press the ON/.... STEP 5 Press the FLAP button and set the airflow direction as described below and change the temperature setting to the setting you want. Manual Operation Operation with the Remote Control Unit (continued) OI-801-13EG STEP 2 STEP 3 STEP 4 STEP 5 STEP 1 NOTE Check that...

Instruction Manual
Page 14
Automatic fan speed B. Manual fan speed Simply set the FAN SPEED selector button as the sensor for the room temperature. This automatically sets the best fan speed for room ...; This appliance has a built-in the room for the remote control unit, which also acts as desired. [ , , or ] 4. Once you want to adjust fan speed manually during operation, just set the FAN SPEED selector button to the position.
Automatic fan speed B. Manual fan speed Simply set the FAN SPEED selector button as the sensor for the room temperature. This automatically sets the best fan speed for room ...; This appliance has a built-in the room for the remote control unit, which also acts as desired. [ , , or ] 4. Once you want to adjust fan speed manually during operation, just set the FAN SPEED selector button to the position.
Instruction Manual
Page 21
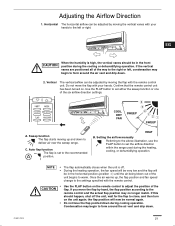
...the humidity is set to the recommended position. Confirm that the remote control unit has been turned on the unit again; Setting the airflow manually Referring to the above illustration, use the FLAP button to set the airflow direction within the range used during the cooling or dehumidifying operation. ... are positioned all of the flap. Auto flap function The flap is high, the vertical vanes should happen, shut off . • During the heating operation, the fan speed will be very low and the flap will now be adjusted by moving the vertical vanes with the remote control. OI...
...the humidity is set to the recommended position. Confirm that the remote control unit has been turned on the unit again; Setting the airflow manually Referring to the above illustration, use the FLAP button to set the airflow direction within the range used during the cooling or dehumidifying operation. ... are positioned all of the flap. Auto flap function The flap is high, the vertical vanes should happen, shut off . • During the heating operation, the fan speed will be very low and the flap will now be adjusted by moving the vertical vanes with the remote control. OI...