Sanyo 12KS71 - 11,900 BTU Ductless Single Zone Mini-Split Wall-Mounted Cool Only Air Conditioner Support and Manuals
Get Help and Manuals for this Sanyo item
View All Support Options Below
Free Sanyo 12KS71 manuals!
Problems with Sanyo 12KS71?
Ask a Question
Free Sanyo 12KS71 manuals!
Problems with Sanyo 12KS71?
Ask a Question
Most Recent Sanyo 12KS71 Questions

Relais?
What is the number of relays this air conditioner. Thank you. Gilles
What is the number of relays this air conditioner. Thank you. Gilles
(Posted by paulem 10 years ago)
Popular Sanyo 12KS71 Manual Pages
Installation Instructions - Page 1

... Rear Panel from that of the air conditioner that you are based on the typical appearance of the Service Valves s Pump Down
from the Unit 3-2. Remove the Grille to the outdoor unit for the Outdoor Unit
3. Wiring Instructions for Test Run) s Basic Functions of a standard model. REMOTE CONTROL UNIT INSTALLATION POSITION 23 7-1. Mounting on the Wall...
Installation Instructions - Page 2

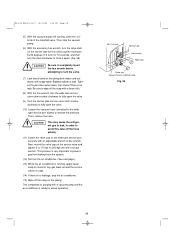
...-free connection. • Check carefully for a special problem, contact our sales/service outlet or your fingers.
When Transporting
Be careful when picking up and moving parts.
• Clean up the site after you require help , and bend your knees when lifting to reduce strain on the air conditioner can cut your certified dealer for connecting...
Installation Instructions - Page 3

...Wall thickness of instructions for the specified copper tubes as detailed in Table 2. Table 2
Model KS0971/1271
Narrow Tube
Outer Dia. Phillips head screwdriver 3. Reamer (for Installation (not supplied...cm to 40 cm) to install the air conditioning system. Foamed polyethylene insulation for the indoor and outdoor units and make sure all accessory parts listed are with the system ...
Installation Instructions - Page 4
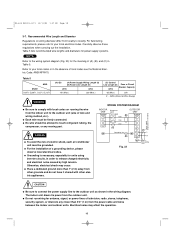
...air conditioner in Table 3 and Fig. 3a.
Allowable Tubing Length at Shipment (ft.)
25
25
Limit of Tubing Length (L) (ft.)
50
65
Limit of Elevation Difference (H) (ft.)
23
23
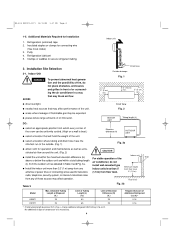
Required Amount of oil mist exist. Additional Materials Required for connecting wire
(See local codes) 3. Insulated staples or clamps for Installation... install wall-mounted type
Minimum height
q Install the indoor unit ...
Installation Instructions - Page 5
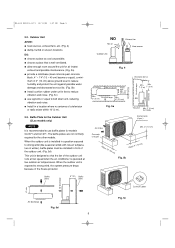
...Air discharge
2" (5 cm)
Min. 8" (20 cm)
Fig. 5a
Air discharge Obstacle
Obstacle above ground level to reduce humidity and protect the unit against possible water damage and decreased service life. (Fig. 5b) q Install... Unit (CLxx models only)
NOTE
It is operated at low speed when the air conditioner is recommended to bolt down unit, reducing vibration and noise. q Install in a position...
Installation Instructions - Page 8
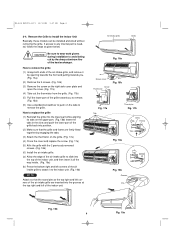
... grille. (Fig. 17b)
(5) Pull the lower part of the grille toward you to remove. (Fig. 18a)
(6) Use a standard screwdriver to push on the grille. (Fig. 17a)
(4) Close the cover and replace the screw. (Fig. 17a)
(5) Affix the grille with the 2 previously removed screws. (Fig. 16b)
(6) Install the air intake grille.
(a) Allow the edge of...
Installation Instructions - Page 10
... with local codes on wiring diameter differ from the outdoor unit.
q For the installation of (A), (B), and (C) in the absence of electric shock, each air conditioner unit must be...shared with other electric appliances. For field wiring requirements, please refer to locality. Table 5
AWG Model C0971, CL0971, C1271, CL1271
(A)+(B)
(A) Power Supply Wiring Length (ft) (B) Power Line Length...
Installation Instructions - Page 13
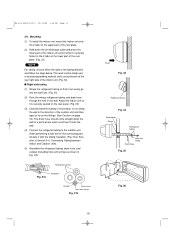
...or left tubing direction and follow the steps below. Mounting
(1) To install the indoor unit, mount the indoor unit onto the 2 tabs on the upper part of the indoor unit. (Fig. 34)
s Right-side tubing... to the 2 tabs on page 18.) The drain hose should come straight down the air discharge outlet and press the lower part of the indoor unit until it is securely seated on the rear panel. (Fig. ...
Installation Instructions - Page 17
.../05 1:28 PM Page 17
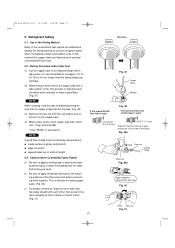
5. It is glossy and smooth. b) Be sure to apply refrigerant lubricant to the matching surfaces of the conventional split system air conditioners employ the flaring method to 50 cm) longer than the tubing length you estimate.
(2) Remove burrs at each other, then screw in the figure.
Installation Instructions - Page 19
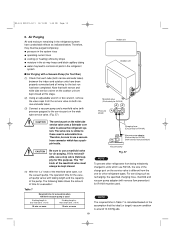
... moisture remaining in Table 7 is calculated based on the service valve is more
15 min. q pressure in the system rises q operating current rises q cooling (or heating) efficiency drops q moisture in automobile tires. The "Hi" knob of parts in the refrigerant
system
s Air Purging with a Vacuum Pump (for evacuation when 100 liter/h vacuum pump...
Installation Instructions - Page 20
... indoor and outdoors) with soapy water. CAUTION
This may cause the refrigerant gas to manifold valve
Fig. 58
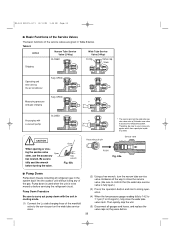
20 Then stop the air conditioner.
(15) Wipe off the soap on the service valve and tighten it again. (Fig. 58)
CAUTION
Be sure to completely insert the hex wrench before attempting to turn ) for...
Installation Instructions - Page 21

...; " " and "oP-1" will disappear from the remote controller display area. The air conditioner will start to be sure to press the ACL (reset) button to return to normal...Air Conditioner
After turning on the main unit blinking. (Fig. 59c) • After 3 minutes, the system shifts into cooling operation, and cool air will not operate correctly if this is not done. Cool mode test run .
(1) Set...
Installation Instructions - Page 22
...
before .
22 Then quickly stop the unit.
(5) Disconnect all gauges and hoses, and replace the valve caps as they were before turning the valve. Pump Down Procedure
Be sure to... air conditioner
Fully OPEN
Fully OPEN
Measuring pressure
*
and gas charging
Air purging with push-pin
* The service port on the wide tube service valve.
(2) Using a hex wrench, turn the narrow tube service valve...
Installation Instructions - Page 23
... it may be operated from the remote control unit every 5 minutes)
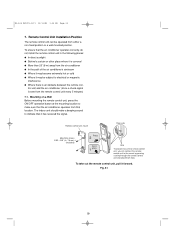
7-1. The indoor unit should make sure that the air conditioner operates from that the air conditioner operates correctly, do not install the remote control unit in place
Hole
To prevent loss of the air conditioner's airstream q Where it may become extremely hot or cold q Where it forward.
Installation Instructions - Page 24
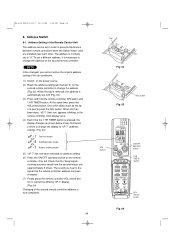
... prevent interference between remote controllers when two Sanyo indoor units are installed near each other. At the same time, press the ACL(reset) button. The sound you cannot restore the original address setting of the air conditioner.
(1) Switch on the power source. (2) Break the address-setting tab marked "A" on the remote
controller. (Fig. 64) Check that...
Sanyo 12KS71 Reviews
We have not received any reviews for Sanyo yet.