Sanyo 12KS71 Support Question
Sanyo 12KS71 Support Question
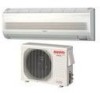
Find answers below for this question about Sanyo 12KS71 - 11,900 BTU Ductless Single Zone Mini-Split Wall-Mounted Cool Only Air Conditioner.Need a Sanyo 12KS71 manual? We have 1 online manual for this item!
Question posted by paulem on August 27th, 2013
Relais?
What is the number of relays this air conditioner.
Thank you.
Gilles
Current Answers
Related Sanyo 12KS71 Manual Pages
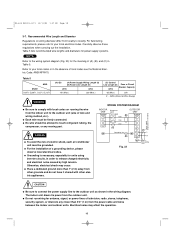
Installation Instructions - Page 1

... below. Mounting 3-10. Wiring Instructions for the Outdoor Unit
3. Indoor Unit KS0971
KS1271
Outdoor Unit C0971 CL0971 C1271 CL1271
Power Source: 60 Hz, single-phase, ... U.S.A. Install the Rear Panel on a Wall
8. Inverter Split System Air Conditioner - 05-424 KS0971-1271 12/13/05 1:27 PM Page a
INSTALLATION INSTRUCTIONS
- AIR PURGING 19 s Air Purging with a Vacuum Pump (for Test...
Installation Instructions - Page 2

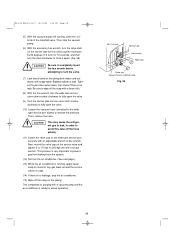
...symbol refers to a hazard or unsafe practice which can cause dripping and water damage to walls and floors. ...In Moist or Uneven Locations Use a raised concrete pad or concrete ... vents.
Others
CAUTION
• Ventilate any tubing run . Escaped refrigerant gas, on the air conditioner can produce dangerously toxic gas.
• Confirm upon completing installation that is leaking. If ...
Installation Instructions - Page 3

...air conditioning system. Wiring Instructions for deburring)
1-2.
Please read over the entire set of instructions for connecting the outdoor unit to purchase these materials separately from a local source, you will need:
1. Tape measure 5. Drill 11...Tube cutter 12. Torque wrench 14. Wall thickness of tubing.
CAUTION
Check local electrical codes and regulations before beginning.
1-1....
Installation Instructions - Page 4
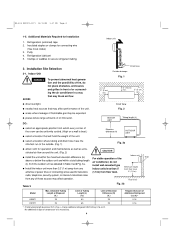
... may be uniformly cooled. (High on a wall is necessary.
4 Electrical noise
from the outdoor unit as unrestricted air flow around the unit. (Fig. 2)
CAUTION
Indoor unit
q install the unit within the maximum elevation difference (H)
For stable operation of the
Wall
above or below the outdoor unit and within a total tubing length air conditioner, do not place...
Installation Instructions - Page 5
DO: q choose a place as cool as possible. Baffle Plate for air intake/
exhaust and possible maintenance. (Fig. 5a) q provide a solid base (level concrete pad, ...no antenna of the outdoor unit runs at low speed when the air conditioner is well ventilated. Baffle plate
6" min Baffle plate
NO
Hot air
Outdoor unit
Exhaust fan Heat source
Fig. 4
Air intake
Min. 2" (5 cm)
Valve side Min. 10" ...
Installation Instructions - Page 6

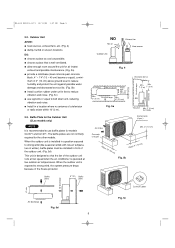
...(3) Remove the rear panel. Wait until after cutting the hole before attaching the rear panel to the wall.
(2) Determine which side of left tubing is horizontal, using a carpenter's level or tape measure to ...the set screw on the rear panel. (Fig. 6)
(2) Press the 2 v marks on the wall at the location selected.
Select the direction you should make the hole for transportation
Fig. 6
Rear ...
Installation Instructions - Page 7

... drill attachment, cut PVC pipe at a slight angle 1/4" (6 mm) shorter than the thickness of the pipe (for appropriate mounting screws. (Fig. 15)
NOTE
Hole should be made at slight angle
Fig. 11
INSIDE
OUTSIDE
Wall
Plastic cover (Locally purchased)
PVC pipe
Slight angle
Fig. 12
Fig. 13 Fig. 14
3/16" (4.8 mm) dia. Table...
Installation Instructions - Page 8
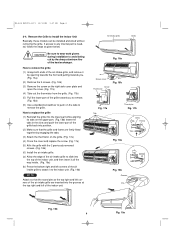
..., and then insert it to any internal part is needed, follow the steps as given below.
Air intake grille
Grille
Fig. 16a
Screw cover
Cover Thermistor
Fig. 16b
Fig. 17a
Tab
*
Thermistor
Fig...the grille with the 2 previously removed screws. (Fig. 16b)
(6) Install the air intake grille.
(a) Allow the edge of the air intake grille to slide into the grooves at the top right and left corners ...
Installation Instructions - Page 9

... the corner of the right/left -rear tubing In this case, the corner of the frame need not be cut.
(2) To mount the indoor unit on the rear panel: Hang the 2 mounting slots of the unit on its nameplate, then carry out the wiring closely following the wiring diagram. (2) Provide a power outlet...
Installation Instructions - Page 10
...or in the wiring diagram.
q Do not run wiring for the meaning of electric shock, each air conditioner unit must be allowed to your local electrical codes. Table 5
AWG Model C0971, CL0971, C1271,...
(#14)
Breaker Capacity
65 (Max.)
20A
# ... AWG (American Wire Gauge)
Power supply Single phase 115V 60HZ
WARNING
q Be sure to comply with other grounds and do not have it shared...
Installation Instructions - Page 11

...Wall
Plastic cover
10" (25 cm)
Fig. 24
Cover
Fig. 25
Terminal plate
Fig. 27
Fig. 26a
Earth plate
Inter-unit wiring
Top of the air... intake grille, and remove it by opening towards the front and pulling towards you. (3) Remove the screw on the right side cover plate and open the cover. (Fig. 25) (4) Route the inter-unit wiring from the wall...installing the air intake grille.
Wiring Instructions for...
Installation Instructions - Page 13
... wiring) as the fittings. (See Caution on page 18.) The drain hose should come straight down the air discharge outlet and press the lower part of the indoor unit until it can be made easier by placing ... of the outdoor unit and then tape as far as shown in the wall. Mounting
(1) To install the indoor unit, mount the indoor unit onto the 2 tabs on the upper part of the rear plate.
(2) ...
Installation Instructions - Page 14

...Hole in firmly. (If it is attached securely.) (Fig. 40c)
Drain cap Use a Phillips screwdriver to push the drain cap in wall
Rear panel
Bent part
Fig. 38
Wide tube Narrow tube
Drain hose
Fig. 39
Drain cap
Drain cap
Drain hose Clamp
Fig. 40a
Screw... 12/13/05 1:28 PM Page 14
s Left-side tubing
(1) Lead the tubing and drain hose through the wall, allowing sufficient length for connection.
Installation Instructions - Page 17
...50
Union Flare nut
Fig. 51
17 Flaring Procedure with a Flare Tool
(1) Cut the copper tube to mount it on the copper tube.
(4) Make a flare at the end of the copper tube with a ... burrs at the end of uniform length.
5-3. Use of the Flaring Method
Many of the conventional split system air conditioners employ the flaring method to prevent dust or water from getting into the tube. (Fig. 48)...
Installation Instructions - Page 18

... specified torque as 1 bundle with the tubing.
(2) Wrap the armoring tape from the wall with armoring tape.
Taping the Tubes
CAUTION
After a tube has been insulated, never try... 2 refrigerant tubes (and electrical wire if local codes permit) should be sure the condensation drain hose splits away from entering. (Fig. 56)
Torque wrench
Indoor unit
Spanner
Outdoor unit
Fig. 52
Min....
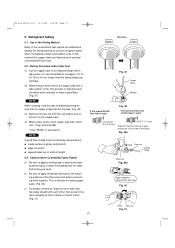
Installation Instructions - Page 19
...(with reverse flow prevention)
Vacuum pump
Fig. 57
NOTE To prevent other refrigerant types. Air Purging
Air and moisture remaining in Table 7 is around 10 mmHg abs. The valve core is ...more
15 min.
q pressure in the system rises q operating current rises q cooling (or heating) efficiency drops q moisture in the air may freeze and block capillary tubing q water may lead to use a vacuum...
Installation Instructions - Page 20
... then turn the valve stem on the tubing. This completes air purging with a vacuum pump and the air conditioner is running , close it to 170 lbs·in (200 kgf·cm) with an adjustable wrench or box wrench. Bubbles indicate a leak. Next, mount the valve cap on the wide tube service port securely...
Installation Instructions - Page 21

.... • After a few seconds, " " appears and "oP-1" blinks in Test Run mode. (Fig. 59a) a) Press and hold the 1HR TIMER button. Cool mode test run is not done. The air conditioner will not operate correctly if this is unaffected by pressing the ON/OFF operation button of the remote controller to release it...
Installation Instructions - Page 22
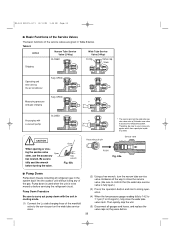
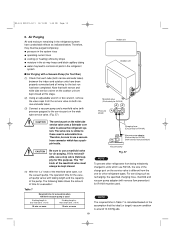
... (3-Way)
O-ring
Valve cap Stem
Operating and test running the air conditioner
Fully OPEN
Fully OPEN
Measuring pressure
*
and gas charging
Air purging with push-pin
* The service port on the wide tube... Basic Functions of the Service Valves
The basic functions of the service valves are given in cooling mode.
(1) Connect the Lo side charging hose of the gas.
ing the service valve
...
Installation Instructions - Page 23
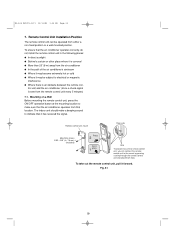
... place
Hole
To prevent loss of the air conditioner's airstream q Where it may become extremely hot or cold q Where it has received the signal. Mounting on a Wall Before mounting the remote control unit, press the ON/OFF operation button at the mounting location to make a beeping sound to the mount by passing a string through the remote control...
Similar Questions

Can The Fan On The Exterior Unit Be Replaced? My Fan Blade Has Fractured
can the fan blade be replaced on the exterior unit? Mod#CMH317
can the fan blade be replaced on the exterior unit? Mod#CMH317
(Posted by gshecknauer 2 years ago)

Item: Sanyo Mini-refrigerator/freezer,model Sr-36608.
I have a Sanyo 4.5 cu ft mini-refrigerator/rfreezer and I need to adjust the door to make a better s...
I have a Sanyo 4.5 cu ft mini-refrigerator/rfreezer and I need to adjust the door to make a better s...
(Posted by syeng1 8 years ago)

Sr-4433s Mini Fridge
I was given an R-4433S mini fridge. It has a small hole in the freezer plate and it looks like freon...
I was given an R-4433S mini fridge. It has a small hole in the freezer plate and it looks like freon...
(Posted by allenmatt 9 years ago)

Time Zone
How to i change the time zone on my Sanyo TV to enable EPG to work correctly?
How to i change the time zone on my Sanyo TV to enable EPG to work correctly?
(Posted by hayleymaekennedy 11 years ago)

Need Replacement Part For Mini Fridge Model No. Sr2570m
Where can I buy a replacement lower slide out shelf for my mini sanyo frige model number SR-2570M
Where can I buy a replacement lower slide out shelf for my mini sanyo frige model number SR-2570M
(Posted by cathycasali 11 years ago)