
Operating Instructions
Page 1
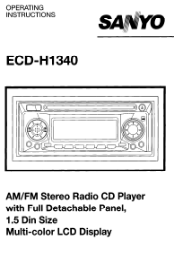
OPERATING INSTRUCTIONS ECD-HI340 AM/FM Stereo Radio CD Player with Full Detachable Panel, 1.5 Din Size Multi-color LCD Display
OPERATING INSTRUCTIONS ECD-HI340 AM/FM Stereo Radio CD Player with Full Detachable Panel, 1.5 Din Size Multi-color LCD Display
Operating Instructions
Page 2
CONTENTS Accessories 1_ Compact Disc Care 2 Installation 3 Using the Detachable Front Panel 4 - 5 Electrical Connections 6 - 7 Location and Function of Controls 8_ - 10 Specification 1_1 Trouble Shooting 12 Warranty 13
CONTENTS Accessories 1_ Compact Disc Care 2 Installation 3 Using the Detachable Front Panel 4 - 5 Electrical Connections 6 - 7 Location and Function of Controls 8_ - 10 Specification 1_1 Trouble Shooting 12 Warranty 13
Operating Instructions
Page 3
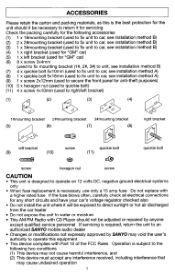
... the car heater l Do not expose the unit to water or moisture l This AM/FM Radio with CD Player should not be adjusted or repaired by anyone except qualified service personnel If servicing is required, return the unit to an authorized SANYO mobile audio dealer l Changes or modifications not expressly approved by SANYO may void the user's authority to operate this equipment l This device complies with Part 15...
... the car heater l Do not expose the unit to water or moisture l This AM/FM Radio with CD Player should not be adjusted or repaired by anyone except qualified service personnel If servicing is required, return the unit to an authorized SANYO mobile audio dealer l Changes or modifications not expressly approved by SANYO may void the user's authority to operate this equipment l This device complies with Part 15...
Operating Instructions
Page 4
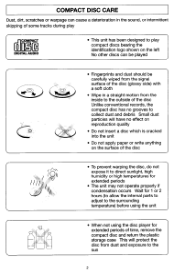
... the disc l To prevent warping the disc, do not expose it to direct sunlight, high humidity or high temperatures for extended periods l The unit may not operate properly if condensation occurs Wait for 1 or 2 hours (to allow the internal parts to adjust to the surrounding temperature) before using the unit l When not using the disc player for extended periods of time, remove the compact disc and...
... the disc l To prevent warping the disc, do not expose it to direct sunlight, high humidity or high temperatures for extended periods l The unit may not operate properly if condensation occurs Wait for 1 or 2 hours (to allow the internal parts to adjust to the surrounding temperature) before using the unit l When not using the disc player for extended periods of time, remove the compact disc and...
Operating Instructions
Page 6
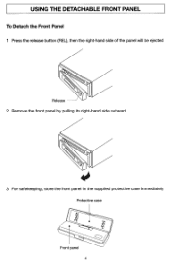
USING THE DETACHABLE FRONT PANEL To Detach the Front Panel 1 Press the release button (REL), then the right-hand side of the panel will be ejected 2 Remove the front panel by pulling its right-hand side outward / 3 For safekeeping, store the front panel in the supplied protective case immediately Protective case
USING THE DETACHABLE FRONT PANEL To Detach the Front Panel 1 Press the release button (REL), then the right-hand side of the panel will be ejected 2 Remove the front panel by pulling its right-hand side outward / 3 For safekeeping, store the front panel in the supplied protective case immediately Protective case
Operating Instructions
Page 7
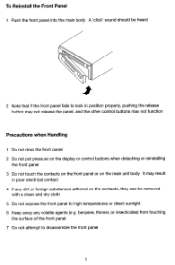
... properly, pushing the release button may not release the panel, and the other control buttons may not function Precautions when Handling 1 Do not drop the front panel 2 Do not put pressure on the display or control buttons when detaching or reinstalling the front panel 3 Do not touch the contacts on the front panel or on the main unit body It may result...
... properly, pushing the release button may not release the panel, and the other control buttons may not function Precautions when Handling 1 Do not drop the front panel 2 Do not put pressure on the display or control buttons when detaching or reinstalling the front panel 3 Do not touch the contacts on the front panel or on the main unit body It may result...

Operating Instructions
Page 8
... position l If the ignition switch does not have an ACC position, connect this wire to a +12V power terminal which receives power continuously (Same as item 2 ) 4 Ground wire (Black) l Connect this wire to the vehicle chassis 5 Power Antenna/Amplifier Turn On (Blue/Red) l Connect this wire to the control terminal of a Power Antenna or an external amplifier l When not using a Power Antenna or an external amplifier, this wire is not connected 6 Ireen) $ @ Rear Left Eew Speaker _ _ _ _ _ _ P-speaker System , ! (White)@& _ _ _ _ _, Left...
... position l If the ignition switch does not have an ACC position, connect this wire to a +12V power terminal which receives power continuously (Same as item 2 ) 4 Ground wire (Black) l Connect this wire to the vehicle chassis 5 Power Antenna/Amplifier Turn On (Blue/Red) l Connect this wire to the control terminal of a Power Antenna or an external amplifier l When not using a Power Antenna or an external amplifier, this wire is not connected 6 Ireen) $ @ Rear Left Eew Speaker _ _ _ _ _ _ P-speaker System , ! (White)@& _ _ _ _ _, Left...
Operating Instructions
Page 9
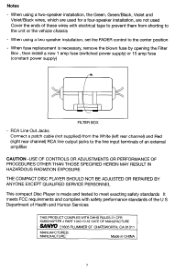
... external amplifier CAUTION -USE OF CONTROLS OR ADJUSTMENTS OR PERFORMANCE OF PROCEDURES OTHER THAN THOSE SPECIFIED HEREIN MAY RESULT IN HAZARDOUS RADIATION EXPOSURE THE COMPACT DISC PLAYER SHOULD NOT BE ADJUSTED OR REPAIRED BY ANYONE EXCEPT QUALIFIED SERVICE PERSONNEL This compact Disc Player is necessary, remove the blown fuse by opening the Filter Box , then install a new 1 amp fuse (switched power supply) or 15 amp fuse (constant power supply) I FILTER BOX - When fuse replacement is...
... external amplifier CAUTION -USE OF CONTROLS OR ADJUSTMENTS OR PERFORMANCE OF PROCEDURES OTHER THAN THOSE SPECIFIED HEREIN MAY RESULT IN HAZARDOUS RADIATION EXPOSURE THE COMPACT DISC PLAYER SHOULD NOT BE ADJUSTED OR REPAIRED BY ANYONE EXCEPT QUALIFIED SERVICE PERSONNEL This compact Disc Player is necessary, remove the blown fuse by opening the Filter Box , then install a new 1 amp fuse (switched power supply) or 15 amp fuse (constant power supply) I FILTER BOX - When fuse replacement is...
Operating Instructions
Page 10
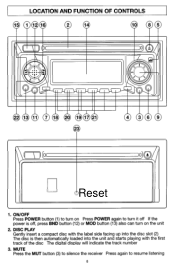
MUTE Press the MUT button (3) to silence the receiver Press again to turn it off If the power is then automatically loaded into the disc slot (2) The disc is off, press BND button (12) or MOD button (13) also can turn on Press POWER again to resume listening 8 LOCATION AND FUNCTION OF CONTROLS Reset 1. ON/OFF Press POWER button (1) to turn on the unit 2. DISC PLAY Gently insert a compact disc with the label side facing up into the unit and starts playing with the first track of the disc The digital display will indicate the track number 3.
MUTE Press the MUT button (3) to silence the receiver Press again to turn it off If the power is then automatically loaded into the disc slot (2) The disc is off, press BND button (12) or MOD button (13) also can turn on Press POWER again to resume listening 8 LOCATION AND FUNCTION OF CONTROLS Reset 1. ON/OFF Press POWER button (1) to turn on the unit 2. DISC PLAY Gently insert a compact disc with the label side facing up into the unit and starts playing with the first track of the disc The digital display will indicate the track number 3.
Operating Instructions
Page 11
... PUSH SELECT button (9) two times Adjust treble level by selecting mono operation 5. SELECT MODE Press PUSH SELECT button (9) to move display through bass, treble, balance, fader and volume functions Use AUDIO ADJUST KNOB (10) to radio operation 9 &IO. CLASSIC - SET THE CLOCK Press and hold the DSP button (7), then press the TUNE/SKIP + /b> button (16) to CD mode) 9 ROCK - LOUDNESS Press LOU button (6) to increase bass output and display will begin to play Press P (eject) button (8) to stop CD play and eject CD from slot Receiver switches to adjust the selected mode...
... PUSH SELECT button (9) two times Adjust treble level by selecting mono operation 5. SELECT MODE Press PUSH SELECT button (9) to move display through bass, treble, balance, fader and volume functions Use AUDIO ADJUST KNOB (10) to radio operation 9 &IO. CLASSIC - SET THE CLOCK Press and hold the DSP button (7), then press the TUNE/SKIP + /b> button (16) to CD mode) 9 ROCK - LOUDNESS Press LOU button (6) to increase bass output and display will begin to play Press P (eject) button (8) to stop CD play and eject CD from slot Receiver switches to adjust the selected mode...
Operating Instructions
Page 12
... operate l Error symbol on the display Note: If RESET button (23) is changed to Preset Scan Preset Scanning Press ASIPS button (22) shortly to toggle preset scanning function During the scanning, it again to play first several seconds of the unit 15 & 16. SELECT STATIONS Press and release a TUNE/SKIPd - RANDOM: PLAY ALL TRACKS Press RND button (21) to stop at every stored station for the following track Track number...
... operate l Error symbol on the display Note: If RESET button (23) is changed to Preset Scan Preset Scanning Press ASIPS button (22) shortly to toggle preset scanning function During the scanning, it again to play first several seconds of the unit 15 & 16. SELECT STATIONS Press and release a TUNE/SKIPd - RANDOM: PLAY ALL TRACKS Press RND button (21) to stop at every stored station for the following track Track number...
Operating Instructions
Page 13
... Laser Output Filter Active AUDIO SECTION Maximum Power Output 40W x4 Load Impedance 4Q GENERAL OperatingVoltage 12V(144VTypical) Operating Current Maximum 15A lnstallationsize(WxHxD) 200x785x142mm IMPORTANT INFORMATION Because its products are subject to continuous improvement, SANYO reserves the right to Noise Ratio 60 dB Alternate Channel Selectivity 50 dB Stereo&par&ion 30dB CaptureRatio 15dB Antenna Impedance 75Q AM TUNER SECTION Frequency Range...
... Laser Output Filter Active AUDIO SECTION Maximum Power Output 40W x4 Load Impedance 4Q GENERAL OperatingVoltage 12V(144VTypical) Operating Current Maximum 15A lnstallationsize(WxHxD) 200x785x142mm IMPORTANT INFORMATION Because its products are subject to continuous improvement, SANYO reserves the right to Noise Ratio 60 dB Alternate Channel Selectivity 50 dB Stereo&par&ion 30dB CaptureRatio 15dB Antenna Impedance 75Q AM TUNER SECTION Frequency Range...
Operating Instructions
Page 14
... defective disc The radio does not work The radio station automatic selection does not work The antenna cable is not connected The signals are too weak Solution If the power supply is properly connected to the car accessory terminal, switch the ignition key to "ACC" Replace the fuse Remove the disc in the player, then put a new one Insert the compact disc with the label facing upward Clean the disc or try to play...
... defective disc The radio does not work The radio station automatic selection does not work The antenna cable is not connected The signals are too weak Solution If the power supply is properly connected to the car accessory terminal, switch the ignition key to "ACC" Replace the fuse Remove the disc in the player, then put a new one Insert the compact disc with the label facing upward Clean the disc or try to play...
Operating Instructions
Page 15
... customer-operated controls as explained in the appropriate model's instruction manual, or(B) the repair of any product whose serial number has been altered, defaced or removed This warranty does not apply to the cabinet or cosmetic parts, knobs or routine maintenance This warranty does not apply to the elimination of car static or motor noise, correction of antenna problems, or damage to compact discs, speakers...
... customer-operated controls as explained in the appropriate model's instruction manual, or(B) the repair of any product whose serial number has been altered, defaced or removed This warranty does not apply to the cabinet or cosmetic parts, knobs or routine maintenance This warranty does not apply to the elimination of car static or motor noise, correction of antenna problems, or damage to compact discs, speakers...

Operating Instructions
Page 16
Printed in Hong Kong 21605 Plummer Street Chatsworth, CA91 311 ECD-HI340 Issue Number 1 88.CO602-03
Printed in Hong Kong 21605 Plummer Street Chatsworth, CA91 311 ECD-HI340 Issue Number 1 88.CO602-03

