Instruction Manual
Page 2
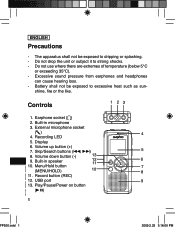
Battery shall not be exposed to dripping or splashing. - shine, fire or the like. Volume down button (-) 19. Menu/Hold button (MENU/HOLD) 13 12 11 10 DIGITAL VOICE RECORDER REC + MENU/HOLD - 6 7 8 ANÇAIS 4191. USB port 9 PAÑOL 7143. Do not use where there are extremes of temperature (below 5°C or exceeding 35°C). - External microphone socket () 4 4. Built-in microphone 3. Do not drop the...
Battery shall not be exposed to dripping or splashing. - shine, fire or the like. Volume down button (-) 19. Menu/Hold button (MENU/HOLD) 13 12 11 10 DIGITAL VOICE RECORDER REC + MENU/HOLD - 6 7 8 ANÇAIS 4191. USB port 9 PAÑOL 7143. Do not use where there are extremes of temperature (below 5°C or exceeding 35°C). - External microphone socket () 4 4. Built-in microphone 3. Do not drop the...
Instruction Manual
Page 3
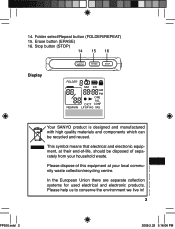
Stop button (STOP) 14 15 16 Display FOLDER/ REPEAT ERASE STOP REMAIN MM DD AM PM ONE ALL DICT CONF LP SP HQ VAS FP550.indd 2 Your SANYO product is designed and manufactured with high quality materials and components which can be disposed of this ...25 FRANÇAIS 49 In the European Union there are separate collection systems for used electrical and electronic prodEucStPs.AÑOL 74 Please help us to conserve the environment we livPeOinR! Folder select/Repeat button (FOLDER/REPEAT) 15. ment, at your household waste. TUGUÊS 99 ITALI2ANO 67 81 2009...
Stop button (STOP) 14 15 16 Display FOLDER/ REPEAT ERASE STOP REMAIN MM DD AM PM ONE ALL DICT CONF LP SP HQ VAS FP550.indd 2 Your SANYO product is designed and manufactured with high quality materials and components which can be disposed of this ...25 FRANÇAIS 49 In the European Union there are separate collection systems for used electrical and electronic prodEucStPs.AÑOL 74 Please help us to conserve the environment we livPeOinR! Folder select/Repeat button (FOLDER/REPEAT) 15. ment, at your household waste. TUGUÊS 99 ITALI2ANO 67 81 2009...
Instruction Manual
Page 4
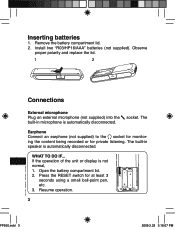
...ÊS 99 3. Resume operation. Observe proper polarity and replace the lid. 11 22 Connections External microphone Plug an external microphone (not supplied) into the built-in speaker is automatically disconnected. The built-in microphone is not normal, UTSCH 25 1. RESET - + WHAT TO DO IF... Press the RESET switch for private listening. FP550.indd 3 2009.2.23 3:16:07 PM Open the battery compartment lid. - LIANO 637...
...ÊS 99 3. Resume operation. Observe proper polarity and replace the lid. 11 22 Connections External microphone Plug an external microphone (not supplied) into the built-in speaker is automatically disconnected. The built-in microphone is not normal, UTSCH 25 1. RESET - + WHAT TO DO IF... Press the RESET switch for private listening. FP550.indd 3 2009.2.23 3:16:07 PM Open the battery compartment lid. - LIANO 637...
Instruction Manual
Page 5
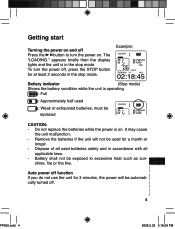
... the stop mode. To turn the power on . Do not replace the batteries while the power is operating. : Full : Approximately half used for a month or longer. - Battery shall not be autFoRmAaNti-ÇAIS cally turned off. ESPAÑOL 1 25 49 74 PORTUGUÊS 99 ITALI4ANO 67 81 FP550.indd 4 2009.2.23 3:16:09 PM Getting start Turning the power on and off Press the l button...
... the stop mode. To turn the power on . Do not replace the batteries while the power is operating. : Full : Approximately half used for a month or longer. - Battery shall not be autFoRmAaNti-ÇAIS cally turned off. ESPAÑOL 1 25 49 74 PORTUGUÊS 99 ITALI4ANO 67 81 FP550.indd 4 2009.2.23 3:16:09 PM Getting start Turning the power on and off Press the l button...
Instruction Manual
Page 6
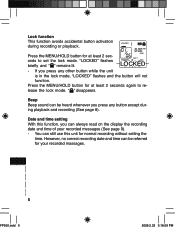
... button activation during recording or playback. LOCKED Date and time setting With this function, you can still use this unit for at least 2 seconds again to set the lock mode. GLISH 1 UTSCH 25 ANÇAIS 49 PAÑOL 74 RTUGUÊS 99 LIANO 657 81 FP550.indd 5 2009.2.23 3:16:09 PM " " disappears. AM Press the MENU/HOLD button for normal recording without setting the time...
... button activation during recording or playback. LOCKED Date and time setting With this function, you can still use this unit for at least 2 seconds again to set the lock mode. GLISH 1 UTSCH 25 ANÇAIS 49 PAÑOL 74 RTUGUÊS 99 LIANO 657 81 FP550.indd 5 2009.2.23 3:16:09 PM " " disappears. AM Press the MENU/HOLD button for normal recording without setting the time...
Instruction Manual
Page 7
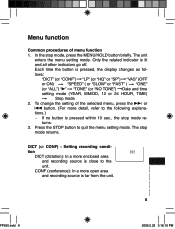
... the stop mode returns. To change the setting of menu function 1. The stop mode, press the MENU/HOLD button briefly. If no button is pressed, the display changes as follows: "DICT" (or "CONF") v "LP" (or "HQ" or "SP") v "VAS" (OFF or ON) v "SPEED" ( or "SLOW" or "FAST" ) v "ONE" (or "ALL") "a" v "TONE" (or "NO TONE") vDate and time setting mode (YEAR, MM/DD, 12 or 24 HOUR, TIME) v Stop mode 2. Each time the button...
... the stop mode returns. To change the setting of menu function 1. The stop mode, press the MENU/HOLD button briefly. If no button is pressed, the display changes as follows: "DICT" (or "CONF") v "LP" (or "HQ" or "SP") v "VAS" (OFF or ON) v "SPEED" ( or "SLOW" or "FAST" ) v "ONE" (or "ALL") "a" v "TONE" (or "NO TONE") vDate and time setting mode (YEAR, MM/DD, 12 or 24 HOUR, TIME) v Stop mode 2. Each time the button...
Instruction Manual
Page 8
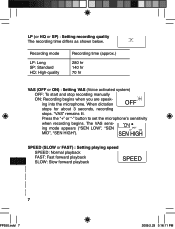
...) : Setting recording quality The recording time differs as shown below. LP Recording mode LP: Long SP: Standard HQ: High-quality Recording time (approx.) 280 hr 140 hr 70 hr VAS (OFF or ON) : Setting VAS (Voice activated system) OFF: To start and stop recording manually ON: Recording begins when you are speaking into the microphone. Press the "+" or "-" button to set the microphoneʼs sensitivity when recording begins. The VAS sens- When dictation...
...) : Setting recording quality The recording time differs as shown below. LP Recording mode LP: Long SP: Standard HQ: High-quality Recording time (approx.) 280 hr 140 hr 70 hr VAS (OFF or ON) : Setting VAS (Voice activated system) OFF: To start and stop recording manually ON: Recording begins when you are speaking into the microphone. Press the "+" or "-" button to set the microphoneʼs sensitivity when recording begins. The VAS sens- When dictation...
Instruction Manual
Page 9
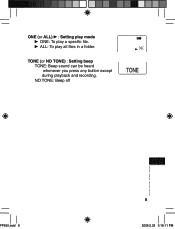
a ALL: To play a specific file. ONE (or ALL) a : Setting play mode a ONE: To play all files in a folder. NO TONE: Beep off ONE TONE FP550.indd 8 ENGLISH 1 DEUTSCH 25 FRANÇAIS 49 ESPAÑOL 74 PORTUGUÊS 99 ITALI8ANO 67 81 2009.2.23 3:16:11 PM TONE (or NO TONE) : Setting beep TONE: Beep sound can be heard whenever you press any button except during playback and recording.
a ALL: To play a specific file. ONE (or ALL) a : Setting play mode a ONE: To play all files in a folder. NO TONE: Beep off ONE TONE FP550.indd 8 ENGLISH 1 DEUTSCH 25 FRANÇAIS 49 ESPAÑOL 74 PORTUGUÊS 99 ITALI8ANO 67 81 2009.2.23 3:16:11 PM TONE (or NO TONE) : Setting beep TONE: Beep sound can be heard whenever you press any button except during playback and recording.
Instruction Manual
Page 11
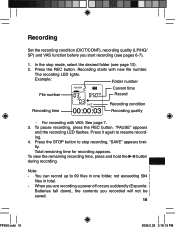
... PM Recording Set the recording condition (DICT/CONF), recording quality (LP/HQ/ SP) and VAS function before you recorded will nPoOt RbTeUGUÊS 99 saved. The recording LED lights. Example: Folder number Current time File number AM Record C Recording time DICT HQ 00:00:03 Recording condition Recording quality - For recording with new file number. In the stop recording, "SAVE" appears brei- fly. ing. 4. ENGLISH 1 Note: DEUTSCH 25 - Press the REC button. To pause recording, press the REC button. To...
... PM Recording Set the recording condition (DICT/CONF), recording quality (LP/HQ/ SP) and VAS function before you recorded will nPoOt RbTeUGUÊS 99 saved. The recording LED lights. Example: Folder number Current time File number AM Record C Recording time DICT HQ 00:00:03 Recording condition Recording quality - For recording with new file number. In the stop recording, "SAVE" appears brei- fly. ing. 4. ENGLISH 1 Note: DEUTSCH 25 - Press the REC button. To pause recording, press the REC button. To...
Instruction Manual
Page 12
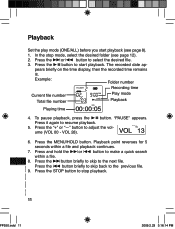
... the STOP button to start playback (see page 12). 2. In the stop playback. VOL 28). Press the e button briefly to skip to adjust the volume (VOL 00 - "PAUSE" appears. Press and hold the e or f button to the previous file. Example: Folder number Recording time Current file number AM Play mode on the time display, then the recorded time remains lit. Press the "+" or "-" button to the next file. Playback Set the play mode...
... the STOP button to start playback (see page 12). 2. In the stop playback. VOL 28). Press the e button briefly to skip to adjust the volume (VOL 00 - "PAUSE" appears. Press and hold the e or f button to the previous file. Example: Folder number Recording time Current file number AM Play mode on the time display, then the recorded time remains lit. Press the "+" or "-" button to the next file. Playback Set the play mode...
Instruction Manual
Page 13
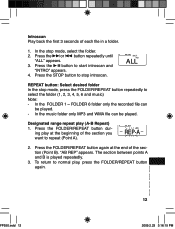
... B is played repeatedly. 3. AM ONE DICT HQ ALL REPEAT button: Select desired folder In the stop mode, press the FOLDER/REPEAT button repeatedly to start introscan and "INTRO" appears. 4. Introscan Play back the first 3 seconds of the section you want to stop introscan. Press the FOLDER/REPEAT button dur- DEUTSCH 1 25 FRANÇAIS 49 ESPAÑOL 74 PORTUGUÊS 99 ITAL1I2ANO 67 81 FP550.indd...
... B is played repeatedly. 3. AM ONE DICT HQ ALL REPEAT button: Select desired folder In the stop mode, press the FOLDER/REPEAT button repeatedly to start introscan and "INTRO" appears. 4. Introscan Play back the first 3 seconds of the section you want to stop introscan. Press the FOLDER/REPEAT button dur- DEUTSCH 1 25 FRANÇAIS 49 ESPAÑOL 74 PORTUGUÊS 99 ITAL1I2ANO 67 81 FP550.indd...
Instruction Manual
Page 14
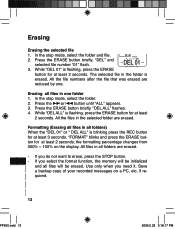
... selected folder are erased. Press the ERASE button briefly. Save a backup copy of your recorded messages on the display. Use only when you select the format function, the memory will be erased. "DEL" and selected file number "01" flash. In the stop mode, select the folder and file. 2. All the files in the folder is flashing, press the ERASE button for at least 3 seconds. Formatting (Erasing all...
... selected folder are erased. Press the ERASE button briefly. Save a backup copy of your recorded messages on the display. Use only when you select the format function, the memory will be erased. "DEL" and selected file number "01" flash. In the stop mode, select the folder and file. 2. All the files in the folder is flashing, press the ERASE button for at least 3 seconds. Formatting (Erasing all...

Instruction Manual
Page 15
... 67 81 FP550.indd 14 2009.2.23 3:16:17 PM When using Windows XP or Windows 2000, ENGLISH 1. 2. Upgraded Windows environments Windows 95, Windows NT,Windows 98, Windows 98SE Dual-boot Windows environments - Log in as an administrator. Connecting to operate with all PCs in the recom- Operation is not guaranteed to PC Recommended PC environment Supported PCs Windows preinstalled PC Supported OS Windows Vista Windows XP Professional Windows XP Home...
... 67 81 FP550.indd 14 2009.2.23 3:16:17 PM When using Windows XP or Windows 2000, ENGLISH 1. 2. Upgraded Windows environments Windows 95, Windows NT,Windows 98, Windows 98SE Dual-boot Windows environments - Log in as an administrator. Connecting to operate with all PCs in the recom- Operation is not guaranteed to PC Recommended PC environment Supported PCs Windows preinstalled PC Supported OS Windows Vista Windows XP Professional Windows XP Home...
Instruction Manual
Page 16
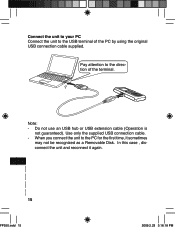
... FP550.indd 15 2009.2.23 3:16:18 PM Do not use an USB hub or USB extension cable (Operation is not guaranteed). When you connect the unit to the PC for the first time, it again. In this case , disconnect the unit and reconnect it sometimes may not be recognized as a Removable Disk. Note: - Connect the unit to your PC Connect...
... FP550.indd 15 2009.2.23 3:16:18 PM Do not use an USB hub or USB extension cable (Operation is not guaranteed). When you connect the unit to the PC for the first time, it again. In this case , disconnect the unit and reconnect it sometimes may not be recognized as a Removable Disk. Note: - Connect the unit to your PC Connect...
Instruction Manual
Page 17
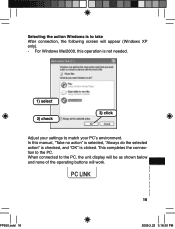
... operation is clicked. tion to the PC. ENGLISH PC LINK DEUTSCH FRANÇAIS 1 25 49 ESPAÑOL 74 PORTUGUÊS 99 ITAL1I6ANO 67 81 FP550.indd 16 2009.2.23 3:16:20 PM This completes the connec- For Windows Me/2000, this manual,... not needed. 1) select 2) check 3) click Adjust your settings to match your PCʼs environment. When connected to the PC, the unit display will be as shown below and none of the operating buttons will appear (Windows XP only). - Selecting the action Windows is to take After connection, the following screen will work.
... operation is clicked. tion to the PC. ENGLISH PC LINK DEUTSCH FRANÇAIS 1 25 49 ESPAÑOL 74 PORTUGUÊS 99 ITAL1I6ANO 67 81 FP550.indd 16 2009.2.23 3:16:20 PM This completes the connec- For Windows Me/2000, this manual,... not needed. 1) select 2) check 3) click Adjust your settings to match your PCʼs environment. When connected to the PC, the unit display will be as shown below and none of the operating buttons will appear (Windows XP only). - Selecting the action Windows is to take After connection, the following screen will work.
Instruction Manual
Page 19
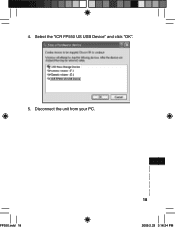
4. Select the "ICR FP550 US USB Device" and click "OK". ICR FP550 US USB Device 5. Disconnect the unit from your PC. FP550.indd 18 ENGLISH 1 DEUTSCH 25 FRANÇAIS 49 ESPAÑOL 74 PORTUGUÊS 99 ITAL1I8ANO 67 81 2009.2.23 3:16:24 PM
4. Select the "ICR FP550 US USB Device" and click "OK". ICR FP550 US USB Device 5. Disconnect the unit from your PC. FP550.indd 18 ENGLISH 1 DEUTSCH 25 FRANÇAIS 49 ESPAÑOL 74 PORTUGUÊS 99 ITAL1I8ANO 67 81 2009.2.23 3:16:24 PM
Instruction Manual
Page 20
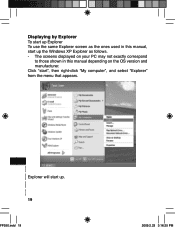
GLISH 1 UTSCH 25 ANÇAIS 4E9xplorer will start up the Windows XP Explorer as follows. - Click "start", then right-click "My computer", and select "Explorer" from the menu that appears. PAÑOL 74 RTUGUÊS 99 LIANO 6179 81 FP550.indd 19 2009.2.23 3:16:25 PM Displaying by Explorer To start up Explorer To use the same Explorer screen as the ones used in this manual depending on your PC may not exactly correspond to those shown in this manual, start up . The screens displayed on the OS version and manufacturer.
GLISH 1 UTSCH 25 ANÇAIS 4E9xplorer will start up the Windows XP Explorer as follows. - Click "start", then right-click "My computer", and select "Explorer" from the menu that appears. PAÑOL 74 RTUGUÊS 99 LIANO 6179 81 FP550.indd 19 2009.2.23 3:16:25 PM Displaying by Explorer To start up Explorer To use the same Explorer screen as the ones used in this manual depending on your PC may not exactly correspond to those shown in this manual, start up . The screens displayed on the OS version and manufacturer.

Instruction Manual
Page 21
FOLDER_1 FOLDER_2 FOLDER_3 FOLDER_4 FOLDER 1 FOLDER 2 FOLDER 3 FOLDER 4 FOLDER 5 FOLDER 6 MUSIC VOICE FOLDER_5 MUSIC FOLDER_6 [FOLDER 1] ~ [FOLDER 2] Files recorded using the unit are stored here. [MUSIC] Files transfered from your PC are trans- There is no set format for file names for a Removable Disk will appear in My Computer in Windows when the unit is connected to the folder. You can not create a folder in this folder. - DEUTSCH 1 25 FRANÇAIS 49 ESPAÑ...
FOLDER_1 FOLDER_2 FOLDER_3 FOLDER_4 FOLDER 1 FOLDER 2 FOLDER 3 FOLDER 4 FOLDER 5 FOLDER 6 MUSIC VOICE FOLDER_5 MUSIC FOLDER_6 [FOLDER 1] ~ [FOLDER 2] Files recorded using the unit are stored here. [MUSIC] Files transfered from your PC are trans- There is no set format for file names for a Removable Disk will appear in My Computer in Windows when the unit is connected to the folder. You can not create a folder in this folder. - DEUTSCH 1 25 FRANÇAIS 49 ESPAÑ...
Instruction Manual
Page 24
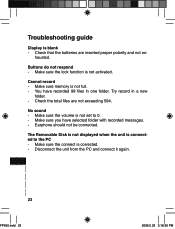
... have selected folder with recorded messages. - Check the total files are inserted proper polarity and not ex- Make sure you have recorded 99 files in a new folder. - Troubleshooting guide Display is not activated. Buttons do not respond - Try record in one folder. No sound - Disconnect the unit from the PC and connect it again. The Removable Disk is not displayed when the unit is not set to...
... have selected folder with recorded messages. - Check the total files are inserted proper polarity and not ex- Make sure you have recorded 99 files in a new folder. - Troubleshooting guide Display is not activated. Buttons do not respond - Try record in one folder. No sound - Disconnect the unit from the PC and connect it again. The Removable Disk is not displayed when the unit is not set to...
Instruction Manual
Page 25
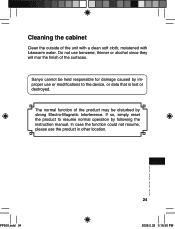
Sanyo cannot be disturbed by strong Electro-Magnetic Interference. The normal function of the unit with a clean soft cloth, moistened with lukewarm water. If so, simply reset the product to the device, or data that is lost or destroyed. FP550.indd 24 ENGLISH 1 DEUTSCH... 25 FRANÇAIS 49 ESPAÑOL 74 PORTUGUÊS 99 ITAL2I4ANO 67 81 2009.2.23 3:16:30 PM In case the function could not resume, please use or modifications to resume normal operation by following the instruction manual...
Sanyo cannot be disturbed by strong Electro-Magnetic Interference. The normal function of the unit with a clean soft cloth, moistened with lukewarm water. If so, simply reset the product to the device, or data that is lost or destroyed. FP550.indd 24 ENGLISH 1 DEUTSCH... 25 FRANÇAIS 49 ESPAÑOL 74 PORTUGUÊS 99 ITAL2I4ANO 67 81 2009.2.23 3:16:30 PM In case the function could not resume, please use or modifications to resume normal operation by following the instruction manual...


