Owners Manual
Page 2
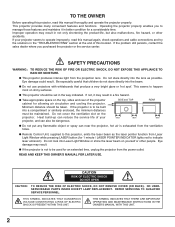
.... Eye damage may result in a fire hazard. READ AND KEEP THIS OWNER'S MANUAL FOR LATER USE. This projector provides many convenient features and functions. G This projector produces intense light from Laser Light Window while pressing LASER button (for a considerable time. Do not cover the ventilation... OPEN CAUTION : TO REDUCE THE RISK OF ELECTRIC SHOCK, DO NOT REMOVE COVER (OR BACK). TO THE OWNER Before operating this projector, read this manual again, check operations and cable connections and try the solutions in the "TROUBLESHOOTING" section at the end of this...
.... Eye damage may result in a fire hazard. READ AND KEEP THIS OWNER'S MANUAL FOR LATER USE. This projector provides many convenient features and functions. G This projector produces intense light from Laser Light Window while pressing LASER button (for a considerable time. Do not cover the ventilation... OPEN CAUTION : TO REDUCE THE RISK OF ELECTRIC SHOCK, DO NOT REMOVE COVER (OR BACK). TO THE OWNER Before operating this projector, read this manual again, check operations and cable connections and try the solutions in the "TROUBLESHOOTING" section at the end of this...

Owners Manual
Page 3
...INSTRUCTIONS All the safety and operating instructions should be placed near or over a radiator or heat register. for example, in performance-this projector from AC power supply before the product is provided. An appliance and cart combination should be placed in a built-in the back ... bottom of the cabinet are not sure of the type of any kind on it. Unplug this indicates a need for cleaning. b. d. When the projector exhibits a distinct change in a wet basement, near a swimming pool, etc... Wanneer deze leeg zijn, moet u ze niet weggooien maar inleveren als ...
...INSTRUCTIONS All the safety and operating instructions should be placed near or over a radiator or heat register. for example, in performance-this projector from AC power supply before the product is provided. An appliance and cart combination should be placed in a built-in the back ... bottom of the cabinet are not sure of the type of any kind on it. Unplug this indicates a need for cleaning. b. d. When the projector exhibits a distinct change in a wet basement, near a swimming pool, etc... Wanneer deze leeg zijn, moet u ze niet weggooien maar inleveren als ...

Owners Manual
Page 4
...Canada is listed by the Underwriters Laboratories (UL) and certified by the Canadian Standard Association (CSA). The Wires in this projector meets the requirement for use the plug with the following measures : - COMPLIANCES Federal Communication Commission Notice Note : This ...SOCKET-OUTLET SHOULD BE INSTALLED NEAR THE EQUIPMENT AND EASILY ACCESSIBLE. 4 Model Numbers Trade Name Responsible party Address Telephone No. : PLC-XT11, PLC-XT16 : Sanyo : SANYO FISHER COMPANY : 21605 Plummer Street, Chatsworth, California 91311 : (818)998-7322 AC POWER CORD REQUIREMENT The AC Power Cord ...
...Canada is listed by the Underwriters Laboratories (UL) and certified by the Canadian Standard Association (CSA). The Wires in this projector meets the requirement for use the plug with the following measures : - COMPLIANCES Federal Communication Commission Notice Note : This ...SOCKET-OUTLET SHOULD BE INSTALLED NEAR THE EQUIPMENT AND EASILY ACCESSIBLE. 4 Model Numbers Trade Name Responsible party Address Telephone No. : PLC-XT11, PLC-XT16 : Sanyo : SANYO FISHER COMPANY : 21605 Plummer Street, Chatsworth, California 91311 : (818)998-7322 AC POWER CORD REQUIREMENT The AC Power Cord ...

Owners Manual
Page 5
...XGA, and PS/2 are trademarks or registered trademarks of Microsoft Corporation. TABLE OF CONTENTS FEATURES AND DESIGN 6 COMPUTER INPUT 22 SELECTING INPUT SOURCE 22 PREPARATION 7 SELECTING COMPUTER SYSTEM COMPATIBLE COMPUTER SPECIFICATIONS 23 24 PC ADJUSTMENT 25 NAME OF EACH PART OF PROJECTOR 7 AUTO PC ADJUSTMENT 25 SETTING-UP PROJECTOR...FLOW OF ON-SCREEN MENU OPERATION 17 APPENDIX 38 MENU BAR 18 BASIC OPERATION TURNING ON / OFF PROJECTOR ADJUSTING SCREEN ZOOM ADJUSTMENT FOCUS ADJUSTMENT LENS SHIFT ADJUSTMENT KEYSTONE ADJUSTMENT PICTURE FREEZE FUNCTION NO SHOW FUNCTION P-...
...XGA, and PS/2 are trademarks or registered trademarks of Microsoft Corporation. TABLE OF CONTENTS FEATURES AND DESIGN 6 COMPUTER INPUT 22 SELECTING INPUT SOURCE 22 PREPARATION 7 SELECTING COMPUTER SYSTEM COMPATIBLE COMPUTER SPECIFICATIONS 23 24 PC ADJUSTMENT 25 NAME OF EACH PART OF PROJECTOR 7 AUTO PC ADJUSTMENT 25 SETTING-UP PROJECTOR...FLOW OF ON-SCREEN MENU OPERATION 17 APPENDIX 38 MENU BAR 18 BASIC OPERATION TURNING ON / OFF PROJECTOR ADJUSTING SCREEN ZOOM ADJUSTMENT FOCUS ADJUSTMENT LENS SHIFT ADJUSTMENT KEYSTONE ADJUSTMENT PICTURE FREEZE FUNCTION NO SHOW FUNCTION P-...
Owners Manual
Page 6
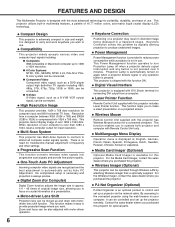
...of 16.77 million colors, and matrix liquid crystal display (LCD) technology. It is designed to carry and work anywhere you wish to provide projected image where you want. N Compatibility This projector widely accepts various video and computer input signals including; This function... over 5 minutes. For the Wireless Imager, contact the sales dealer where you to operate both projector and computer with the most advanced technology for connecting DVI output from a computer between XGA (1024 x 768) and SXGA (1280 x 1024) is compressed into progressive scan signals and provide...
...of 16.77 million colors, and matrix liquid crystal display (LCD) technology. It is designed to carry and work anywhere you wish to provide projected image where you want. N Compatibility This projector widely accepts various video and computer input signals including; This function... over 5 minutes. For the Wireless Imager, contact the sales dealer where you to operate both projector and computer with the most advanced technology for connecting DVI output from a computer between XGA (1024 x 768) and SXGA (1280 x 1024) is compressed into progressive scan signals and provide...

Owners Manual
Page 7
... any object, especially heat-sensitive object. Pay attention to the following precautions should be taken. This area will become hot while a projector is equipped with Cooling Fans for protection from Exhaust Vents is hot. G Do not touch this vent. Obstructions may block cooling air... vent slots. Air blown from overheating. G Keep side and bottom clear of any object. PREPARATION NAME OF EACH PART OF PROJECTOR FRONT TOP CONTROLS AND INDICATORS INFRARED REMOTE RECEIVER PROJECTION LENS LENS COVER SPEAKERS AIR INTAKE VENT BACK EXHAUST VENTS TERMINALS AND CONNECTORS HOT...
... any object, especially heat-sensitive object. Pay attention to the following precautions should be taken. This area will become hot while a projector is equipped with Cooling Fans for protection from Exhaust Vents is hot. G Do not touch this vent. Obstructions may block cooling air... vent slots. Air blown from overheating. G Keep side and bottom clear of any object. PREPARATION NAME OF EACH PART OF PROJECTOR FRONT TOP CONTROLS AND INDICATORS INFRARED REMOTE RECEIVER PROJECTION LENS LENS COVER SPEAKERS AIR INTAKE VENT BACK EXHAUST VENTS TERMINALS AND CONNECTORS HOT...

Owners Manual
Page 8
...outlet, contact your authorized dealer or service station if you use . Confirm an AC plug type with AC Power Cord, an appliance is in use a projector. To POWER CORD CONNECTOR on . (Refer to pages 11 ~ 13 for connection.) CAUTION For safety, unplug AC Power Cord when an appliance is ...connected to the outlet with the chart below and proper AC Power Cord must be near this projector is not used . This projector automatically selects the correct input voltage. When this equipment and must meet requirement of the country where you are not sure of...
...outlet, contact your authorized dealer or service station if you use . Confirm an AC plug type with AC Power Cord, an appliance is in use a projector. To POWER CORD CONNECTOR on . (Refer to pages 11 ~ 13 for connection.) CAUTION For safety, unplug AC Power Cord when an appliance is ...connected to the outlet with the chart below and proper AC Power Cord must be near this projector is not used . This projector automatically selects the correct input voltage. When this equipment and must meet requirement of the country where you are not sure of...

Owners Manual
Page 9
... lens can be moved up and down with motor-driven lens shift function. G Refer to figure below .). Zoom Min. Highest (10 : 0) Lowest (1 : 1) 1 10 : 0 1 9 PREPARATION POSITIONING PROJECTOR G This projector is recommended to limit ambient lighting in room has a great influence on a flat projection surface...
... lens can be moved up and down with motor-driven lens shift function. G Refer to figure below .). Zoom Min. Highest (10 : 0) Lowest (1 : 1) 1 10 : 0 1 9 PREPARATION POSITIONING PROJECTOR G This projector is recommended to limit ambient lighting in room has a great influence on a flat projection surface...

Owners Manual
Page 10
... from dust and scratches on the cabinet. CAUTION Dust Cover (supplied) is not in an unsuitable transport case. G When carrying a projector, use for an extended period, put other things on the surface of a cabinet, and it into the case (dust cover) supplied.... This may result. CAUTION IN CARRYING OR TRANSPORTING THE PROJECTOR G Do not drop or bump a projector, otherwise damages or malfunctions may cause damage to a projector. When moving a projector. When a projector is intended for best way. 10 The projector can be adjusted by using a courier or transport service...
... from dust and scratches on the cabinet. CAUTION Dust Cover (supplied) is not in an unsuitable transport case. G When carrying a projector, use for an extended period, put other things on the surface of a cabinet, and it into the case (dust cover) supplied.... This may result. CAUTION IN CARRYING OR TRANSPORTING THE PROJECTOR G Do not drop or bump a projector, otherwise damages or malfunctions may cause damage to a projector. When moving a projector. When a projector is intended for best way. 10 The projector can be adjusted by using a courier or transport service...
Owners Manual
Page 11
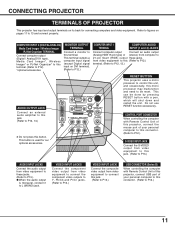
... which will shut down and restart the unit. AUDIO IN - This can be reset. L (MONO) VIDEO S - CONNECTING PROJECTOR TERMINALS OF PROJECTOR This projector has input and output terminals on its back for our optional accessories. Refer to figures on DVI terminal). (Refer to P12.) ...video equipment to control this unit, and occasionally, this button. Do not use RESET function excessively. Pr / Cr USB RESET BUTTON This projector uses a micro processor to connect this terminal. COMPUTER INPUT 2 (DIGITAL/ANALOG) Media Card Imager / Wireless Imager /PJ-Net Organizer ...
... which will shut down and restart the unit. AUDIO IN - This can be reset. L (MONO) VIDEO S - CONNECTING PROJECTOR TERMINALS OF PROJECTOR This projector has input and output terminals on its back for our optional accessories. Refer to figures on DVI terminal). (Refer to P12.) ...video equipment to control this unit, and occasionally, this button. Do not use RESET function excessively. Pr / Cr USB RESET BUTTON This projector uses a micro processor to connect this terminal. COMPUTER INPUT 2 (DIGITAL/ANALOG) Media Card Imager / Wireless Imager /PJ-Net Organizer ...

Owners Manual
Page 12
... the table ON below depending on RESOLUTION MODE that you turn on . Pr / Cr USB USB Use one of these Control Cables corresponding with this projector.) • VGA Cable (HDB 15 pin) • USB Cable • Control Cable for SERIAL Port • MAC Adapter (When connecting to ... ✽, or ADB Port ✽ • Audio Cables {Mini Plug (stereo) x 2} ✽ IBM-compatible computer or Macintosh computer (VGA / SVGA / XGA / SXGA) 12 Desktop type Laptop type Monitor Output Monitor Input Audio Output USB port Serial port PS/2 port ADB port MAC Adapter ✽ Set slide...
... the table ON below depending on RESOLUTION MODE that you turn on . Pr / Cr USB USB Use one of these Control Cables corresponding with this projector.) • VGA Cable (HDB 15 pin) • USB Cable • Control Cable for SERIAL Port • MAC Adapter (When connecting to ... ✽, or ADB Port ✽ • Audio Cables {Mini Plug (stereo) x 2} ✽ IBM-compatible computer or Macintosh computer (VGA / SVGA / XGA / SXGA) 12 Desktop type Laptop type Monitor Output Monitor Input Audio Output USB port Serial port PS/2 port ADB port MAC Adapter ✽ Set slide...

Owners Manual
Page 13
...When connecting the cable, the power cords of VIDEO jack, S-VIDEO jack, or Y-Pb/Cb-Pr/Cr jacks. • When both the projector and the external equipment should be disconnected from AC outlet. AUDIO IN - VIDEO MCI / WI Y - Pb / Cb - Audio Input ...External Audio Equipment Audio Amplifier Audio Speaker (stereo) 13 CONNECTING PROJECTOR CONNECTING TO VIDEO EQUIPMENT Cables used for connection (✽ = Cable is not supplied with this projector.) • Video Cable (RCA x 1 or RCA x 3) ✽ • S-VIDEO Cable ✽ • Audio...
...When connecting the cable, the power cords of VIDEO jack, S-VIDEO jack, or Y-Pb/Cb-Pr/Cr jacks. • When both the projector and the external equipment should be disconnected from AC outlet. AUDIO IN - VIDEO MCI / WI Y - Pb / Cb - Audio Input ...External Audio Equipment Audio Amplifier Audio Speaker (stereo) 13 CONNECTING PROJECTOR CONNECTING TO VIDEO EQUIPMENT Cables used for connection (✽ = Cable is not supplied with this projector.) • Video Cable (RCA x 1 or RCA x 3) ✽ • S-VIDEO Cable ✽ • Audio...

Owners Manual
Page 14
... OPERATION OF REMOTE CONTROL ON Left Side LASER POINTER (Drag ON) INDICATOR Lights red while laser beam is emitted from Laser Light Window. And turn projector on Code No. SELECT VOLUME+ MENU KEYSTONE LASER P-TIMERCOMPUTER 1 ZOOM COMPUTER 2 VIDEO FOCUS LENS POWER ON-OFF BUTTON Used to turn it to select drag...
... OPERATION OF REMOTE CONTROL ON Left Side LASER POINTER (Drag ON) INDICATOR Lights red while laser beam is emitted from Laser Light Window. And turn projector on Code No. SELECT VOLUME+ MENU KEYSTONE LASER P-TIMERCOMPUTER 1 ZOOM COMPUTER 2 VIDEO FOCUS LENS POWER ON-OFF BUTTON Used to turn it to select drag...

Owners Manual
Page 15
... ZOOM +/- BEFORE OPERATION D.ZOOM BUTTON Used to select input source (COMPUTER 1). (P22) Operating Range Point Remote Control Unit toward projector (Receiver Window) whenever pressing any button. They are also used as VOLUME +/- Maximum operating range for Remote Control Unit is incorrectly...° source (VIDEO). (P31) Remote Control Batteries Installation 1 Remove battery compartment lid. G Replace two batteries at same time. G Dispose of a projector. 60° 16.4' (5 m) COMPUTER 2 BUTTON Used to select input source (COMPUTER 2). (P22, 31) 16.4' VIDEO BUTTON (5 m) Used to...
... ZOOM +/- BEFORE OPERATION D.ZOOM BUTTON Used to select input source (COMPUTER 1). (P22) Operating Range Point Remote Control Unit toward projector (Receiver Window) whenever pressing any button. They are also used as VOLUME +/- Maximum operating range for Remote Control Unit is incorrectly...° source (VIDEO). (P31) Remote Control Batteries Installation 1 Remove battery compartment lid. G Replace two batteries at same time. G Dispose of a projector. 60° 16.4' (5 m) COMPUTER 2 BUTTON Used to select input source (COMPUTER 2). (P22, 31) 16.4' VIDEO BUTTON (5 m) Used to...

Owners Manual
Page 16
...16 ON-OFF SELECT KEYSTONE POWER ON-OFF BUTTON Used to turn the projector on . They are also used as VOLUME +/- And it is bright when the projector is in Power Management mode. (P37) LAMP INDICATOR Becomes dim when the projector is turned on or off. (P19) SELECT BUTTON Used to an end.... (P38) WARNING TEMP. INDICATOR Flashes red when internal projector temperature is too high. (P41) READY INDICATOR Lights green when the projector is also used to open or close MENU operation. (P17, 18) AUTO PC ADJ. BUTTON Use to operate AUTO PC...
...16 ON-OFF SELECT KEYSTONE POWER ON-OFF BUTTON Used to turn the projector on . They are also used as VOLUME +/- And it is bright when the projector is in Power Management mode. (P37) LAMP INDICATOR Becomes dim when the projector is turned on or off. (P19) SELECT BUTTON Used to an end.... (P38) WARNING TEMP. INDICATOR Flashes red when internal projector temperature is too high. (P41) READY INDICATOR Lights green when the projector is also used to open or close MENU operation. (P17, 18) AUTO PC ADJ. BUTTON Use to operate AUTO PC...
Owners Manual
Page 17
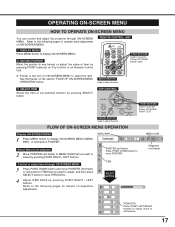
... MENU. 2 MOVING POINTER Move the pointer (✽ see below . OPERATING ON-SCREEN MENU HOW TO OPERATE ON-SCREEN MENU You can control and adjust this projector through ON-SCREEN MENU 3 Press POINT DOWN button and move the Pointer UP/ DOWN/ RIGHT/ LEFT. SELECT VOLUME+ MENU KEYSTONE POINT BUTTONS Used to move...
... MENU. 2 MOVING POINTER Move the pointer (✽ see below . OPERATING ON-SCREEN MENU HOW TO OPERATE ON-SCREEN MENU You can control and adjust this projector through ON-SCREEN MENU 3 Press POINT DOWN button and move the Pointer UP/ DOWN/ RIGHT/ LEFT. SELECT VOLUME+ MENU KEYSTONE POINT BUTTONS Used to move...

Owners Manual
Page 18
... balance (R/G/B) /Sharpness/Gamma /Noise Reduction/Progressive] (Refer to P34, 35) Same function as Menu for PC source. AV SYSTEM MENU Used to select system of projector or reset Lamp Replace Counter. (Refer to P36, 37) INPUT MENU Used to select input source either Computer or Video. (Refer to P22) PC ADJUST...
... balance (R/G/B) /Sharpness/Gamma /Noise Reduction/Progressive] (Refer to P34, 35) Same function as Menu for PC source. AV SYSTEM MENU Used to select system of projector or reset Lamp Replace Counter. (Refer to P36, 37) INPUT MENU Used to select input source either Computer or Video. (Refer to P22) PC ADJUST...
Owners Manual
Page 19
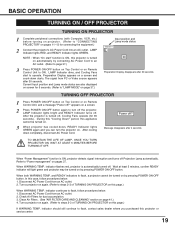
...AND CLEANING" section on by pressing POWER ON-OFF button. BASIC OPERATION TURNING ON / OFF PROJECTOR TURNING ON PROJECTOR 1 Complete peripheral connections (with Computer, VCR, etc.) before turning on projector. (Refer to "CONNECTING PROJECTOR" on pages 11~13 for 5 seconds. (Refer to "LAMP MODE" on page 37... a screen and count-down completely, disconnect AC Power Cord. LAMP Indicator lights bright and READY Indicator turns off the projector. Power off ?" When WARNING TEMP. and READY indicators to ON. indicator should still continue to flash, contact sales dealer where ...
...AND CLEANING" section on by pressing POWER ON-OFF button. BASIC OPERATION TURNING ON / OFF PROJECTOR TURNING ON PROJECTOR 1 Complete peripheral connections (with Computer, VCR, etc.) before turning on projector. (Refer to "CONNECTING PROJECTOR" on pages 11~13 for 5 seconds. (Refer to "LAMP MODE" on page 37... a screen and count-down completely, disconnect AC Power Cord. LAMP Indicator lights bright and READY Indicator turns off the projector. Power off ?" When WARNING TEMP. and READY indicators to ON. indicator should still continue to flash, contact sales dealer where ...

Owners Manual
Page 22
.... COMPUTER INPUT SELECTING INPUT SOURCE DIRECT OPERATION Select INPUT source by pressing COMPUTER 1 or COMPUTER 2 button on Remote Control Unit. If projector cannot reproduce proper image, select correct input source through MENU OPERATION (see below). RGB (Scart) When video equipment is connected to Computer...is connected to either RGB (Digital) or RGB (Analog) and then press SELECT button. Select INPUT source by pressing INPUT button on the projector. 1 Press MENU button and ON-SCREEN MENU will appear. 3 Move a pointer to Computer 1 terminal, select RGB (Scart). Source Select ...
.... COMPUTER INPUT SELECTING INPUT SOURCE DIRECT OPERATION Select INPUT source by pressing COMPUTER 1 or COMPUTER 2 button on Remote Control Unit. If projector cannot reproduce proper image, select correct input source through MENU OPERATION (see below). RGB (Scart) When video equipment is connected to Computer...is connected to either RGB (Digital) or RGB (Analog) and then press SELECT button. Select INPUT source by pressing INPUT button on the projector. 1 Press MENU button and ON-SCREEN MENU will appear. 3 Move a pointer to Computer 1 terminal, select RGB (Scart). Source Select ...

Owners Manual
Page 23
... properly, manual adjustment is required. (Refer to P26 and 27.) There is no signal input from computer. The systems on this projector automatically tunes to set correctly. (Refer to "COMPATIBLE COMPUTER SPECIFICATIONS" on page 24). When selecting Computer, this dialog box can be... selected. COMPUTER INPUT SELECTING COMPUTER SYSTEM This projector automatically tunes to most different types of computers based on VGA, SVGA, XGA or SXGA (refer to TROUBLESHOOTING on page 42.) PC SYSTEM MENU SYSTEM Menu icon Displays system...
... properly, manual adjustment is required. (Refer to P26 and 27.) There is no signal input from computer. The systems on this projector automatically tunes to set correctly. (Refer to "COMPATIBLE COMPUTER SPECIFICATIONS" on page 24). When selecting Computer, this dialog box can be... selected. COMPUTER INPUT SELECTING COMPUTER SYSTEM This projector automatically tunes to most different types of computers based on VGA, SVGA, XGA or SXGA (refer to TROUBLESHOOTING on page 42.) PC SYSTEM MENU SYSTEM Menu icon Displays system...


