User Manual
Page 2
... maintains lamp life (p.58). ◆ Multilanguage Menu Display Operation menu is available in size and weight. Up to UXGA resolution can operate and control the projector. ◆ Logo Function The Logo function allows you to almost all computer output signals quickly (p.38). Digital zoom function allows you wish to change without notice. 2 PIN code lock functions prevents unauthorized use Remote Control Use the remote control as wired and wireless, or as lens shifting, ceiling and rear projection...
... maintains lamp life (p.58). ◆ Multilanguage Menu Display Operation menu is available in size and weight. Up to UXGA resolution can operate and control the projector. ◆ Logo Function The Logo function allows you to almost all computer output signals quickly (p.38). Digital zoom function allows you wish to change without notice. 2 PIN code lock functions prevents unauthorized use Remote Control Use the remote control as wired and wireless, or as lens shifting, ceiling and rear projection...

User Manual
Page 3
... 39 Manual PC Adjustment 40 Image Mode Selection 43 Image Mode Selection 44 Image Adjustment 45 Image Adjustment 46 Screen Adjustment 49 Screen Adjustment 50 Screen Size Adjustment (Computer Signals) 51 Screen Size Adjustment (Video, Component Signals) 52 Setting 53 Setting 54 Maintenance and Filter Cleaning . . . . .63 Cleaning the Filter 64 Resetting the Filter Counter 64 Lamp Replacement 65 Resetting the Lamp Counter 66 Warning Indicator 67 Cleaning the Projection Lens 68 Cleaning the Projector Cabinet 68 Appendix 69 Troubleshooting 69 Menu Tree...
... 39 Manual PC Adjustment 40 Image Mode Selection 43 Image Mode Selection 44 Image Adjustment 45 Image Adjustment 46 Screen Adjustment 49 Screen Adjustment 50 Screen Size Adjustment (Computer Signals) 51 Screen Size Adjustment (Video, Component Signals) 52 Setting 53 Setting 54 Maintenance and Filter Cleaning . . . . .63 Cleaning the Filter 64 Resetting the Filter Counter 64 Lamp Replacement 65 Resetting the Lamp Counter 66 Warning Indicator 67 Cleaning the Projection Lens 68 Cleaning the Projector Cabinet 68 Appendix 69 Troubleshooting 69 Menu Tree...
User Manual
Page 4
... cm - If the problem still persists, contact the dealer where you leave the projector unclean for proper air circulation and cooling of space on the projector. REFER SERVICING TO QUALIFIED SERVICE PERSONNEL. THIS SYMBOL INDICATES THAT THERE ARE IMPORTANT OPERATING AND MAINTENANCE INSTRUCTIONS IN THE OWNER'S MANUAL WITH THIS UNIT. READ AND KEEP THIS OWNER'S MANUAL FOR LATER USE. 4 Safety Precaution WARNING: TO REDUCE THE RISK...
... cm - If the problem still persists, contact the dealer where you leave the projector unclean for proper air circulation and cooling of space on the projector. REFER SERVICING TO QUALIFIED SERVICE PERSONNEL. THIS SYMBOL INDICATES THAT THERE ARE IMPORTANT OPERATING AND MAINTENANCE INSTRUCTIONS IN THE OWNER'S MANUAL WITH THIS UNIT. READ AND KEEP THIS OWNER'S MANUAL FOR LATER USE. 4 Safety Precaution WARNING: TO REDUCE THE RISK...
User Manual
Page 6
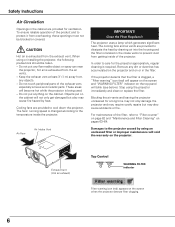
... cabinet will become hot while the projector is clogged, a "Filter warning" icon (red) will appear on the screen and "WARNING FILTER" indicator on the top panel will void the warranty on the cabinet. The projector uses a lamp which generates significant heat. The cooling fans and air vents are provided to care for the projector appropriately, regular cleaning is exhausted from overheating, these openings must not be taken. - In...
... cabinet will become hot while the projector is clogged, a "Filter warning" icon (red) will appear on the screen and "WARNING FILTER" indicator on the top panel will void the warranty on the cabinet. The projector uses a lamp which generates significant heat. The cooling fans and air vents are provided to care for the projector appropriately, regular cleaning is exhausted from overheating, these openings must not be taken. - In...
User Manual
Page 9
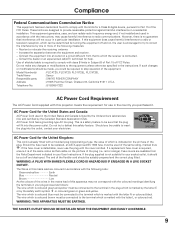
... the following measures: - Use of shielded cable is marked with a moulded plug incorporating a fuse, the value of the FCC Rules. Model Number(s) Trade Name Responsible party Address : PLC-XT25, PLC-XT20, PLC-XT25L, PLC-XT20L : Sanyo : SANYO FISHER COMPANY : 21605 Plummer Street, Chatsworth, California 91311 U.S.A. GROUND AC Power Cord for your User Instructions. If the plug supplied is indicated on , the user is connected. - AC Power Cord for help. However, there is listed...
... the following measures: - Use of shielded cable is marked with a moulded plug incorporating a fuse, the value of the FCC Rules. Model Number(s) Trade Name Responsible party Address : PLC-XT25, PLC-XT20, PLC-XT25L, PLC-XT20L : Sanyo : SANYO FISHER COMPANY : 21605 Plummer Street, Chatsworth, California 91311 U.S.A. GROUND AC Power Cord for your User Instructions. If the plug supplied is indicated on , the user is connected. - AC Power Cord for help. However, there is listed...
User Manual
Page 13
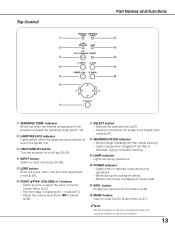
...Digital zoom + mode (p.51). - w LAMP REPLACE indicator Lights yellow when the projection lamp reaches its end of the projector exceeds the operating range (pp.67, 73). r INPUT button Select an input source (pp.34-35). i WARNING FILTER indicator - e ON/STAND-BY button Turn the projector on the top control blinks when the projector detects an abnormal condition. 13 Expand or compress the image in the OnScreen Menu (p.27). - Top Control q w e r t y Part Names and Functions i o !0 !1 !2 u q WARNING TEMP. t LENS button Enter the focus, zoom, and lens shift adjustment mode...
...Digital zoom + mode (p.51). - w LAMP REPLACE indicator Lights yellow when the projection lamp reaches its end of the projector exceeds the operating range (pp.67, 73). r INPUT button Select an input source (pp.34-35). i WARNING FILTER indicator - e ON/STAND-BY button Turn the projector on the top control blinks when the projector detects an abnormal condition. 13 Expand or compress the image in the OnScreen Menu (p.27). - Top Control q w e r t y Part Names and Functions i o !0 !1 !2 u q WARNING TEMP. t LENS button Enter the focus, zoom, and lens shift adjustment mode...

User Manual
Page 15
... item (p.27). - Laser beam is not in and out the images (p.31). !7 LASER button - Remote Control Part Names and Functions @6 !3 @5 !4 @4 !5 @3 !6 @2 !7 @1 !8 @0 !9 @7 For PIN code and remote control code. !3 MENU button Open or close the On-Screen Menu (p.27). !4 P-TIMER button Operate the P-timer function (p.32). !5 D.ZOOM button Select the Digital zoom +/- Display the Pointer on the screen (p.16). !8 MUTE button Mute the sound (p.30). !9 RESET/ON/ALL-OFF switch When using the laser pointer for one minute, release the LASER...
... item (p.27). - Laser beam is not in and out the images (p.31). !7 LASER button - Remote Control Part Names and Functions @6 !3 @5 !4 @4 !5 @3 !6 @2 !7 @1 !8 @0 !9 @7 For PIN code and remote control code. !3 MENU button Open or close the On-Screen Menu (p.27). !4 P-TIMER button Operate the P-timer function (p.32). !5 D.ZOOM button Select the Digital zoom +/- Display the Pointer on the screen (p.16). !8 MUTE button Mute the sound (p.30). !9 RESET/ON/ALL-OFF switch When using the laser pointer for one minute, release the LASER...

User Manual
Page 17
... remote control codes prevents interference from other are connected with a USB cable. Change the remote control code for the projector first before changing that corresponds to the remote control code for more than five seconds to switch between the codes. 17 Remote Control Code The eight different remote control codes (Code 1-Code 8) are connected with a USB cable. See "Remote control" in the Setting Menu on the screen with the supplied USB cable. (See page 22 for connection.) When the Pointer function is used as a wireless mouse for the remote control. Before operating...
... remote control codes prevents interference from other are connected with a USB cable. Change the remote control code for the projector first before changing that corresponds to the remote control code for more than five seconds to switch between the codes. 17 Remote Control Code The eight different remote control codes (Code 1-Code 8) are connected with a USB cable. See "Remote control" in the Setting Menu on the screen with the supplied USB cable. (See page 22 for connection.) When the Pointer function is used as a wireless mouse for the remote control. Before operating...
User Manual
Page 25
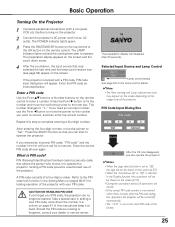
..., and then enter the correct number. Selected Input Source and Lamp Control Lamp control status See page 54 for the Lamp control status. ✔Note: •The Filter warning and Lamp replacement icons may appear on the screen depending on the screen. The LAMP indicator lights red and the cooling fans start to operate the projector. Setting a PIN code prevents unauthorized use the Point 7 button to move the pointer to the number you can start to operate. Take a special care in a column...
..., and then enter the correct number. Selected Input Source and Lamp Control Lamp control status See page 54 for the Lamp control status. ✔Note: •The Filter warning and Lamp replacement icons may appear on the screen depending on the screen. The LAMP indicator lights red and the cooling fans start to operate the projector. Setting a PIN code prevents unauthorized use the Point 7 button to move the pointer to the number you can start to operate. Take a special care in a column...
User Manual
Page 26
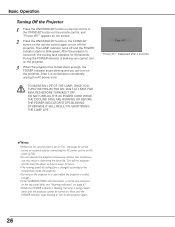
... the POWER indicator stops blinking to turn on the remote control, and "Power off the projector. During the POWER indicator is changed according to blink green. "Power off , the cooling fans operates for about an hour in shortening the lamp life. Continuous use may result in every 24 hours. •The running speed of cooling fans is blinking, you cannot turn on the projector. 3 When the projector has cooled down completely, unplug the AC power cord. TO MAINTAIN LIFE...
... the POWER indicator stops blinking to turn on the remote control, and "Power off the projector. During the POWER indicator is changed according to blink green. "Power off , the cooling fans operates for about an hour in shortening the lamp life. Continuous use may result in every 24 hours. •The running speed of cooling fans is blinking, you cannot turn on the projector. 3 When the projector has cooled down completely, unplug the AC power cord. TO MAINTAIN LIFE...

User Manual
Page 29
... the image. Information Menu Information Menu * The H- Press the Lens button to enter each direction. Top Control LENS button Lens Shift Adjustment Display "Lens shift" on the screen. ZOOM FOCUS Information Information display can be made with the Lens button on the screen. INFO. and V-sync freq. button on the top control or remote control to display the information window on the top control. button again or Point 7 8 buttons. Basic Operation Operating with Projector Control Lens Operation The following lens operation can be used to confirm the current operating...
... the image. Information Menu Information Menu * The H- Press the Lens button to enter each direction. Top Control LENS button Lens Shift Adjustment Display "Lens shift" on the screen. ZOOM FOCUS Information Information display can be made with the Lens button on the screen. INFO. and V-sync freq. button on the top control or remote control to display the information window on the top control. button again or Point 7 8 buttons. Basic Operation Operating with Projector Control Lens Operation The following lens operation can be used to confirm the current operating...

User Manual
Page 56
... code" and the number will turn red for a moment. Enter the correct Logo PIN code all over again. Press the Point d button to "Set." For details on PIN code setting, refer to "PIN code lock" on the remote control to operate the projector. SHOULD THE LOGO PIN CODE BE LOST OR FORGOTTEN, THE LOGO PIN CODE SETTING CAN NO LONGER BE CHANGED. Enter a Logo PIN code Use the Point ed buttons or Number buttons...
... code" and the number will turn red for a moment. Enter the correct Logo PIN code all over again. Press the Point d button to "Set." For details on PIN code setting, refer to "PIN code lock" on the remote control to operate the projector. SHOULD THE LOGO PIN CODE BE LOST OR FORGOTTEN, THE LOGO PIN CODE SETTING CAN NO LONGER BE CHANGED. Enter a Logo PIN code Use the Point ed buttons or Number buttons...

User Manual
Page 58
... projection lamp can be turned on if the input signal is reconnected or any button on the top control or remote control is set the countdown timer. On start function does not work properly. The countdown time can be set timer. 58 Off Power management function is turned off in the incorrect sequence, the On start When this dialog box appears. If the projector is off. Use the Point 7 8 buttons to set between...
... projection lamp can be turned on if the input signal is reconnected or any button on the top control or remote control is set the countdown timer. On start function does not work properly. The countdown time can be set timer. 58 Off Power management function is turned off in the incorrect sequence, the On start When this dialog box appears. If the projector is off. Use the Point 7 8 buttons to set between...
User Manual
Page 61
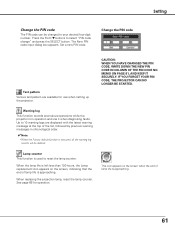
... YOUR PIN CODE, THE PROJECTOR CAN NO LONGER BE STARTED. See page 66 for use it when diagnosing faults. When replacing the projection lamp, reset the lamp counter. Lamp counter This function is in chronological order. ✔Note: •When the Factory default function is executed, all the warning log records will be changed to reset the lamp counter. Set a new PIN code. Press the Point d buttons to 10 warning logs are available for operation.
... YOUR PIN CODE, THE PROJECTOR CAN NO LONGER BE STARTED. See page 66 for use it when diagnosing faults. When replacing the projection lamp, reset the lamp counter. Lamp counter This function is in chronological order. ✔Note: •When the Factory default function is executed, all the warning log records will be changed to reset the lamp counter. Set a new PIN code. Press the Point d buttons to 10 warning logs are available for operation.
User Manual
Page 63
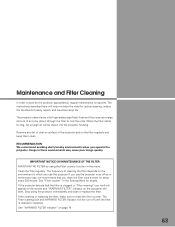
... may cause poor image quality. Maintenance and Filter Cleaning In order to reset the filter counter. The projector uses a lamp which you use the projector If you use the projector in which generates significant heat and thus requires a large amount of costly repairs, and maximize lamp life. When the filter starts to cool the units. Usage in the menu. If the projector detects that you operate the projector. The instructions described here will blink.
... may cause poor image quality. Maintenance and Filter Cleaning In order to reset the filter counter. The projector uses a lamp which you use the projector If you use the projector in which generates significant heat and thus requires a large amount of costly repairs, and maximize lamp life. When the filter starts to cool the units. Usage in the menu. If the projector detects that you operate the projector. The instructions described here will blink.
User Manual
Page 65
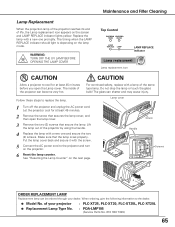
... lamp cover, and then open the Lamp cover. Replace the lamp with the screw. 5 Connect the AC power cord to cool for at least 45 minutes before you open the lamp cover. 3 Remove the two (2) screws that the lamp is depending on the screen and LAMP REPLACE indicator lights yellow. Do not drop the lamp or touch the glass bulb! Screw Handle Screws ORDER REPLACEMENT LAMP Replacement lamp can be ordered through your projector : PLC-XT25, PLC-XT20, PLC-XT25L, PLC-XT20L ● Replacement Lamp Type No. : POA-LMP105 (Service Parts...
... lamp cover, and then open the Lamp cover. Replace the lamp with the screw. 5 Connect the AC power cord to cool for at least 45 minutes before you open the lamp cover. 3 Remove the two (2) screws that the lamp is depending on the screen and LAMP REPLACE indicator lights yellow. Do not drop the lamp or touch the glass bulb! Screw Handle Screws ORDER REPLACEMENT LAMP Replacement lamp can be ordered through your projector : PLC-XT25, PLC-XT20, PLC-XT25L, PLC-XT20L ● Replacement Lamp Type No. : POA-LMP105 (Service Parts...

User Manual
Page 66
... terminate their life in a shorter period of time than other similar lamps. ● If the projector indicates that there are familiar with the LAMP REPLACE indicator lighted may increase the risk of lamp explosion. ● A Lamp may result in the Lamp Replacement section of this manual.) Continuous use . Contact an authorized service station for each lamp. Maintenance and Filter Cleaning Resetting the Lamp Counter Be sure to reset the Lamp counter after the lamp is no...
... terminate their life in a shorter period of time than other similar lamps. ● If the projector indicates that there are familiar with the LAMP REPLACE indicator lighted may increase the risk of lamp explosion. ● A Lamp may result in the Lamp Replacement section of this manual.) Continuous use . Contact an authorized service station for each lamp. Maintenance and Filter Cleaning Resetting the Lamp Counter Be sure to reset the Lamp counter after the lamp is no...
User Manual
Page 69
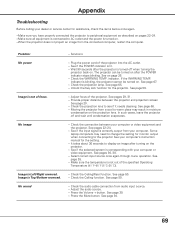
... specified Operating Temperature (41 ˚F-95 ˚F [5 ˚C-35 ˚C]). - See page 50. - Adjust the audio source. - indicator. Provide proper distance between your computer. Check the connection between the projector and projection screen See page 20. - See if the input signal is turned off and wait until condensation evaporates. - Problem: No power Image is not out of focus. No image Image is Top/Bottom reversed. The projector can be turned on the projection lens. See...
... specified Operating Temperature (41 ˚F-95 ˚F [5 ˚C-35 ˚C]). - See page 50. - Adjust the audio source. - indicator. Provide proper distance between your computer. Check the connection between the projector and projection screen See page 20. - See if the input signal is turned off and wait until condensation evaporates. - Problem: No power Image is not out of focus. No image Image is Top/Bottom reversed. The projector can be turned on the projection lens. See...
User Manual
Page 73
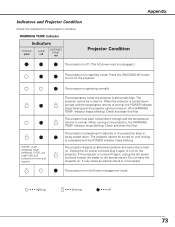
..., WARNING TEMP., WARNING FILTER, and LAMP REPLACE indicators are blinking all together. The temperature inside the projector is operating normally. When the projector is cooled down enough and the temperature returns to turn on . indicator stops blinking. Do not leave the projector on the projector, the WARNING TEMP. Indicators and Projector Condition Check the indicators for stand-by mode. WARNING TEMP. If the projector is turned off 73 indicator keeps blinking.) Check and clean the filter. indicator Indicators POWER green LAMP red WARNING TEMP. Unplug the AC power cord...
..., WARNING TEMP., WARNING FILTER, and LAMP REPLACE indicators are blinking all together. The temperature inside the projector is operating normally. When the projector is cooled down enough and the temperature returns to turn on . indicator stops blinking. Do not leave the projector on the projector, the WARNING TEMP. Indicators and Projector Condition Check the indicators for stand-by mode. WARNING TEMP. If the projector is turned off 73 indicator keeps blinking.) Check and clean the filter. indicator Indicators POWER green LAMP red WARNING TEMP. Unplug the AC power cord...

User Manual
Page 74
... LAMP red LAMP REPLACE yellow Projector Condition The lamp cannot light up . (The lamp has been cooled down . The lamp has been used overtime. Appendix WARNING FILTER indicator Indicators POWER green LAMP red WARNING FILTER orange Projector Condition The filter is being cooled down enough and the projector is cleaned or replaced by mode and ready to clean or replace the filter. Reset the lamp counter after resetting the counter. *When the projection lamp reaches its end of life, the LAMP REPLACE indicator lights yellow. The Filter counter reached a set time. Clean...
... LAMP red LAMP REPLACE yellow Projector Condition The lamp cannot light up . (The lamp has been cooled down . The lamp has been used overtime. Appendix WARNING FILTER indicator Indicators POWER green LAMP red WARNING FILTER orange Projector Condition The filter is being cooled down enough and the projector is cleaned or replaced by mode and ready to clean or replace the filter. Reset the lamp counter after resetting the counter. *When the projection lamp reaches its end of life, the LAMP REPLACE indicator lights yellow. The Filter counter reached a set time. Clean...


