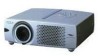
Owners Manual
Page 5
... Business Machines, Inc. INDICATOR 37 19 AIR FILTER CARE AND CLEANING 37 CLEANING PROJECTION LENS 37 TURNING ON / OFF PROJECTOR 19 LAMP REPLACEMENT LAMP REPLACE COUNTER 38 38 ADJUSTING SCREEN 20 TROUBLESHOOTING 39 ZOOM ADJUSTMENT FOCUS ADJUSTMENT 20 20 TECHNICAL SPECIFICATIONS 41... OF PROJECTOR 11 SELECTING INPUT SOURCE 30 CONNECTING TO COMPUTER 12 SELECTING VIDEO SYSTEM 31 CONNECTING TO VIDEO EQUIPMENT 13 PICTURE IMAGE ADJUSTMENT 32 IMAGE LEVEL SELECT 32 IMAGE LEVEL ADJUSTMENT 33 BEFORE OPERATION 14 PICTURE SCREEN ADJUSTMENT 34 OPERATION OF REMOTE CONTROL...
... Business Machines, Inc. INDICATOR 37 19 AIR FILTER CARE AND CLEANING 37 CLEANING PROJECTION LENS 37 TURNING ON / OFF PROJECTOR 19 LAMP REPLACEMENT LAMP REPLACE COUNTER 38 38 ADJUSTING SCREEN 20 TROUBLESHOOTING 39 ZOOM ADJUSTMENT FOCUS ADJUSTMENT 20 20 TECHNICAL SPECIFICATIONS 41... OF PROJECTOR 11 SELECTING INPUT SOURCE 30 CONNECTING TO COMPUTER 12 SELECTING VIDEO SYSTEM 31 CONNECTING TO VIDEO EQUIPMENT 13 PICTURE IMAGE ADJUSTMENT 32 IMAGE LEVEL SELECT 32 IMAGE LEVEL ADJUSTMENT 33 BEFORE OPERATION 14 PICTURE SCREEN ADJUSTMENT 34 OPERATION OF REMOTE CONTROL...

Owners Manual
Page 7
... hot. TERMINALS AND CONNECTORS BOTTOM SPEAKER AIR INTAKE VENTS AND AIR FILTERS LAMP COVER AIR INTAKE VENTS (Back and Bottom) This projector is equipped with Cooling Fans for protection from Exhaust Vents is used. q Do not cover vent slots. Air blown from overheating..... Pay attention to ensure proper ventilation and avoid a possible risk of fire and malfunction. PREPARATION NAME OF EACH PART OF PROJECTOR FRONT INFRARED REMOTE RECEIVER PROJECTION LENS FOCUS RING POWER CORD CONNECTOR ZOOM LEVER LENS COVER BACK TOP CONTROLS AND INDICATORS EXHAUST VENTS HOT AIR EXHAUSTED !
... hot. TERMINALS AND CONNECTORS BOTTOM SPEAKER AIR INTAKE VENTS AND AIR FILTERS LAMP COVER AIR INTAKE VENTS (Back and Bottom) This projector is equipped with Cooling Fans for protection from Exhaust Vents is used. q Do not cover vent slots. Air blown from overheating..... Pay attention to ensure proper ventilation and avoid a possible risk of fire and malfunction. PREPARATION NAME OF EACH PART OF PROJECTOR FRONT INFRARED REMOTE RECEIVER PROJECTION LENS FOCUS RING POWER CORD CONNECTOR ZOOM LEVER LENS COVER BACK TOP CONTROLS AND INDICATORS EXHAUST VENTS HOT AIR EXHAUSTED !
Owners Manual
Page 11
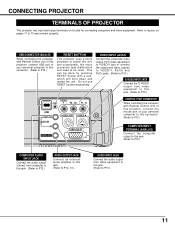
... / Cr USB COMPUTER AUDIO IN AV AUDIO OUT CONTROL PORT S-VIDEO COMPUTER IN CONTROL PORT CONNECTOR When controlling the computer with Remote Control Unit of this projector, connect the mouse port of your personal computer to this connector. (Refer to P12.) COMPUTER INPUT TERMINAL (ANALOG) Connect the...and restart the unit. This can be done by pressing RESET button with Remote Control Unit of this projector, connect USB port of your personal computer to this connector. (Refer to P12.) RESET BUTTON This projector uses a micro processor to control this unit, and occasionally, this micro ...
... / Cr USB COMPUTER AUDIO IN AV AUDIO OUT CONTROL PORT S-VIDEO COMPUTER IN CONTROL PORT CONNECTOR When controlling the computer with Remote Control Unit of this projector, connect the mouse port of your personal computer to this connector. (Refer to P12.) COMPUTER INPUT TERMINAL (ANALOG) Connect the...and restart the unit. This can be done by pressing RESET button with Remote Control Unit of this projector, connect USB port of your personal computer to this connector. (Refer to P12.) RESET BUTTON This projector uses a micro processor to control this unit, and occasionally, this micro ...

Owners Manual
Page 14
..., use soft dry cloth. AUTO PC ADJ. P-TIMER IMAGE To insure safe operation, please observe the following precautions : q Do not bend, drop Remote Control Unit, or expose Remote Control Unit to operate P-TIMER function. (P21) INPUT ON-OFF KEYSTONE D.ZOOM VOLUME + - POWER ON-OFF BUTTON Used to select image level. ...MENU BUTTON Used to select MENU operation. (P17, 18) FREEZE BUTTON Used to freeze the picture. (P20) NO SHOW BUTTON Used to turn the projector on or off. (P19) VOLUME BUTTONS Used to adjust volume. (P21) POINT BUTTONS Used to move the pointer on the MENU, to adjust the...
..., use soft dry cloth. AUTO PC ADJ. P-TIMER IMAGE To insure safe operation, please observe the following precautions : q Do not bend, drop Remote Control Unit, or expose Remote Control Unit to operate P-TIMER function. (P21) INPUT ON-OFF KEYSTONE D.ZOOM VOLUME + - POWER ON-OFF BUTTON Used to select image level. ...MENU BUTTON Used to select MENU operation. (P17, 18) FREEZE BUTTON Used to freeze the picture. (P20) NO SHOW BUTTON Used to turn the projector on or off. (P19) VOLUME BUTTONS Used to adjust volume. (P21) POINT BUTTONS Used to move the pointer on the MENU, to adjust the...
Owners Manual
Page 15
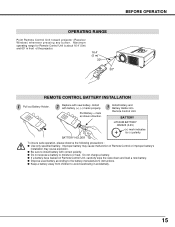
... a battery to the battery-manufacturer's instructions. Put Battery + mark as shown direction. 3 Install battery and Battery Holder into Remote Control Unit. Improper battery may cause malfunction of the projector. 16.4' (5 m) 30° 30° REMOTE CONTROL BATTERY INSTALLATION 1 Pull out Battery Holder. 2 Replace with battery (+),(-) marks properly. Install with new battery. Maximum operating...
... a battery to the battery-manufacturer's instructions. Put Battery + mark as shown direction. 3 Install battery and Battery Holder into Remote Control Unit. Improper battery may cause malfunction of the projector. 16.4' (5 m) 30° 30° REMOTE CONTROL BATTERY INSTALLATION 1 Pull out Battery Holder. 2 Replace with battery (+),(-) marks properly. Install with new battery. Maximum operating...

Owners Manual
Page 17
...SCREEN MENU HOW TO OPERATE ON-SCREEN MENU You can control and adjust this projector through ON-SCREEN MENU 3 Press POINT DOWN button and move POINTER (red frame... Refer to the following pages for details of item by pressing POINT button(s) on Top Control or on Remote Control Unit. ✽ Pointer is POINTER. MENU BAR Select Menu to be adjusted 2 Move POINTER (...ITEM Select the item or set function. 17 MENU BUTTON POINT BUTTONS Used to display ON-SCREEN MENU. WIRELESS REMOTE CONTROL MENU BUTTON POINT BUTTON Used to select the item. A red frame is the icon on ON-SCREEN MENU...
...SCREEN MENU HOW TO OPERATE ON-SCREEN MENU You can control and adjust this projector through ON-SCREEN MENU 3 Press POINT DOWN button and move POINTER (red frame... Refer to the following pages for details of item by pressing POINT button(s) on Top Control or on Remote Control Unit. ✽ Pointer is POINTER. MENU BAR Select Menu to be adjusted 2 Move POINTER (...ITEM Select the item or set function. 17 MENU BUTTON POINT BUTTONS Used to display ON-SCREEN MENU. WIRELESS REMOTE CONTROL MENU BUTTON POINT BUTTON Used to select the item. A red frame is the icon on ON-SCREEN MENU...
Owners Manual
Page 19
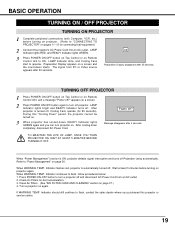
... AC Power Cord. Wait at least 5 minutes before turning on projector. (Refer to "CONNECTING TO PROJECTOR" on Remote Control Unit to ON. Refer to "Power Management" on projector again. When WARNING TEMP. TURNING OFF PROJECTOR 1 Press POWER ON-OFF button on Top Control or on again.... When WARNING TEMP. Indicator flashes red, projector is ON, projector detects signal interruption and turns off ?" Turn a projector on Remote Control Unit, and a message "Power off Projection Lamp automatically. LAMP Indicator lights RED, and READY...
... AC Power Cord. Wait at least 5 minutes before turning on projector. (Refer to "CONNECTING TO PROJECTOR" on Remote Control Unit to ON. Refer to "Power Management" on projector again. When WARNING TEMP. TURNING OFF PROJECTOR 1 Press POWER ON-OFF button on Top Control or on again.... When WARNING TEMP. Indicator flashes red, projector is ON, projector detects signal interruption and turns off ?" Turn a projector on Remote Control Unit, and a message "Power off Projection Lamp automatically. LAMP Indicator lights RED, and READY...
Owners Manual
Page 20
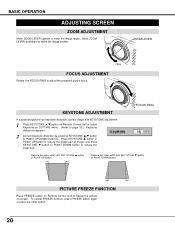
...FREEZE function, press FREEZE button again or press any other button. 20 Reduce the upper width with KEYSTONE adjustment. 1 Press KEYSTONE v/w button on Remote Control Unit or select Keystone on SETTING menu. (Refer to page 35.) Keystone dialog box appears. 2 Correct keystone distortion by pressing KEYSTONE v/w... UP button to reduce the upper part of image, and press KEYSTONE w button or POINT DOWN button to freeze the picture on Remote Control Unit to reduce the lower part. PICTURE FREEZE FUNCTION Press FREEZE button on -screen. BASIC OPERATION ADJUSTING SCREEN ZOOM ADJUSTMENT Move ...
...FREEZE function, press FREEZE button again or press any other button. 20 Reduce the upper width with KEYSTONE adjustment. 1 Press KEYSTONE v/w button on Remote Control Unit or select Keystone on SETTING menu. (Refer to page 35.) Keystone dialog box appears. 2 Correct keystone distortion by pressing KEYSTONE v/w... UP button to reduce the upper part of image, and press KEYSTONE w button or POINT DOWN button to freeze the picture on Remote Control Unit to reduce the lower part. PICTURE FREEZE FUNCTION Press FREEZE button on -screen. BASIC OPERATION ADJUSTING SCREEN ZOOM ADJUSTMENT Move ...
Owners Manual
Page 21
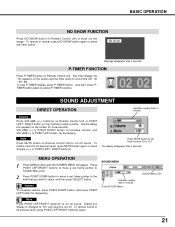
..., and VOLUME (-) or POINT LEFT button for decreasing. VOLUME (+) or POINT RIGHT button to cancel P-TIMER function. Mute Press MUTE button on Remote Control Unit to its previous level, press POINT LEFT/RIGHT button(s) again. Press MUTE button to "On" and sound is changed to set Mute... press any other button. To restore to cut off sound. To stop P-TIMER display, press P-TIMER button. Volume Press VOLUME (+/-) button(s) on Remote Control Unit or POINT LEFT / RIGHT button on the screen for decreasing. Press POINT LEFT/RIGHT buttons to move a red frame pointer to SOUND ...
..., and VOLUME (-) or POINT LEFT button for decreasing. VOLUME (+) or POINT RIGHT button to cancel P-TIMER function. Mute Press MUTE button on Remote Control Unit to its previous level, press POINT LEFT/RIGHT button(s) again. Press MUTE button to "On" and sound is changed to set Mute... press any other button. To restore to cut off sound. To stop P-TIMER display, press P-TIMER button. Volume Press VOLUME (+/-) button(s) on Remote Control Unit or POINT LEFT / RIGHT button on the screen for decreasing. Press POINT LEFT/RIGHT buttons to move a red frame pointer to SOUND ...
Owners Manual
Page 22
... INPUT button on Top Control or on page 23). Make sure the connection of computers based on VGA, SVGA, XGA or SXGA (refer to most different types of computer and a projector is no signal input from computer. Press POINT LEFT/RIGHT button to move a red frame pointer to INPUT Menu... system that you want to TROUBLESHOOTING on page 39.) PC SYSTEM MENU SYSTEM Menu icon Displays system being selected. SELECTING COMPUTER SYSTEM This projector automatically tunes to "COMPATIBLE COMPUTER SPECIFICATION" on Remote Control Unit. PC SYSTEM MENU SYSTEM Menu icon Displays system being selected.
... INPUT button on Top Control or on page 23). Make sure the connection of computers based on VGA, SVGA, XGA or SXGA (refer to most different types of computer and a projector is no signal input from computer. Press POINT LEFT/RIGHT button to move a red frame pointer to INPUT Menu... system that you want to TROUBLESHOOTING on page 39.) PC SYSTEM MENU SYSTEM Menu icon Displays system being selected. SELECTING COMPUTER SYSTEM This projector automatically tunes to "COMPATIBLE COMPUTER SPECIFICATION" on Remote Control Unit. PC SYSTEM MENU SYSTEM Menu icon Displays system being selected.

Owners Manual
Page 24
...Store adjustment parameters. Once parameters are required. (Refer to page 25, 26.) q Auto PC Adjustment function cannot be fully adjusted with this projector. NOTE q Fine sync, Total dots and Picture Position of MANUAL PC ADJUSTMENT section (P26). When the image is not provided properly through... some computers can be memorized in PC SYSTEM Menu (P22). COMPUTER INPUT PC ADJUSTMENT AUTO PC ADJUSTMENT Auto PC Adjustment function is selected on Remote Control Unit. Auto PC Adj. 1 Press MENU button and ON-SCREEN MENU will appear. button on PC SYSTEM Menu (P22). Auto PC...
...Store adjustment parameters. Once parameters are required. (Refer to page 25, 26.) q Auto PC Adjustment function cannot be fully adjusted with this projector. NOTE q Fine sync, Total dots and Picture Position of MANUAL PC ADJUSTMENT section (P26). When the image is not provided properly through... some computers can be memorized in PC SYSTEM Menu (P22). COMPUTER INPUT PC ADJUSTMENT AUTO PC ADJUSTMENT Auto PC Adjustment function is selected on Remote Control Unit. Auto PC Adj. 1 Press MENU button and ON-SCREEN MENU will appear. button on PC SYSTEM Menu (P22). Auto PC...
Owners Manual
Page 27
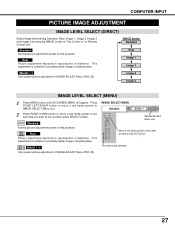
... IMAGE LEVEL SELECT (DIRECT) Select image level among Standard, Real, Image 1, Image 2, Image 3 and Image 4 by pressing IMAGE button on Top Control or on this projector. Press POINT LEFT/RIGHT button to move a red frame pointer to IMAGE SELECT Menu icon. 2 Press POINT DOWN button to move a red frame pointer to... to set and then press SELECT button. This adjustment is suitable for providing better image in reproduction of halftones. Standard Normal picture adjustment preset on Remote Control Unit. Standard Normal picture adjustment preset on this projector.
... IMAGE LEVEL SELECT (DIRECT) Select image level among Standard, Real, Image 1, Image 2, Image 3 and Image 4 by pressing IMAGE button on Top Control or on this projector. Press POINT LEFT/RIGHT button to move a red frame pointer to IMAGE SELECT Menu icon. 2 Press POINT DOWN button to move a red frame pointer to... to set and then press SELECT button. This adjustment is suitable for providing better image in reproduction of halftones. Standard Normal picture adjustment preset on Remote Control Unit. Standard Normal picture adjustment preset on this projector.
Owners Manual
Page 29
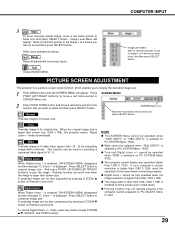
.... To cancel Digital Zoom +/- q True and Digital zoom +/- q This projector cannot display any resolution higher than XGA (1024 x 768) is modified to fit wide video aspect ratio (16 : 9) by pressing D.ZOOM w button on Remote Control Unit. If your computer's screen resolution is selected, ON-SCREEN MENU disappears... button and ON-SCREEN MENU will appear. Panning function can be selected when "RGB" is larger than XGA (1024 x 768). cannot be also expanded by pressing D.ZOOM v button on Remote Control Unit. Move a red frame pointer to the Image 1 to 4 where you want to select and...
.... To cancel Digital Zoom +/- q True and Digital zoom +/- q This projector cannot display any resolution higher than XGA (1024 x 768) is modified to fit wide video aspect ratio (16 : 9) by pressing D.ZOOM w button on Remote Control Unit. If your computer's screen resolution is selected, ON-SCREEN MENU disappears... button and ON-SCREEN MENU will appear. Panning function can be selected when "RGB" is larger than XGA (1024 x 768). cannot be also expanded by pressing D.ZOOM v button on Remote Control Unit. Move a red frame pointer to the Image 1 to 4 where you want to select and...
Owners Manual
Page 30
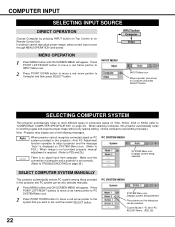
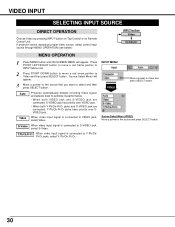
VIDEO INPUT SELECTING INPUT SOURCE DIRECT OPERATION Choose Video by pressing INPUT button on Top Control or on Remote Control Unit. If projector cannot reproduce proper video source, select correct input source through MENU OPERATION (see below). Source Select Menu will appear. S-... want to Video and press SELECT button. Source Select Menu (VIDEO) Move a pointer to Video and then press SELECT button. Auto Video Projector automatically detects incoming Video signal, and adjusts itself to VIDEO jack, select Video. When video input signal is connected to optimize its performance....
VIDEO INPUT SELECTING INPUT SOURCE DIRECT OPERATION Choose Video by pressing INPUT button on Top Control or on Remote Control Unit. If projector cannot reproduce proper video source, select correct input source through MENU OPERATION (see below). Source Select Menu will appear. S-... want to Video and press SELECT button. Source Select Menu (VIDEO) Move a pointer to Video and then press SELECT button. Auto Video Projector automatically detects incoming Video signal, and adjusts itself to VIDEO jack, select Video. When video input signal is connected to optimize its performance....
Owners Manual
Page 32
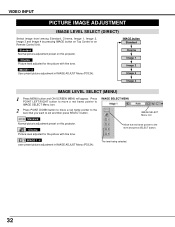
...level among Standard, Cinema, Image 1, Image 2, Image 3 and Image 4 by pressing IMAGE button on Top Control or on this projector. Standard Normal picture adjustment preset on Remote Control Unit. Press POINT LEFT/RIGHT button to move a red frame pointer to IMAGE SELECT Menu icon. 2 Press POINT DOWN .... 32 IMAGE 1~4 User preset picture adjustment in IMAGE ADJUST Menu (P33,34). Standard Normal picture adjustment preset on this projector. Cinema Picture level adjusted for the picture with fine tone. IMAGE 1~4 User preset picture adjustment in IMAGE ADJUST Menu (P33,34).
...level among Standard, Cinema, Image 1, Image 2, Image 3 and Image 4 by pressing IMAGE button on Top Control or on this projector. Standard Normal picture adjustment preset on Remote Control Unit. Press POINT LEFT/RIGHT button to move a red frame pointer to IMAGE SELECT Menu icon. 2 Press POINT DOWN .... 32 IMAGE 1~4 User preset picture adjustment in IMAGE ADJUST Menu (P33,34). Standard Normal picture adjustment preset on this projector. Cinema Picture level adjusted for the picture with fine tone. IMAGE 1~4 User preset picture adjustment in IMAGE ADJUST Menu (P33,34).
Owners Manual
Page 36
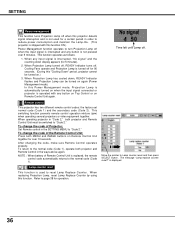
... has cooled down display appears (for over 5 minutes. This switching function prevents remote control operation mixture (jam) when operating several projectors or video equipment together. To change the code of Projector; Lamp counter reset This function is used for operation. Refer to page 38 for... in the SETTING MENU to "Code 2." Time left until Lamp off . When operating projector in the ways above again. Move the pointer to the normal code (Code 1), operate both projector and Remote Control in "Code 2," both MENU and IMAGE buttons on .) 3. In this Power Management...
... has cooled down display appears (for over 5 minutes. This switching function prevents remote control operation mixture (jam) when operating several projectors or video equipment together. To change the code of Projector; Lamp counter reset This function is used for operation. Refer to page 38 for... in the SETTING MENU to "Code 2." Time left until Lamp off . When operating projector in the ways above again. Move the pointer to the normal code (Code 1), operate both projector and Remote Control in "Code 2," both MENU and IMAGE buttons on .) 3. In this Power Management...
Owners Manual
Page 40
...attempt to meet rigid U.L. If the problem still persists after following all operating instructions, contact the sales dealer where you how to projector. (See "SETTING" section on the nameplate means the product is designed and manufactured to open the cabinet. Give the model number.... 40 This symbol on page 35, 36.) WARNING : High voltages are not too far from a projector when using Remote Control Unit. Maximum operating range is between Infrared Remote Receiver and Remote Control Unit. q Make sure the code of fire, casualty and electrical hazards. We will advise you ...
...attempt to meet rigid U.L. If the problem still persists after following all operating instructions, contact the sales dealer where you how to projector. (See "SETTING" section on the nameplate means the product is designed and manufactured to open the cabinet. Give the model number.... 40 This symbol on page 35, 36.) WARNING : High voltages are not too far from a projector when using Remote Control Unit. Maximum operating range is between Infrared Remote Receiver and Remote Control Unit. q Make sure the code of fire, casualty and electrical hazards. We will advise you ...
Owners Manual
Page 41
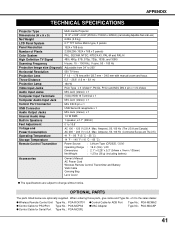
...Connector Audio Output Jacks Internal Audio Amp Built-in Speakers Feet Adjustment Voltage and Power Consumption Operating Temperature Storage Temperature Remote Control Transmitter Multi-media Projector 10.12" x 2.98" x 9.02" (257mm x 75.8mm x 229mm) (not including Adjustble ... x 1 1.0 W RMS 1 speaker, ø1.1" (28mm) 0˚ to 10.6˚ AC 100 ~ 120 V (2.8 A Max. APPENDIX TECHNICAL SPECIFICATIONS Projector Type Dimensions (W x H x D) Net Weight LCD Panel System Panel Resolution Number of it to change without notice. Ampere), 50 / 60 Hz (The U.S.A and Canada) AC 200 ~ 240 V (1.4 ...
...Connector Audio Output Jacks Internal Audio Amp Built-in Speakers Feet Adjustment Voltage and Power Consumption Operating Temperature Storage Temperature Remote Control Transmitter Multi-media Projector 10.12" x 2.98" x 9.02" (257mm x 75.8mm x 229mm) (not including Adjustble ... x 1 1.0 W RMS 1 speaker, ø1.1" (28mm) 0˚ to 10.6˚ AC 100 ~ 120 V (2.8 A Max. APPENDIX TECHNICAL SPECIFICATIONS Projector Type Dimensions (W x H x D) Net Weight LCD Panel System Panel Resolution Number of it to change without notice. Ampere), 50 / 60 Hz (The U.S.A and Canada) AC 200 ~ 240 V (1.4 ...


