Owners Manual
Page 2
... UNIT. 2 Be especially careful that children do not stare directly into a compartment or similarly enclosed, the minimum distances must be taken. q This projector should be maintained. CAUTION RISK OF ELECTRIC SHOCK DO NOT OPEN CAUTION : TO REDUCE THE RISK OF ELECTRIC SHOCK, DO NOT REMOVE COVER (OR BACK...center. If the problem still persists, contact the sales dealer where you to be set in better condition for an extended time, unplug the projector from the power outlet. If not, it in the way indicated. SIDE and TOP 50cm 50cm REAR 50cm q Do not put any flammable...
... UNIT. 2 Be especially careful that children do not stare directly into a compartment or similarly enclosed, the minimum distances must be taken. q This projector should be maintained. CAUTION RISK OF ELECTRIC SHOCK DO NOT OPEN CAUTION : TO REDUCE THE RISK OF ELECTRIC SHOCK, DO NOT REMOVE COVER (OR BACK...center. If the problem still persists, contact the sales dealer where you to be set in better condition for an extended time, unplug the projector from the power outlet. If not, it in the way indicated. SIDE and TOP 50cm 50cm REAR 50cm q Do not put any flammable...
Owners Manual
Page 3
...etc... Follow all servicing to rain or water. Use only with a cart or stand recommended by a qualified technician to restore the projector to this projector yourself as they may result in a fire or electric shock. Wall or shelf mounting should follow the manufacturer's instructions, and should ... injury to a child or adult, and serious damage to qualified service personnel under the following the operating instructions. If the projector does not operate normally by the manufacturers. Use a damp cloth for later use attachments not recommended by the manufacturer as opening...
...etc... Follow all servicing to rain or water. Use only with a cart or stand recommended by a qualified technician to restore the projector to this projector yourself as they may result in a fire or electric shock. Wall or shelf mounting should follow the manufacturer's instructions, and should ... injury to a child or adult, and serious damage to qualified service personnel under the following the operating instructions. If the projector does not operate normally by the manufacturers. Use a damp cloth for later use attachments not recommended by the manufacturer as opening...
Owners Manual
Page 4
...by the safety earth symbol or coloured green or green-and-yellow. Model Number Trade Name Responsible party Address Telephone No. : PLC-XW20U, PLC-XW20E, PLC-XW20B : Sanyo : SANYO FISHER COMPANY : 21605 Plummer Street, Chatsworth, California 91311 : (818)998-7322 AC POWER CORD REQUIREMENT The AC Power Cord ...Standard Association (CSA). Should you purchased it. However, there is marked by the letter E or by one or more of this projector meets the requirement for use the plug with the cover omitted. Connect the equipment into the power outlet. Fuse covers are designed ...
...by the safety earth symbol or coloured green or green-and-yellow. Model Number Trade Name Responsible party Address Telephone No. : PLC-XW20U, PLC-XW20E, PLC-XW20B : Sanyo : SANYO FISHER COMPANY : 21605 Plummer Street, Chatsworth, California 91311 : (818)998-7322 AC POWER CORD REQUIREMENT The AC Power Cord ...Standard Association (CSA). Should you purchased it. However, there is marked by the letter E or by one or more of this projector meets the requirement for use the plug with the cover omitted. Connect the equipment into the power outlet. Fuse covers are designed ...
Owners Manual
Page 5
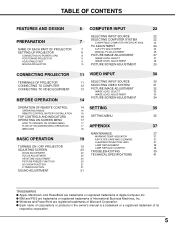
INDICATOR 37 19 AIR FILTER CARE AND CLEANING 37 CLEANING PROJECTION LENS 37 TURNING ON / OFF PROJECTOR 19 LAMP REPLACEMENT LAMP REPLACE COUNTER 38 38 ADJUSTING SCREEN 20 TROUBLESHOOTING 39 ZOOM ADJUSTMENT FOCUS ADJUSTMENT 20 20... 25 CONNECTING AC POWER CORD 8 PICTURE IMAGE ADJUSTMENT 27 POSITIONING PROJECTOR 9 IMAGE LEVEL SELECT 27 ADJUSTABLE FEET 9 IMAGE LEVEL ADJUSTMENT 28 MOVING PROJECTOR 10 PICTURE SCREEN ADJUSTMENT 29 CONNECTING PROJECTOR 11 VIDEO INPUT 30 TERMINALS OF PROJECTOR 11 SELECTING INPUT SOURCE 30 CONNECTING TO COMPUTER 12 SELECTING VIDEO...
INDICATOR 37 19 AIR FILTER CARE AND CLEANING 37 CLEANING PROJECTION LENS 37 TURNING ON / OFF PROJECTOR 19 LAMP REPLACEMENT LAMP REPLACE COUNTER 38 38 ADJUSTING SCREEN 20 TROUBLESHOOTING 39 ZOOM ADJUSTMENT FOCUS ADJUSTMENT 20 20... 25 CONNECTING AC POWER CORD 8 PICTURE IMAGE ADJUSTMENT 27 POSITIONING PROJECTOR 9 IMAGE LEVEL SELECT 27 ADJUSTABLE FEET 9 IMAGE LEVEL ADJUSTMENT 28 MOVING PROJECTOR 10 PICTURE SCREEN ADJUSTMENT 29 CONNECTING PROJECTOR 11 VIDEO INPUT 30 TERMINALS OF PROJECTOR 11 SELECTING INPUT SOURCE 30 CONNECTING TO COMPUTER 12 SELECTING VIDEO...
Owners Manual
Page 6
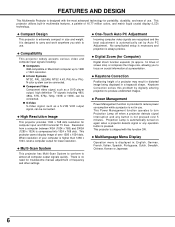
...matrix liquid crystal display (LCD) technology. x Multi-Scan System This projector has Multi-Scan System to conform to 1280 x 1024 resolution. x Digital Zoom (for computer input and 550 horizontal TV lines. FEATURES AND DESIGN This Multimedia Projector is designed with this problem...quickly. Resolution from a computer between XGA (1024 x 768) and SXGA (1280 x 1024) is always precise. This Power Management function operates to reduce power consumption while a projector is automatically turned on crucial information at a presentation. This projector utilizes built-in use . q ...
...matrix liquid crystal display (LCD) technology. x Multi-Scan System This projector has Multi-Scan System to conform to 1280 x 1024 resolution. x Digital Zoom (for computer input and 550 horizontal TV lines. FEATURES AND DESIGN This Multimedia Projector is designed with this problem...quickly. Resolution from a computer between XGA (1024 x 768) and SXGA (1280 x 1024) is always precise. This Power Management function operates to reduce power consumption while a projector is automatically turned on crucial information at a presentation. This projector utilizes built-in use . q ...

Owners Manual
Page 7
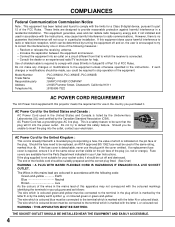
... hot. TERMINALS AND CONNECTORS BOTTOM SPEAKER AIR INTAKE VENTS AND AIR FILTERS LAMP COVER AIR INTAKE VENTS (Back and Bottom) This projector is equipped with Cooling Fans for protection from Exhaust Vents is used. ADJUSTABLE FEET AND FEET LOCK LATCHES 7 Air blown from overheating.... be taken. q Keep back and bottom clear of Cooling Fans. q Do not cover vent slots. PREPARATION NAME OF EACH PART OF PROJECTOR FRONT INFRARED REMOTE RECEIVER PROJECTION LENS FOCUS RING POWER CORD CONNECTOR ZOOM LEVER LENS COVER BACK TOP CONTROLS AND INDICATORS EXHAUST VENTS HOT AIR EXHAUSTED...
... hot. TERMINALS AND CONNECTORS BOTTOM SPEAKER AIR INTAKE VENTS AND AIR FILTERS LAMP COVER AIR INTAKE VENTS (Back and Bottom) This projector is equipped with Cooling Fans for protection from Exhaust Vents is used. ADJUSTABLE FEET AND FEET LOCK LATCHES 7 Air blown from overheating.... be taken. q Keep back and bottom clear of Cooling Fans. q Do not cover vent slots. PREPARATION NAME OF EACH PART OF PROJECTOR FRONT INFRARED REMOTE RECEIVER PROJECTION LENS FOCUS RING POWER CORD CONNECTOR ZOOM LEVER LENS COVER BACK TOP CONTROLS AND INDICATORS EXHAUST VENTS HOT AIR EXHAUSTED...
Owners Manual
Page 8
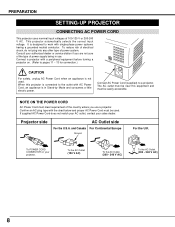
...risk of electrical shock, do not plug into any other type of 100-120 V or 200-240 V AC. Connect a projector with a peripheral equipment before turning a projector on your projector. Connect AC Power Cord (supplied) to work with the chart below and proper AC Power Cord must be used . If ...(200 - 240 V AC) To the AC Outlet. (200 - 240 V AC) 8 and Canada For Continental Europe Ground For the U.K. It is in use a projector. NOTE ON THE POWER CORD AC Power Cord must meet requirement of power supply being in Stand-by Mode and consumes a little electric power. Consult...
...risk of electrical shock, do not plug into any other type of 100-120 V or 200-240 V AC. Connect a projector with a peripheral equipment before turning a projector on your projector. Connect AC Power Cord (supplied) to work with the chart below and proper AC Power Cord must be used . If ...(200 - 240 V AC) To the AC Outlet. (200 - 240 V AC) 8 and Canada For Continental Europe Ground For the U.K. It is in use a projector. NOTE ON THE POWER CORD AC Power Cord must meet requirement of power supply being in Stand-by Mode and consumes a little electric power. Consult...
Owners Manual
Page 9
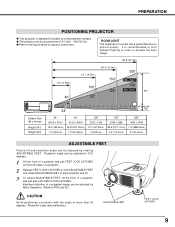
...FEET Picture tilt and projection angle can be adjusted by Menu Operation. (Refer to P20 and 35.) CAUTION Avoid positioning a projector with the angle of a projector and pull and undo FEET LOCK LATCHES. Keystone distortion of a projected image can be adjusted by rotating ADJUSTABLE FEET. Projection ...angle can be adjusted to 10.6 degrees. 1 Lift the front of a projector and pull FEET LOCK LATCHES on the both sides of a projector. 2 Release FEET LOCK LATCHES to lock ADJUSTABLE FEET and rotate ADJUSTABLE FEET to adjust position and tilt. ...
...FEET Picture tilt and projection angle can be adjusted by Menu Operation. (Refer to P20 and 35.) CAUTION Avoid positioning a projector with the angle of a projector and pull and undo FEET LOCK LATCHES. Keystone distortion of a projected image can be adjusted by rotating ADJUSTABLE FEET. Projection ...angle can be adjusted to 10.6 degrees. 1 Lift the front of a projector and pull FEET LOCK LATCHES on the both sides of a projector. 2 Release FEET LOCK LATCHES to lock ADJUSTABLE FEET and rotate ADJUSTABLE FEET to adjust position and tilt. ...
Owners Manual
Page 10
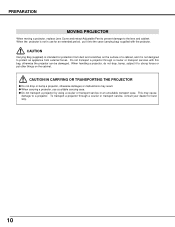
... or put it to protect an appliance from external forces. q Do not transport a projector by using a courier or transport service in use a suitable carrying case. To transport a projector through a courier or transport services with the projector. Do not transport a projector through a courier or transport service, consult your dealer for an extended period, put other...
... or put it to protect an appliance from external forces. q Do not transport a projector by using a courier or transport service in use a suitable carrying case. To transport a projector through a courier or transport services with the projector. Do not transport a projector through a courier or transport service, consult your dealer for an extended period, put other...
Owners Manual
Page 11
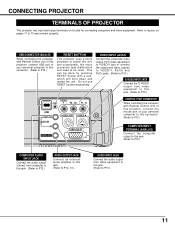
...IN AV AUDIO OUT CONTROL PORT S-VIDEO COMPUTER IN CONTROL PORT CONNECTOR When controlling the computer with Remote Control Unit of this projector, connect the mouse port of your personal computer to this connector. (Refer to P12.) COMPUTER INPUT TERMINAL (ANALOG) Connect ...RESET Y - Do not use RESET function excessively. Refer to figures on its side for connecting computers and video equipment. CONNECTING PROJECTOR TERMINALS OF PROJECTOR This projector has input and output terminals on pages 11 to 13 and connect properly. USB CONNECTOR (Series B) When controlling the computer with...
...IN AV AUDIO OUT CONTROL PORT S-VIDEO COMPUTER IN CONTROL PORT CONNECTOR When controlling the computer with Remote Control Unit of this projector, connect the mouse port of your personal computer to this connector. (Refer to P12.) COMPUTER INPUT TERMINAL (ANALOG) Connect ...RESET Y - Do not use RESET function excessively. Refer to figures on its side for connecting computers and video equipment. CONNECTING PROJECTOR TERMINALS OF PROJECTOR This projector has input and output terminals on pages 11 to 13 and connect properly. USB CONNECTOR (Series B) When controlling the computer with...
Owners Manual
Page 12
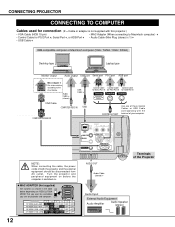
.../2 Port ✽ for ADB Port ✽ Terminal Terminal Terminal CONTROL PORT Use one of these Control Cables or USB Cable corresponding with this projector.) • VGA Cable (HDB 15 pin) • MAC Adapter (When connecting to Macintosh computer) ✽ • Control Cable for ... AC outlet. CONNECTING PROJECTOR CONNECTING TO COMPUTER Cables used for PS/2 Port ✽, Serial Port ✽, or ADB Port ✽ • Audio Cable (Mini Plug (stereo) x 1) ✽ • USB Cable ✽ IBM-compatible computer or Macintosh computer (VGA / SVGA / XGA / SXGA) Desktop ...
.../2 Port ✽ for ADB Port ✽ Terminal Terminal Terminal CONTROL PORT Use one of these Control Cables or USB Cable corresponding with this projector.) • VGA Cable (HDB 15 pin) • MAC Adapter (When connecting to Macintosh computer) ✽ • Control Cable for ... AC outlet. CONNECTING PROJECTOR CONNECTING TO COMPUTER Cables used for PS/2 Port ✽, Serial Port ✽, or ADB Port ✽ • Audio Cable (Mini Plug (stereo) x 1) ✽ • USB Cable ✽ IBM-compatible computer or Macintosh computer (VGA / SVGA / XGA / SXGA) Desktop ...

Owners Manual
Page 13
... TO VIDEO EQUIPMENT Cables used for connection (✽ = Cable is not supplied with this projector.) • Video Cable (RCA x 1 or RCA x 3) ✽ • S-VIDEO Cable ✽ • Audio Cable (Mini Plug (stereo) x 1) ✽ Video Source (example) Video ... IN AV AUDIO OUT CONTROL PORT S-VIDEO COMPUTER IN S-VIDEO Use any of both the projector and the external equipment should be disconnected from AC outlet. 13 Cr/Pr VIDEO RESET Y - Terminals of the Projector Audio Input External Audio Equipment Audio Amplifier Audio Speaker (stereo) NOTE : When connecting the cable...
... TO VIDEO EQUIPMENT Cables used for connection (✽ = Cable is not supplied with this projector.) • Video Cable (RCA x 1 or RCA x 3) ✽ • S-VIDEO Cable ✽ • Audio Cable (Mini Plug (stereo) x 1) ✽ Video Source (example) Video ... IN AV AUDIO OUT CONTROL PORT S-VIDEO COMPUTER IN S-VIDEO Use any of both the projector and the external equipment should be disconnected from AC outlet. 13 Cr/Pr VIDEO RESET Y - Terminals of the Projector Audio Input External Audio Equipment Audio Amplifier Audio Speaker (stereo) NOTE : When connecting the cable...

Owners Manual
Page 14
..., 35) MENU BUTTON Used to select MENU operation. (P17, 18) FREEZE BUTTON Used to freeze the picture. (P20) NO SHOW BUTTON Used to turn the projector on or off. (P19) VOLUME BUTTONS Used to adjust volume. (P21) POINT BUTTONS Used to move the pointer on the MENU, to adjust the item...
..., 35) MENU BUTTON Used to select MENU operation. (P17, 18) FREEZE BUTTON Used to freeze the picture. (P20) NO SHOW BUTTON Used to turn the projector on or off. (P19) VOLUME BUTTONS Used to adjust volume. (P21) POINT BUTTONS Used to move the pointer on the MENU, to adjust the item...
Owners Manual
Page 15
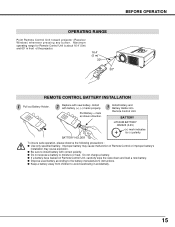
...: q Use only specified battery. q Dispose used battery according to moisture or heat. BEFORE OPERATION OPERATING RANGE Point Remote Control Unit toward projector (Receiver Window) whenever pressing any button. q Be sure to avoid swallowing it accidentally. 15 q If a battery have leaked on Remote... (5m) and 60° in front of Remote Control or improper battery's installation may cause explosion. Improper battery may cause malfunction of the projector. 16.4' (5 m) 30° 30° REMOTE CONTROL BATTERY INSTALLATION 1 Pull out Battery Holder. 2 Replace with new battery. q Keep...
...: q Use only specified battery. q Dispose used battery according to moisture or heat. BEFORE OPERATION OPERATING RANGE Point Remote Control Unit toward projector (Receiver Window) whenever pressing any button. q Be sure to avoid swallowing it accidentally. 15 q If a battery have leaked on Remote... (5m) and 60° in front of Remote Control or improper battery's installation may cause explosion. Improper battery may cause malfunction of the projector. 16.4' (5 m) 30° 30° REMOTE CONTROL BATTERY INSTALLATION 1 Pull out Battery Holder. 2 Replace with new battery. q Keep...
Owners Manual
Page 16
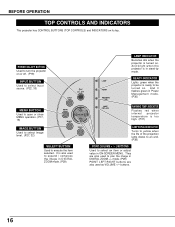
... +/- They are also used to expand / compress the image in stand-by mode. OFF LAMP READY WARNING TEMP . READY INDICATOR Lights green when the projector is too high. (P37) LAMP REPLACE INDICATOR Turns to yellow when the life of the projection lamp draws to an end. (P38) POINT (VOLUME... SELECT BUTTON Used to be turned on its top. LAMP INDICATOR Becomes dim when the projector is in DIGITAL ZOOM mode. (P29) LAMP REPLACE WARNING TEMP. BEFORE OPERATION TOP CONTROLS AND INDICATORS This projector has CONTROL BUTTONS (TOP CONTROLS) and INDICATORS on . buttons. 16 mode. (P29)...
... +/- They are also used to expand / compress the image in stand-by mode. OFF LAMP READY WARNING TEMP . READY INDICATOR Lights green when the projector is too high. (P37) LAMP REPLACE INDICATOR Turns to yellow when the life of the projection lamp draws to an end. (P38) POINT (VOLUME... SELECT BUTTON Used to be turned on its top. LAMP INDICATOR Becomes dim when the projector is in DIGITAL ZOOM mode. (P29) LAMP REPLACE WARNING TEMP. BEFORE OPERATION TOP CONTROLS AND INDICATORS This projector has CONTROL BUTTONS (TOP CONTROLS) and INDICATORS on . buttons. 16 mode. (P29)...

Owners Manual
Page 17
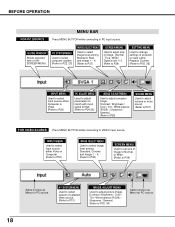
... Select the item or set function. 17 BEFORE OPERATION OPERATING ON-SCREEN MENU HOW TO OPERATE ON-SCREEN MENU You can control and adjust this projector through ON-SCREEN MENU 3 Press POINT DOWN button and move POINTER (red frame or red arrow) to ITEM that you want to the following pages...
... Select the item or set function. 17 BEFORE OPERATION OPERATING ON-SCREEN MENU HOW TO OPERATE ON-SCREEN MENU You can control and adjust this projector through ON-SCREEN MENU 3 Press POINT DOWN button and move POINTER (red frame or red arrow) to ITEM that you want to the following pages...
Owners Manual
Page 18
... P22, 23) IMAGE SELECT MENU Used to select image level among Standard, Cinema and Image 1 ~ 4. (Refer to P32) SCREEN MENU Used to set size of projector or reset Lamp Replace Counter. (Refer to P35, 36) INPUT MENU Used to select input source either Computer or Video. (Refer to P22) PC ADJUST...
... P22, 23) IMAGE SELECT MENU Used to select image level among Standard, Cinema and Image 1 ~ 4. (Refer to P32) SCREEN MENU Used to set size of projector or reset Lamp Replace Counter. (Refer to P35, 36) INPUT MENU Used to select input source either Computer or Video. (Refer to P22) PC ADJUST...
Owners Manual
Page 19
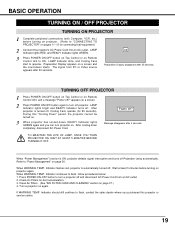
...again to operate. Power off Projection Lamp automatically. When "Power Management" function is ON, projector detects signal interruption and turns off ? When WARNING TEMP. Indicator flashes red, projector is turned off . When WARNING TEMP. Press POWER ON-OFF button to flash, contact ... Refer to flash, follow procedures below: 1. Wait at least 5 minutes before turning on projector. (Refer to ON. Clean Air Filters. (See "AIR FILTER CARE AND CLEANING" section on projector again. Preparation Display appears on . Indicator continues to "Power Management" on page 36....
...again to operate. Power off Projection Lamp automatically. When "Power Management" function is ON, projector detects signal interruption and turns off ? When WARNING TEMP. Indicator flashes red, projector is turned off . When WARNING TEMP. Press POWER ON-OFF button to flash, contact ... Refer to flash, follow procedures below: 1. Wait at least 5 minutes before turning on projector. (Refer to ON. Clean Air Filters. (See "AIR FILTER CARE AND CLEANING" section on projector again. Preparation Display appears on . Indicator continues to "Power Management" on page 36....
Owners Manual
Page 22
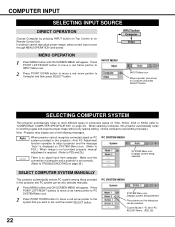
...PC ADJUST Menu. (P25, 26) 22 SELECTING COMPUTER SYSTEM This projector automatically tunes to most different types of computer and a projector is displayed on Remote Control Unit. Make sure the connection of computers based on VGA, SVGA, XGA or SXGA (refer to set in this dialog box can be ...selected. The systems on this projector and PC system can be also selected manually. 1 Press MENU button and ON-SCREEN MENU will appear. If projector cannot reproduce proper image, select correct...
...PC ADJUST Menu. (P25, 26) 22 SELECTING COMPUTER SYSTEM This projector automatically tunes to most different types of computer and a projector is displayed on Remote Control Unit. Make sure the connection of computers based on VGA, SVGA, XGA or SXGA (refer to set in this dialog box can be ...selected. The systems on this projector and PC system can be also selected manually. 1 Press MENU button and ON-SCREEN MENU will appear. If projector cannot reproduce proper image, select correct...

Owners Manual
Page 23
... x 600 SVGA 10 800 x 600 SVGA 11 800 x 600 MAC 16 832 x 624 XGA 1 1024 x 768 XGA 2 1024 x 768 XGA 3 1024 x 768 XGA 4 1024 x 768 XGA 5 1024 x 768 XGA 6 1024 x 768 XGA 7 1024 x 768 XGA 8 1024 x 768 XGA 9 1024 x 768 H-Freq. (kHz) 31.47 31.47 31.47 37.86 37.... 960 MAC 1280 x 1024 720p (HDTV) -------- 1035i (HDTV) -------- 1080i (HDTV) -------- RGB -------- COMPUTER INPUT COMPATIBLE COMPUTER SPECIFICATIONS Basically this projector can accept the signal from all computers with the V, H-Frequency below mentioned and less than 140 MHz of Dot Clock. ON-SCREEN DISPLAY RESOLUTION...
... x 600 SVGA 10 800 x 600 SVGA 11 800 x 600 MAC 16 832 x 624 XGA 1 1024 x 768 XGA 2 1024 x 768 XGA 3 1024 x 768 XGA 4 1024 x 768 XGA 5 1024 x 768 XGA 6 1024 x 768 XGA 7 1024 x 768 XGA 8 1024 x 768 XGA 9 1024 x 768 H-Freq. (kHz) 31.47 31.47 31.47 37.86 37.... 960 MAC 1280 x 1024 720p (HDTV) -------- 1035i (HDTV) -------- 1080i (HDTV) -------- RGB -------- COMPUTER INPUT COMPATIBLE COMPUTER SPECIFICATIONS Basically this projector can accept the signal from all computers with the V, H-Frequency below mentioned and less than 140 MHz of Dot Clock. ON-SCREEN DISPLAY RESOLUTION...


