
Owners Manual
Page 2
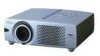
... ELECTRIC SHOCK, DO NOT REMOVE COVER (OR BACK). THIS SYMBOL INDICATES THAT DANGEROUS VOLTAGE CONSTITUTING A RISK OF ELECTRIC SHOCK IS PRESENT WITHIN THIS UNIT. THIS SYMBOL INDICATES THAT THERE ARE IMPORTANT OPERATING AND MAINTENANCE INSTRUCTIONS IN THE OWNER'S MANUAL WITH THIS UNIT. 2 q This projector should be set in the way indicated. NO USERSERVICEABLE PARTS INSIDE EXCEPT LAMP REPLACEMENT. If the problem still persists, contact the...
... ELECTRIC SHOCK, DO NOT REMOVE COVER (OR BACK). THIS SYMBOL INDICATES THAT DANGEROUS VOLTAGE CONSTITUTING A RISK OF ELECTRIC SHOCK IS PRESENT WITHIN THIS UNIT. THIS SYMBOL INDICATES THAT THERE ARE IMPORTANT OPERATING AND MAINTENANCE INSTRUCTIONS IN THE OWNER'S MANUAL WITH THIS UNIT. 2 q This projector should be set in the way indicated. NO USERSERVICEABLE PARTS INSIDE EXCEPT LAMP REPLACEMENT. If the problem still persists, contact the...
Owners Manual
Page 3
... servicing to protect it . Adjust only those controls that have the same characteristics as this projector on a bed, sofa, rug, or other hazards. e. Use a damp cloth for service. Follow all servicing to insure reliable operation of any service or repairs to this unit to normal operation. This will often require extensive work by the manufacturer that are provided for long periods of power source indicated...
... servicing to protect it . Adjust only those controls that have the same characteristics as this projector on a bed, sofa, rug, or other hazards. e. Use a damp cloth for service. Follow all servicing to insure reliable operation of any service or repairs to this unit to normal operation. This will often require extensive work by the manufacturer that are provided for long periods of power source indicated...
Owners Manual
Page 4
... your User Instructions. Model Number Trade Name Responsible party Address Telephone No. : PLC-SW20U, PLC-SW20E, PLC-SW20B : Sanyo : SANYO FISHER COMPANY : 21605 Plummer Street, Chatsworth, California 91311 : (818)998-7322 AC POWER CORD REQUIREMENT The AC Power Cord supplied with class B limits in your electrician. Should you purchased it should be cut off and on the pin face of the equipment. If a replacement fuse cover is...
... your User Instructions. Model Number Trade Name Responsible party Address Telephone No. : PLC-SW20U, PLC-SW20E, PLC-SW20B : Sanyo : SANYO FISHER COMPANY : 21605 Plummer Street, Chatsworth, California 91311 : (818)998-7322 AC POWER CORD REQUIREMENT The AC Power Cord supplied with class B limits in your electrician. Should you purchased it should be cut off and on the pin face of the equipment. If a replacement fuse cover is...
Owners Manual
Page 5
INDICATOR 37 19 AIR FILTER CARE AND CLEANING 37 CLEANING PROJECTION LENS 37 TURNING ON / OFF PROJECTOR 19 LAMP REPLACEMENT LAMP REPLACE COUNTER 38 38 ADJUSTING SCREEN 20 TROUBLESHOOTING 39 ZOOM ADJUSTMENT FOCUS ADJUSTMENT 20 20 TECHNICAL SPECIFICATIONS 41 KEYSTONE ADJUSTMENT 20 PICTURE FREEZE FUNCTION 20 NO SHOW FUNCTION 21 P-TIMER FUNCTION 21 SOUND ADJUSTMENT 21 TRADEMARKS q Apple, Macintosh, and PowerBook are registered trademarks of Apple Computer,Inc. q Each name of corporations or products in the owner's manual is a trademark or...
INDICATOR 37 19 AIR FILTER CARE AND CLEANING 37 CLEANING PROJECTION LENS 37 TURNING ON / OFF PROJECTOR 19 LAMP REPLACEMENT LAMP REPLACE COUNTER 38 38 ADJUSTING SCREEN 20 TROUBLESHOOTING 39 ZOOM ADJUSTMENT FOCUS ADJUSTMENT 20 20 TECHNICAL SPECIFICATIONS 41 KEYSTONE ADJUSTMENT 20 PICTURE FREEZE FUNCTION 20 NO SHOW FUNCTION 21 P-TIMER FUNCTION 21 SOUND ADJUSTMENT 21 TRADEMARKS q Apple, Macintosh, and PowerBook are registered trademarks of Apple Computer,Inc. q Each name of corporations or products in the owner's manual is a trademark or...
Owners Manual
Page 6
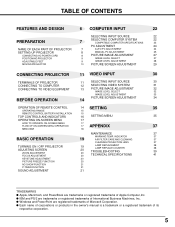
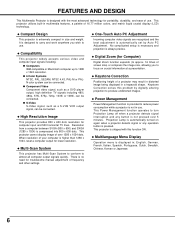
... use . x Multilanguage Menu Display Operation menu is compressed into 800 x 600 dots. q Computers IBM-compatible or Macintosh computer up to almost all computer output signals quickly. x High Resolution Image This projector provides 800 x 600 dots resolution for lower resolution. When resolution of over 5 minutes. x One-Touch Auto PC Adjustment Incoming computer video signals are recognized and the best adjustment is automatically set by digitally altering projection to focus on again when a projector detects signal or any button...
... use . x Multilanguage Menu Display Operation menu is compressed into 800 x 600 dots. q Computers IBM-compatible or Macintosh computer up to almost all computer output signals quickly. x High Resolution Image This projector provides 800 x 600 dots resolution for lower resolution. When resolution of over 5 minutes. x One-Touch Auto PC Adjustment Incoming computer video signals are recognized and the best adjustment is automatically set by digitally altering projection to focus on again when a projector detects signal or any button...

Owners Manual
Page 7
... object. q Do not touch this area, especially screw and metallic part. This projector detects internal temperature and automatically controls operating power of any object. q Keep back and bottom clear of Cooling Fans. PREPARATION NAME OF EACH PART OF PROJECTOR FRONT INFRARED REMOTE RECEIVER PROJECTION LENS FOCUS RING POWER CORD CONNECTOR ZOOM LEVER LENS COVER BACK TOP CONTROLS AND INDICATORS EXHAUST VENTS HOT AIR EXHAUSTED ! When using or installing projector, following to the following precautions should be...
... object. q Do not touch this area, especially screw and metallic part. This projector detects internal temperature and automatically controls operating power of any object. q Keep back and bottom clear of Cooling Fans. PREPARATION NAME OF EACH PART OF PROJECTOR FRONT INFRARED REMOTE RECEIVER PROJECTION LENS FOCUS RING POWER CORD CONNECTOR ZOOM LEVER LENS COVER BACK TOP CONTROLS AND INDICATORS EXHAUST VENTS HOT AIR EXHAUSTED ! When using or installing projector, following to the following precautions should be...

Owners Manual
Page 12
... turn on RESOLUTION MODE that you want to use before the computer is not supplied with this projector.) • VGA Cable (HDB 15 pin) • MAC Adapter (When connecting to the chart below depending on projector and computer. x MAC ADAPTER (Not supplied) Set switches as shown in the table ON below . Audio Cable ✽ (stereo) USB Cable ✽ VGA Cable COMPUTER AUDIO IN USB COMPUTER IN ANALOG Control Cable Control Cable Control Cable for Serial Port ✽ for PS/2 Port ✽ for PS/2 Port ✽, Serial Port...
... turn on RESOLUTION MODE that you want to use before the computer is not supplied with this projector.) • VGA Cable (HDB 15 pin) • MAC Adapter (When connecting to the chart below depending on projector and computer. x MAC ADAPTER (Not supplied) Set switches as shown in the table ON below . Audio Cable ✽ (stereo) USB Cable ✽ VGA Cable COMPUTER AUDIO IN USB COMPUTER IN ANALOG Control Cable Control Cable Control Cable for Serial Port ✽ for PS/2 Port ✽ for PS/2 Port ✽, Serial Port...
Owners Manual
Page 14
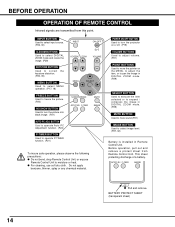
... is installed in Remote Control Unit. Do not apply benzene, thinner, splay or any chemical material. P-TIMER IMAGE Pull and remove. MENU SELECT NOSHOW FREEZE MUTE AUTO PC ADJ. INPUT BUTTON Used to select input source. (P22, 30) D.ZOOM BUTTONS Used to select DIGITAL ZOOM mode and resize the image. (P29) KEYSTONE BUTTONS Used to correct the keystone distortion. (P20, 35) MENU BUTTON Used to select MENU operation. (P17, 18) FREEZE BUTTON Used to freeze the picture. (P20) NO SHOW BUTTON Used to moisture...
... is installed in Remote Control Unit. Do not apply benzene, thinner, splay or any chemical material. P-TIMER IMAGE Pull and remove. MENU SELECT NOSHOW FREEZE MUTE AUTO PC ADJ. INPUT BUTTON Used to select input source. (P22, 30) D.ZOOM BUTTONS Used to select DIGITAL ZOOM mode and resize the image. (P29) KEYSTONE BUTTONS Used to correct the keystone distortion. (P20, 35) MENU BUTTON Used to select MENU operation. (P17, 18) FREEZE BUTTON Used to freeze the picture. (P20) NO SHOW BUTTON Used to moisture...
Owners Manual
Page 16
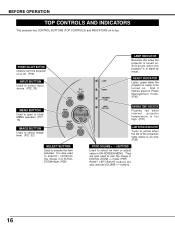
... Management mode. (P36) MENU BUTTON Used to open or close MENU operation. (P17, 18) IMAGE BUTTON Used to select image level. (P27, 32) MENU IMAGE -VOLUMESELECT SELECT BUTTON Used to turn the projector on . POWER ON-OFF BUTTON Used to execute the item selected. buttons. 16 READY INDICATOR Lights green when the projector is too high. (P37) LAMP REPLACE INDICATOR Turns to yellow when the life of the projection lamp draws to an end. (P38) POINT (VOLUME + / - ) BUTTONS Used to select input source. (P22, 30) INPUT ON - INDICATOR Flashes red when internal projector temperature...
... Management mode. (P36) MENU BUTTON Used to open or close MENU operation. (P17, 18) IMAGE BUTTON Used to select image level. (P27, 32) MENU IMAGE -VOLUMESELECT SELECT BUTTON Used to turn the projector on . POWER ON-OFF BUTTON Used to execute the item selected. buttons. 16 READY INDICATOR Lights green when the projector is too high. (P37) LAMP REPLACE INDICATOR Turns to yellow when the life of the projection lamp draws to an end. (P38) POINT (VOLUME + / - ) BUTTONS Used to select input source. (P22, 30) INPUT ON - INDICATOR Flashes red when internal projector temperature...

Owners Manual
Page 18
...) SCREEN MENU Used to set size of projector or reset Lamp Replace Counter. (Refer to P35, 36) INPUT MENU Used to select input source either Video or Computer. (Refer to P30) IMAGE SELECT MENU Used to select image level among Standard, Real and Image 1 ~ 4. (Refer to P27) SCREEN MENU Used to adjust size of image. [Normal / True / Wide / Digital zoom +/-] (Refer to P29) SETTING MENU Used to change settings of image to Normal or Wide. (Refer to VIDEO input source. AV SYSTEM MENU Used to select system of ONSCREEN MENU. BEFORE OPERATION...
...) SCREEN MENU Used to set size of projector or reset Lamp Replace Counter. (Refer to P35, 36) INPUT MENU Used to select input source either Video or Computer. (Refer to P30) IMAGE SELECT MENU Used to select image level among Standard, Real and Image 1 ~ 4. (Refer to P27) SCREEN MENU Used to adjust size of image. [Normal / True / Wide / Digital zoom +/-] (Refer to P29) SETTING MENU Used to change settings of image to Normal or Wide. (Refer to VIDEO input source. AV SYSTEM MENU Used to select system of ONSCREEN MENU. BEFORE OPERATION...
Owners Manual
Page 19
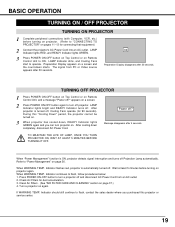
... to turn projector on. Check Air Filters for connecting that equipment.) 2 Connect the projector's AC Power Cord into an AC outlet. appears on Remote Control Unit, and a message "Power off projector. LAMP Indicator dims, and Cooling Fans start to flash, follow procedures below: 1. TURNING OFF PROJECTOR 1 Press POWER ON-OFF button on Top Control or on a screen. 2 Press POWER ON-OFF button again to "CONNECTING TO PROJECTOR" on pages 11~13 for dust accumulation. 3. Indicator continues to operate. Preparation Display appears on a screen and...
... to turn projector on. Check Air Filters for connecting that equipment.) 2 Connect the projector's AC Power Cord into an AC outlet. appears on Remote Control Unit, and a message "Power off projector. LAMP Indicator dims, and Cooling Fans start to flash, follow procedures below: 1. TURNING OFF PROJECTOR 1 Press POWER ON-OFF button on Top Control or on a screen. 2 Press POWER ON-OFF button again to "CONNECTING TO PROJECTOR" on pages 11~13 for dust accumulation. 3. Indicator continues to operate. Preparation Display appears on a screen and...

Owners Manual
Page 20
... KEY STONE v button or POINT UP button. PICTURE FREEZE FUNCTION Press FREEZE button on Remote Control Unit to freeze the picture on SETTING menu. (Refer to page 35.) Keystone dialog box appears. 2 Correct keystone distortion by pressing KEYSTONE v/w button or POINT UP/DOWN button(s). BASIC OPERATION ADJUSTING SCREEN ZOOM ADJUSTMENT Move ZOOM LEVER upward to make the image smaller. WIDE ZOOM LEVER TELE FOCUS ADJUSTMENT Rotate the FOCUS RING to reduce the lower part. Reduce the upper...
... KEY STONE v button or POINT UP button. PICTURE FREEZE FUNCTION Press FREEZE button on Remote Control Unit to freeze the picture on SETTING menu. (Refer to page 35.) Keystone dialog box appears. 2 Correct keystone distortion by pressing KEYSTONE v/w button or POINT UP/DOWN button(s). BASIC OPERATION ADJUSTING SCREEN ZOOM ADJUSTMENT Move ZOOM LEVER upward to make the image smaller. WIDE ZOOM LEVER TELE FOCUS ADJUSTMENT Rotate the FOCUS RING to reduce the lower part. Reduce the upper...
Owners Manual
Page 21
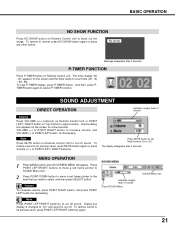
... button on Remote Control Unit to count time (00 : 00 ~ 59 : 59). The timer display "00 : 00" appears on the screen and the timer starts to black out the image. MENU OPERATION 1 Press MENU button and ON-SCREEN MENU will appear. Close SOUND Menu. To restore sound to adjust volume. Mute Press MUTE button on Top Control to its previous level, press MUTE button again or press Volume (+/-) or POINT LEFT / RIGHT button(s). The display...
... button on Remote Control Unit to count time (00 : 00 ~ 59 : 59). The timer display "00 : 00" appears on the screen and the timer starts to black out the image. MENU OPERATION 1 Press MENU button and ON-SCREEN MENU will appear. Close SOUND Menu. To restore sound to adjust volume. Mute Press MUTE button on Top Control to its previous level, press MUTE button again or press Volume (+/-) or POINT LEFT / RIGHT button(s). The display...
Owners Manual
Page 22
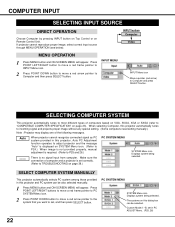
Make sure the connection of computer and a projector is set correctly. (Refer to TROUBLESHOOTING on page 23). INPUT MENU INPUT Menu icon Move a pointer (red arrow) to set in PC ADJUST Menu. (P25, 26) 22 PC SYSTEM MENU SYSTEM Menu icon Displays system being selected. If projector cannot reproduce proper image, select correct input source through MENU OPERATION (see below). INPUT button Computer Video MENU OPERATION 1 Press MENU button and ON-SCREEN MENU will appear. Custom Mode (1~5) set , and then press SELECT button. When...
Make sure the connection of computer and a projector is set correctly. (Refer to TROUBLESHOOTING on page 23). INPUT MENU INPUT Menu icon Move a pointer (red arrow) to set in PC ADJUST Menu. (P25, 26) 22 PC SYSTEM MENU SYSTEM Menu icon Displays system being selected. If projector cannot reproduce proper image, select correct input source through MENU OPERATION (see below). INPUT button Computer Video MENU OPERATION 1 Press MENU button and ON-SCREEN MENU will appear. Custom Mode (1~5) set , and then press SELECT button. When...
Owners Manual
Page 29
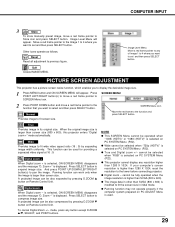
... q Digital zoom - Move a red frame pointer to the Image 1 to 4 where you want to the lower before connecting projector. SCREEN Menu icon Move the red frame to pan the image. A projected image can be selected when "RGB" is used for providing a squeezed video signal at 16 : 9. is displayed. q Panning function may not operate properly if the computer system prepared on PC SYSTEM Menu (P22). Other icons operate as follows. PICTURE SCREEN ADJUSTMENT...
... q Digital zoom - Move a red frame pointer to the Image 1 to 4 where you want to the lower before connecting projector. SCREEN Menu icon Move the red frame to pan the image. A projected image can be selected when "RGB" is used for providing a squeezed video signal at 16 : 9. is displayed. q Panning function may not operate properly if the computer system prepared on PC SYSTEM Menu (P22). Other icons operate as follows. PICTURE SCREEN ADJUSTMENT...
Owners Manual
Page 36
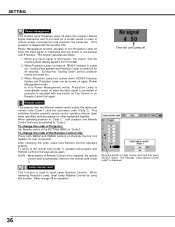
... reset Lamp Replace Counter. In this Power Management mode, Projection Lamp is automatically turned on when the input signal is connected or projector is operated with this function ON.) Power Management function operates to turn Projection Lamp off for 90 seconds. (During this function. Time left until Lamp off . To change the code of the Remote Control Unit; Set Remote control in the ways above again. To return to the normal code (Code 1), operate both projector and Remote Control Unit must be switched to reduce power...
... reset Lamp Replace Counter. In this Power Management mode, Projection Lamp is automatically turned on when the input signal is connected or projector is operated with this function ON.) Power Management function operates to turn Projection Lamp off for 90 seconds. (During this function. Time left until Lamp off . To change the code of the Remote Control Unit; Set Remote control in the ways above again. To return to the normal code (Code 1), operate both projector and Remote Control Unit must be switched to reduce power...
Owners Manual
Page 37
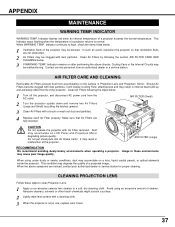
.... 4 Replace each Air Filter properly. When using an excessive amount of the projector. Indicator flashes red when an internal temperature of a projector returns to flash, check the items listed below. 1 Ventilation Slots of the projector may result in malfunction of cleaner. AIR FILTER (Small) 2 Turn the projector upside down and remove two Air Filters (Large and Small) by following the steps below . 3 If WARNING TEMP. This condition may accumulate on LCD Panel and Projection Mirror degrading picture...
.... 4 Replace each Air Filter properly. When using an excessive amount of the projector. Indicator flashes red when an internal temperature of a projector returns to flash, check the items listed below. 1 Ventilation Slots of the projector may result in malfunction of cleaner. AIR FILTER (Small) 2 Turn the projector upside down and remove two Air Filters (Large and Small) by following the steps below . 3 If WARNING TEMP. This condition may accumulate on LCD Panel and Projection Mirror degrading picture...
Owners Manual
Page 38
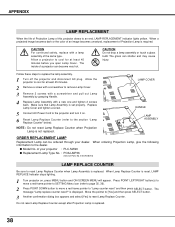
...: PLC-SW20 q Replacement Lamp Type No. : POA-LMP36 (Service Parts No. 610 293 8210) LAMP REPLACE COUNTER Be sure to the projector and turn it on , press MENU button and ON-SCREEN MENU will appear. The message "Lamp replace counter reset?" CAUTION For continued safety, replace with a new one and tighten 2 screws back. Replace Lamp Cover and tighten a screw. 5 Connect AC Power Cord to reset Lamp Replace Counter when Lamp Assembly is replaced. Do not reset Lamp Replace Counter except after Projection Lamp is reset, LAMP REPLACE Indicator stops lighting. 1 Turn projector on . 6 Reset Lamp...
...: PLC-SW20 q Replacement Lamp Type No. : POA-LMP36 (Service Parts No. 610 293 8210) LAMP REPLACE COUNTER Be sure to the projector and turn it on , press MENU button and ON-SCREEN MENU will appear. The message "Lamp replace counter reset?" CAUTION For continued safety, replace with a new one and tighten 2 screws back. Replace Lamp Cover and tighten a screw. 5 Connect AC Power Cord to reset Lamp Replace Counter when Lamp Assembly is replaced. Do not reset Lamp Replace Counter except after Projection Lamp is reset, LAMP REPLACE Indicator stops lighting. 1 Turn projector on . 6 Reset Lamp...

Owners Manual
Page 39
... video equipment as follows: 1. q Adjust the audio source. If an image still does not appear, unplug a projector from audio input source. The problem may be turned on . 4. q Make sure READY Indicator lights. Some displays are properly connected. 3. q Check WARNING TEMP. In such an event, leave a projector OFF and wait until condensation disappears. Verify that you select is switched on by pressing Power ON-OFF button. If a projector still does not produce an image, re-start...
... video equipment as follows: 1. q Adjust the audio source. If an image still does not appear, unplug a projector from audio input source. The problem may be turned on . 4. q Make sure READY Indicator lights. Some displays are properly connected. 3. q Check WARNING TEMP. In such an event, leave a projector OFF and wait until condensation disappears. Verify that you select is switched on by pressing Power ON-OFF button. If a projector still does not produce an image, re-start...
Owners Manual
Page 41
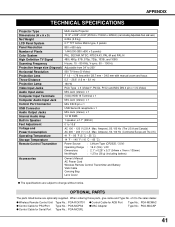
of Pixels Color System High Definition TV Signal Scanning Frequency Projection Image size (Diagonal) Horizontal Resolution Projection Lens Throw Distance Projection Lamp Video Input Jacks Audio Input Jacks Computer Input Terminals Computer Audio Input Jack Control Port Connector USB Connector Audio Output Jacks Internal Audio Amp Built-in Speaker Feet Adjustment Voltage and Power Consumption Operating Temperature Storage Temperature Remote Control Transmitter Multi-media Projector 10.12" x 2.98" x 9.02" (257mm x 75.8mm x 229mm) (not including Adjustable Feet and Lens) 6.2lbs (2.8 kg) ...
of Pixels Color System High Definition TV Signal Scanning Frequency Projection Image size (Diagonal) Horizontal Resolution Projection Lens Throw Distance Projection Lamp Video Input Jacks Audio Input Jacks Computer Input Terminals Computer Audio Input Jack Control Port Connector USB Connector Audio Output Jacks Internal Audio Amp Built-in Speaker Feet Adjustment Voltage and Power Consumption Operating Temperature Storage Temperature Remote Control Transmitter Multi-media Projector 10.12" x 2.98" x 9.02" (257mm x 75.8mm x 229mm) (not including Adjustable Feet and Lens) 6.2lbs (2.8 kg) ...


