
Instruction Manual, PLC-XP51
Page 2
...Eye damage could result. Eye damage may result. NO USERSERVICEABLE PARTS INSIDE EXCEPT LAMP REPLACEMENT. TO THE OWNER Before operating this projector, read this manual again, check operations and cable connections and try the solutions in the Standard for the Protection of Electronic Computer...not look into the lens as defined in the "Trouble-shooting" section of the end of this manual thoroughly and operate the projector properly. THIS SYMBOL INDICATES THAT THERE ARE IMPORTANT OPERATING AND MAINTENANCE INSTRUCTIONS IN THE OWNER'S MANUAL WITH THIS UNIT. 2 THIS SYMBOL...
...Eye damage could result. Eye damage may result. NO USERSERVICEABLE PARTS INSIDE EXCEPT LAMP REPLACEMENT. TO THE OWNER Before operating this projector, read this manual again, check operations and cable connections and try the solutions in the Standard for the Protection of Electronic Computer...not look into the lens as defined in the "Trouble-shooting" section of the end of this manual thoroughly and operate the projector properly. THIS SYMBOL INDICATES THAT THERE ARE IMPORTANT OPERATING AND MAINTENANCE INSTRUCTIONS IN THE OWNER'S MANUAL WITH THIS UNIT. 2 THIS SYMBOL...

Instruction Manual, PLC-XP51
Page 3
...routine safety checks to overturn. Unauthorized substitutions may cause the appliance and cart combination to determine that have the same characteristics as this projector on it from overheating. This will often require extensive work by persons walking on an unstable cart, stand, or table. Do... personnel under the following the operating instructions. Follow all warnings and instructions marked on the power cord. Do not expose this projector from the wall outlet. Never spill liquid of any kind on the marking label. Adjust only those controls that could result ...
...routine safety checks to overturn. Unauthorized substitutions may cause the appliance and cart combination to determine that have the same characteristics as this projector on it from overheating. This will often require extensive work by persons walking on an unstable cart, stand, or table. Do... personnel under the following the operating instructions. Follow all warnings and instructions marked on the power cord. Do not expose this projector from the wall outlet. Never spill liquid of any kind on the marking label. Adjust only those controls that could result ...

Instruction Manual, PLC-XP51
Page 4
...occur in a particular installation. Model Number Trade Name Responsible party Address Telephone No. : PLC-XP50/PLC-XP51/PLC-XP50L/PLC-XP51L : Sanyo : SANYO FISHER COMPANY : 21605 Plummer Street, Chatsworth, California 91311 : (818)998-7322 AC POWER CORD REQUIREMENT The AC Power Cord supplied with the... modifications should be determined by turning the equipment off and destroyed. Do not make any changes or modifications to defeat this projector meets the requirement for your User Instructions. The wire which is encouraged to try to the equipment unless otherwise specified in the...
...occur in a particular installation. Model Number Trade Name Responsible party Address Telephone No. : PLC-XP50/PLC-XP51/PLC-XP50L/PLC-XP51L : Sanyo : SANYO FISHER COMPANY : 21605 Plummer Street, Chatsworth, California 91311 : (818)998-7322 AC POWER CORD REQUIREMENT The AC Power Cord supplied with the... modifications should be determined by turning the equipment off and destroyed. Do not make any changes or modifications to defeat this projector meets the requirement for your User Instructions. The wire which is encouraged to try to the equipment unless otherwise specified in the...
Instruction Manual, PLC-XP51
Page 5
... 43 21 CLEANING PROJECTION LENS 43 21 LAMP REPLACEMENT 44 21 LAMP REPLACE COUNTER 45 21 TROUBLESHOOTING 46 21 INDICATORS AND PROJECTOR CONDITION 48 22 22 COMPATIBLE COMPUTER SPECIFICATION 49 22 MENU TREE 50 22 TECHNICAL SPECIFICATIONS 52 CONFIGURATIONS OF TERMINALS 53 OPTIONAL...ON-SCREEN MENU 18 FLOW OF ON-SCREEN MENU OPERATION 18 MENU BAR 19 APPENDIX 41 BASIC OPERATION TURNING ON / OFF PROJECTOR ADJUSTING SCREEN ZOOM ADJUSTMENT FOCUS ADJUSTMENT LENS SHIFT ADJUSTMENT KEYSTONE ADJUSTMENT PICTURE FREEZE FUNCTION NO SHOW FUNCTION P-TIMER FUNCTION SOUND ADJUSTMENT...
... 43 21 CLEANING PROJECTION LENS 43 21 LAMP REPLACEMENT 44 21 LAMP REPLACE COUNTER 45 21 TROUBLESHOOTING 46 21 INDICATORS AND PROJECTOR CONDITION 48 22 22 COMPATIBLE COMPUTER SPECIFICATION 49 22 MENU TREE 50 22 TECHNICAL SPECIFICATIONS 52 CONFIGURATIONS OF TERMINALS 53 OPTIONAL...ON-SCREEN MENU 18 FLOW OF ON-SCREEN MENU OPERATION 18 MENU BAR 19 APPENDIX 41 BASIC OPERATION TURNING ON / OFF PROJECTOR ADJUSTING SCREEN ZOOM ADJUSTMENT FOCUS ADJUSTMENT LENS SHIFT ADJUSTMENT KEYSTONE ADJUSTMENT PICTURE FREEZE FUNCTION NO SHOW FUNCTION P-TIMER FUNCTION SOUND ADJUSTMENT...
Instruction Manual, PLC-XP51
Page 6
... Projection lens can be connected. N Wireless Mouse Remote Control Unit supplied with motordriven lens shift function. N Compatibility This projector widely accepts various video and computer input signals including; This Power Management function operates to produce undistorted images. This function ... image size to approx. 1/4 ~ 49 times of your computer is over 1280 x 1024 dots. Resolution from a computer. This projector is shipped with most advanced technology for computer input and 800 horizontal TV lines. English, German, French, Italian, Spanish, Portuguese, ...
... Projection lens can be connected. N Wireless Mouse Remote Control Unit supplied with motordriven lens shift function. N Compatibility This projector widely accepts various video and computer input signals including; This Power Management function operates to produce undistorted images. This function ... image size to approx. 1/4 ~ 49 times of your computer is over 1280 x 1024 dots. Resolution from a computer. This projector is shipped with most advanced technology for computer input and 800 horizontal TV lines. English, German, French, Italian, Spanish, Portuguese, ...
Instruction Manual, PLC-XP51
Page 7
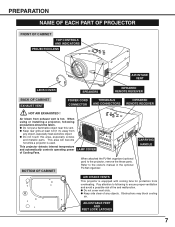
...for protection from any objects. G Keep side clear of Cooling Fans. Refer to the projector, remove the these parts. PREPARATION NAME OF EACH PART OF PROJECTOR FRONT OF CABINET TOP CONTROLS AND INDICATORS PROJECTION LENS AIR INTAKE VENT LENS COVER SPEAKERS ...EXHAUST VENT POWER CORD CONNECTOR TERMINALS AND CONNECTORS INFRARED REMOTE RECEIVER HOT AIR EXHAUSTED ! ADJUSTABLE FEET AND FEET LOCK LATCHES 7 This projector detects internal temperature and automatically controls operating power of any object, especially heat-sensitive object. G Keep rear grills at least 3.3'(1 ...
...for protection from any objects. G Keep side clear of Cooling Fans. Refer to the projector, remove the these parts. PREPARATION NAME OF EACH PART OF PROJECTOR FRONT OF CABINET TOP CONTROLS AND INDICATORS PROJECTION LENS AIR INTAKE VENT LENS COVER SPEAKERS ...EXHAUST VENT POWER CORD CONNECTOR TERMINALS AND CONNECTORS INFRARED REMOTE RECEIVER HOT AIR EXHAUSTED ! ADJUSTABLE FEET AND FEET LOCK LATCHES 7 This projector detects internal temperature and automatically controls operating power of any object, especially heat-sensitive object. G Keep rear grills at least 3.3'(1 ...

Instruction Manual, PLC-XP51
Page 8
...unplug AC Power Cord when an appliance is connected to outlet with a peripheral equipment before turning a projector on your projector. PREPARATION SETTING-UP PROJECTOR CONNECTING AC POWER CORD This projector uses nominal input voltages of power system. To reduce risk of electrical shock, do not plug ... NOTE ON POWER CORD AC Power Cord must be easily accessible. Consult your sales dealer. Projector side AC Outlet side For the U.S.A. Connect a projector with AC Power Cord, an appliance is designed to a projector. To the AC Outlet. (120 V AC) To the AC Outlet. (200 - 240...
...unplug AC Power Cord when an appliance is connected to outlet with a peripheral equipment before turning a projector on your projector. PREPARATION SETTING-UP PROJECTOR CONNECTING AC POWER CORD This projector uses nominal input voltages of power system. To reduce risk of electrical shock, do not plug ... NOTE ON POWER CORD AC Power Cord must be easily accessible. Consult your sales dealer. Projector side AC Outlet side For the U.S.A. Connect a projector with AC Power Cord, an appliance is designed to a projector. To the AC Outlet. (120 V AC) To the AC Outlet. (200 - 240...
Instruction Manual, PLC-XP51
Page 9
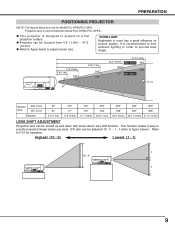
...400" 300" 231" Min. Highest (10 : 0) Lowest (1 : 1) 1 10 : 0 1 9 This function makes it easy to project on picture quality. G This projector is designed to provide projected image where you want. Zoom Distance 40" 31" 4.6' (1.4m) 100" 77" 11.8' (3.6m) 150" 115" 17.7' (5.4m) 200" .... Refer to adjust screen size. Projection lens is recommended to limit ambient lighting in room has a great influence on a flat projection surface. G Projector can be focused from 4.6' (1.4m) ~ 47.3' (14.4m). Zoom 308" Screen Size Max. Zoom Min. G Refer to figure below to...
...400" 300" 231" Min. Highest (10 : 0) Lowest (1 : 1) 1 10 : 0 1 9 This function makes it easy to project on picture quality. G This projector is designed to provide projected image where you want. Zoom Distance 40" 31" 4.6' (1.4m) 100" 77" 11.8' (3.6m) 150" 115" 17.7' (5.4m) 200" .... Refer to adjust screen size. Projection lens is recommended to limit ambient lighting in room has a great influence on a flat projection surface. G Projector can be focused from 4.6' (1.4m) ~ 47.3' (14.4m). Zoom 308" Screen Size Max. Zoom Min. G Refer to figure below to...
Instruction Manual, PLC-XP51
Page 10
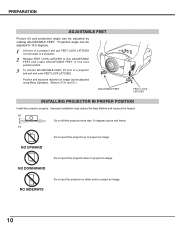
... to project an image. PREPARATION ADJUSTABLE FEET Picture tilt and projection angle can be adjusted to 10.5 degrees. 1 Lift front of a projector and pull FEET LOCK LATCHES on either side to project an image. 10 Projection angle can be adjusted using Menu Operation. (Refer to ...tune position and tilt. 3 To shorten ADJUSTABLE FEET, lift front of image can be adjusted by rotating ADJUSTABLE FEET. Position and keystone distortion of a projector and pull and undo FEET LOCK LATCHES. Improper installation may reduce the lamp lifetime and cause a fire hazard. 10˚ Do not tilt the...
... to project an image. PREPARATION ADJUSTABLE FEET Picture tilt and projection angle can be adjusted to 10.5 degrees. 1 Lift front of a projector and pull FEET LOCK LATCHES on either side to project an image. 10 Projection angle can be adjusted using Menu Operation. (Refer to ...tune position and tilt. 3 To shorten ADJUSTABLE FEET, lift front of image can be adjusted by rotating ADJUSTABLE FEET. Position and keystone distortion of a projector and pull and undo FEET LOCK LATCHES. Improper installation may reduce the lamp lifetime and cause a fire hazard. 10˚ Do not tilt the...
Instruction Manual, PLC-XP51
Page 11
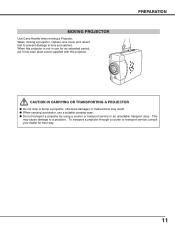
...suitable carrying case. This may result. When this projector. To transport a projector through a courier or transport service, consult your dealer for an extended period, put it into case (dust cover) supplied with this projector is not in an unsuitable transport case. PREPARATION ... IN CARRYING OR TRANSPORTING A PROJECTOR G Do not drop or bump a projector, otherwise damages or malfunctions may cause damage to lens and cabinet. G When carrying a projector, use for best way. 11 MOVING PROJECTOR Use Carry Handle when moving a projector, replace lens cover and retract...
...suitable carrying case. This may result. When this projector. To transport a projector through a courier or transport service, consult your dealer for an extended period, put it into case (dust cover) supplied with this projector is not in an unsuitable transport case. PREPARATION ... IN CARRYING OR TRANSPORTING A PROJECTOR G Do not drop or bump a projector, otherwise damages or malfunctions may cause damage to lens and cabinet. G When carrying a projector, use for best way. 11 MOVING PROJECTOR Use Carry Handle when moving a projector, replace lens cover and retract...
Instruction Manual, PLC-XP51
Page 12
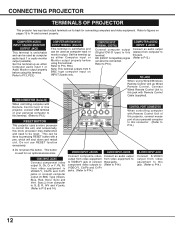
.... Set the terminal up as computer input or monitor output. USB CONNECTOR (Series B) When controlling computer with Remote Control Unit of this projector, connect mouse port of your personal computer to this connector. (Refer to P13, P23.) COMPUTER INPUT/MONITOR OUTPUT TERMINAL (ANALOG) This ... these jacks. (Refer to P14.) S-VIDEO INPUT JACK Connect S-VIDEO output from video equipment to 14 and connect properly. CONNECTING PROJECTOR TERMINALS OF PROJECTOR This projector has input and output terminals on INPUT 2 jacks only. Refer to figures on pages 12 to VIDEO/Y, Cb/Pb and Cr...
.... Set the terminal up as computer input or monitor output. USB CONNECTOR (Series B) When controlling computer with Remote Control Unit of this projector, connect mouse port of your personal computer to this connector. (Refer to P13, P23.) COMPUTER INPUT/MONITOR OUTPUT TERMINAL (ANALOG) This ... these jacks. (Refer to P14.) S-VIDEO INPUT JACK Connect S-VIDEO output from video equipment to 14 and connect properly. CONNECTING PROJECTOR TERMINALS OF PROJECTOR This projector has input and output terminals on INPUT 2 jacks only. Refer to figures on pages 12 to VIDEO/Y, Cb/Pb and Cr...
Instruction Manual, PLC-XP51
Page 13
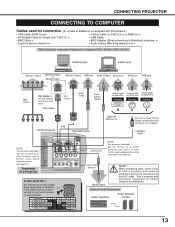
... this terminal. (See page 23.) Audio Cable (stereo) ✽ Audio Input NOTE : When connecting cable, power cords of your computer. CONNECTING PROJECTOR CONNECTING TO COMPUTER Cables used for Serial Port • Audio Cables (Mini Plug (stereo) x 2) ✽ IBM-compatible computer or Macintosh computer ...Macintosh computer) ✽ • Control Cable for connection (✽ = Cable or adapter is not supplied with terminal of both a projector and external equipment should be disconnected from AC outlet. VGA Cable DVI Cable ✽ USB Cable Audio Cable ✽ (stereo) ...
... this terminal. (See page 23.) Audio Cable (stereo) ✽ Audio Input NOTE : When connecting cable, power cords of your computer. CONNECTING PROJECTOR CONNECTING TO COMPUTER Cables used for Serial Port • Audio Cables (Mini Plug (stereo) x 2) ✽ IBM-compatible computer or Macintosh computer ...Macintosh computer) ✽ • Control Cable for connection (✽ = Cable or adapter is not supplied with terminal of both a projector and external equipment should be disconnected from AC outlet. VGA Cable DVI Cable ✽ USB Cable Audio Cable ✽ (stereo) ...
Instruction Manual, PLC-XP51
Page 14
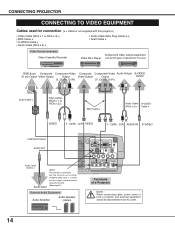
... Cb/Pb Cr/Pr INPUT 2 VIDEO/Y Cb/Pb Cr/Pr R-AUDIO-L S-VIDEO (MONO) INPUT 3 Terminals of a Projector NOTE : When connecting cable, power cords of both a projector and external equipment should be disconnected from AC outlet. 14 Video Disc Player (such as either Computer audio input 1 or ...audio monitor output (variable) before using this projector.) • Video Cable (RCA x 1 or RCA x 3) ✽ • BNC Cable ✽ • S-VIDEO Cable ✽ • Audio Cable ...
... Cb/Pb Cr/Pr INPUT 2 VIDEO/Y Cb/Pb Cr/Pr R-AUDIO-L S-VIDEO (MONO) INPUT 3 Terminals of a Projector NOTE : When connecting cable, power cords of both a projector and external equipment should be disconnected from AC outlet. 14 Video Disc Player (such as either Computer audio input 1 or ...audio monitor output (variable) before using this projector.) • Video Cable (RCA x 1 or RCA x 3) ✽ • BNC Cable ✽ • S-VIDEO Cable ✽ • Audio Cable ...
Instruction Manual, PLC-XP51
Page 15
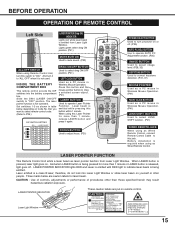
.... BEFORE OPERATION OPERATION OF REMOTE CONTROL ON Left Side LASER POINTER (Drag ON) INDICATOR Lights red while laser beam is a class II laser; And turn projector on or off . INSIDE THE BATTERY COMPARTMENT BOX This remote control provide the DIP switches into Laser Light Window or shine laser beam on Code...
.... BEFORE OPERATION OPERATION OF REMOTE CONTROL ON Left Side LASER POINTER (Drag ON) INDICATOR Lights red while laser beam is a class II laser; And turn projector on or off . INSIDE THE BATTERY COMPARTMENT BOX This remote control provide the DIP switches into Laser Light Window or shine laser beam on Code...
Instruction Manual, PLC-XP51
Page 16
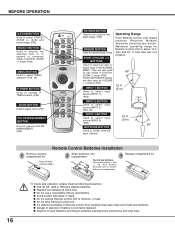
... BUTTON Used to execute the selected item, or to select input source (INPUT 1). (P23) Operating Range Point Remote Control Unit toward projector (Receiver Window) whenever pressing any button. mode. (P29) POINT LEFT/RIGHT buttons are also used as VOLUME +/- Two AA size batteries...batteries at same time. G Do not use a new battery with an used batteries according to turn picture into compartment. 3 Replace compartment lid. G Dispose of a projector. 60° 16.4' (5 m) INPUT 2 BUTTON Used to select input source (INPUT 2). (P24, 30) INPUT 3 BUTTON Used to select input source (INPUT...
... BUTTON Used to execute the selected item, or to select input source (INPUT 1). (P23) Operating Range Point Remote Control Unit toward projector (Receiver Window) whenever pressing any button. mode. (P29) POINT LEFT/RIGHT buttons are also used as VOLUME +/- Two AA size batteries...batteries at same time. G Do not use a new battery with an used batteries according to turn picture into compartment. 3 Replace compartment lid. G Dispose of a projector. 60° 16.4' (5 m) INPUT 2 BUTTON Used to select input source (INPUT 2). (P24, 30) INPUT 3 BUTTON Used to select input source (INPUT...
Instruction Manual, PLC-XP51
Page 17
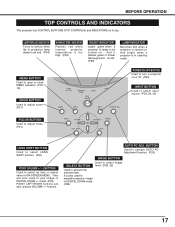
...ZOOM BUTTON Used to adjust zoom. (P21) POWER ON-OFF BUTTON Used to pan image in ON-SCREEN MENU. They are also used to turn a projector on . BUTTON Used to operate AUTO PC Adjustment function. (P25) IMAGE BUTTON Used to select image SELECT BUTTON level. (P28, 32) Used to an... LENS SHIFT function. (P21) POINT (VOLUME + / - ) BUTTONS Used to expand/compress image in stand-by mode. BEFORE OPERATION TOP CONTROLS AND INDICATORS This projector has CONTROL BUTTONS (TOP CONTROLS) and INDICATORS on . And it flashes green in Power Management mode. (P39) LAMP INDICATOR Becomes dim when...
...ZOOM BUTTON Used to adjust zoom. (P21) POWER ON-OFF BUTTON Used to pan image in ON-SCREEN MENU. They are also used to turn a projector on . BUTTON Used to operate AUTO PC Adjustment function. (P25) IMAGE BUTTON Used to select image SELECT BUTTON level. (P28, 32) Used to an... LENS SHIFT function. (P21) POINT (VOLUME + / - ) BUTTONS Used to expand/compress image in stand-by mode. BEFORE OPERATION TOP CONTROLS AND INDICATORS This projector has CONTROL BUTTONS (TOP CONTROLS) and INDICATORS on . And it flashes green in Power Management mode. (P39) LAMP INDICATOR Becomes dim when...
Instruction Manual, PLC-XP51
Page 18
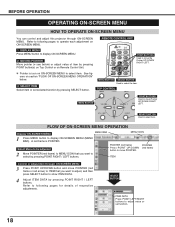
BEFORE OPERATION OPERATING ON-SCREEN MENU HOW TO OPERATE ON-SCREEN MENU You can control and adjust this projector through ON-SCREEN MENU 3 Press POINT UP/DOWN button and move POINTER (red frame or red arrow) to ITEM that you want to select by ...
BEFORE OPERATION OPERATING ON-SCREEN MENU HOW TO OPERATE ON-SCREEN MENU You can control and adjust this projector through ON-SCREEN MENU 3 Press POINT UP/DOWN button and move POINTER (red frame or red arrow) to ITEM that you want to select by ...
Instruction Manual, PLC-XP51
Page 19
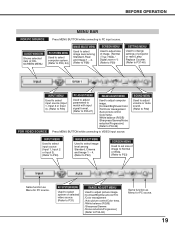
... /Auto picture control/Color temp. /White balance (R/G/B) /Sharpness/Gamma /Noise reduction/Progressive] (Refer to PC input source. AV SYSTEM MENU Used to select system of projector or reset Lamp Replace Counter. (Refer to P37-40) INPUT MENU Used to select input source (Input 1, Input 2 or Input 3). (Refer to P23) PC ADJUST...
... /Auto picture control/Color temp. /White balance (R/G/B) /Sharpness/Gamma /Noise reduction/Progressive] (Refer to PC input source. AV SYSTEM MENU Used to select system of projector or reset Lamp Replace Counter. (Refer to P37-40) INPUT MENU Used to select input source (Input 1, Input 2 or Input 3). (Refer to P23) PC ADJUST...
Instruction Manual, PLC-XP51
Page 20
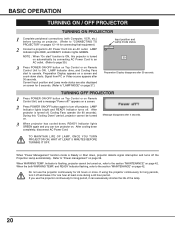
... can turn it off . LAMP Indicator dims, and Cooling Fans start " function is ON, this "Cooling Down" period, projector cannot be turned on, refer to the section "MAINTENANCE" on page 42. appears on Remote Control Unit to ON. Do not use ...flashing, refer to the section "MAINTENANCE" on Remote Control Unit, and a message "Power off projector. Preparation Display appears on . During this projector is turned off the Projection Lamp automatically. After cooling down , projector detects signal interruption and turns off , Cooling Fans operate (for 5 seconds. (Refer to "...
... can turn it off . LAMP Indicator dims, and Cooling Fans start " function is ON, this "Cooling Down" period, projector cannot be turned on, refer to the section "MAINTENANCE" on page 42. appears on Remote Control Unit to ON. Do not use ...flashing, refer to the section "MAINTENANCE" on Remote Control Unit, and a message "Power off projector. Preparation Display appears on . During this projector is turned off the Projection Lamp automatically. After cooling down , projector detects signal interruption and turns off , Cooling Fans operate (for 5 seconds. (Refer to "...
Instruction Manual, PLC-XP51
Page 23
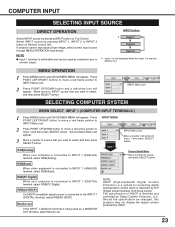
Select INPUT source by pressing INPUT 1, INPUT 2 or INPUT 3 button on Top Control. If projector cannot reproduce proper image, select correct input source through MENU OPERATION (see below). Press POINT LEFT/RIGHT buttons to move a red arrow pointer to INPUT... Monitor out. NOTE; INPUT button ✽ Input 1 Input 2 Input 3 ✽ Input 1 is not displayed when the Input 1 is switchable and can be changed, this projector may not display the digital content protected by Digital Content Protection, LLC. RGB(PC Digital) When your computer is connected to source and press SELECT...
Select INPUT source by pressing INPUT 1, INPUT 2 or INPUT 3 button on Top Control. If projector cannot reproduce proper image, select correct input source through MENU OPERATION (see below). Press POINT LEFT/RIGHT buttons to move a red arrow pointer to INPUT... Monitor out. NOTE; INPUT button ✽ Input 1 Input 2 Input 3 ✽ Input 1 is not displayed when the Input 1 is switchable and can be changed, this projector may not display the digital content protected by Digital Content Protection, LLC. RGB(PC Digital) When your computer is connected to source and press SELECT...


