Instruction Manual, PLC-XP51
Page 2
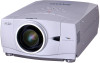
... and rear of Electronic Computer/Data Processing Equipment, ANSI/NFPA 75. G Remote Control Unit, supplied to be built into Laser Light Window or shine the laser beam on the projector. THIS SYMBOL INDICATES THAT THERE ARE IMPORTANT OPERATING AND MAINTENANCE INSTRUCTIONS IN THE OWNER'S MANUAL WITH THIS UNIT. 2 G This projector produces intense light from the ventilation holes. CAUTION Not for use in a computer room as...
... and rear of Electronic Computer/Data Processing Equipment, ANSI/NFPA 75. G Remote Control Unit, supplied to be built into Laser Light Window or shine the laser beam on the projector. THIS SYMBOL INDICATES THAT THERE ARE IMPORTANT OPERATING AND MAINTENANCE INSTRUCTIONS IN THE OWNER'S MANUAL WITH THIS UNIT. 2 G This projector produces intense light from the ventilation holes. CAUTION Not for use in a computer room as...
Instruction Manual, PLC-XP51
Page 4
... which is coloured blue must be sure that visible on , the user is connected. - Consult the dealer or an experienced radio/TV technician for your User Instructions. Model Number Trade Name Responsible party Address Telephone No. : PLC-XP50/PLC-XP51/PLC-XP50L/PLC-XP51L : Sanyo : SANYO FISHER COMPANY : 21605 Plummer Street, Chatsworth, California 91311 : (818)998-7322 AC POWER CORD REQUIREMENT The AC Power Cord supplied with the coloured...
... which is coloured blue must be sure that visible on , the user is connected. - Consult the dealer or an experienced radio/TV technician for your User Instructions. Model Number Trade Name Responsible party Address Telephone No. : PLC-XP50/PLC-XP51/PLC-XP50L/PLC-XP51L : Sanyo : SANYO FISHER COMPANY : 21605 Plummer Street, Chatsworth, California 91311 : (818)998-7322 AC POWER CORD REQUIREMENT The AC Power Cord supplied with the coloured...
Instruction Manual, PLC-XP51
Page 5
... IMAGE ADJUSTMENTS 34 OPERATION OF REMOTE CONTROL 15 LASER POINTER FUNCTION 15 REMOTE CONTROL BATTERIES INSTALLATION 16 SETTING 37 TOP CONTROLS AND INDICATORS 17 OPERATING ON-SCREEN MENU 18 SETTING MENU 37 HOW TO OPERATE ON-SCREEN MENU 18 FLOW OF ON-SCREEN MENU OPERATION 18 MENU BAR 19 APPENDIX 41 BASIC OPERATION TURNING ON / OFF PROJECTOR ADJUSTING SCREEN ZOOM ADJUSTMENT FOCUS ADJUSTMENT LENS SHIFT ADJUSTMENT KEYSTONE ADJUSTMENT PICTURE FREEZE FUNCTION NO SHOW FUNCTION P-TIMER FUNCTION SOUND ADJUSTMENT 20 OPERATING WIRELESS MOUSE 41 MAINTENANCE 42 WARNING TEMP...
... IMAGE ADJUSTMENTS 34 OPERATION OF REMOTE CONTROL 15 LASER POINTER FUNCTION 15 REMOTE CONTROL BATTERIES INSTALLATION 16 SETTING 37 TOP CONTROLS AND INDICATORS 17 OPERATING ON-SCREEN MENU 18 SETTING MENU 37 HOW TO OPERATE ON-SCREEN MENU 18 FLOW OF ON-SCREEN MENU OPERATION 18 MENU BAR 19 APPENDIX 41 BASIC OPERATION TURNING ON / OFF PROJECTOR ADJUSTING SCREEN ZOOM ADJUSTMENT FOCUS ADJUSTMENT LENS SHIFT ADJUSTMENT KEYSTONE ADJUSTMENT PICTURE FREEZE FUNCTION NO SHOW FUNCTION P-TIMER FUNCTION SOUND ADJUSTMENT 20 OPERATING WIRELESS MOUSE 41 MAINTENANCE 42 WARNING TEMP...
Instruction Manual, PLC-XP51
Page 6
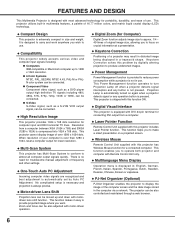
... Remote Control Unit only. No complicated setup is necessary and projection is not pressed. This function makes it easy to provide projected image where you to focus on crucial information at a presentation. N Digital Zoom (for computer input and 800 horizontal TV lines. This Power Management function operates to use . This function helps you wish to turn Projection Lamp off when a projector detects signal interruption and any operation button is pressed. N Multilanguage Menu Display Operation menu...
... Remote Control Unit only. No complicated setup is necessary and projection is not pressed. This function makes it easy to provide projected image where you to focus on crucial information at a presentation. N Digital Zoom (for computer input and 800 horizontal TV lines. This Power Management function operates to use . This function helps you wish to turn Projection Lamp off when a projector detects signal interruption and any operation button is pressed. N Multilanguage Menu Display Operation menu...
Instruction Manual, PLC-XP51
Page 13
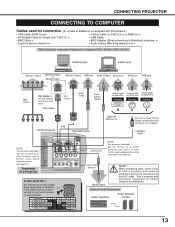
... (VGA / SVGA / XGA / SXGA) Desktop type Laptop type Monitor Output Monitor Output or Monitor Input Monitor Output USB port Audio Output Serial port PS/2 port ADB port BNC Cable ✽ MAC Adapter ✽ Set slide switches according to chart below depending on RESOLU- This terminal is switchable. This terminal is switchable. CONNECTING PROJECTOR CONNECTING TO COMPUTER Cables used for connection (✽ = Cable or adapter is not supplied with this terminal. (See page 23.) Audio Cable (stereo) ✽ Audio Input...
... (VGA / SVGA / XGA / SXGA) Desktop type Laptop type Monitor Output Monitor Output or Monitor Input Monitor Output USB port Audio Output Serial port PS/2 port ADB port BNC Cable ✽ MAC Adapter ✽ Set slide switches according to chart below depending on RESOLU- This terminal is switchable. This terminal is switchable. CONNECTING PROJECTOR CONNECTING TO COMPUTER Cables used for connection (✽ = Cable or adapter is not supplied with this terminal. (See page 23.) Audio Cable (stereo) ✽ Audio Input...
Instruction Manual, PLC-XP51
Page 15
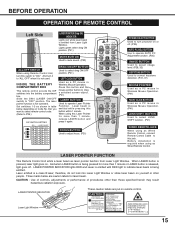
... BUTTON Used as a PC mouse in Wireless Mouse Operation. Laser emitted is not operated. CAUTION : Use of controls, adjustments or performance of procedures other people. The laser pointer function is a class II laser; that you want to select remote control code. (Refer to this switch to "OFF" position. SELECT VOLUME+ MENU KEYSTONE LASER P-TIMER INPUT 1 ZOOM COLOR.M INPUT 2 INPUT 3 FOCUS LENS NETWORK POWER ON-OFF BUTTON Used to adjust focus. (P21) LOCK AUTO PC ON-OFF D.ZOOM FREEZE NO SHOW MUTE IMAGE...
... BUTTON Used as a PC mouse in Wireless Mouse Operation. Laser emitted is not operated. CAUTION : Use of controls, adjustments or performance of procedures other people. The laser pointer function is a class II laser; that you want to select remote control code. (Refer to this switch to "OFF" position. SELECT VOLUME+ MENU KEYSTONE LASER P-TIMER INPUT 1 ZOOM COLOR.M INPUT 2 INPUT 3 FOCUS LENS NETWORK POWER ON-OFF BUTTON Used to adjust focus. (P21) LOCK AUTO PC ON-OFF D.ZOOM FREEZE NO SHOW MUTE IMAGE...
Instruction Manual, PLC-XP51
Page 16
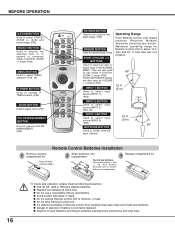
... Range Point Remote Control Unit toward projector (Receiver Window) whenever pressing any button. SELECT VOLUME+ MENU KEYSTONE P-TIMER BUTTON Used to operate PTIMER function. (P22) ZOOM BUTTON Used to adjust zoom. (P21) COLOR MANAGEMENT BUTTON Used to operate COLOR MANAGEMENT. (P34) LASER P-TIMER INPUT 1 ZOOM COLOR.M INPUT 2 INPUT 3 FOCUS LENS NETWORK NO SHOW BUTTON Used to turn picture into compartment. 3 Replace compartment lid. G Replace two batteries at same time. G Avoid contact with water or liquid. Press lid downward and slide it. 2 Slide batteries into black image. (P22...
... Range Point Remote Control Unit toward projector (Receiver Window) whenever pressing any button. SELECT VOLUME+ MENU KEYSTONE P-TIMER BUTTON Used to operate PTIMER function. (P22) ZOOM BUTTON Used to adjust zoom. (P21) COLOR MANAGEMENT BUTTON Used to operate COLOR MANAGEMENT. (P34) LASER P-TIMER INPUT 1 ZOOM COLOR.M INPUT 2 INPUT 3 FOCUS LENS NETWORK NO SHOW BUTTON Used to turn picture into compartment. 3 Replace compartment lid. G Replace two batteries at same time. G Avoid contact with water or liquid. Press lid downward and slide it. 2 Slide batteries into black image. (P22...
Instruction Manual, PLC-XP51
Page 17
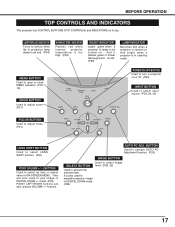
.../RIGHT buttons are also used to pan image in DIGITAL ZOOM +/- buttons. It is in stand-by mode. INDICATOR Flashes red when internal projector temperature is too high. (P42) READY INDICATOR Lights green when a projector is turned on . And bright when a projector is also used as VOLUME +/- AUTO PC ADJ. BEFORE OPERATION TOP CONTROLS AND INDICATORS This projector has CONTROL BUTTONS (TOP CONTROLS) and INDICATORS on or off. (P20) INPUT BUTTON Used to select input source. (P23, 24, 30) FOCUS BUTTON Used to adjust focus. (P21) LENS SHIFT BUTTON Used to select LENS...
.../RIGHT buttons are also used to pan image in DIGITAL ZOOM +/- buttons. It is in stand-by mode. INDICATOR Flashes red when internal projector temperature is too high. (P42) READY INDICATOR Lights green when a projector is turned on . And bright when a projector is also used as VOLUME +/- AUTO PC ADJ. BEFORE OPERATION TOP CONTROLS AND INDICATORS This projector has CONTROL BUTTONS (TOP CONTROLS) and INDICATORS on or off. (P20) INPUT BUTTON Used to select input source. (P23, 24, 30) FOCUS BUTTON Used to adjust focus. (P21) LENS SHIFT BUTTON Used to select LENS...
Instruction Manual, PLC-XP51
Page 18
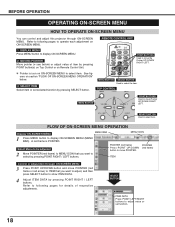
... UP/ DOWN/ RIGHT/ LEFT. REMOTE CONTROL UNIT 1 DISPLAY MENU Press MENU button to select item. See figures on ON-SCREEN MENU to display ON-SCREEN MENU. 2 MOVING POINTER Move pointer (✽ see below . 3 SELECT ITEM Select item or set function. 18 AUTO PC ON-OFF D.ZOOM FREEZE NO SHOW MUTE IMAGE VOLUME- LOCK MENU BUTTON SELECT BUTTON Used to select item. ITEM Control or adjust item through ON-SCREEN MENU. Refer to move the...
... UP/ DOWN/ RIGHT/ LEFT. REMOTE CONTROL UNIT 1 DISPLAY MENU Press MENU button to select item. See figures on ON-SCREEN MENU to display ON-SCREEN MENU. 2 MOVING POINTER Move pointer (✽ see below . 3 SELECT ITEM Select item or set function. 18 AUTO PC ON-OFF D.ZOOM FREEZE NO SHOW MUTE IMAGE VOLUME- LOCK MENU BUTTON SELECT BUTTON Used to select item. ITEM Control or adjust item through ON-SCREEN MENU. Refer to move the...
Instruction Manual, PLC-XP51
Page 19
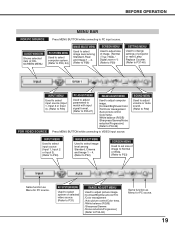
... P28) SCREEN MENU Used to adjust size of image. [Normal / True / Wide / Digital zoom +/-] (Refer to P29) SETTING MENU Used to change settings of selected video source. (Refer to P31) IMAGE ADJUST MENU Used to adjust picture image. [Contrast/Brightness/Color/Tint /Color management /Auto picture control/Color temp. /White balance (R/G/B) /Sharpness/Gamma /Noise reduction/Progressive] (Refer to P33) Same function as Menu for PC source. AV SYSTEM MENU Used to select system of projector or reset Lamp Replace Counter. (Refer to P37-40) INPUT MENU Used to select input source (Input 1, Input...
... P28) SCREEN MENU Used to adjust size of image. [Normal / True / Wide / Digital zoom +/-] (Refer to P29) SETTING MENU Used to change settings of selected video source. (Refer to P31) IMAGE ADJUST MENU Used to adjust picture image. [Contrast/Brightness/Color/Tint /Color management /Auto picture control/Color temp. /White balance (R/G/B) /Sharpness/Gamma /Noise reduction/Progressive] (Refer to P33) Same function as Menu for PC source. AV SYSTEM MENU Used to select system of projector or reset Lamp Replace Counter. (Refer to P37-40) INPUT MENU Used to select input source (Input 1, Input...
Instruction Manual, PLC-XP51
Page 20
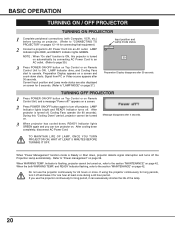
... Remote Control Unit to ON. LAMP Indicator lights bright and READY Indicator turns off ?" After projector is Ready or Shut down , READY Indicator lights GREEN again and you use the projector continuously for long period, it for 5 seconds. (Refer to "LAMP MODE" on page 37.) Input position and Lamp mode status 30 Preparation Display disappears after 30 seconds. When WARNING TEMP. NOTE : When "On start to operate. During this projector is flashing, projector cannot be turned on. LAMP Indicator lights RED, and READY Indicator lights GREEN...
... Remote Control Unit to ON. LAMP Indicator lights bright and READY Indicator turns off ?" After projector is Ready or Shut down , READY Indicator lights GREEN again and you use the projector continuously for long period, it for 5 seconds. (Refer to "LAMP MODE" on page 37.) Input position and Lamp mode status 30 Preparation Display disappears after 30 seconds. When WARNING TEMP. NOTE : When "On start to operate. During this projector is flashing, projector cannot be turned on. LAMP Indicator lights RED, and READY Indicator lights GREEN...
Instruction Manual, PLC-XP51
Page 39
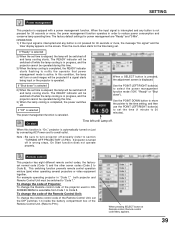
... timer display appears on and images will turn projector off while the lamp cooling is in progress, and the projector cannot be operated during this condition, the lamp will be operated during this function is "On," projector is completed, the READY indicator starts flashing to P15.) When pressing SELECT button at Remote control, Remote control code Menu appears. 39 Be sure to Code 8. Use the POINT DOWN button to move the pointer to the time setting...
... timer display appears on and images will turn projector off while the lamp cooling is in progress, and the projector cannot be operated during this condition, the lamp will be operated during this function is "On," projector is completed, the READY indicator starts flashing to P15.) When pressing SELECT button at Remote control, Remote control code Menu appears. 39 Be sure to Code 8. Use the POINT DOWN button to move the pointer to the time setting...
Instruction Manual, PLC-XP51
Page 41
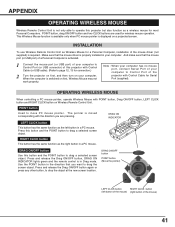
... displayed on first, Wireless Mouse may not work properly. Make sure that the mouse driver is properly installed in Drag mode. When the computer is switched on a projected screen. OPERATING WIRELESS MOUSE When controlling a PC mouse pointer, operate Wireless Mouse with Control Cable (or USB cable). (Refer to page 12, 13 for connection.) 2 Turn the projector on first, and then turn on Wireless Remote Control Unit. DRAG ON D.ZOOM FREEZE NO SHOW INDICATOR LEFT CLICK button MUTE IMAGE LOCK This button...
... displayed on first, Wireless Mouse may not work properly. Make sure that the mouse driver is properly installed in Drag mode. When the computer is switched on a projected screen. OPERATING WIRELESS MOUSE When controlling a PC mouse pointer, operate Wireless Mouse with Control Cable (or USB cable). (Refer to page 12, 13 for connection.) 2 Turn the projector on first, and then turn on Wireless Remote Control Unit. DRAG ON D.ZOOM FREEZE NO SHOW INDICATOR LEFT CLICK button MUTE IMAGE LOCK This button...
Instruction Manual, PLC-XP51
Page 44
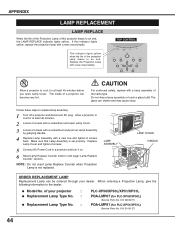
... page "Lamp Replace Counter" section). Replace Lamp Cover and tighten 2 screws. 5 Connect AC Power Cord to a projector and turn it on. 6 Reset Lamp Replace Counter (refer to replace lamp assembly. 1 Turn off a projector and disconnect AC plug. Allow a projector to cool for at least 45 minutes. 2 Loosen 2 screws with a screwdriver and open Lamp Cover. G Model No. The inside of this indicator lights yellow, replace the projection lamp with a new one promptly. NOTE : Do not reset Lamp Replace Counter when Projection Lamp is set properly. When ordering a Projection Lamp, give...
... page "Lamp Replace Counter" section). Replace Lamp Cover and tighten 2 screws. 5 Connect AC Power Cord to a projector and turn it on. 6 Reset Lamp Replace Counter (refer to replace lamp assembly. 1 Turn off a projector and disconnect AC plug. Allow a projector to cool for at least 45 minutes. 2 Loosen 2 screws with a screwdriver and open Lamp Cover. G Model No. The inside of this indicator lights yellow, replace the projection lamp with a new one promptly. NOTE : Do not reset Lamp Replace Counter when Projection Lamp is set properly. When ordering a Projection Lamp, give...
Instruction Manual, PLC-XP51
Page 45
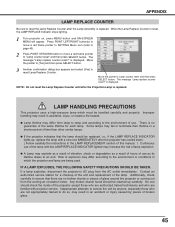
... be replaced, i.e., if the LAMP REPLACE INDICATOR lights up, replace the lamp with a new one should be cleaned up carefully. Risk of explosion may explode as a result of vibration, shock or degradation as a result of hours of use . There is replaced. When the Lamp Replace Counter is replaced. Improper handling may result in the LAMP REPLACEMENT section of this manual. ) Continuous use of the lamp with projector service. Any broken shards found should check...
... be replaced, i.e., if the LAMP REPLACE INDICATOR lights up, replace the lamp with a new one should be cleaned up carefully. Risk of explosion may explode as a result of vibration, shock or degradation as a result of hours of use . There is replaced. When the Lamp Replace Counter is replaced. Improper handling may result in the LAMP REPLACEMENT section of this manual. ) Continuous use of the lamp with projector service. Any broken shards found should check...
Instruction Manual, PLC-XP51
Page 46
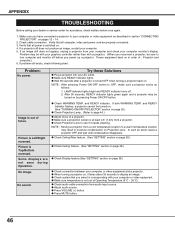
... a projector into your computer. 5. LAMP indicator lights bright and READY indicator turns off before you select is turned OFF when turning a projector back on Projection Lens. and READY indicator. G Adjust audio source. G Press VOLUME (+) button. Verify that all power is out of Operating Temperature (5°C ~ 35°C). Problem may be with your computer monitor's display. Picture is Top/Bottom reversed. Picture is Left/Right reversed. G Check WARNING TEMP. G Make sure a projection screen is not out of focus. No sound. In...
... a projector into your computer. 5. LAMP indicator lights bright and READY indicator turns off before you select is turned OFF when turning a projector back on Projection Lens. and READY indicator. G Adjust audio source. G Press VOLUME (+) button. Verify that all power is out of Operating Temperature (5°C ~ 35°C). Problem may be with your computer monitor's display. Picture is Top/Bottom reversed. Picture is Left/Right reversed. G Check WARNING TEMP. G Make sure a projection screen is not out of focus. No sound. In...
Instruction Manual, PLC-XP51
Page 48
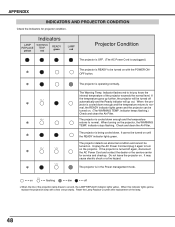
... indicator lights green. Check and clean the Air Filter. ✽ The projector is cooled down . Do not leave the projector on . (The WARNING TEMP. Reset the Lamp Replace Counter after replacement of the projector exceeds the normal level. APPENDIX INDICATORS AND PROJECTOR CONDITION Check the Indicators for service and checkup. yellow red READY green LAMP red Projector Condition The projector is OFF. (The AC Power Cord is unplugged.) ✽ The projector is turned off ✽ automatically and the Ready indicator will go out. The Warning Temp. Indicator flashes red...
... indicator lights green. Check and clean the Air Filter. ✽ The projector is cooled down . Do not leave the projector on . (The WARNING TEMP. Reset the Lamp Replace Counter after replacement of the projector exceeds the normal level. APPENDIX INDICATORS AND PROJECTOR CONDITION Check the Indicators for service and checkup. yellow red READY green LAMP red Projector Condition The projector is OFF. (The AC Power Cord is unplugged.) ✽ The projector is turned off ✽ automatically and the Ready indicator will go out. The Warning Temp. Indicator flashes red...
Instruction Manual, PLC-XP51
Page 51
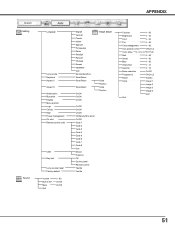
... 51 System Setting Sound Language Lamp mode Keystone Aspect V Aspect H Anamorphic Blue back Display Menu position Logo Ceiling Rear Power management On start Remote control code USB Key lock Lamp counter reset Factory default Volume Built-in SP. Mute Quit 0 - 63 On/Off On/Off APPENDIX English German French Italian Spanish Portuguese Dutch Swedish Russian Chinese Korean Japanese Quit Normal/Auto/Eco Store/Reset Store/Reset Store/Reset On/Off On/Off On/Off Image adjust Scale...
... 51 System Setting Sound Language Lamp mode Keystone Aspect V Aspect H Anamorphic Blue back Display Menu position Logo Ceiling Rear Power management On start Remote control code USB Key lock Lamp counter reset Factory default Volume Built-in SP. Mute Quit 0 - 63 On/Off On/Off APPENDIX English German French Italian Spanish Portuguese Dutch Swedish Russian Chinese Korean Japanese Quit Normal/Auto/Eco Store/Reset Store/Reset Store/Reset On/Off On/Off On/Off Image adjust Scale...
Instruction Manual, PLC-XP51
Page 52
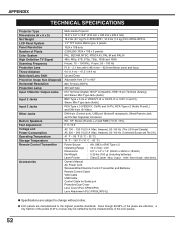
... zoom and focus 4.6' (1.4 m) ~ 47.3' (14.4 m) Up and Down Adjustable from 31" to the highest possible standards. Stereo (R and L), 2 watt RMS (T.H.D. 10%) 0˚ to change without notice. Ampere), 50 / 60 Hz (The U.S.A and Canada) AC 200 ~ 240 V (2.5 A Max. Output : 1mW / Wave length : 650±20nm) Owner's Manual AC Power Cord Wireless/Wired Remote Control Transmitter and Batteries Remote Control Cable VGA Cable USB Cable Control Cable for Serial port Protective Dust Cover Lens Cover (PLC-XP50/XP51) Lens...
... zoom and focus 4.6' (1.4 m) ~ 47.3' (14.4 m) Up and Down Adjustable from 31" to the highest possible standards. Stereo (R and L), 2 watt RMS (T.H.D. 10%) 0˚ to change without notice. Ampere), 50 / 60 Hz (The U.S.A and Canada) AC 200 ~ 240 V (2.5 A Max. Output : 1mW / Wave length : 650±20nm) Owner's Manual AC Power Cord Wireless/Wired Remote Control Transmitter and Batteries Remote Control Cable VGA Cable USB Cable Control Cable for Serial port Protective Dust Cover Lens Cover (PLC-XP50/XP51) Lens...
Instruction Manual, PLC-XP51
Page 54
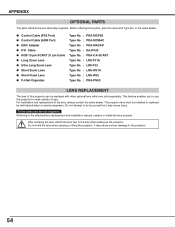
... setting up the projector. Do not attempt to the sales dealer. After installing the lens, attach the lens cap to the attached lens replacement and installation manual, replace or install the lens properly. to do by well-trained sales or service engineers. For installation and replacement of uses. APPENDIX OPTIONAL PARTS The parts listed below are sold separately. G Control Cable (PS2 Port) G Control Cable (ADB Port) G MAC Adapter G DVI Cable G HDB 15 pin-SCART 21 pin Cable G Long Zoom Lens...
... setting up the projector. Do not attempt to the sales dealer. After installing the lens, attach the lens cap to the attached lens replacement and installation manual, replace or install the lens properly. to do by well-trained sales or service engineers. For installation and replacement of uses. APPENDIX OPTIONAL PARTS The parts listed below are sold separately. G Control Cable (PS2 Port) G Control Cable (ADB Port) G MAC Adapter G DVI Cable G HDB 15 pin-SCART 21 pin Cable G Long Zoom Lens...

