
Owners Manual
Page 1
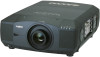
Multimedia Projector MODEL PLV-HD150 ✽ Projection lens is optional. Owner's Manual
Multimedia Projector MODEL PLV-HD150 ✽ Projection lens is optional. Owner's Manual
Owners Manual
Page 2
... INDICATES THAT THERE ARE IMPORTANT OPERATING AND MAINTENANCE INSTRUCTIONS IN THE OWNER'S MANUAL WITH THIS UNIT. 2 This projector provides many convenient features and functions. If your projector, and can near the projector, hot air is not to manage those features and maintains it may ... REPLACEMENT. If the problem still persists, contact the sales dealer where you to be used for Protection of this manual thoroughly and operate the projector properly. Be especially careful that children do not stare directly into a compartment or similarly enclosed, the minimum distances ...
... INDICATES THAT THERE ARE IMPORTANT OPERATING AND MAINTENANCE INSTRUCTIONS IN THE OWNER'S MANUAL WITH THIS UNIT. 2 This projector provides many convenient features and functions. If your projector, and can near the projector, hot air is not to manage those features and maintains it may ... REPLACEMENT. If the problem still persists, contact the sales dealer where you to be used for Protection of this manual thoroughly and operate the projector properly. Be especially careful that children do not stare directly into a compartment or similarly enclosed, the minimum distances ...
Owners Manual
Page 4
...likely to cause harmful interference in the instructions. Operation of the equipment. CAUTION! Should you be required to stop operation of this projector meets the requirement for a Class A digital device, pursuant to Part 15 of FCC Rules. Do not make any changes or...(UL) and certified by the Canadian Standard Association (CSA). This is operated in a commercial environment. in accordance with the instruction manual, may cause harmful interference to radio communications. GROUND THE SOCKET-OUTLET SHOULD BE INSTALLED NEAR THE EQUIPMENT AND EASILY ACCESSIBLE. 4 COMPLIANCES...
...likely to cause harmful interference in the instructions. Operation of the equipment. CAUTION! Should you be required to stop operation of this projector meets the requirement for a Class A digital device, pursuant to Part 15 of FCC Rules. Do not make any changes or...(UL) and certified by the Canadian Standard Association (CSA). This is operated in a commercial environment. in accordance with the instruction manual, may cause harmful interference to radio communications. GROUND THE SOCKET-OUTLET SHOULD BE INSTALLED NEAR THE EQUIPMENT AND EASILY ACCESSIBLE. 4 COMPLIANCES...

Owners Manual
Page 5
... respective corporation. 5 TABLE OF CONTENTS FEATURES AND DESIGN 6 DISPLAY ADJUST 28 DISPLAY ADJUSTMENTS 28 PREPARATION SCREEN ADJUSTMENTS 28 7 AUTO PC ADJUSTMENT 29 MANUAL DISPLAY ADJUSTMENTS 30 NAME OF EACH PART OF PROJECTOR 7 IMAGE ADJUSTMENTS 32 SETTING-UP PROJECTOR 8 IMAGE LEVEL SELECT IMAGE LEVEL ADJUSTMENTS 32 33 CONNECTING AC POWER CORD 8 LENS INSTALLATION 9 POSITIONING...
... respective corporation. 5 TABLE OF CONTENTS FEATURES AND DESIGN 6 DISPLAY ADJUST 28 DISPLAY ADJUSTMENTS 28 PREPARATION SCREEN ADJUSTMENTS 28 7 AUTO PC ADJUSTMENT 29 MANUAL DISPLAY ADJUSTMENTS 30 NAME OF EACH PART OF PROJECTOR 7 IMAGE ADJUSTMENTS 32 SETTING-UP PROJECTOR 8 IMAGE LEVEL SELECT IMAGE LEVEL ADJUSTMENTS 32 33 CONNECTING AC POWER CORD 8 LENS INSTALLATION 9 POSITIONING...

Owners Manual
Page 6
... signals from a computer. G Component Video Component video signal, such as a S-VHS VCR output signal, can be connected. N High Resolution Image This projector provides 1920 x 1080 dots resolution for troublesome manual adjustment of frequency and other settings. No complicated setup is necessary and projection is not pressed. This Power Management function operates to...
... signals from a computer. G Component Video Component video signal, such as a S-VHS VCR output signal, can be connected. N High Resolution Image This projector provides 1920 x 1080 dots resolution for troublesome manual adjustment of frequency and other settings. No complicated setup is necessary and projection is not pressed. This Power Management function operates to...

Owners Manual
Page 9
... through bottom vent. Use LENS SHIFT button and POINT UP/DOWN button to manual separately attached or contact sales dealer where you want. For installation, refer to installation manual supplied to project on a flat projection surface. SCREEN VENTILATION This projector is used and prepare suitable lens. G Do not cover vents with motor-driven...
... through bottom vent. Use LENS SHIFT button and POINT UP/DOWN button to manual separately attached or contact sales dealer where you want. For installation, refer to installation manual supplied to project on a flat projection surface. SCREEN VENTILATION This projector is used and prepare suitable lens. G Do not cover vents with motor-driven...

Owners Manual
Page 26
...and displays it. ✽ Mode 1 and SVGA 1 are examples. When image is not provided properly, manual adjustment is required. (Refer to P30 and 31.) There is set manually.) The projector displays one of the Auto, -----, Mode 1 ~ Mode 20, or the system provided in DISPLAY ADJUST ... OPERATION SYSTEM SELECT AUTOMATIC MULTI-SCAN SYSTEM This projector automatically tunes to most different types of computer and a projector is no signal input from computer. SELECT COMPUTER SYSTEM MANUALLY SYSTEM SELECT MENU (PC) This projector automatically selects PC system among those provided in this...
...and displays it. ✽ Mode 1 and SVGA 1 are examples. When image is not provided properly, manual adjustment is required. (Refer to P30 and 31.) There is set manually.) The projector displays one of the Auto, -----, Mode 1 ~ Mode 20, or the system provided in DISPLAY ADJUST ... OPERATION SYSTEM SELECT AUTOMATIC MULTI-SCAN SYSTEM This projector automatically tunes to most different types of computer and a projector is no signal input from computer. SELECT COMPUTER SYSTEM MANUALLY SYSTEM SELECT MENU (PC) This projector automatically selects PC system among those provided in this...

Owners Manual
Page 27
...system manually first. Custom Mode (1~15) set in DISPLAY ADJUST Menu. (P30, 31) SYSTEM SELECT MENU (Component video) SYSTEM SELECT Menu icon Displays system being selected. BASIC OPERATION SELECT VIDEO SYSTEM 1 Press MENU button and ON-SCREEN MENU will appear. SDI Input Projector automatically ...to optimize its performance. Systems on this dialog box can be selected. Component video (Y, Pb/Cb, Pr/Cr) Input Auto Projector automatically detects incoming Video signal, and adjusts itself to optimize its performance. Systems on this dialog box can be selected. Press POINT...
...system manually first. Custom Mode (1~15) set in DISPLAY ADJUST Menu. (P30, 31) SYSTEM SELECT MENU (Component video) SYSTEM SELECT Menu icon Displays system being selected. BASIC OPERATION SELECT VIDEO SYSTEM 1 Press MENU button and ON-SCREEN MENU will appear. SDI Input Projector automatically ...to optimize its performance. Systems on this dialog box can be selected. Component video (Y, Pb/Cb, Pr/Cr) Input Auto Projector automatically detects incoming Video signal, and adjusts itself to optimize its performance. Systems on this dialog box can be selected. Press POINT...

Owners Manual
Page 29
... 1 Press MENU button and ON-SCREEN MENU will appear. Refer to your computer. NOTE G Fine sync, Total dots and Picture Position of MANUAL DISPLAY ADJUSTMENT section (P31). When image is provided to automatically adjust Fine sync, Total dots and Picture Position to conform to step 3 of ...some computers can be fully adjusted with this projector. Adjustment parameters from Auto PC Adjustment can not be memorized in SYSTEM SELECT Menu (P26). Auto PC Adjustment function can be operated as...
... 1 Press MENU button and ON-SCREEN MENU will appear. Refer to your computer. NOTE G Fine sync, Total dots and Picture Position of MANUAL DISPLAY ADJUSTMENT section (P31). When image is provided to automatically adjust Fine sync, Total dots and Picture Position to conform to step 3 of ...some computers can be fully adjusted with this projector. Adjustment parameters from Auto PC Adjustment can not be memorized in SYSTEM SELECT Menu (P26). Auto PC Adjustment function can be operated as...

Owners Manual
Page 30
This projector has a Manual display adjustment to enable you want to match with this projector. Press POINT LEFT/RIGHT button to move a ... a skewed picture. Press POINT LEFT/RIGHT button(s) to display next items. Press SELECT button at this projector. Display area H Adjustment of horizontal area displayed with this icon to adjust position. Press SELECT button at...vertical area displayed with this icon to item and press SELECT button. DISPLAY ADJUST MANUAL DISPLAY ADJUSTMENTS This projector can automatically tune to decrease/increase value and then press SELECT button. However,...
This projector has a Manual display adjustment to enable you want to match with this projector. Press POINT LEFT/RIGHT button to move a ... a skewed picture. Press POINT LEFT/RIGHT button(s) to display next items. Press SELECT button at this projector. Display area H Adjustment of horizontal area displayed with this icon to adjust position. Press SELECT button at...vertical area displayed with this icon to item and press SELECT button. DISPLAY ADJUST MANUAL DISPLAY ADJUSTMENTS This projector can automatically tune to decrease/increase value and then press SELECT button. However,...

Owners Manual
Page 42
APPENDIX LAMP MANAGEMENT This Projector is equipped with 4 Projection Lamps to 4 lamps or 2 lamps manually. Projection Lamp is changed input position (input 1, input 2, Input 3 or input 4). If this mark still appears, replace lamp corresponding with 1 lamp. Lamp Mode ...Mode) by Lamp Management Function. Refer to be switched to ensure brighter image and those lamps are out, a projector operates with number marked X. ON, OFF, NEAR END, or OUT. Restart a projector on, and make sure lamp is nearing its end. INPUT AND LAMP STATUS 30 LAMP REPLACE INDICATOR Lamp Replace ...
APPENDIX LAMP MANAGEMENT This Projector is equipped with 4 Projection Lamps to 4 lamps or 2 lamps manually. Projection Lamp is changed input position (input 1, input 2, Input 3 or input 4). If this mark still appears, replace lamp corresponding with 1 lamp. Lamp Mode ...Mode) by Lamp Management Function. Refer to be switched to ensure brighter image and those lamps are out, a projector operates with number marked X. ON, OFF, NEAR END, or OUT. Restart a projector on, and make sure lamp is nearing its end. INPUT AND LAMP STATUS 30 LAMP REPLACE INDICATOR Lamp Replace ...
Owners Manual
Page 44
... projector : G Replacement Lamp Type No. : PLV-HD150 POA-LMP95 (Service Parts No. 610 323 5394) LAMP HANDLING PRECAUTIONS This projector uses a high-pressure lamp which the projector and lamp are not appropriately trained to do so, may result in the LAMP REPLACEMENT section of this manual.)... Continuous use . Any broken shards found should be replaced, i.e., if the LAMP REPLACE INDICATOR lights up carefully. If a lamp explodes, disconnect the projector's AC plug from the cooling air circulation holes. ...
... projector : G Replacement Lamp Type No. : PLV-HD150 POA-LMP95 (Service Parts No. 610 323 5394) LAMP HANDLING PRECAUTIONS This projector uses a high-pressure lamp which the projector and lamp are not appropriately trained to do so, may result in the LAMP REPLACEMENT section of this manual.)... Continuous use . Any broken shards found should be replaced, i.e., if the LAMP REPLACE INDICATOR lights up carefully. If a lamp explodes, disconnect the projector's AC plug from the cooling air circulation holes. ...
Owners Manual
Page 50
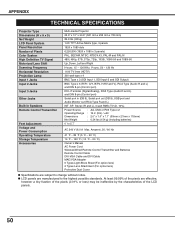
...TECHNICAL SPECIFICATIONS Projector Type Dimensions (W x H x D) Net Weight LCD Panel System Panel Resolution Number of the LCD panels. 50 SP. Ampere), 50 / 60 Hz 41 ˚F ~ 86 ˚F (5 ˚C ~ 30 ˚C) 14 ˚F ~ 140 ˚F (-10 ˚C ~ 60 ˚C) Owner's Manual AC Power ...Input 2 Jacks Input 3 Jacks Other Jacks Built-in Speakers Remote Control Transmitter Feet Adjustment Voltage and Power Consumption Operating Temperature Storage Temperature Accessories Multi-media Projector 22.9" x 10" x 30.9" (581 mm x 252 mm x 783 mm) 83.9 lbs (38 kg) 1.65" TFT Active Matrix type,...
...TECHNICAL SPECIFICATIONS Projector Type Dimensions (W x H x D) Net Weight LCD Panel System Panel Resolution Number of the LCD panels. 50 SP. Ampere), 50 / 60 Hz 41 ˚F ~ 86 ˚F (5 ˚C ~ 30 ˚C) 14 ˚F ~ 140 ˚F (-10 ˚C ~ 60 ˚C) Owner's Manual AC Power ...Input 2 Jacks Input 3 Jacks Other Jacks Built-in Speakers Remote Control Transmitter Feet Adjustment Voltage and Power Consumption Operating Temperature Storage Temperature Accessories Multi-media Projector 22.9" x 10" x 30.9" (581 mm x 252 mm x 783 mm) 83.9 lbs (38 kg) 1.65" TFT Active Matrix type,...

