
Owners Manual
Page 1
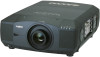
Owner's Manual Multimedia Projector MODEL PLV-HD150 ✽ Projection lens is optional.
Owner's Manual Multimedia Projector MODEL PLV-HD150 ✽ Projection lens is optional.
Owners Manual
Page 2
...used for use in the way indicated. NO USERSERVICEABLE PARTS INSIDE EXCEPT LAMP REPLACEMENT. CAUTION Not for an extended time, unplug the projector from the power outlet. REFER SERVICING TO QUALIFIED SERVICE PERSONNEL. Do not stare directly into the beam. Eye damage could result. ... THAT THERE ARE IMPORTANT OPERATING AND MAINTENANCE INSTRUCTIONS IN THE OWNER'S MANUAL WITH THIS UNIT. 2 TO THE OWNER Before operating this projector, read this manual again, check operations and cable connections and try the solutions in better condition for the Protection of this manual ...
...used for use in the way indicated. NO USERSERVICEABLE PARTS INSIDE EXCEPT LAMP REPLACEMENT. CAUTION Not for an extended time, unplug the projector from the power outlet. REFER SERVICING TO QUALIFIED SERVICE PERSONNEL. Do not stare directly into the beam. Eye damage could result. ... THAT THERE ARE IMPORTANT OPERATING AND MAINTENANCE INSTRUCTIONS IN THE OWNER'S MANUAL WITH THIS UNIT. 2 TO THE OWNER Before operating this projector, read this manual again, check operations and cable connections and try the solutions in better condition for the Protection of this manual ...

Owners Manual
Page 3
... Slots and openings in a wet basement, near or over a radiator or heat register. Never push objects of any kind into the projector. This projector should be read before cleaning. Do not allow anything to qualified service personnel. Do not attempt to overturn. b. If liquid has been...manufacturer, or sold with cloth or other hazards. Unauthorized substitutions may be placed near a swimming pool, etc... Do not place this projector from wall outlet and refer servicing to lightning and power line surges. Wall or shelf mounting should follow the manufacturer's instructions, and ...
... Slots and openings in a wet basement, near or over a radiator or heat register. Never push objects of any kind into the projector. This projector should be read before cleaning. Do not allow anything to qualified service personnel. Do not attempt to overturn. b. If liquid has been...manufacturer, or sold with cloth or other hazards. Unauthorized substitutions may be placed near a swimming pool, etc... Do not place this projector from wall outlet and refer servicing to lightning and power line surges. Wall or shelf mounting should follow the manufacturer's instructions, and ...
Owners Manual
Page 4
... the outlet, contact your electrician. CAUTION! AC POWER CORD REQUIREMENT The AC Power Cord supplied with this safety feature. Do not try to defeat this projector meets the requirement for a Class A digital device, pursuant to the equipment unless otherwise specified in a commercial environment. in this equipment in a residential area is operated...
... the outlet, contact your electrician. CAUTION! AC POWER CORD REQUIREMENT The AC Power Cord supplied with this safety feature. Do not try to defeat this projector meets the requirement for a Class A digital device, pursuant to the equipment unless otherwise specified in a commercial environment. in this equipment in a residential area is operated...

Owners Manual
Page 5
... LAMP MANAGEMENT 42 LAMP REPLACEMENT 43 BEFORE OPERATION 16 CLEANING PROJECTION LENS 44 TROUBLESHOOTING 45 SIDE CONTROLS AND INDICATORS INDICATORS AND PROJECTOR CONDITION 47 16 MENU TREE 48 OPERATION OF REMOTE CONTROL 18 TECHNICAL SPECIFICATIONS 50 REMOTE CONTROL CODE CHANGE CONFIGURATIONS OF TERMINALS ...OPERATE ON-SCREEN MENU 20 FLOW OF ON-SCREEN MENU OPERATION 20 MENU BAR 21 BASIC OPERATION 22 TURNING ON / OFF PROJECTOR 22 ADJUSTING SCREEN 23 ZOOM ADJUSTMENT 23 FOCUS ADJUSTMENT 23 LENS SHIFT ADJUSTMENT 23 PICTURE FREEZE FUNCTION 23 NO SHOW FUNCTION ...
... LAMP MANAGEMENT 42 LAMP REPLACEMENT 43 BEFORE OPERATION 16 CLEANING PROJECTION LENS 44 TROUBLESHOOTING 45 SIDE CONTROLS AND INDICATORS INDICATORS AND PROJECTOR CONDITION 47 16 MENU TREE 48 OPERATION OF REMOTE CONTROL 18 TECHNICAL SPECIFICATIONS 50 REMOTE CONTROL CODE CHANGE CONFIGURATIONS OF TERMINALS ...OPERATE ON-SCREEN MENU 20 FLOW OF ON-SCREEN MENU OPERATION 20 MENU BAR 21 BASIC OPERATION 22 TURNING ON / OFF PROJECTOR 22 ADJUSTING SCREEN 23 ZOOM ADJUSTMENT 23 FOCUS ADJUSTMENT 23 LENS SHIFT ADJUSTMENT 23 PICTURE FREEZE FUNCTION 23 NO SHOW FUNCTION ...

Owners Manual
Page 6
...G Component Video Component video signal, such as a S-VHS VCR output signal, can be connected. N High Resolution Image This projector provides 1920 x 1080 dots resolution for optional parts. N One-Touch Auto PC Adjustment Incoming computer video signals are recognized and ...signals into progressive scan signals and provide fine picture quality. For Terminal Boards, contact sales dealer where you want. N Compatibility This projector widely accepts various video and computer input signals including; English, German, French, Italian, Spanish, Portuguese, Dutch, Swedish, Russian, Chinese...
...G Component Video Component video signal, such as a S-VHS VCR output signal, can be connected. N High Resolution Image This projector provides 1920 x 1080 dots resolution for optional parts. N One-Touch Auto PC Adjustment Incoming computer video signals are recognized and ...signals into progressive scan signals and provide fine picture quality. For Terminal Boards, contact sales dealer where you want. N Compatibility This projector widely accepts various video and computer input signals including; English, German, French, Italian, Spanish, Portuguese, Dutch, Swedish, Russian, Chinese...
Owners Manual
Page 7
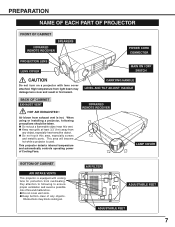
... G Keep bottom clear of Cooling Fans. G Keep rear grills at least 3.3' (1m) away from any objects. PREPARATION NAME OF EACH PART OF PROJECTOR FRONT OF CABINET SPEAKERS INFRARED REMOTE RECEIVER POWER CORD CONNECTOR PROJECTION LENS LENS COVER MAIN ON / OFF SWITCH CAUTION Do not turn on... a projector with cooling fans for protection from overheating. High temperature from exhaust vent is used. CARRYING HANDLE LEVEL AND TILT ADJUST HANDLE BACK ...
... G Keep bottom clear of Cooling Fans. G Keep rear grills at least 3.3' (1m) away from any objects. PREPARATION NAME OF EACH PART OF PROJECTOR FRONT OF CABINET SPEAKERS INFRARED REMOTE RECEIVER POWER CORD CONNECTOR PROJECTION LENS LENS COVER MAIN ON / OFF SWITCH CAUTION Do not turn on... a projector with cooling fans for protection from overheating. High temperature from exhaust vent is used. CARRYING HANDLE LEVEL AND TILT ADJUST HANDLE BACK ...

Owners Manual
Page 8
Consult your authorized dealer or service station if you are not sure of type of 240 V AC. Connect a projector with single-phase power systems having a grounded neutral conductor. PREPARATION SETTING-UP PROJECTOR CONNECTING AC POWER CORD This projector uses nominal input voltages of power supply being in use. To reduce risk of electrical shock, do not plug into any other type of power system. It is designed to work with peripheral equipment before turning a projector on. (Refer to pages 12 ~ 15 for connection.) To the AC Outlet (240 V AC) 8
Consult your authorized dealer or service station if you are not sure of type of 240 V AC. Connect a projector with single-phase power systems having a grounded neutral conductor. PREPARATION SETTING-UP PROJECTOR CONNECTING AC POWER CORD This projector uses nominal input voltages of power supply being in use. To reduce risk of electrical shock, do not plug into any other type of power system. It is designed to work with peripheral equipment before turning a projector on. (Refer to pages 12 ~ 15 for connection.) To the AC Outlet (240 V AC) 8

Owners Manual
Page 9
... Lens, refer to manual separately attached or contact sales dealer where you want. G Make sure that there are no objects under a projector may damage lens, cabinet, or mechanical parts. And be sure to replace a Lens Cover to limit ambient lighting in room has a...(1 m) away from taking cooling air through bottom vent. For specifications of fire and malfunction. It may prevent a projector from any object. POSITIONING PROJECTOR This projector is equipped with papers or other materials. For installation, refer to installation manual supplied to strong forces. It is used...
... Lens, refer to manual separately attached or contact sales dealer where you want. G Make sure that there are no objects under a projector may damage lens, cabinet, or mechanical parts. And be sure to replace a Lens Cover to limit ambient lighting in room has a...(1 m) away from taking cooling air through bottom vent. For specifications of fire and malfunction. It may prevent a projector from any object. POSITIONING PROJECTOR This projector is equipped with papers or other materials. For installation, refer to installation manual supplied to strong forces. It is used...

Owners Manual
Page 10
...handles and release locks. 2 Pull carrying handles out fully until it's locked (with handles on both sides by rotating them until projector properly stabled on table. 3 Press knob and retract handle. Replace lens cover and retract feet to prevent damage to P7). ...your dealer and best case should be adjusted to a projector. Moving it 's locked. G When carrying a projector, use a suitable carrying case. Handle pop out. Move a projector by holding two handles by 2 or more people when moving a projector. PREPARATION PICTURE LEVEL AND TILT ADJUSTMENT Picture tilt and...
...handles and release locks. 2 Pull carrying handles out fully until it's locked (with handles on both sides by rotating them until projector properly stabled on table. 3 Press knob and retract handle. Replace lens cover and retract feet to prevent damage to P7). ...your dealer and best case should be adjusted to a projector. Moving it 's locked. G When carrying a projector, use a suitable carrying case. Handle pop out. Move a projector by holding two handles by 2 or more people when moving a projector. PREPARATION PICTURE LEVEL AND TILT ADJUSTMENT Picture tilt and...
Owners Manual
Page 11
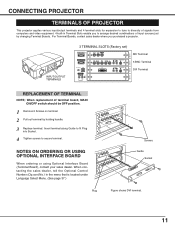
... TERMINAL NOTE; When contacting the sales dealer, tell the Optional Control Number (Op.cont.No.) in Terminal Slots enable you purchased a projector. When replacement of terminal board, MAIN ON/OFF switch should be OFF position. 1 Remove 2 Screws on terminal. 2 Pull out ...contact your sales dealer. Insert terminal along Guide to fit Plug into Socket. 4 Tighten screws to secure terminal. CONNECTING PROJECTOR TERMINALS OF PROJECTOR This projector applies various input/output terminals and 4 terminal slots for expansion to tune to diversity of signals from computers and video equipment...
... TERMINAL NOTE; When contacting the sales dealer, tell the Optional Control Number (Op.cont.No.) in Terminal Slots enable you purchased a projector. When replacement of terminal board, MAIN ON/OFF switch should be OFF position. 1 Remove 2 Screws on terminal. 2 Pull out ...contact your sales dealer. Insert terminal along Guide to fit Plug into Socket. 4 Tighten screws to secure terminal. CONNECTING PROJECTOR TERMINALS OF PROJECTOR This projector applies various input/output terminals and 4 terminal slots for expansion to tune to diversity of signals from computers and video equipment...
Owners Manual
Page 12
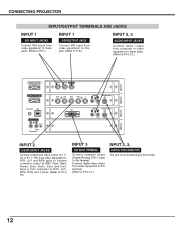
Sync and Vert. Sync.)] from video equipment to R/Pr, G/Y and B/Pb jacks or connect computer output [5 BNC Type (Red, Green, Blue, Horiz. CONNECTING PROJECTOR INPUT/OUTPUT TERMINALS AND JACKS INPUT 1 SDI INPUT JACKS Connect SDI output from video equipment to these jacks. (Refer to P15.) INPUT 1 SDI OUTPUT JACK ...
Sync and Vert. Sync.)] from video equipment to R/Pr, G/Y and B/Pb jacks or connect computer output [5 BNC Type (Red, Green, Blue, Horiz. CONNECTING PROJECTOR INPUT/OUTPUT TERMINALS AND JACKS INPUT 1 SDI INPUT JACKS Connect SDI output from video equipment to these jacks. (Refer to P15.) INPUT 1 SDI OUTPUT JACK ...
Owners Manual
Page 13
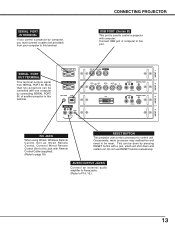
.... (Refer to be done by pressing RESET button with Remote Control Cable (supplied). (Refer to page 18.) RESET BUTTON This projector uses a micro processor to control a projector with one computer by computer, you must connect a cable (not provided) from SERIAL PORT IN. of computer to this jack ... will shut down and restart unit. Occasionally, micro processor may malfunction and need to P14, 15.) 13 SERIAL PORT IN TERMINAL If you control a projector by connecting SERIAL PORT IN. SERIAL PORT IN SERIAL PORT OUT R/C JACK USB AUDIO OUT R L RESET (MONO) SDI IN1 SDI IN2 SDI OUT...
.... (Refer to be done by pressing RESET button with Remote Control Cable (supplied). (Refer to page 18.) RESET BUTTON This projector uses a micro processor to control a projector with one computer by computer, you must connect a cable (not provided) from SERIAL PORT IN. of computer to this jack ... will shut down and restart unit. Occasionally, micro processor may malfunction and need to P14, 15.) 13 SERIAL PORT IN TERMINAL If you control a projector by connecting SERIAL PORT IN. SERIAL PORT IN SERIAL PORT OUT R/C JACK USB AUDIO OUT R L RESET (MONO) SDI IN1 SDI IN2 SDI OUT...

Owners Manual
Page 14
... Monitor Output MAC/VGA Adapter Set slide switches following chart below depending on RESOLUTION MODE that you want to use before computer is switched on a projector and computer MODE SWITCHES 1 2 3 4 5 6 13"MODE (640 x 480) ON ON OFF OFF OFF OFF 16"MODE (832 x 624)... R L RESET (MONO) R/Pr G/Y B/Pb H/HV V AUDIO R L CONTROL PORT (MONO) DVI AUDIO CONTROL PORT R L (MONO) INPUT 4 INPUT 3 INPUT 2 Terminals of a Projector MAC/VGA ADAPTER Audio Cable (stereo) ✽ Audio Input External Audio Equipment Audio Amplifier Audio Speaker (stereo) Switches of both...
... Monitor Output MAC/VGA Adapter Set slide switches following chart below depending on RESOLUTION MODE that you want to use before computer is switched on a projector and computer MODE SWITCHES 1 2 3 4 5 6 13"MODE (640 x 480) ON ON OFF OFF OFF OFF 16"MODE (832 x 624)... R L RESET (MONO) R/Pr G/Y B/Pb H/HV V AUDIO R L CONTROL PORT (MONO) DVI AUDIO CONTROL PORT R L (MONO) INPUT 4 INPUT 3 INPUT 2 Terminals of a Projector MAC/VGA ADAPTER Audio Cable (stereo) ✽ Audio Input External Audio Equipment Audio Amplifier Audio Speaker (stereo) Switches of both...
Owners Manual
Page 15
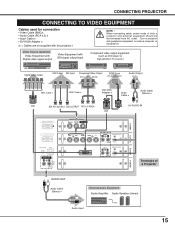
... OUT Audio Cable (Stereo) ✽ External Audio Equipment Audio Amplifier Audio Speaker (stereo) Audio Input 15 Turn a projector and peripheral equipment on before computer is switched on. CONNECTING PROJECTOR CONNECTING TO VIDEO EQUIPMENT Cables used for connection • Video Cable (BNC)✽ • Audio Cable (RCA x 2) ✽ •...R L RESET (MONO) R/Pr G/Y B/Pb H/HV V AUDIO R L CONTROL PORT (MONO) DVI AUDIO CONTROL PORT R L (MONO) INPUT 4 INPUT 3 INPUT 2 Terminals of both a projector and external equipment should be disconnected from AC outlet.
... OUT Audio Cable (Stereo) ✽ External Audio Equipment Audio Amplifier Audio Speaker (stereo) Audio Input 15 Turn a projector and peripheral equipment on before computer is switched on. CONNECTING PROJECTOR CONNECTING TO VIDEO EQUIPMENT Cables used for connection • Video Cable (BNC)✽ • Audio Cable (RCA x 2) ✽ •...R L RESET (MONO) R/Pr G/Y B/Pb H/HV V AUDIO R L CONTROL PORT (MONO) DVI AUDIO CONTROL PORT R L (MONO) INPUT 4 INPUT 3 INPUT 2 Terminals of both a projector and external equipment should be disconnected from AC outlet.
Owners Manual
Page 16
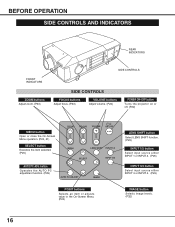
... ZOOM buttons Adjust zoom. (P23) SIDE CONTROLS SIDE CONTROLS FOCUS buttons Adjust focus. (P23) VOLUME buttons Adjust volume. (P24) POWER ON-OFF button Turns the projector on or off. (P22) MENU button Open or close the On-Screen Menu operation. (P20, 21) SELECT button Executes the item selected. (P20) ZOOM FOCUS...
... ZOOM buttons Adjust zoom. (P23) SIDE CONTROLS SIDE CONTROLS FOCUS buttons Adjust focus. (P23) VOLUME buttons Adjust volume. (P24) POWER ON-OFF button Turns the projector on or off. (P22) MENU button Open or close the On-Screen Menu operation. (P20, 21) SELECT button Executes the item selected. (P20) ZOOM FOCUS...

Owners Manual
Page 17
...indicator lights yellow when any of Projection Lamps is in Power Management mode or internal projector temperature is to high. (P39, 41) LAMP indicator This indicator is dim when a projector is ready to be turned on. And it flashes green in stand-by mode....BEFORE OPERATION FRONT INDICATORS INDICATORS READY WARNING LAMP TEMP. indicator This indicator flashes red when internal projector temperature is too high. (P41) READY indicator This indicator lights green when a projector is turned on Lamp Status Display. (P42-43) WARNING TEMP. LAMP READY RWELTAPAERLMMANPPCIN.EG REAR...
...indicator lights yellow when any of Projection Lamps is in Power Management mode or internal projector temperature is to high. (P39, 41) LAMP indicator This indicator is dim when a projector is ready to be turned on. And it flashes green in stand-by mode....BEFORE OPERATION FRONT INDICATORS INDICATORS READY WARNING LAMP TEMP. indicator This indicator flashes red when internal projector temperature is too high. (P41) READY indicator This indicator lights green when a projector is turned on Lamp Status Display. (P42-43) WARNING TEMP. LAMP READY RWELTAPAERLMMANPPCIN.EG REAR...
Owners Manual
Page 18
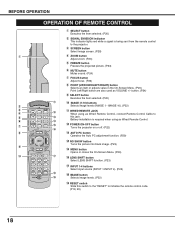
... Menu. (P20) Point Left/Right button are also used as Wired Remote Control, connect Remote Control Cable to this switch to the "RESET" to the projector. button. (P24) o SELECT button Executes the item selected. (P20) !0 IMAGE (1-10) buttons Selects image levels (IMAGE 1 - BEFORE OPERATION OPERATION OF REMOTE CONTROL q.... (P19, 39) 18 IMAGE 10). (P32) !1 WIRED REMOTE JACK When using as Wired Remote Control. !2 POWER ON-OFF button Turns the projector on or off. (P22) !3 AUTO PC button Operates the Auto PC adjustment function. (P29) !4 NO SHOW button Turns the picture into black image...
... Menu. (P20) Point Left/Right button are also used as Wired Remote Control, connect Remote Control Cable to this switch to the "RESET" to the projector. button. (P24) o SELECT button Executes the item selected. (P20) !0 IMAGE (1-10) buttons Selects image levels (IMAGE 1 - BEFORE OPERATION OPERATION OF REMOTE CONTROL q.... (P19, 39) 18 IMAGE 10). (P32) !1 WIRED REMOTE JACK When using as Wired Remote Control. !2 POWER ON-OFF button Turns the projector on or off. (P22) !3 AUTO PC button Operates the Auto PC adjustment function. (P29) !4 NO SHOW button Turns the picture into black image...
Owners Manual
Page 19
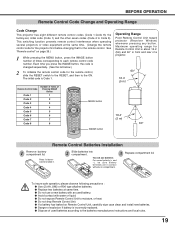
... according to each remote control code number. G Replace two batteries at the same time. (Change the remote control code for the projector first before changing that for the remote control. G Do not expose Remote Control Unit to Code 8). G Danger of explosion if ...16.4' (5 m) 60° Remote Control Batteries Installation 1 Remove battery compartment lid. BEFORE OPERATION Remote Control Code Change and Operating Range Code Change This projector has eight different remote control codes (Code 1-Code 8); the factory-set, initial code (Code 1) and the other seven codes (Code 2 to ...
... according to each remote control code number. G Replace two batteries at the same time. (Change the remote control code for the projector first before changing that for the remote control. G Do not expose Remote Control Unit to Code 8). G Danger of explosion if ...16.4' (5 m) 60° Remote Control Batteries Installation 1 Remove battery compartment lid. BEFORE OPERATION Remote Control Code Change and Operating Range Code Change This projector has eight different remote control codes (Code 1-Code 8); the factory-set, initial code (Code 1) and the other seven codes (Code 2 to ...
Owners Manual
Page 20
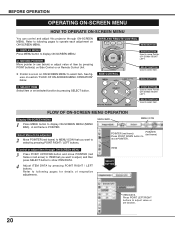
... adjust value of respective adjustments. BEFORE OPERATION OPERATING ON-SCREEN MENU ON-OFF HOW TO OPERATE ON-SCREZOEOM N MENU You can control and adjust this projector through ON-SCREEN MENU 3 Press POINT UP/DOWN button and move POINTER (red frame or red arrow) to ITEM that you want to move Pointer...
... adjust value of respective adjustments. BEFORE OPERATION OPERATING ON-SCREEN MENU ON-OFF HOW TO OPERATE ON-SCREZOEOM N MENU You can control and adjust this projector through ON-SCREEN MENU 3 Press POINT UP/DOWN button and move POINTER (red frame or red arrow) to ITEM that you want to move Pointer...


