
Instruction Manual, PLC-SU33
Page 5
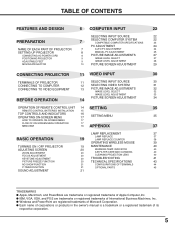
... LEVEL SELECT 27 ADJUSTABLE FEET 9 IMAGE LEVEL ADJUSTMENT 28 MOVING PROJECTOR 10 PICTURE SCREEN ADJUSTMENT 29 CONNECTING PROJECTOR 11 VIDEO INPUT 30 TERMINALS OF PROJECTOR 11 SELECTING INPUT SOURCE 30 CONNECTING TO COMPUTER 12 SELECTING VIDEO SYSTEM 31 CONNECTING TO VIDEO EQUIPMENT 13 PICTURE IMAGE ADJUSTMENTS 32 IMAGE LEVEL SELECT 32 IMAGE LEVEL ADJUSTMENT 33 BEFORE...
... LEVEL SELECT 27 ADJUSTABLE FEET 9 IMAGE LEVEL ADJUSTMENT 28 MOVING PROJECTOR 10 PICTURE SCREEN ADJUSTMENT 29 CONNECTING PROJECTOR 11 VIDEO INPUT 30 TERMINALS OF PROJECTOR 11 SELECTING INPUT SOURCE 30 CONNECTING TO COMPUTER 12 SELECTING VIDEO SYSTEM 31 CONNECTING TO VIDEO EQUIPMENT 13 PICTURE IMAGE ADJUSTMENTS 32 IMAGE LEVEL SELECT 32 IMAGE LEVEL ADJUSTMENT 33 BEFORE...

Instruction Manual, PLC-SU33
Page 6
... Design This projector is extremely compact in ; N Compatibility This projector widely accepts various video and computer input signals including; N Digital Visual Interface This projector is equipped...use . N High Resolution Image This projector provides 800 x 600 dots resolution for connecting DVI output from a computer between SVGA (800 x 600) and SXGA (...LCD) technology. FEATURES AND DESIGN This Multimedia Projector is designed with the most advanced technology for portability, durability, and ease of use . This projector utilizes built-in multimedia features, a palette of a projector...
... Design This projector is extremely compact in ; N Compatibility This projector widely accepts various video and computer input signals including; N Digital Visual Interface This projector is equipped...use . N High Resolution Image This projector provides 800 x 600 dots resolution for connecting DVI output from a computer between SVGA (800 x 600) and SXGA (...LCD) technology. FEATURES AND DESIGN This Multimedia Projector is designed with the most advanced technology for portability, durability, and ease of use . This projector utilizes built-in multimedia features, a palette of a projector...

Instruction Manual, PLC-SU33
Page 11
... JACKS Connect the audio output from video equipment to VIDEO/Y jack or connect the component video outputs to VIDEO/Y, Pb/Cb and Pr/Cr jacks. (Refer to P13.) COMPUTER IN VIDEO DVI - VIDEO INPUT JACKS Connect the composite video output from video equipment to these jacks. (Refer to P12, 13.) RESET BUTTON This projector uses a micro processor to control...
... JACKS Connect the audio output from video equipment to VIDEO/Y jack or connect the component video outputs to VIDEO/Y, Pb/Cb and Pr/Cr jacks. (Refer to P13.) COMPUTER IN VIDEO DVI - VIDEO INPUT JACKS Connect the composite video output from video equipment to these jacks. (Refer to P12, 13.) RESET BUTTON This projector uses a micro processor to control...
Instruction Manual, PLC-SU33
Page 12
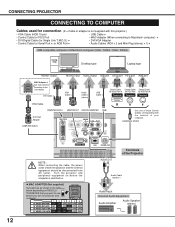
...VIDEO AUDIO IN R - CONTROL PORT MCI / WI MONITOR OUT NOTE : When connecting the cable, the power cords of your computer. TION MODE that you want to use before the computer is not supplied with the terminal of both the projector and the external equipment should be disconnected from AC outlet. Turn the projector...; • Audio Cables (RCA x 2 and Mini Plug (stereo) x 1) ✽ IBM-compatible computer or Macintosh computer (VGA / SVGA / XGA / SXGA) Desktop type Laptop type 12 Monitor Output Monitor Input Audio Output USB port Serial port PS/2 port ADB port MAC Adapter...
...VIDEO AUDIO IN R - CONTROL PORT MCI / WI MONITOR OUT NOTE : When connecting the cable, the power cords of your computer. TION MODE that you want to use before the computer is not supplied with the terminal of both the projector and the external equipment should be disconnected from AC outlet. Turn the projector...; • Audio Cables (RCA x 2 and Mini Plug (stereo) x 1) ✽ IBM-compatible computer or Macintosh computer (VGA / SVGA / XGA / SXGA) Desktop type Laptop type 12 Monitor Output Monitor Input Audio Output USB port Serial port PS/2 port ADB port MAC Adapter...

Instruction Manual, PLC-SU33
Page 13
... this projector.) • Video Cable (RCA x 1 or RCA x 3) ✽ • S-VIDEO Cable ✽ • Audio Cable (RCA x 2) ✽ Video Source (example) Video Cassette Recorder Video Disc Player Component video output equipment. (such as DVD player or high-definition TV source.) S-VIDEO Output Composite Component Video Output Audio Output Video Output (Y, Pb/Cb, Pr/Cr) (R, L) S-VIDEO Cable ✽ Video Cable (RCA x 1) ✽ Video Cable...
... this projector.) • Video Cable (RCA x 1 or RCA x 3) ✽ • S-VIDEO Cable ✽ • Audio Cable (RCA x 2) ✽ Video Source (example) Video Cassette Recorder Video Disc Player Component video output equipment. (such as DVD player or high-definition TV source.) S-VIDEO Output Composite Component Video Output Audio Output Video Output (Y, Pb/Cb, Pr/Cr) (R, L) S-VIDEO Cable ✽ Video Cable (RCA x 1) ✽ Video Cable...

Instruction Manual, PLC-SU33
Page 18
...image. [Normal / True / Wide / Digital zoom +/-] (Refer to P29) SETTING MENU Used to change settings of projector or reset Lamp Replace Counter. (Refer to P35, 36) INPUT MENU Used to select input source either Video or Computer. (Refer to P30) IMAGE SELECT MENU Used to select image level among Standard, Cinema and... image to Normal or Wide. (Refer to P34) Same function as Menu for PC source. INPUT MENU Used to select input source either Computer or Video. (Refer to P22) PC ADJUST MENU Used to adjust parameters to match with input signal format. (Refer to P24-26) IMAGE ADJUST MENU Used ...
...image. [Normal / True / Wide / Digital zoom +/-] (Refer to P29) SETTING MENU Used to change settings of projector or reset Lamp Replace Counter. (Refer to P35, 36) INPUT MENU Used to select input source either Video or Computer. (Refer to P30) IMAGE SELECT MENU Used to select image level among Standard, Cinema and... image to Normal or Wide. (Refer to P34) Same function as Menu for PC source. INPUT MENU Used to select input source either Computer or Video. (Refer to P22) PC ADJUST MENU Used to adjust parameters to match with input signal format. (Refer to P24-26) IMAGE ADJUST MENU Used ...

Instruction Manual, PLC-SU33
Page 19
... bright and READY Indicator is turned off Projection Lamp automatically. Message disappears after 30 seconds. TO MAINTAIN THE LIFE OF LAMP, ONCE YOU TURN PROJECTOR ON, WAIT AT LEAST 5 MINUTES BEFORE TURNING IT OFF. When "Power Management" function is turned off . When WARNING TEMP. Wait at... should still continue to ON. Power off and disconnect AC Power Cord from PC or Video source appears after 30 seconds. 30 Preparation Display disappears after 4 seconds. Indicator flashes red, the projector is turned on automatically by connecting AC Power Cord to an AC outlet. (Refer to...
... bright and READY Indicator is turned off Projection Lamp automatically. Message disappears after 30 seconds. TO MAINTAIN THE LIFE OF LAMP, ONCE YOU TURN PROJECTOR ON, WAIT AT LEAST 5 MINUTES BEFORE TURNING IT OFF. When "Power Management" function is turned off . When WARNING TEMP. Wait at... should still continue to ON. Power off and disconnect AC Power Cord from PC or Video source appears after 30 seconds. 30 Preparation Display disappears after 4 seconds. Indicator flashes red, the projector is turned on automatically by connecting AC Power Cord to an AC outlet. (Refer to...
Instruction Manual, PLC-SU33
Page 22
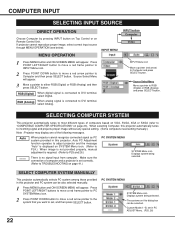
...Computer by pressing INPUT button on Top Control or on page 23). Computer INPUT button Computer Video INPUT Menu icon Move a pointer (red arrow) to either RGB (Digital) or RGB ... PC SYSTEM MENU SYSTEM Menu icon Displays system being selected. Auto ---- The systems on VGA, SVGA, XGA or SXGA (refer to RGB (Digital) or RGB (Analog) and press SELECT button....no signal input from computer. PC SYSTEM MENU SYSTEM Menu icon Displays system being selected. If projector cannot reproduce proper image, select correct input source through MENU OPERATION (see below). Source Select...
...Computer by pressing INPUT button on Top Control or on page 23). Computer INPUT button Computer Video INPUT Menu icon Move a pointer (red arrow) to either RGB (Digital) or RGB ... PC SYSTEM MENU SYSTEM Menu icon Displays system being selected. Auto ---- The systems on VGA, SVGA, XGA or SXGA (refer to RGB (Digital) or RGB (Analog) and press SELECT button....no signal input from computer. PC SYSTEM MENU SYSTEM Menu icon Displays system being selected. If projector cannot reproduce proper image, select correct input source through MENU OPERATION (see below). Source Select...
Instruction Manual, PLC-SU33
Page 29
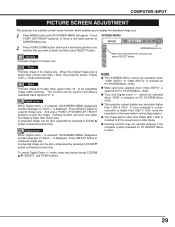
... work only when the image is larger than SVGA (800 x 600) is modified to fit the screen size in initial mode. Press SELECT button to fit screen size. G Wide cannot be used . 29 COMPUTER INPUT PICTURE SCREEN ADJUSTMENT This projector has a picture screen resize function, which enables... button on PC ADJUST Menu is selected on Remote Control Unit. When Digital zoom - And press POINT UP/DOWN/LEFT/RIGHT button(s) to fit wide video aspect ratio (16 : 9) by pressing D.ZOOM M button on PC SYSTEM Menu (P22). To cancel Digital Zoom +/- A projected image can be ...
... work only when the image is larger than SVGA (800 x 600) is modified to fit the screen size in initial mode. Press SELECT button to fit screen size. G Wide cannot be used . 29 COMPUTER INPUT PICTURE SCREEN ADJUSTMENT This projector has a picture screen resize function, which enables... button on PC ADJUST Menu is selected on Remote Control Unit. When Digital zoom - And press POINT UP/DOWN/LEFT/RIGHT button(s) to fit wide video aspect ratio (16 : 9) by pressing D.ZOOM M button on PC SYSTEM Menu (P22). To cancel Digital Zoom +/- A projected image can be ...
Instruction Manual, PLC-SU33
Page 30
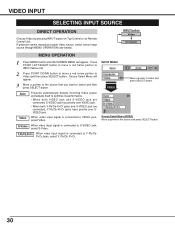
... are connected, Y-Pb/Cb-Pr/Cr jacks have priority over SVIDEO jack. Auto Video Projector automatically detects incoming Video signal, and adjusts itself to Video and then press SELECT button. S-Video When video input signal is connected to VIDEO jack, select Video. When video input signal is connected to the source and press SELECT button. 30 Source Select Menu...
... are connected, Y-Pb/Cb-Pr/Cr jacks have priority over SVIDEO jack. Auto Video Projector automatically detects incoming Video signal, and adjusts itself to Video and then press SELECT button. S-Video When video input signal is connected to VIDEO jack, select Video. When video input signal is connected to the source and press SELECT button. 30 Source Select Menu...

Instruction Manual, PLC-SU33
Page 31
... that you want to the system and press SELECT button. 31 PAL / SECAM / NTSC / NTSC4.43 / PAL-M / PAL-N If projector cannot reproduce proper video image, it is necessary to select a specific broadcast signal format among 480i, 575i, 480p, 575p, 720p, 1035i and 1080i. Y, Pb/...pointer to select and then press SELECT button. AV SYSTEM MENU (COMPONENT VIDEO) COMPONENT VIDEO SIGNAL FORMAT If projector cannot reproduce proper video image, it is necessary to optimize its performance. AV SYSTEM MENU (VIDEO OR S-VIDEO) AV SYSTEM Menu icon This box indicates the system being selected. AV...
... that you want to the system and press SELECT button. 31 PAL / SECAM / NTSC / NTSC4.43 / PAL-M / PAL-N If projector cannot reproduce proper video image, it is necessary to select a specific broadcast signal format among 480i, 575i, 480p, 575p, 720p, 1035i and 1080i. Y, Pb/...pointer to select and then press SELECT button. AV SYSTEM MENU (COMPONENT VIDEO) COMPONENT VIDEO SIGNAL FORMAT If projector cannot reproduce proper video image, it is necessary to optimize its performance. AV SYSTEM MENU (VIDEO OR S-VIDEO) AV SYSTEM Menu icon This box indicates the system being selected. AV...
Instruction Manual, PLC-SU33
Page 32
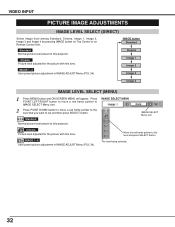
Standard Normal picture level preset on Remote Control Unit. IMAGE SELECT Menu icon Cinema Picture level adjusted for the picture with fine tone. VIDEO INPUT PICTURE IMAGE ADJUSTMENTS IMAGE LEVEL SELECT (DIRECT) Select image level among Standard, Cinema, Image 1, Image 2, Image 3 and Image ...4 by pressing IMAGE button on Top Control or on this projector. Cinema Picture level adjusted for the picture with fine tone. Move the red frame pointer to set and then press SELECT button. IMAGE 1~4 ...
Standard Normal picture level preset on Remote Control Unit. IMAGE SELECT Menu icon Cinema Picture level adjusted for the picture with fine tone. VIDEO INPUT PICTURE IMAGE ADJUSTMENTS IMAGE LEVEL SELECT (DIRECT) Select image level among Standard, Cinema, Image 1, Image 2, Image 3 and Image ...4 by pressing IMAGE button on Top Control or on this projector. Cinema Picture level adjusted for the picture with fine tone. Move the red frame pointer to set and then press SELECT button. IMAGE 1~4 ...

Instruction Manual, PLC-SU33
Page 33
... to IMAGE ADJUST Menu icon. 2 Press POINT DOWN button to move a red frame pointer to the item that you want to be adjusted when the video system is displayed. Contrast Press POINT LEFT button to decrease contrast, and POINT RIGHT button to increase contrast. (From 0 to 63.) IMAGE ADJUST MENU Move... a red frame pointer to the item to adjust and then press SELECT button. Adjust each item is PAL, SECAM, PAL-M or PAL-N. VIDEO INPUT IMAGE LEVEL ADJUSTMENT 1 Press MENU button and ON-SCREEN MENU will appear.
... to IMAGE ADJUST Menu icon. 2 Press POINT DOWN button to move a red frame pointer to the item that you want to be adjusted when the video system is displayed. Contrast Press POINT LEFT button to decrease contrast, and POINT RIGHT button to increase contrast. (From 0 to 63.) IMAGE ADJUST MENU Move... a red frame pointer to the item to adjust and then press SELECT button. Adjust each item is PAL, SECAM, PAL-M or PAL-N. VIDEO INPUT IMAGE LEVEL ADJUSTMENT 1 Press MENU button and ON-SCREEN MENU will appear.
Instruction Manual, PLC-SU33
Page 34
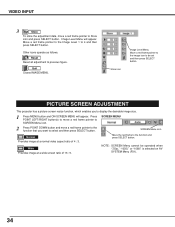
...then press SELECT button. Normal Provides image at a wide screen ratio of 4 : 3. Wide Provides image at a normal video aspect ratio of 16 : 9. PICTURE SCREEN ADJUSTMENT This projector has a picture screen resize function, which enables you want to display the desirable image size. 1 Press MENU button and... move a red frame pointer to Store icon and press SELECT button. NOTE : SCREEN Menu cannot be set and then press SELECT button. VIDEO INPUT 3 Store To store the adjustment data, move a red frame pointer to SCREEN Menu icon. Quit Closes IMAGE MENU. Store icon Image...
...then press SELECT button. Normal Provides image at a wide screen ratio of 4 : 3. Wide Provides image at a normal video aspect ratio of 16 : 9. PICTURE SCREEN ADJUSTMENT This projector has a picture screen resize function, which enables you want to display the desirable image size. 1 Press MENU button and... move a red frame pointer to Store icon and press SELECT button. NOTE : SCREEN Menu cannot be set and then press SELECT button. VIDEO INPUT 3 Store To store the adjustment data, move a red frame pointer to SCREEN Menu icon. Quit Closes IMAGE MENU. Store icon Image...
Instruction Manual, PLC-SU33
Page 35
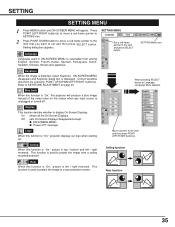
... to KEYSTONE ADJUSTMENT on the screen when any input source is unplugged or turned off ?" G ON-SCREEN MENU G "Power off . Ceiling function Rear When this projector will appear. Move a pointer to set and then press SELECT button. On ··· shows all the On-Screen Displays. Press POINT LEFT/RIGHT... item and then press POINT LEFT/RIGHT button(s). SETTING SETTING MENU 1 Press MENU button and ON-SCREEN MENU will produce a blue image instead of the video noise on page 20.
... to KEYSTONE ADJUSTMENT on the screen when any input source is unplugged or turned off ?" G ON-SCREEN MENU G "Power off . Ceiling function Rear When this projector will appear. Move a pointer to set and then press SELECT button. On ··· shows all the On-Screen Displays. Press POINT LEFT/RIGHT... item and then press POINT LEFT/RIGHT button(s). SETTING SETTING MENU 1 Press MENU button and ON-SCREEN MENU will produce a blue image instead of the video noise on page 20.

Instruction Manual, PLC-SU33
Page 36
... MENU to page 38 for 90 seconds (Power Management mode). This switching function prevents remote control operation mixture (jam) when operating several projectors or video equipment together. Set Remote control in the wrong steps, On Start function does not operate properly. To return to the normal code ...(Code 1), operate both projector and Remote Control Unit must be switched to "Code 2." Lamp counter reset This function is automatically turned on ...
... MENU to page 38 for 90 seconds (Power Management mode). This switching function prevents remote control operation mixture (jam) when operating several projectors or video equipment together. Set Remote control in the wrong steps, On Start function does not operate properly. To return to the normal code ...(Code 1), operate both projector and Remote Control Unit must be switched to "Code 2." Lamp counter reset This function is automatically turned on ...

Instruction Manual, PLC-SU33
Page 41
...G Make sure the projection screen is turned off before you reconnect the projector, be turned on. (See "TURNING ON/OFF PROJECTOR" section on page 19.) G Check Projection Lamp. (Refer to your computer or video equipment and a projector. G Check Ceiling / Rear feature. (See "SETTING" section on ...4. G Make sure the temperature is switched on page 35.) G Check the connection between your computer or video equipment as follows: 1. G Check audio cable connection from the projector. G Press MUTE button. 41 If the problem still exists, check the following chart. Picture is Top/Bottom...
...G Make sure the projection screen is turned off before you reconnect the projector, be turned on. (See "TURNING ON/OFF PROJECTOR" section on page 19.) G Check Projection Lamp. (Refer to your computer or video equipment and a projector. G Check Ceiling / Rear feature. (See "SETTING" section on ...4. G Make sure the temperature is switched on page 35.) G Check the connection between your computer or video equipment as follows: 1. G Check audio cable connection from the projector. G Press MUTE button. 41 If the problem still exists, check the following chart. Picture is Top/Bottom...

Instruction Manual, PLC-SU33
Page 43
... of Pixels Color System High Definition TV Signal Scanning Frequency Projection Image size (Diagonal) Horizontal Resolution Projection Lens Throw Distance Projection Lamp Video Input Jacks Audio Input Jacks Computer Input Terminal Monitor Out Terminal Computer Audio Input Jack Control Port Connector USB Connector Audio Output Jacks ...port DVI/VGA Adapter Carrying Bag Lens Cover G The specifications are subject to 15.6˚ AC 100 ~ 120 V (3.6 A Max. APPENDIX TECHNICAL SPECIFICATIONS Projector Type Dimensions (W x H x D) Net Weight LCD Panel System Panel Resolution Number of the...
... of Pixels Color System High Definition TV Signal Scanning Frequency Projection Image size (Diagonal) Horizontal Resolution Projection Lens Throw Distance Projection Lamp Video Input Jacks Audio Input Jacks Computer Input Terminal Monitor Out Terminal Computer Audio Input Jack Control Port Connector USB Connector Audio Output Jacks ...port DVI/VGA Adapter Carrying Bag Lens Cover G The specifications are subject to 15.6˚ AC 100 ~ 120 V (3.6 A Max. APPENDIX TECHNICAL SPECIFICATIONS Projector Type Dimensions (W x H x D) Net Weight LCD Panel System Panel Resolution Number of the...


