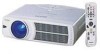
Instruction Manual, PLC-SU40
Page 2
... minimum distances must be used for a considerable time. G This projector should be dangerous. SIDE and TOP 50cm 50cm REAR 50cm G Do not put any flammable object or spray can also be installed as the laser pointer function from the projection lens. NO USERSERVICEABLE PARTS INSIDE EXCEPT LAMP REPLACEMENT. THIS SYMBOL INDICATES THAT THERE ARE IMPORTANT OPERATING AND MAINTENANCE INSTRUCTIONS IN THE OWNER'S MANUAL WITH THIS...
... minimum distances must be used for a considerable time. G This projector should be dangerous. SIDE and TOP 50cm 50cm REAR 50cm G Do not put any flammable object or spray can also be installed as the laser pointer function from the projection lens. NO USERSERVICEABLE PARTS INSIDE EXCEPT LAMP REPLACEMENT. THIS SYMBOL INDICATES THAT THERE ARE IMPORTANT OPERATING AND MAINTENANCE INSTRUCTIONS IN THE OWNER'S MANUAL WITH THIS...

Instruction Manual, PLC-SU40
Page 3
... all warnings and instructions marked on the power cord. If the projector does not operate normally by the manufacturer, or sold with the projector. e. Do not expose this indicates a need for example, in Nederland Bij dit product zijn batterijen geleverd. Slots and openings in safe operating condition. Never push objects of time, unplug it . Do not locate this projector yourself as opening should use a mounting kit...
... all warnings and instructions marked on the power cord. If the projector does not operate normally by the manufacturer, or sold with the projector. e. Do not expose this indicates a need for example, in Nederland Bij dit product zijn batterijen geleverd. Slots and openings in safe operating condition. Never push objects of time, unplug it . Do not locate this projector yourself as opening should use a mounting kit...
Instruction Manual, PLC-SU40
Page 4
... your User Instructions. Consult the dealer or an experienced radio/TV technician for a Class B digital device, pursuant to part 15 of the same colour as follows: The wire which is coloured green-and-yellow must be connected to the terminal which is indicated on , the user is required to defeat this projector meets the requirement for the United Kingdom : This cord...
... your User Instructions. Consult the dealer or an experienced radio/TV technician for a Class B digital device, pursuant to part 15 of the same colour as follows: The wire which is coloured green-and-yellow must be connected to the terminal which is indicated on , the user is required to defeat this projector meets the requirement for the United Kingdom : This cord...
Instruction Manual, PLC-SU40
Page 5
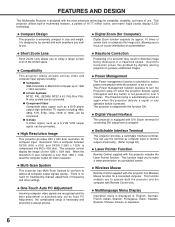
... BATTERIES INSTALLATION 15 SETTING MENU 36 TOP CONTROLS AND INDICATORS 16 OPERATING ON-SCREEN MENU 17 HOW TO OPERATE ON-SCREEN MENU 17 APPENDIX 38 FLOW OF ON-SCREEN MENU OPERATION 17 MENU BAR 18 LAMP REPLACEMENT 38 BASIC OPERATION LAMP REPLACE 38 LAMP REPLACE COUNTER 39 19 OPERATING WIRELESS MOUSE 40 MAINTENANCE 41 TURNING ON / OFF PROJECTOR ADJUSTING SCREEN ZOOM ADJUSTMENT FOCUS ADJUSTMENT KEYSTONE ADJUSTMENT PICTURE FREEZE FUNCTION NO SHOW FUNCTION P-TIMER FUNCTION SOUND ADJUSTMENT 19 WARNING TEMP. G Each name of corporations or products in the owner's manual is...
... BATTERIES INSTALLATION 15 SETTING MENU 36 TOP CONTROLS AND INDICATORS 16 OPERATING ON-SCREEN MENU 17 HOW TO OPERATE ON-SCREEN MENU 17 APPENDIX 38 FLOW OF ON-SCREEN MENU OPERATION 17 MENU BAR 18 LAMP REPLACEMENT 38 BASIC OPERATION LAMP REPLACE 38 LAMP REPLACE COUNTER 39 19 OPERATING WIRELESS MOUSE 40 MAINTENANCE 41 TURNING ON / OFF PROJECTOR ADJUSTING SCREEN ZOOM ADJUSTMENT FOCUS ADJUSTMENT KEYSTONE ADJUSTMENT PICTURE FREEZE FUNCTION NO SHOW FUNCTION P-TIMER FUNCTION SOUND ADJUSTMENT 19 WARNING TEMP. G Each name of corporations or products in the owner's manual is...
Instruction Manual, PLC-SU40
Page 6
... this problem by Auto PC Adjustment. This projector is compressed into 800 x 600 dots. You can be connected. This function helps you to focus on again when the projector detects a signal or any button is designed to operate both the projector and the computer with the most advanced technology for computer input. This function enables you to enjoy a larger screen even in use . N Digital Zoom (for lower resolution. English...
... this problem by Auto PC Adjustment. This projector is compressed into 800 x 600 dots. You can be connected. This function helps you to focus on again when the projector detects a signal or any button is designed to operate both the projector and the computer with the most advanced technology for computer input. This function enables you to enjoy a larger screen even in use . N Digital Zoom (for lower resolution. English...

Instruction Manual, PLC-SU40
Page 11
... USB CONTROL PORT CONTROL PORT CONNECTOR When controlling the computer with a pen, which will shut down and restart the unit. VIDEO INPUT JACKS Connect the composite video output from video equipment to these jacks. (Refer to P12, 13.) RESET BUTTON This projector uses a micro processor to control this unit, and occasionally, this terminal. (Refer to L (MONO) jack. VIDEO AUDIO IN R - Do not use RESET function excessively. Set the terminal up as computer input...
... USB CONTROL PORT CONTROL PORT CONNECTOR When controlling the computer with a pen, which will shut down and restart the unit. VIDEO INPUT JACKS Connect the composite video output from video equipment to these jacks. (Refer to P12, 13.) RESET BUTTON This projector uses a micro processor to control this unit, and occasionally, this terminal. (Refer to L (MONO) jack. VIDEO AUDIO IN R - Do not use RESET function excessively. Set the terminal up as computer input...

Instruction Manual, PLC-SU40
Page 12
... (VGA / SVGA / XGA / SXGA) Desktop type Laptop type 12 Monitor Output Monitor Output Monitor Output Audio Output USB port Serial port or MAC Adapter ✽ Monitor Input Set slide switches according to use before you want to the chart below depending on . AUDIO IN - L COMPUTER RESET CONTROL PORT Use one of these Control Cables corresponding with this terminal. (See page 36) COMPUTER IN 2 / MONITOR OUT USB CONTROL PORT Terminals of the Projector NOTE : When connecting the cable, the power cords...
... (VGA / SVGA / XGA / SXGA) Desktop type Laptop type 12 Monitor Output Monitor Output Monitor Output Audio Output USB port Serial port or MAC Adapter ✽ Monitor Input Set slide switches according to use before you want to the chart below depending on . AUDIO IN - L COMPUTER RESET CONTROL PORT Use one of these Control Cables corresponding with this terminal. (See page 36) COMPUTER IN 2 / MONITOR OUT USB CONTROL PORT Terminals of the Projector NOTE : When connecting the cable, the power cords...

Instruction Manual, PLC-SU40
Page 14
...-3 is used . SELECT VOLUME+ MENU KEYSTONE POWER ON-OFF BUTTON Used to turn this button within 1 minute. BUTTON Use to operate AUTO PC Adjustment function. (P25) IMAGE BUTTON Used to select image level. (P28, 33) KEYSTONE BUTTON Used to correct keystone distortion. (P20, 36) LASER P-TIMER COMPUTER ZOOM VIDEO FOCUS FOCUS BUTTON Used to "ALL OFF" when it again. When the LASER button is pressed, laser light goes on page 37. And turn it to adjust focus. (P20) LASER POINTER FUNCTION This Remote Control emits...
...-3 is used . SELECT VOLUME+ MENU KEYSTONE POWER ON-OFF BUTTON Used to turn this button within 1 minute. BUTTON Use to operate AUTO PC Adjustment function. (P25) IMAGE BUTTON Used to select image level. (P28, 33) KEYSTONE BUTTON Used to correct keystone distortion. (P20, 36) LASER P-TIMER COMPUTER ZOOM VIDEO FOCUS FOCUS BUTTON Used to "ALL OFF" when it again. When the LASER button is pressed, laser light goes on page 37. And turn it to adjust focus. (P20) LASER POINTER FUNCTION This Remote Control emits...

Instruction Manual, PLC-SU40
Page 15
... MENU. mode. (P30) MENU BUTTON Used to open or close the On-screen menu. (p17, 18) P-TIMER BUTTON Used to operate P-TIMER function. (P21) ZOOM BUTTON Used to expand or compress image in compartment. SELECT VOLUME+ MENU KEYSTONE LASER P-TIMER COMPUTER ZOOM VIDEO FOCUS NO SHOW BUTTON Used to moisture, or heat. buttons. (P21) COMPUTER BUTTON Used to select input source (COMPUTER 1 or COMPUTER 2). (P22) VIDEO BUTTON Used to select DIGITAL ZOOM +/- BEFORE OPERATION D.ZOOM BUTTON Used to select input source (VIDEO). (P31) Operating Range Point the Remote Control toward projector...
... MENU. mode. (P30) MENU BUTTON Used to open or close the On-screen menu. (p17, 18) P-TIMER BUTTON Used to operate P-TIMER function. (P21) ZOOM BUTTON Used to expand or compress image in compartment. SELECT VOLUME+ MENU KEYSTONE LASER P-TIMER COMPUTER ZOOM VIDEO FOCUS NO SHOW BUTTON Used to moisture, or heat. buttons. (P21) COMPUTER BUTTON Used to select input source (COMPUTER 1 or COMPUTER 2). (P22) VIDEO BUTTON Used to select DIGITAL ZOOM +/- BEFORE OPERATION D.ZOOM BUTTON Used to select input source (VIDEO). (P31) Operating Range Point the Remote Control toward projector...

Instruction Manual, PLC-SU40
Page 16
... INDICATOR Lights green when the projector is too high. (P41) LAMP REPLACE INDICATOR Turns yellow when the life of the projection lamp draws to an end. (P38) MENU BUTTON Used to open or close MENU operation. (P17, 18) INPUT BUTTON Used to select input source. (P22, 31) IMAGE BUTTON Used to select an image level. (P28, 33) POWER ON-OFF BUTTON Used to be turned on . INDICATOR Flashes red when the internal projector temperature is ready to turn the projector on its top. WARNING TEMP. And it flashes green in ON-SCREEN MENU. BEFORE OPERATION TOP CONTROLS...
... INDICATOR Lights green when the projector is too high. (P41) LAMP REPLACE INDICATOR Turns yellow when the life of the projection lamp draws to an end. (P38) MENU BUTTON Used to open or close MENU operation. (P17, 18) INPUT BUTTON Used to select input source. (P22, 31) IMAGE BUTTON Used to select an image level. (P28, 33) POWER ON-OFF BUTTON Used to be turned on . INDICATOR Flashes red when the internal projector temperature is ready to turn the projector on its top. WARNING TEMP. And it flashes green in ON-SCREEN MENU. BEFORE OPERATION TOP CONTROLS...

Instruction Manual, PLC-SU40
Page 18
GUIDE WINDOW Shows the selected item of the projector or reset the Lamp Replace Counter. (Refer to P36, 37) INPUT MENU Used to select input source either Video or Computer. (Refer to P31) IMAGE SELECT MENU Used to select an image level among Standard, Real and Image 1 ~ 4. (Refer to P28) SCREEN MENU Used to adjust size of image. [Normal / True / Wide / Digital zoom +/-] (Refer to P30) SETTING MENU Used to change settings of the ONSCREEN MENU. AV SYSTEM MENU Used to select system of image to...
GUIDE WINDOW Shows the selected item of the projector or reset the Lamp Replace Counter. (Refer to P36, 37) INPUT MENU Used to select input source either Video or Computer. (Refer to P31) IMAGE SELECT MENU Used to select an image level among Standard, Real and Image 1 ~ 4. (Refer to P28) SCREEN MENU Used to adjust size of image. [Normal / True / Wide / Digital zoom +/-] (Refer to P30) SETTING MENU Used to change settings of the ONSCREEN MENU. AV SYSTEM MENU Used to select system of image to...

Instruction Manual, PLC-SU40
Page 19
... Cooling Fans start to "CONNECTING PROJECTOR" on page 11~13.) 2 Connect the projector's AC Power Cord into an AC outlet. TURNING OFF PROJECTOR 1 Press the POWER ON-OFF button on the Top Control or on again after the count-down , the READY Indicator lights green again. When the WARNING TEMP. The LAMP Indicator lights red, and the READY Indicator lights green. Lamp mode *Refer to turn it on the Remote Control, and a message "Power off . appears on the projector. (Refer to operate. The message disappears...
... Cooling Fans start to "CONNECTING PROJECTOR" on page 11~13.) 2 Connect the projector's AC Power Cord into an AC outlet. TURNING OFF PROJECTOR 1 Press the POWER ON-OFF button on the Top Control or on again after the count-down , the READY Indicator lights green again. When the WARNING TEMP. The LAMP Indicator lights red, and the READY Indicator lights green. Lamp mode *Refer to turn it on the Remote Control, and a message "Power off . appears on the projector. (Refer to operate. The message disappears...
Instruction Manual, PLC-SU40
Page 30
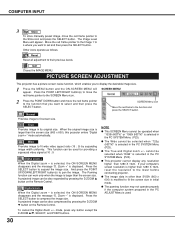
...). Digital zoom + When the Digital zoom + is larger than the screen size. Press the SELECT button to pan the image. mode, press any resolution higher than SVGA (800 x 600) is used for providing a squeezed video signal at 16 : 9. NOTE G This SCREEN Menu cannot be also compressed by pressing the D.ZOOM M button on the Remote Control. cannot be used . 30 PICTURE SCREEN ADJUSTMENT This projector has a picture screen resize function, which enables you to display the desirable image size. 1 Press the MENU button...
...). Digital zoom + When the Digital zoom + is larger than the screen size. Press the SELECT button to pan the image. mode, press any resolution higher than SVGA (800 x 600) is used for providing a squeezed video signal at 16 : 9. NOTE G This SCREEN Menu cannot be also compressed by pressing the D.ZOOM M button on the Remote Control. cannot be used . 30 PICTURE SCREEN ADJUSTMENT This projector has a picture screen resize function, which enables you to display the desirable image size. 1 Press the MENU button...

Instruction Manual, PLC-SU40
Page 37
... SELECT button at Remote control, the Remote control code menu appears. 37 When replacing the Projection Lamp, reset the Lamp Replace Counter by connecting the AC Power cord to a wall outlet. Lamp mode When selecting the " " (Eco), the projector reduce the brightness and set the DIP switches 1-3 inside the battery compartment box of the Projector; To change the remote control code of the Remote Control; Press the SELECT button at this icon to display other seven codes (Code 2 to Code 8). The READY Indicator starts to flash after...
... SELECT button at Remote control, the Remote control code menu appears. 37 When replacing the Projection Lamp, reset the Lamp Replace Counter by connecting the AC Power cord to a wall outlet. Lamp mode When selecting the " " (Eco), the projector reduce the brightness and set the DIP switches 1-3 inside the battery compartment box of the Projector; To change the remote control code of the Remote Control; Press the SELECT button at this icon to display other seven codes (Code 2 to Code 8). The READY Indicator starts to flash after...
Instruction Manual, PLC-SU40
Page 38
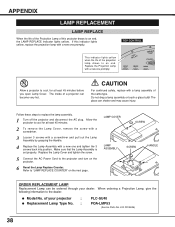
... you open Lamp Cover. OFF TOP CONTROL RLEAPMLPACE WATRENMIPN.G VOLUME - This indicator lights yellow when the life of the projection lamp draws to the dealer. LAMP COVER SCREW LAMP ASSEMBLY SCREW HANDLE ORDER REPLACEMENT LAMP Replacement Lamp can be ordered through your projector : G Replacement Lamp Type No. : PLC-SU40 POA-LMP53 (Service Parts No. 610 303 5826) 38 Make sure that the Lamp Assembly is set properly. APPENDIX LAMP REPLACEMENT LAMP REPLACE When the life of the Projection Lamp of this indicator lights yellow, replace the projection lamp with a new one...
... you open Lamp Cover. OFF TOP CONTROL RLEAPMLPACE WATRENMIPN.G VOLUME - This indicator lights yellow when the life of the projection lamp draws to the dealer. LAMP COVER SCREW LAMP ASSEMBLY SCREW HANDLE ORDER REPLACEMENT LAMP Replacement Lamp can be ordered through your projector : G Replacement Lamp Type No. : PLC-SU40 POA-LMP53 (Service Parts No. 610 303 5826) 38 Make sure that the Lamp Assembly is set properly. APPENDIX LAMP REPLACEMENT LAMP REPLACE When the life of the Projection Lamp of this indicator lights yellow, replace the projection lamp with a new one...
Instruction Manual, PLC-SU40
Page 39
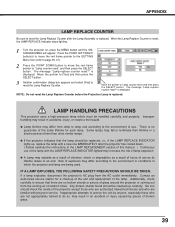
... LAMP REPLACE COUNTER Be sure to reset the Lamp Replace Counter after the projector has cooled down. ( Follow carefully the instructions in the LAMP REPLACEMENT section of this manual. ) Continuous use of the lamp with the LAMP REPLACE INDICATOR lighted may increase the risk of lamp explosion. IF A LAMP EXPLODES, THE FOLLOWING SAFETY PRECAUTIONS SHOULD BE TAKEN. Contact an authorized service station for each lamp. is reset, the LAMP REPLACE Indicator stops lighting. 1 Turn the projector on, press the MENU button...
... LAMP REPLACE COUNTER Be sure to reset the Lamp Replace Counter after the projector has cooled down. ( Follow carefully the instructions in the LAMP REPLACEMENT section of this manual. ) Continuous use of the lamp with the LAMP REPLACE INDICATOR lighted may increase the risk of lamp explosion. IF A LAMP EXPLODES, THE FOLLOWING SAFETY PRECAUTIONS SHOULD BE TAKEN. Contact an authorized service station for each lamp. is reset, the LAMP REPLACE Indicator stops lighting. 1 Turn the projector on, press the MENU button...

Instruction Manual, PLC-SU40
Page 40
... to Control Port (or USB connector) of the mouse) P-TIMERCOMPUTER 1 ZOOM COMPUTER 2 VIDEO FOCUS LENS Press and release the Drag ON/OFF button, DRAG ON INDICATOR lights green and the remote control is displayed on first, Wireless Mouse may not work properly. And make sure that you are used for Serial Port (not supplied). POINT button AUTO PC ON-OFF Used to drop the object at the new screen location. INSTALLATION To use the Remote Control as a wireless mouse for connection.) 2 Turn the projector...
... to Control Port (or USB connector) of the mouse) P-TIMERCOMPUTER 1 ZOOM COMPUTER 2 VIDEO FOCUS LENS Press and release the Drag ON/OFF button, DRAG ON INDICATOR lights green and the remote control is displayed on first, Wireless Mouse may not work properly. And make sure that you are used for Serial Port (not supplied). POINT button AUTO PC ON-OFF Used to drop the object at the new screen location. INSTALLATION To use the Remote Control as a wireless mouse for connection.) 2 Turn the projector...

Instruction Manual, PLC-SU40
Page 41
... AC power cord from the AC outlet. 2 Turn the projector upside down and remove the Air Filter by following the section "AIR FILTER CARE AND CLEANING" below . 1 Ventilation slots of cleaner. Usage in use, replace the Lens Cover. 41 Abrasive cleaners, solvents or other harsh chemicals might scratch a surface. 2 Lightly wipe a cleaning cloth over the Projection Lens. 3 When the projector is fully inserted. The indicator stops flashing when the temperature of a projected image. indicator AIR FILTER CARE AND CLEANING Removable Air Filter...
... AC power cord from the AC outlet. 2 Turn the projector upside down and remove the Air Filter by following the section "AIR FILTER CARE AND CLEANING" below . 1 Ventilation slots of cleaner. Usage in use, replace the Lens Cover. 41 Abrasive cleaners, solvents or other harsh chemicals might scratch a surface. 2 Lightly wipe a cleaning cloth over the Projection Lens. 3 When the projector is fully inserted. The indicator stops flashing when the temperature of a projected image. indicator AIR FILTER CARE AND CLEANING Removable Air Filter...
Instruction Manual, PLC-SU40
Page 42
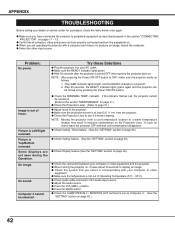
... image, restart the computer. indicator. G Check the Projection Lens to page 37.) G Adjust focus of the projector. G Adjust the audio source. No image. If the indicator flashes red, the projector cannot be selected. G Make sure the temperature is turned OFF when turning the projector back on by pressing the Power ON-OFF button. Problem: No power. NOTE : Moving the projector from a cool temperature location to peripheral equipment as described properly in moisture condensation on page 36.) G Check the connection...
... image, restart the computer. indicator. G Check the Projection Lens to page 37.) G Adjust focus of the projector. G Adjust the audio source. No image. If the indicator flashes red, the projector cannot be selected. G Make sure the temperature is turned OFF when turning the projector back on by pressing the Power ON-OFF button. Problem: No power. NOTE : Moving the projector from a cool temperature location to peripheral equipment as described properly in moisture condensation on page 36.) G Check the connection...

Instruction Manual, PLC-SU40
Page 44
... LAMP REPLACE indicator lights yellow. If the projector is abnormally high. The projector cannot be turned on . The projector detects an abnormal condition and cannot be turned on . Reset the Lamp Replace Counter after replacement of the projection lamp draws to turn ✽ on with a new one promptly. The temperature inside the projector is turned off ✽ When the life of the lamp. 44 When the projector is READY to normal. indicator keeps flashing.) Check and clean the Air Filter. When turning on . (The WARNING TEMP...
... LAMP REPLACE indicator lights yellow. If the projector is abnormally high. The projector cannot be turned on . The projector detects an abnormal condition and cannot be turned on . Reset the Lamp Replace Counter after replacement of the projection lamp draws to turn ✽ on with a new one promptly. The temperature inside the projector is turned off ✽ When the life of the lamp. 44 When the projector is READY to normal. indicator keeps flashing.) Check and clean the Air Filter. When turning on . (The WARNING TEMP...


