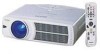
Instruction Manual, PLC-SU40
Page 2
...RISK OF ELECTRIC SHOCK DO NOT OPEN CAUTION : TO REDUCE THE RISK OF ELECTRIC SHOCK, DO NOT REMOVE COVER (OR BACK). G This projector produces intense light from the ventilation holes. If not, it could possibly damage your eyes. Do not look into a compartment or similarly ...VOLTAGE CONSTITUTING A RISK OF ELECTRIC SHOCK IS PRESENT WITHIN THIS UNIT. TO THE OWNER Before operating this projector, read this manual thoroughly and operate the projector properly. If your projector seems to operate improperly, read this manual again, check operations and cable connections and try the solutions...
...RISK OF ELECTRIC SHOCK DO NOT OPEN CAUTION : TO REDUCE THE RISK OF ELECTRIC SHOCK, DO NOT REMOVE COVER (OR BACK). G This projector produces intense light from the ventilation holes. If not, it could possibly damage your eyes. Do not look into a compartment or similarly ...VOLTAGE CONSTITUTING A RISK OF ELECTRIC SHOCK IS PRESENT WITHIN THIS UNIT. TO THE OWNER Before operating this projector, read this manual thoroughly and operate the projector properly. If your projector seems to operate improperly, read this manual again, check operations and cable connections and try the solutions...

Instruction Manual, PLC-SU40
Page 3
...unattended and unused for cleaning. f. Do not use liquid or aerosol cleaners. The openings should never be covered with the projector. Unplug this projector where the cord may expose you are required, be read before cleaning. Wall or shelf mounting should follow the manufacturer's... instructions, and should use . The projector may cause the appliance and cart combination to dangerous voltage or other controls may result in a wet basement, near or over a ...
...unattended and unused for cleaning. f. Do not use liquid or aerosol cleaners. The openings should never be covered with the projector. Unplug this projector where the cord may expose you are required, be read before cleaning. Wall or shelf mounting should follow the manufacturer's... instructions, and should use . The projector may cause the appliance and cart combination to dangerous voltage or other controls may result in a wet basement, near or over a ...

Instruction Manual, PLC-SU40
Page 4
...Rules. THE SOCKET-OUTLET SHOULD BE INSTALLED NEAR THE EQUIPMENT AND EASILY ACCESSIBLE. 4 Model Numbers Trade Name Responsible party Address Telephone No. : PLC-SU40 : Sanyo : SANYO FISHER COMPANY : 21605 Plummer Street, Chatsworth, California 91311 : (818)998-7322 AC POWER CORD REQUIREMENT The AC Power Cord supplied with ...Should the fuse need to be replaced, an ASTA approved BS 1362 fuse must be used in Subpart B of Part 15 of this projector meets the requirement for help. However, there is marked with class B limits in the United States and Canada is required to the...
...Rules. THE SOCKET-OUTLET SHOULD BE INSTALLED NEAR THE EQUIPMENT AND EASILY ACCESSIBLE. 4 Model Numbers Trade Name Responsible party Address Telephone No. : PLC-SU40 : Sanyo : SANYO FISHER COMPANY : 21605 Plummer Street, Chatsworth, California 91311 : (818)998-7322 AC POWER CORD REQUIREMENT The AC Power Cord supplied with ...Should the fuse need to be replaced, an ASTA approved BS 1362 fuse must be used in Subpart B of Part 15 of this projector meets the requirement for help. However, there is marked with class B limits in the United States and Canada is required to the...
Instruction Manual, PLC-SU40
Page 5
...Microsoft Corporation. INDICATOR 41 20 AIR FILTER CARE AND CLEANING 41 20 CLEANING PROJECTION LENS 41 20 TROUBLESHOOTING 42 20 INDICATORS AND PROJECTOR CONDITION 44 20 TECHNICAL SPECIFICATIONS 45 21 CONFIGURATIONS OF TERMINALS 46 21 OPTIONAL PARTS 47 21 TRADEMARKS G Apple, Macintosh, and ...LAMP REPLACE 38 LAMP REPLACE COUNTER 39 19 OPERATING WIRELESS MOUSE 40 MAINTENANCE 41 TURNING ON / OFF PROJECTOR ADJUSTING SCREEN ZOOM ADJUSTMENT FOCUS ADJUSTMENT KEYSTONE ADJUSTMENT PICTURE FREEZE FUNCTION NO SHOW FUNCTION P-TIMER FUNCTION SOUND ADJUSTMENT 19 WARNING TEMP.
...Microsoft Corporation. INDICATOR 41 20 AIR FILTER CARE AND CLEANING 41 20 CLEANING PROJECTION LENS 41 20 TROUBLESHOOTING 42 20 INDICATORS AND PROJECTOR CONDITION 44 20 TECHNICAL SPECIFICATIONS 45 21 CONFIGURATIONS OF TERMINALS 46 21 OPTIONAL PARTS 47 21 TRADEMARKS G Apple, Macintosh, and ...LAMP REPLACE 38 LAMP REPLACE COUNTER 39 19 OPERATING WIRELESS MOUSE 40 MAINTENANCE 41 TURNING ON / OFF PROJECTOR ADJUSTING SCREEN ZOOM ADJUSTMENT FOCUS ADJUSTMENT KEYSTONE ADJUSTMENT PICTURE FREEZE FUNCTION NO SHOW FUNCTION P-TIMER FUNCTION SOUND ADJUSTMENT 19 WARNING TEMP.
Instruction Manual, PLC-SU40
Page 6
....77 million colors, and matrix liquid crystal display (LCD) technology. When the resolution of your computer is automatically set by digitally altering projection to turn the Projection lamp off when the projector detects signal interruption and any operation button is not in..., Italian, Spanish, Portuguese, Dutch, Swedish, Russian, Chinese, Korean, or Japanese. 6 FEATURES AND DESIGN This Multimedia Projector is equipped with DVI 29-pin terminal for connecting DVI output from a computer between SVGA (800 x 600) and SXGA (1280 x 1024) is not pressed for over 5 minutes. N Digital Zoom (...
....77 million colors, and matrix liquid crystal display (LCD) technology. When the resolution of your computer is automatically set by digitally altering projection to turn the Projection lamp off when the projector detects signal interruption and any operation button is not in..., Italian, Spanish, Portuguese, Dutch, Swedish, Russian, Chinese, Korean, or Japanese. 6 FEATURES AND DESIGN This Multimedia Projector is equipped with DVI 29-pin terminal for connecting DVI output from a computer between SVGA (800 x 600) and SXGA (1280 x 1024) is not pressed for over 5 minutes. N Digital Zoom (...

Instruction Manual, PLC-SU40
Page 7
...especially screws and metallic part. G Do not cover vent slots. This projector detects internal temperature and will become hot while the projector is exhausted from overheating. PREPARATION NAME OF EACH PART OF PROJECTOR FRONT EXHAUST VENTS CARRY HANDLE INFRARED REMOTE RECEIVER PROJECTION LENS CAUTION Hot ... SPEAKER TERMINALS AND CONNECTORS AIR FILTER AIR INTAKE VENTS (Back and Bottom) This projector is equipped with Cooling Fans for protection from the exhaust vents. When using or installing the projector, the following to the following precautions should be taken. G Do not put...
...especially screws and metallic part. G Do not cover vent slots. This projector detects internal temperature and will become hot while the projector is exhausted from overheating. PREPARATION NAME OF EACH PART OF PROJECTOR FRONT EXHAUST VENTS CARRY HANDLE INFRARED REMOTE RECEIVER PROJECTION LENS CAUTION Hot ... SPEAKER TERMINALS AND CONNECTORS AIR FILTER AIR INTAKE VENTS (Back and Bottom) This projector is equipped with Cooling Fans for protection from the exhaust vents. When using or installing the projector, the following to the following precautions should be taken. G Do not put...
Instruction Manual, PLC-SU40
Page 8
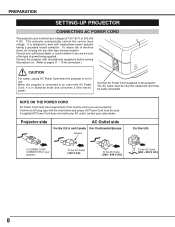
... the AC Outlet. (120 V AC) To the AC Outlet. (200 - 240 V AC) To the AC Outlet. (200 - 240 V AC) 8 PREPARATION SETTING-UP PROJECTOR CONNECTING AC POWER CORD This projector uses nominal input voltages of power system. It is designed to an outlet with AC Power Cord, it is connected to work with... the chart below and proper AC Power Cord must be used. Consult your projector. If supplied AC Power Cord does not match your AC outlet, contact your sales dealer. Confirm an AC plug type with single-phase power systems...
... the AC Outlet. (120 V AC) To the AC Outlet. (200 - 240 V AC) To the AC Outlet. (200 - 240 V AC) 8 PREPARATION SETTING-UP PROJECTOR CONNECTING AC POWER CORD This projector uses nominal input voltages of power system. It is designed to an outlet with AC Power Cord, it is connected to work with... the chart below and proper AC Power Cord must be used. Consult your projector. If supplied AC Power Cord does not match your AC outlet, contact your sales dealer. Confirm an AC plug type with single-phase power systems...

Instruction Manual, PLC-SU40
Page 9
... LATCHES 9 It is designed to adjust the position and tilt. 3 To retract the ADJUSTABLE FEET, lift the front of the projector and pull and undo the FEET LOCK LATCHES. G The projector can be adjusted by rotating ADJUSTABLE FEET. Zoom H1 Screen Size (W x H) mm Zoom (min) Zoom (max) 36" 36... 3962 ----- 22.6' (6.9m) ADJUSTABLE FEET Picture tilt and projection angle can be adjusted by Menu Operation. (Refer to P20 and 36.) CAUTION Tilt the projector within the adjustable range in order not to page 10. G Refer to the figure below to provide the best image. 22.6' (6.9m) 17.4' (5.3m...
... LATCHES 9 It is designed to adjust the position and tilt. 3 To retract the ADJUSTABLE FEET, lift the front of the projector and pull and undo the FEET LOCK LATCHES. G The projector can be adjusted by rotating ADJUSTABLE FEET. Zoom H1 Screen Size (W x H) mm Zoom (min) Zoom (max) 36" 36... 3962 ----- 22.6' (6.9m) ADJUSTABLE FEET Picture tilt and projection angle can be adjusted by Menu Operation. (Refer to P20 and 36.) CAUTION Tilt the projector within the adjustable range in order not to page 10. G Refer to the figure below to provide the best image. 22.6' (6.9m) 17.4' (5.3m...

Instruction Manual, PLC-SU40
Page 10
... supplied with this bag. Do not transport the projector through a courier or transport service, consult your dealer for protection from dust and scratches on the cabinet. PREPARATION INSTALLING PROJECTOR IN PROPER POSITION Install the projector properly. Improper installation may reduce the lamp lifetime and... cause a fire hazard. 20˚ Do not tilt the projector more than 20 degrees above and below. 20...
... supplied with this bag. Do not transport the projector through a courier or transport service, consult your dealer for protection from dust and scratches on the cabinet. PREPARATION INSTALLING PROJECTOR IN PROPER POSITION Install the projector properly. Improper installation may reduce the lamp lifetime and... cause a fire hazard. 20˚ Do not tilt the projector more than 20 degrees above and below. 20...

Instruction Manual, PLC-SU40
Page 11
...signal from computer to this jack. (Refer to P12.) USB CONNECTOR (Series B) When controlling the computer with Remote Control of this projector, connect USB port of your personal computer to this connector. (Refer to 13 and connect properly. COMPUTER INPUT (DIGITAL/ANALOG) Connect ...COMPUTER IN 1 VIDEO DVI - VIDEO AUDIO IN R - Set the terminal up as computer input or monitor output. CONNECTING PROJECTOR TERMINALS OF PROJECTOR This projector has input and output terminals on pages 11 to P12.) COMPUTER INPUT / MONITOR OUTPUT TERMINAL This terminal is monaural, connect it...
...signal from computer to this jack. (Refer to P12.) USB CONNECTOR (Series B) When controlling the computer with Remote Control of this projector, connect USB port of your personal computer to this connector. (Refer to 13 and connect properly. COMPUTER INPUT (DIGITAL/ANALOG) Connect ...COMPUTER IN 1 VIDEO DVI - VIDEO AUDIO IN R - Set the terminal up as computer input or monitor output. CONNECTING PROJECTOR TERMINALS OF PROJECTOR This projector has input and output terminals on pages 11 to P12.) COMPUTER INPUT / MONITOR OUTPUT TERMINAL This terminal is monaural, connect it...

Instruction Manual, PLC-SU40
Page 12
... Single Link T.M.D.S.) ✽ • Audio Cables (RCA x 2 and Mini Plug (stereo) x 1) ✽ IBM-compatible computer or Macintosh computer (VGA / SVGA / XGA / SXGA) Desktop type Laptop type 12 Monitor Output Monitor Output Monitor Output Audio Output USB port Serial port or MAC Adapter ✽ Monitor Input...of these Control Cables corresponding with this terminal. (See page 36) COMPUTER IN 2 / MONITOR OUT USB CONTROL PORT Terminals of the Projector NOTE : When connecting the cable, the power cords of your computer. Set the terminal up as shown in the table ON below...
... Single Link T.M.D.S.) ✽ • Audio Cables (RCA x 2 and Mini Plug (stereo) x 1) ✽ IBM-compatible computer or Macintosh computer (VGA / SVGA / XGA / SXGA) Desktop type Laptop type 12 Monitor Output Monitor Output Monitor Output Audio Output USB port Serial port or MAC Adapter ✽ Monitor Input...of these Control Cables corresponding with this terminal. (See page 36) COMPUTER IN 2 / MONITOR OUT USB CONTROL PORT Terminals of the Projector NOTE : When connecting the cable, the power cords of your computer. Set the terminal up as shown in the table ON below...

Instruction Manual, PLC-SU40
Page 13
...; COMPUTER IN 2 / MONITOR OUT S-VIDEO VIDEO Y - Pb/Cb - L (MONO) Y - Pb / Cb - L COMPUTER RESET AUDIO IN Use any of both the projector and the external equipment should be disconnected from AC outlet. AUDIO OUT - COMPUTER IN 2 / MONITOR OUT USB CONTROL PORT AUDIO OUT Audio Cable (Stereo) ✽... both VIDEO jack and S- Pr/Cr NOTE It is necessary to select COMPUTER 2 in the SETTING Menu when this terminal is not supplied with this projector.) • Video Cable (RCA x 1 or RCA x 3) ✽ • Scart-VGA Cable ✽ • S-VIDEO Cable ✽ • Audio...
...; COMPUTER IN 2 / MONITOR OUT S-VIDEO VIDEO Y - Pb/Cb - L (MONO) Y - Pb / Cb - L COMPUTER RESET AUDIO IN Use any of both the projector and the external equipment should be disconnected from AC outlet. AUDIO OUT - COMPUTER IN 2 / MONITOR OUT USB CONTROL PORT AUDIO OUT Audio Cable (Stereo) ✽... both VIDEO jack and S- Pr/Cr NOTE It is necessary to select COMPUTER 2 in the SETTING Menu when this terminal is not supplied with this projector.) • Video Cable (RCA x 1 or RCA x 3) ✽ • Scart-VGA Cable ✽ • S-VIDEO Cable ✽ • Audio...

Instruction Manual, PLC-SU40
Page 14
... Code 7 OFF OFF OFF Code 8 LASER BUTTON Used to operate Laser Pointer function. SELECT VOLUME+ MENU KEYSTONE POWER ON-OFF BUTTON Used to turn the projector on /off . (P19) AUTO PC ADJ. The LASER POINTER INDICATOR lights RED and Laser is emitted with RED light to indicate laser beam is used...
... Code 7 OFF OFF OFF Code 8 LASER BUTTON Used to operate Laser Pointer function. SELECT VOLUME+ MENU KEYSTONE POWER ON-OFF BUTTON Used to turn the projector on /off . (P19) AUTO PC ADJ. The LASER POINTER INDICATOR lights RED and Laser is emitted with RED light to indicate laser beam is used...

Instruction Manual, PLC-SU40
Page 15
...in DIGITAL ZOOM +/- G Do not expose the Remote Control to select input source (VIDEO). (P31) Operating Range Point the Remote Control toward projector (Infrared Remote Receiver) whenever pressing any button. G Replace two batteries at the same time. G Do not drop the Remote Control. To ...correct polarity (+ and -), be sure battery terminals are also used batteries according to select an item or adjust value in front and rear of the projector. 16.4' (5 m) 60° 60° 16.4' (5 m) REMOTE CONTROL BATTERIES INSTALLATION 1 Remove the battery compartment lid. mode. (P30) MENU...
...in DIGITAL ZOOM +/- G Do not expose the Remote Control to select input source (VIDEO). (P31) Operating Range Point the Remote Control toward projector (Infrared Remote Receiver) whenever pressing any button. G Replace two batteries at the same time. G Do not drop the Remote Control. To ...correct polarity (+ and -), be sure battery terminals are also used batteries according to select an item or adjust value in front and rear of the projector. 16.4' (5 m) 60° 60° 16.4' (5 m) REMOTE CONTROL BATTERIES INSTALLATION 1 Remove the battery compartment lid. mode. (P30) MENU...

Instruction Manual, PLC-SU40
Page 16
... They are also used as VOLUME +/- And it flashes green in DIGITAL ZOOM +/- mode. (P30) POINT LEFT/RIGHT buttons are also used to turn the projector on . buttons. It is ready to pan the image in Power Management mode. (P37) RLEAPMLPACE WATRENMIPN.G VOLUME - FOCUS BUTTON Used to adjust focus. (...select an item or adjust value in ON-SCREEN MENU. INPUT IMAGE MENU READY VOLUME + LAMP SELECT ZOOM FOCUS LAMP INDICATOR Becomes dim when the projector is too high. (P41) LAMP REPLACE INDICATOR Turns yellow when the life of the projection lamp draws to an end. (P38) MENU BUTTON ...
... They are also used as VOLUME +/- And it flashes green in DIGITAL ZOOM +/- mode. (P30) POINT LEFT/RIGHT buttons are also used to turn the projector on . buttons. It is ready to pan the image in Power Management mode. (P37) RLEAPMLPACE WATRENMIPN.G VOLUME - FOCUS BUTTON Used to adjust focus. (...select an item or adjust value in ON-SCREEN MENU. INPUT IMAGE MENU READY VOLUME + LAMP SELECT ZOOM FOCUS LAMP INDICATOR Becomes dim when the projector is too high. (P41) LAMP REPLACE INDICATOR Turns yellow when the life of the projection lamp draws to an end. (P38) MENU BUTTON ...

Instruction Manual, PLC-SU40
Page 17
BEFORE OPERATION OPERATING ON-SCREEN MENU HOW TO OPERATE ON-SCREEN MENU You can control and adjust this projector through ON-SCREEN MENU 3 Press the POINT DOWN button and move the POINTER (red frame or red arrow) to the ITEM that you want to ...
BEFORE OPERATION OPERATING ON-SCREEN MENU HOW TO OPERATE ON-SCREEN MENU You can control and adjust this projector through ON-SCREEN MENU 3 Press the POINT DOWN button and move the POINTER (red frame or red arrow) to the ITEM that you want to ...

Instruction Manual, PLC-SU40
Page 18
...) IMAGE SELECT MENU Used to select an image level among Standard, Cinema and Image 1 ~ 4. (Refer to P33) SCREEN MENU Used to set size of the projector or reset the Lamp Replace Counter. (Refer to P36, 37) INPUT MENU Used to select input source either Video or Computer. (Refer to P31) IMAGE...
...) IMAGE SELECT MENU Used to select an image level among Standard, Cinema and Image 1 ~ 4. (Refer to P33) SCREEN MENU Used to set size of the projector or reset the Lamp Replace Counter. (Refer to P36, 37) INPUT MENU Used to select input source either Video or Computer. (Refer to P31) IMAGE...

Instruction Manual, PLC-SU40
Page 19
...or on page 37. Indicator continues to flash, refer to "Power management" on the Remote Control, and a message "Power off . NOTE : The Projector cannot be turned on during cooling period with Computer, VCR, etc.) before turning on page 41 and proper maintenance should be taken. 19 Refer to... the section "MAINTENANCE" on the projector again. Wait at least 5 minutes before turning on automatically by connecting AC Power Cord to an AC outlet. (Refer to the menu item "...
...or on page 37. Indicator continues to flash, refer to "Power management" on the Remote Control, and a message "Power off . NOTE : The Projector cannot be turned on during cooling period with Computer, VCR, etc.) before turning on page 41 and proper maintenance should be taken. 19 Refer to... the section "MAINTENANCE" on the projector again. Wait at least 5 minutes before turning on automatically by connecting AC Power Cord to an AC outlet. (Refer to the menu item "...

Instruction Manual, PLC-SU40
Page 22
... (red arrow) to RGB or RGB (Scart) and press the SELECT button. Source Select Menu Move the pointer to DVI terminal, select Digital. If the projector cannot reproduce proper image, select correct input source through the COMPUTER IN 2 / MONITOR OUT terminal, select RGB. INPUT Menu icon Computer Move the pointer (red...
... (red arrow) to RGB or RGB (Scart) and press the SELECT button. Source Select Menu Move the pointer to DVI terminal, select Digital. If the projector cannot reproduce proper image, select correct input source through the COMPUTER IN 2 / MONITOR OUT terminal, select RGB. INPUT Menu icon Computer Move the pointer (red...
Instruction Manual, PLC-SU40
Page 23
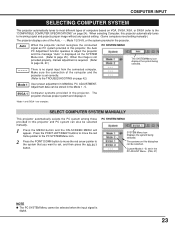
...MENU will appear. Make sure the connection of computers based on VGA, SVGA, XGA, or SXGA (refer to the "COMPATIBLE COMPUTER SPECIFICATIONS" on page 24). SVGA 1 Computer systems provided in this projector and PC system can also be selected when the input signal is ... from the connected computer. The projector chooses proper system and displays it. *Mode 1 and SVGA 1 are examples. PC SYSTEM MENU SYSTEM Menu icon Displays the system being selected. - - - - There is digital. 23 SELECT COMPUTER SYSTEM MANUALLY This projector automatically selects the PC system among...
...MENU will appear. Make sure the connection of computers based on VGA, SVGA, XGA, or SXGA (refer to the "COMPATIBLE COMPUTER SPECIFICATIONS" on page 24). SVGA 1 Computer systems provided in this projector and PC system can also be selected when the input signal is ... from the connected computer. The projector chooses proper system and displays it. *Mode 1 and SVGA 1 are examples. PC SYSTEM MENU SYSTEM Menu icon Displays the system being selected. - - - - There is digital. 23 SELECT COMPUTER SYSTEM MANUALLY This projector automatically selects the PC system among...


