
Instruction Manual
Page 1
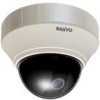
... for later reference. • Refer to the supplied CD-ROM for proper use. INSTRUCTION MANUAL (Pattern sheet attached) Color CCD Camera VDC-DP9584S VDC-DP9585P VCC-P9574S VCC-P9575P VDC-DP9584S/VDC-DP9585P VCC-P9574S/VCC-P9575P Please read this manual before installing and using this camera, and always follow the instructions in it for the French, Spanish, German and Chinese...
... for later reference. • Refer to the supplied CD-ROM for proper use. INSTRUCTION MANUAL (Pattern sheet attached) Color CCD Camera VDC-DP9584S VDC-DP9585P VCC-P9574S VCC-P9575P VDC-DP9584S/VDC-DP9585P VCC-P9574S/VCC-P9575P Please read this manual before installing and using this camera, and always follow the instructions in it for the French, Spanish, German and Chinese...

Instruction Manual
Page 3
Contents Registering Monitoring Positions
Contents Registering Monitoring Positions
Instruction Manual
Page 6
... successively along the registered preset positions: R AUTO MODE → SEQUENTIAL PAN (see page 31) ■ Performing automatic panning: R AUTO MODE → AUTO PAN (see page 32) ■ Setting the camera to return to the specified monitoring mode following manual operation on the angle of view: R AUTO RETURN (see page 34) ■ Connecting to an external... (see page 45) (VDC-DP9584S/VDC-DP9585P) ■ Switching between "Color" and "Black-and-White" mode of DAY/NIGHT function using an external switch, etc.: R CAMERA → DAY/NIGHT (see page 25) 5
... successively along the registered preset positions: R AUTO MODE → SEQUENTIAL PAN (see page 31) ■ Performing automatic panning: R AUTO MODE → AUTO PAN (see page 32) ■ Setting the camera to return to the specified monitoring mode following manual operation on the angle of view: R AUTO RETURN (see page 34) ■ Connecting to an external... (see page 45) (VDC-DP9584S/VDC-DP9585P) ■ Switching between "Color" and "Black-and-White" mode of DAY/NIGHT function using an external switch, etc.: R CAMERA → DAY/NIGHT (see page 25) 5

Instruction Manual
Page 7
... 1 second for the main menu to appear. 2 Select button • Press up the camera using the buttons on the circuit board Place the dome cover back once you have finished settings. • See the INSTALLATION MANUAL supplied with the unit. Pan: Press d(LEFT) or c(RIGHT) Tilt: Press j(UP) or l(DOWN) Wide: Press d(LEFT) Tele...
... 1 second for the main menu to appear. 2 Select button • Press up the camera using the buttons on the circuit board Place the dome cover back once you have finished settings. • See the INSTALLATION MANUAL supplied with the unit. Pan: Press d(LEFT) or c(RIGHT) Tilt: Press j(UP) or l(DOWN) Wide: Press d(LEFT) Tele...
Instruction Manual
Page 19
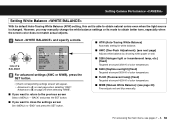
Setting Camera Performance Setting White Balance With its mode to obtain better tone, especially when ...even when the light source is changed. For accessing the main menu, see page 20) Fine-adjusts red and blue manually. Advances to "END" and press the SET button. ■ ATW (Auto-Tracing White Balance) Automatic setting for white... 5600 K of color temperature. ■ FLUO (Fluorescent lamp) (fixed) Targeted at around 4200 K of color temperature. ■ MWB (Manual White Balance): (see pages 7 - 8. 18 "BACK" and press the SET button. ■ If you want to close the settings screen...
Setting Camera Performance Setting White Balance With its mode to obtain better tone, especially when ...even when the light source is changed. For accessing the main menu, see page 20) Fine-adjusts red and blue manually. Advances to "END" and press the SET button. ■ ATW (Auto-Tracing White Balance) Automatic setting for white... 5600 K of color temperature. ■ FLUO (Fluorescent lamp) (fixed) Targeted at around 4200 K of color temperature. ■ MWB (Manual White Balance): (see pages 7 - 8. 18 "BACK" and press the SET button. ■ If you want to close the settings screen...
Instruction Manual
Page 20
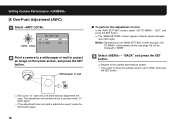
AWC SETTING ·AWC LOCK SET GO TO MWB ·AWC LOCK SET y 2 Point a camera to a white paper or wall to "END" and press the SET button. R The "MWB SETTING" screen appears. "BACK" and press the SET button. RThe cursor "q" ... button again. 19 "SET", and press the SET button. The adjustment will start. Specify values manually (see page 18) will be changed to "MWB". 3 Select - Setting Camera Performance A One-Push Adjustment (AWC) 1 Select . RReturns to the camera performance screen. • If you want to close the settings screen, set to project an image...
AWC SETTING ·AWC LOCK SET GO TO MWB ·AWC LOCK SET y 2 Point a camera to a white paper or wall to "END" and press the SET button. R The "MWB SETTING" screen appears. "BACK" and press the SET button. RThe cursor "q" ... button again. 19 "SET", and press the SET button. The adjustment will start. Specify values manually (see page 18) will be changed to "MWB". 3 Select - Setting Camera Performance A One-Push Adjustment (AWC) 1 Select . RReturns to the camera performance screen. • If you want to close the settings screen, set to project an image...

Instruction Manual
Page 21
Setting Camera Performance 2 Select - RReturns to the camera performance screen. • If you want to close the settings screen, set to adjust tint (0 - 255). "BACK" and press the SET button. B Manual White Balance (MWB) 1 Select or to "END" and press the SET button. 20 MWB SETTING · R 43 B 66 PRESET MENU OFF BACK R : Adjusting Red B : Adjusting Blue • The greater the number, the deeper the tint becomes.
Setting Camera Performance 2 Select - RReturns to the camera performance screen. • If you want to close the settings screen, set to adjust tint (0 - 255). "BACK" and press the SET button. B Manual White Balance (MWB) 1 Select or to "END" and press the SET button. 20 MWB SETTING · R 43 B 66 PRESET MENU OFF BACK R : Adjusting Red B : Adjusting Blue • The greater the number, the deeper the tint becomes.

Instruction Manual
Page 35
... (S=second, M=minute) Note: specifies the pause after manual operation. 4 Set to Specified Monitoring Mode Automatically Performing a manual operation on the angle of view (pan, tilt, or zoom) cancels the current monitoring mode (sequential pan, auto pan, preset position). SET R 2 Select to the specified monitoring mode. ·AUTO RETURN ON CAMERA SET y PRESET POSITION 1 y AUTO MODE SEQ...
... (S=second, M=minute) Note: specifies the pause after manual operation. 4 Set to Specified Monitoring Mode Automatically Performing a manual operation on the angle of view (pan, tilt, or zoom) cancels the current monitoring mode (sequential pan, auto pan, preset position). SET R 2 Select to the specified monitoring mode. ·AUTO RETURN ON CAMERA SET y PRESET POSITION 1 y AUTO MODE SEQ...

Instruction Manual
Page 48
... timing of DAY/NIGHT: Items to Be Checked • Is "ON" specified for ? (see pages 26, 27) Service The camera is used in the INSTALLATION MANUAL.) • Is sync adjusted by the line lock? (see page 15) • Is the lens transparent without blur? (Use .... 47 Troubleshooting Before seeking repair service, please review the following points first. If the trouble persists, consult your dealer or an Authorized Sanyo Service Center. Symptom No images available: Distorted images: Unclear images: Unrecognizable subject in the backlight: Poor color images: Inappropriate contrast or ...
... timing of DAY/NIGHT: Items to Be Checked • Is "ON" specified for ? (see pages 26, 27) Service The camera is used in the INSTALLATION MANUAL.) • Is sync adjusted by the line lock? (see page 15) • Is the lens transparent without blur? (Use .... 47 Troubleshooting Before seeking repair service, please review the following points first. If the trouble persists, consult your dealer or an Authorized Sanyo Service Center. Symptom No images available: Distorted images: Unclear images: Unrecognizable subject in the backlight: Poor color images: Inappropriate contrast or ...

Instruction Manual
Page 49
...Pan/Tilt range Wall Pan/Tilt speed Preset Manual Menu Preset position Auto mode Backlight compensation White balance Gain control Electronic shutter Gamma Aperture compensation Sync system Camera title Privacy masking Alarm input Alarm output Motion detector VDC-DP9584S VCC-P9574S VDC-DP9585P VCC...- 7.3 mm (2.6x), F=1.9 - 3.0 Focus range: 1 m - ∞ Pan: 0 - 335 degrees, Tilt: 0 - 90 degrees Pan: ±55 degrees, Tilt: 0 - 90 degrees Max. 120 degrees/sec. 5 - 100 degrees/sec. PAL standard 625 lines, 50 fields/sec. 1/4" interline transfer method CCD 768 (H) x 494 (V) 752(H) x ...
...Pan/Tilt range Wall Pan/Tilt speed Preset Manual Menu Preset position Auto mode Backlight compensation White balance Gain control Electronic shutter Gamma Aperture compensation Sync system Camera title Privacy masking Alarm input Alarm output Motion detector VDC-DP9584S VCC-P9574S VDC-DP9585P VCC...- 7.3 mm (2.6x), F=1.9 - 3.0 Focus range: 1 m - ∞ Pan: 0 - 335 degrees, Tilt: 0 - 90 degrees Pan: ±55 degrees, Tilt: 0 - 90 degrees Max. 120 degrees/sec. 5 - 100 degrees/sec. PAL standard 625 lines, 50 fields/sec. 1/4" interline transfer method CCD 768 (H) x 494 (V) 752(H) x ...

Instruction Manual
Page 50
... and Small - 640 g (22.6 oz) CD-ROM Installation manual Clamping core • The appearance and specifications of the product are subject to change without notice. 49 IP66 - Specifications Model name Communications VDC-DP9584S VCC-P9574S VDC-DP9585P Simplified controller (VAC-70: Separately ordered) supported VCC-P9575P Communication protocol Waterproof Standard Coaxial control: SSP/H-SSP...
... and Small - 640 g (22.6 oz) CD-ROM Installation manual Clamping core • The appearance and specifications of the product are subject to change without notice. 49 IP66 - Specifications Model name Communications VDC-DP9584S VCC-P9574S VDC-DP9585P Simplified controller (VAC-70: Separately ordered) supported VCC-P9575P Communication protocol Waterproof Standard Coaxial control: SSP/H-SSP...

