
Instruction Manual
Page 1
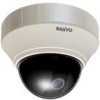
....adobe.com Adobe® Reader PC Adobe Systems Incorporated http://www.adobe.com INSTRUCTION MANUAL (Pattern sheet attached) Color CCD Camera VDC-DP9584S VDC-DP9585P VCC-P9574S VCC-P9575P VDC-DP9584S/VDC-DP9585P VCC-P9574S/VCC-P9575P Please read this manual before installing and using this camera, and always follow the instructions in it for installation from the following web site...
....adobe.com Adobe® Reader PC Adobe Systems Incorporated http://www.adobe.com INSTRUCTION MANUAL (Pattern sheet attached) Color CCD Camera VDC-DP9584S VDC-DP9585P VCC-P9574S VCC-P9575P VDC-DP9584S/VDC-DP9585P VCC-P9574S/VCC-P9575P Please read this manual before installing and using this camera, and always follow the instructions in it for installation from the following web site...

Instruction Manual
Page 3
Contents Registering Monitoring Positions
Contents Registering Monitoring Positions
Instruction Manual
Page 6
... successively along the registered preset positions: R AUTO MODE → SEQUENTIAL PAN (see page 31) ■ Performing automatic panning: R AUTO MODE → AUTO PAN (see page 32) ■ Setting the camera to return to the specified monitoring mode following manual operation on the angle of view: R AUTO RETURN (see page 34) ■ Connecting to an external... (see page 45) (VDC-DP9584S/VDC-DP9585P) ■ Switching between "Color" and "Black-and-White" mode of DAY/NIGHT function using an external switch, etc.: R CAMERA → DAY/NIGHT (see page 25) 5
... successively along the registered preset positions: R AUTO MODE → SEQUENTIAL PAN (see page 31) ■ Performing automatic panning: R AUTO MODE → AUTO PAN (see page 32) ■ Setting the camera to return to the specified monitoring mode following manual operation on the angle of view: R AUTO RETURN (see page 34) ■ Connecting to an external... (see page 45) (VDC-DP9584S/VDC-DP9585P) ■ Switching between "Color" and "Black-and-White" mode of DAY/NIGHT function using an external switch, etc.: R CAMERA → DAY/NIGHT (see page 25) 5

Instruction Manual
Page 7
... and hold for about for VAC-70. When is "ON", background of the monitor is shown in VIDEO OUT VAC-70 CAMERA BNC type RG-6U (5C-2V) cable, 300 m max. Pan: Press d(LEFT) or c(RIGHT) Tilt: Press j(UP) or l(DOWN) Wide: Press d(LEFT) Tele: Press c(RIGHT) 6 ... a Monitor Getting Started ■ Using the Camera Control Unit (VAC-70: Separately ordered) Camera can be controlled remotely during live mode (with no settings screen displayed). Press the SET button to the instruction manual for 5 seconds on the circuit board Place the dome cover back once you have finished settings. &#...
... and hold for about for VAC-70. When is "ON", background of the monitor is shown in VIDEO OUT VAC-70 CAMERA BNC type RG-6U (5C-2V) cable, 300 m max. Pan: Press d(LEFT) or c(RIGHT) Tilt: Press j(UP) or l(DOWN) Wide: Press d(LEFT) Tele: Press c(RIGHT) 6 ... a Monitor Getting Started ■ Using the Camera Control Unit (VAC-70: Separately ordered) Camera can be controlled remotely during live mode (with no settings screen displayed). Press the SET button to the instruction manual for 5 seconds on the circuit board Place the dome cover back once you have finished settings. &#...
Instruction Manual
Page 19
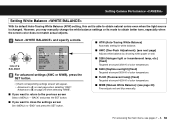
...K of color temperature. ■ FLUO (Fluorescent lamp) (fixed) Targeted at around 4200 K of color temperature. ■ MWB (Manual White Balance): (see pages 7 - 8. 18 Setting Camera Performance Setting White Balance With its mode to obtain natural colors even when the light source is able to obtain better tone...page when selecting "AWC". For accessing the main menu, see page 20) Fine-adjusts red and blue manually. "BACK" and press the SET button. ■ If you may manually change the white balance settings or its default Auto-Tracing White Balance (ATW) setting, this unit is ...
...K of color temperature. ■ FLUO (Fluorescent lamp) (fixed) Targeted at around 4200 K of color temperature. ■ MWB (Manual White Balance): (see pages 7 - 8. 18 Setting Camera Performance Setting White Balance With its mode to obtain natural colors even when the light source is able to obtain better tone...page when selecting "AWC". For accessing the main menu, see page 20) Fine-adjusts red and blue manually. "BACK" and press the SET button. ■ If you may manually change the white balance settings or its default Auto-Tracing White Balance (ATW) setting, this unit is ...
Instruction Manual
Page 20
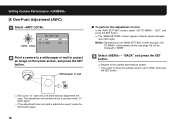
... 2 seconds when "q" lights again. • If the adjustment does not yield a satisfactory result, press the SET button again. 19 RReturns to the camera performance screen. • If you want to close the settings screen, set to "END" and press the SET button. R The "MWB SETTING" screen... appears. Specify values manually (see page 18) will be changed to project an image on the whole screen, and press the SET button. Setting Camera Performance A One-Push Adjustment (AWC) 1 Select . "BACK" and press the SET button.
... 2 seconds when "q" lights again. • If the adjustment does not yield a satisfactory result, press the SET button again. 19 RReturns to the camera performance screen. • If you want to close the settings screen, set to "END" and press the SET button. R The "MWB SETTING" screen... appears. Specify values manually (see page 18) will be changed to project an image on the whole screen, and press the SET button. Setting Camera Performance A One-Push Adjustment (AWC) 1 Select . "BACK" and press the SET button.

Instruction Manual
Page 21
Setting Camera Performance 2 Select - MWB SETTING · R 43 B 66 PRESET MENU OFF BACK R : Adjusting Red B : Adjusting Blue • The greater the number, the deeper the tint becomes. RReturns to the camera performance screen. • If you want to close the settings screen, set to adjust tint (0 - 255). B Manual White Balance (MWB) 1 Select or to "END" and press the SET button. 20 "BACK" and press the SET button.
Setting Camera Performance 2 Select - MWB SETTING · R 43 B 66 PRESET MENU OFF BACK R : Adjusting Red B : Adjusting Blue • The greater the number, the deeper the tint becomes. RReturns to the camera performance screen. • If you want to close the settings screen, set to adjust tint (0 - 255). B Manual White Balance (MWB) 1 Select or to "END" and press the SET button. 20 "BACK" and press the SET button.

Instruction Manual
Page 35
... accessing the main menu, see pages 7 - 8. 34 SET R 2 Select to automatic panning. RCloses the settings screen and returns to the normal monitoring screen. • If you can set the camera to return to the specified monitoring mode automatically once the manual operation is over. 1 Set to "ON" and press the SET button. 3 Select...
... accessing the main menu, see pages 7 - 8. 34 SET R 2 Select to automatic panning. RCloses the settings screen and returns to the normal monitoring screen. • If you can set the camera to return to the specified monitoring mode automatically once the manual operation is over. 1 Set to "ON" and press the SET button. 3 Select...

Instruction Manual
Page 48
... timing of major parts If the unit is a precision instrument. If the trouble persists, consult your dealer or an Authorized Sanyo Service Center. If the camera requires service, never try Gamma characteristic adjustment? (see page 22) • Is the aperture adjusted? (see page 24)... securely? • Is lighting appropriate? • Is power supplied? (see "Connections" in the INSTALLATION MANUAL.) • Are power supply and voltage appropriate? (see "Connections" in the INSTALLATION MANUAL.) • Is sync adjusted by the line lock? (see page 15) • Is the lens transparent...
... timing of major parts If the unit is a precision instrument. If the trouble persists, consult your dealer or an Authorized Sanyo Service Center. If the camera requires service, never try Gamma characteristic adjustment? (see page 22) • Is the aperture adjusted? (see page 24)... securely? • Is lighting appropriate? • Is power supplied? (see "Connections" in the INSTALLATION MANUAL.) • Are power supply and voltage appropriate? (see "Connections" in the INSTALLATION MANUAL.) • Is sync adjusted by the line lock? (see page 15) • Is the lens transparent...

Instruction Manual
Page 49
...Pan/Tilt range Wall Pan/Tilt speed Preset Manual Menu Preset position Auto mode Backlight compensation White balance Gain control Electronic shutter Gamma Aperture compensation Sync system Camera title Privacy masking Alarm input Alarm output Motion detector VDC-DP9584S VCC-P9574S VDC-DP9585P VCC.../OFF, Motion zoom function • The factory setting value is represented in motorized zoom pan focus auto iris lens, f=2.8 - 7.3 mm (2.6x), F=1.9 - 3.0 Focus range: 1 m - ∞ Pan: 0 - 335 degrees, Tilt: 0 - 90 degrees Pan: ±55 degrees, Tilt: 0 - 90 degrees Max. 120 degrees/sec. 5...
...Pan/Tilt range Wall Pan/Tilt speed Preset Manual Menu Preset position Auto mode Backlight compensation White balance Gain control Electronic shutter Gamma Aperture compensation Sync system Camera title Privacy masking Alarm input Alarm output Motion detector VDC-DP9584S VCC-P9574S VDC-DP9585P VCC.../OFF, Motion zoom function • The factory setting value is represented in motorized zoom pan focus auto iris lens, f=2.8 - 7.3 mm (2.6x), F=1.9 - 3.0 Focus range: 1 m - ∞ Pan: 0 - 335 degrees, Tilt: 0 - 90 degrees Pan: ±55 degrees, Tilt: 0 - 90 degrees Max. 120 degrees/sec. 5...

Instruction Manual
Page 50
IP66 - Specifications Model name Communications VDC-DP9584S VCC-P9574S VDC-DP9585P Simplified controller (VAC-70: Separately ordered) supported VCC-P9575P Communication protocol Waterproof Standard Coaxial control: SSP/H-SSP/PELCO-C, RS485:SSP/PELCO-D, Video out: Coaxial cable/...When heater (VA-50H: option board) turned on 1.5 kg (52.9 oz) CD-ROM Installation manual Clamping core Cushioning sheet Hexagonal wrench, Large and Small - 640 g (22.6 oz) CD-ROM Installation manual Clamping core • The appearance and specifications of the product are subject to change without notice. ...
IP66 - Specifications Model name Communications VDC-DP9584S VCC-P9574S VDC-DP9585P Simplified controller (VAC-70: Separately ordered) supported VCC-P9575P Communication protocol Waterproof Standard Coaxial control: SSP/H-SSP/PELCO-C, RS485:SSP/PELCO-D, Video out: Coaxial cable/...When heater (VA-50H: option board) turned on 1.5 kg (52.9 oz) CD-ROM Installation manual Clamping core Cushioning sheet Hexagonal wrench, Large and Small - 640 g (22.6 oz) CD-ROM Installation manual Clamping core • The appearance and specifications of the product are subject to change without notice. ...

