
Instruction Manual
Page 1
... for the French, Spanish, German and Chinese "INSTRUCTION MANUAL". INSTRUCTION MANUAL (Pattern sheet attached) Color CCD Camera VDC-DP9584S VDC-DP9585P VCC-P9574S VCC-P9575P VDC-DP9584S/VDC-DP9585P VCC-P9574S/VCC-P9575P Please read this manual before installing and using this camera, and always follow the instructions in it handy for later reference. • Refer to keep it...
... for the French, Spanish, German and Chinese "INSTRUCTION MANUAL". INSTRUCTION MANUAL (Pattern sheet attached) Color CCD Camera VDC-DP9584S VDC-DP9585P VCC-P9574S VCC-P9575P VDC-DP9584S/VDC-DP9585P VCC-P9574S/VCC-P9575P Please read this manual before installing and using this camera, and always follow the instructions in it handy for later reference. • Refer to keep it...

Instruction Manual
Page 2
Contents ☞The contents in angle brackets < > are the menu screen title. Getting Started Precautions 3 Information 4 Characteristics 4 WEEE Symbol Information 4 Useful Operations 5 Setting Up and Making Adjustments Using a Monitor 6 Accessing the Main Menu 7 Selecting Display Language
Contents ☞The contents in angle brackets < > are the menu screen title. Getting Started Precautions 3 Information 4 Characteristics 4 WEEE Symbol Information 4 Useful Operations 5 Setting Up and Making Adjustments Using a Monitor 6 Accessing the Main Menu 7 Selecting Display Language

Instruction Manual
Page 3
Contents Registering Monitoring Positions
Contents Registering Monitoring Positions

Instruction Manual
Page 5
... applied only to EU countries and not applied to the main menu is controlled by UL.) WEEE Symbol Information Please note: Your SANYO product is designed and manufactured with view on screen. • Access to the countries in the other area of separately from your...be obtained in a wider range of scene without intentional focusing. • Equipped with motorized pan/tilt. • Can be installed on the images, and notifies using alarm output. • If a hard disk recorder is connected, monitoring and/or camera adjustment operation can be performed remotely. • Partial masking...
... applied only to EU countries and not applied to the main menu is controlled by UL.) WEEE Symbol Information Please note: Your SANYO product is designed and manufactured with view on screen. • Access to the countries in the other area of separately from your...be obtained in a wider range of scene without intentional focusing. • Equipped with motorized pan/tilt. • Can be installed on the images, and notifies using alarm output. • If a hard disk recorder is connected, monitoring and/or camera adjustment operation can be performed remotely. • Partial masking...
Instruction Manual
Page 6
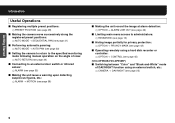
... multiple preset positions: R PRESET POSITION (see page 28) ■ Making the camera move successively along the registered preset positions: R AUTO MODE → SEQUENTIAL PAN (see page 31) ■ Performing automatic panning: R AUTO MODE → AUTO PAN (see page 32) ■ Setting the camera to return to the specified monitoring mode following manual operation on the... (see page 45) (VDC-DP9584S/VDC-DP9585P) ■ Switching between "Color" and "Black-and-White" mode of DAY/NIGHT function using an external switch, etc.: R CAMERA → DAY/NIGHT (see page 25) 5
... multiple preset positions: R PRESET POSITION (see page 28) ■ Making the camera move successively along the registered preset positions: R AUTO MODE → SEQUENTIAL PAN (see page 31) ■ Performing automatic panning: R AUTO MODE → AUTO PAN (see page 32) ■ Setting the camera to return to the specified monitoring mode following manual operation on the... (see page 45) (VDC-DP9584S/VDC-DP9585P) ■ Switching between "Color" and "Black-and-White" mode of DAY/NIGHT function using an external switch, etc.: R CAMERA → DAY/NIGHT (see page 25) 5

Instruction Manual
Page 7
...-70 are necessary. 2 UP LEFT RIGHT DOWN Checking the settings screen or camera angle 1 SET button Press and hold for about for 5 seconds on the settings screen or change a setting value. • The pan/tilt and zoom functions can be operated using the Select button during setting or...RATE) will be displayed about 1 second for the main menu to appear. 2 Select button • Press up the camera using the buttons on the circuit board Place the dome cover back once you have finished settings. • See the INSTALLATION MANUAL supplied with the unit. Example ADDRESS CONTROL BAUD...
...-70 are necessary. 2 UP LEFT RIGHT DOWN Checking the settings screen or camera angle 1 SET button Press and hold for about for 5 seconds on the settings screen or change a setting value. • The pan/tilt and zoom functions can be operated using the Select button during setting or...RATE) will be displayed about 1 second for the main menu to appear. 2 Select button • Press up the camera using the buttons on the circuit board Place the dome cover back once you have finished settings. • See the INSTALLATION MANUAL supplied with the unit. Example ADDRESS CONTROL BAUD...

Instruction Manual
Page 8
... AGC GAIN GAMMA Press the Select button RIGHT and LEFT to switch over to select the item. 3 Open the advanced settings screen. Cursor ·CAMERA SET y PRESET POSITION 1 y AUTO MODE SEQ y AUTO RETURN OFF ALARM SET y Moves the cursor "·" using the Select button UP and...the button for about 1 second. INT OFF SET y ATW NORM 0.45 7 Getting Started Accessing the Main Menu 1 Access the main menu. Main menu ·CAMERA SET y PRESET POSITION 1 y AUTO MODE SEQ y AUTO RETURN OFF ALARM SET y PASSWORD SET y LANGUAGE SET y OPTION SET y PRESET MENU OFF END Note...
... AGC GAIN GAMMA Press the Select button RIGHT and LEFT to switch over to select the item. 3 Open the advanced settings screen. Cursor ·CAMERA SET y PRESET POSITION 1 y AUTO MODE SEQ y AUTO RETURN OFF ALARM SET y Moves the cursor "·" using the Select button UP and...the button for about 1 second. INT OFF SET y ATW NORM 0.45 7 Getting Started Accessing the Main Menu 1 Access the main menu. Main menu ·CAMERA SET y PRESET POSITION 1 y AUTO MODE SEQ y AUTO RETURN OFF ALARM SET y PASSWORD SET y LANGUAGE SET y OPTION SET y PRESET MENU OFF END Note...

Instruction Manual
Page 9
... Speed, Aperture, DAY/NIGHT) Registering Monitoring Positions (No.1 - 16) Automatic Monitoring (Sequential Pan, Auto Pan) Returning to Specified Monitoring Mode Automatically Setting Alarm Setting/Cancelling Password Lock Selecting Display Language Naming Cameras Hiding Image Partially Setting Protocol for Camera Controller Setting Camera Address Setting Alarm Output to Communication Line Initializing Settings Closing a Screen/Returning to...
... Speed, Aperture, DAY/NIGHT) Registering Monitoring Positions (No.1 - 16) Automatic Monitoring (Sequential Pan, Auto Pan) Returning to Specified Monitoring Mode Automatically Setting Alarm Setting/Cancelling Password Lock Selecting Display Language Naming Cameras Hiding Image Partially Setting Protocol for Camera Controller Setting Camera Address Setting Alarm Output to Communication Line Initializing Settings Closing a Screen/Returning to...

Instruction Manual
Page 10
... previous screen, select "RETOUR" ("BACK" or "ATRAS") and press the SET button. VDC-DP9584S/VCC-P9574S LANGUAGE LANGUAGE ·LANGUE IDIOMA ENGLISH FRENCH SPANISH VDC-DP9585P/VCC-P9575P SET R LANGUAGE LANGUAGE ·LANGUE SPRACHE ENGLISH FRENCH GERMAN (In case FRENCH is selected) RCloses...button. Selecting Display Language You can change the language displayed on the settings and adjusting screens. (Default setting: English) ·LANGUAGE CAMERA SET y PRESET POSITION 1 y AUTO MODE SEQ y AUTO RETURN OFF ALARM SET y PASSWORD SET y ·LANGUAGE SET y OPTION...
... previous screen, select "RETOUR" ("BACK" or "ATRAS") and press the SET button. VDC-DP9584S/VCC-P9574S LANGUAGE LANGUAGE ·LANGUE IDIOMA ENGLISH FRENCH SPANISH VDC-DP9585P/VCC-P9575P SET R LANGUAGE LANGUAGE ·LANGUE SPRACHE ENGLISH FRENCH GERMAN (In case FRENCH is selected) RCloses...button. Selecting Display Language You can change the language displayed on the settings and adjusting screens. (Default setting: English) ·LANGUAGE CAMERA SET y PRESET POSITION 1 y AUTO MODE SEQ y AUTO RETURN OFF ALARM SET y PASSWORD SET y ·LANGUAGE SET y OPTION...

Instruction Manual
Page 11
... main menu, see pages 7 - 8. 10 ID x POSITION SET y Character Selecting Field SET R RThe characters are displayed on the monitor so that you use multiple cameras. ·OPTION CAMERA SET y PRESET POSITION 1 y AUTO MODE SEQ y AUTO RETURN OFF ALARM SET y PASSWORD SET y LANGUAGE SET y ·OPTION SET y PRESET MENU OFF END SET R R OPTION...
... main menu, see pages 7 - 8. 10 ID x POSITION SET y Character Selecting Field SET R RThe characters are displayed on the monitor so that you use multiple cameras. ·OPTION CAMERA SET y PRESET POSITION 1 y AUTO MODE SEQ y AUTO RETURN OFF ALARM SET y PASSWORD SET y LANGUAGE SET y ·OPTION SET y PRESET MENU OFF END SET R R OPTION...

Instruction Manual
Page 12
...Set to "ON", and press the SET button. MEMO: • If an alarm signal is input when is "ON" (see page 41), the camera name on the screen will not be displayed on the normal monitoring screen. • If you want to be displayed. 11 ROOM1 SET R RReturns ...to the settings screen. 6 Set to 16 characters. If is not specified, "???...." Getting Started Naming Cameras - 3 Repeat step 2 to complete the name. • You can enter up to "END" and press the SET button. RCloses the settings screen and ...
...Set to "ON", and press the SET button. MEMO: • If an alarm signal is input when is "ON" (see page 41), the camera name on the screen will not be displayed on the normal monitoring screen. • If you want to be displayed. 11 ROOM1 SET R RReturns ...to the settings screen. 6 Set to 16 characters. If is not specified, "???...." Getting Started Naming Cameras - 3 Repeat step 2 to complete the name. • You can enter up to "END" and press the SET button. RCloses the settings screen and ...

Instruction Manual
Page 13
.... You will see pages 7 - 8. 12 When setting a password for the first time, you will be prompted to enter the password to access the main menu. CAMERA SET y PRESET POSITION 1 y AUTO MODE SEQ y AUTO RETURN OFF ALARM SET y ·PASSWORD SET y LANGUAGE SET y OPTION SET y ·PASSWORD PRESET OFF MENU END PASSWORD...
.... You will see pages 7 - 8. 12 When setting a password for the first time, you will be prompted to enter the password to access the main menu. CAMERA SET y PRESET POSITION 1 y AUTO MODE SEQ y AUTO RETURN OFF ALARM SET y ·PASSWORD SET y LANGUAGE SET y OPTION SET y ·PASSWORD PRESET OFF MENU END PASSWORD...

Instruction Manual
Page 15
...SEQ y AUTO RETURN OFF ALARM SET y PASSWORD SET y LANGUAGE SET y OPTION SET y PRESET MENU OFF END SET R RThe settings screen for camera performance appears. ·SYNC BLC IRIS WHITE BALANCE AGC GAIN GAMMA SHUTTER APERTURE DAY/NIGHT PRESET MENU INT OFF SET y ATW NORM 0.45 60 HIGH... AUTO y OFF BACK ■ Camera performance screen guide Items Settings SYNC Adjusting Synchronization Error BLC Backlight Compensation IRIS Adjusting Iris Level WHITE BALANCE Setting White Balance AGC GAIN ...
...SEQ y AUTO RETURN OFF ALARM SET y PASSWORD SET y LANGUAGE SET y OPTION SET y PRESET MENU OFF END SET R RThe settings screen for camera performance appears. ·SYNC BLC IRIS WHITE BALANCE AGC GAIN GAMMA SHUTTER APERTURE DAY/NIGHT PRESET MENU INT OFF SET y ATW NORM 0.45 60 HIGH... AUTO y OFF BACK ■ Camera performance screen guide Items Settings SYNC Adjusting Synchronization Error BLC Backlight Compensation IRIS Adjusting Iris Level WHITE BALANCE Setting White Balance AGC GAIN ...

Instruction Manual
Page 16
...-Lock) Synchronizes the unit with power frequency • Lamp blinking. 3 Select - "BACK" and press the SET button. RReturns to the camera performance screen. • If you must make adjustments in the Line-Lock Setting (L-L) screen, if the monitor screen seems out of the monitor...60 HIGH AUTO y OFF BACK RThe "L-L SETTING" screen appears. Note: The Line-Lock setting is not available for the camera is performed internally (INT). Setting Camera Performance Adjusting Synchronization Error By default, the synchronization adjustment for DC 12 V operation. 1 Set to "END" and press ...
...-Lock) Synchronizes the unit with power frequency • Lamp blinking. 3 Select - "BACK" and press the SET button. RReturns to the camera performance screen. • If you must make adjustments in the Line-Lock Setting (L-L) screen, if the monitor screen seems out of the monitor...60 HIGH AUTO y OFF BACK RThe "L-L SETTING" screen appears. Note: The Line-Lock setting is not available for the camera is performed internally (INT). Setting Camera Performance Adjusting Synchronization Error By default, the synchronization adjustment for DC 12 V operation. 1 Set to "END" and press ...

Instruction Manual
Page 17
...Set to "END" and press the SET button. ■ CENT (Center zone metering) Compensation is made based on the optical measurement that is focused on the central area of the screen (the image of subject to be compensated is located in the center of the screen). ■ MULT1... ■ MULT2 (Multi-spot metering, High mode) Compared to the previous screen Select - For accessing the main menu, see pages 7 - 8. 16 Setting Camera Performance Backlight Compensation If the images of subjects are not clear because of light. ■ OFF No compensation is performed for it by adjusting conditions...
...Set to "END" and press the SET button. ■ CENT (Center zone metering) Compensation is made based on the optical measurement that is focused on the central area of the screen (the image of subject to be compensated is located in the center of the screen). ■ MULT1... ■ MULT2 (Multi-spot metering, High mode) Compared to the previous screen Select - For accessing the main menu, see pages 7 - 8. 16 Setting Camera Performance Backlight Compensation If the images of subjects are not clear because of light. ■ OFF No compensation is performed for it by adjusting conditions...

Instruction Manual
Page 18
... screen. • If you need to "END" and press the SET button. Setting Camera Performance Adjusting Iris Level If you want to close the settings screen, set to adjust the brightness, follow the steps below. 1 Select and press the ...
... screen. • If you need to "END" and press the SET button. Setting Camera Performance Adjusting Iris Level If you want to close the settings screen, set to adjust the brightness, follow the steps below. 1 Select and press the ...
Instruction Manual
Page 19
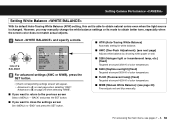
... 5600 K of color temperature. ■ FLUO (Fluorescent lamp) (fixed) Targeted at around 4200 K of color temperature. ■ MWB (Manual White Balance): (see pages 7 - 8. 18 Setting Camera Performance Setting White Balance With its mode to obtain natural colors even when the light source is changed.
... 5600 K of color temperature. ■ FLUO (Fluorescent lamp) (fixed) Targeted at around 4200 K of color temperature. ■ MWB (Manual White Balance): (see pages 7 - 8. 18 Setting Camera Performance Setting White Balance With its mode to obtain natural colors even when the light source is changed.
Instruction Manual
Page 20
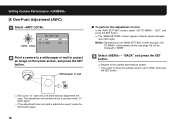
... about 2 seconds when "q" lights again. • If the adjustment does not yield a satisfactory result, press the SET button again. 19 RReturns to the camera performance screen. • If you want to close the settings screen, set to project an image on the whole screen, and press the SET button.... The adjustment will start. "SET", and press the SET button. MEMO: Transferring to "MWB". 3 Select - Setting Camera Performance A One-Push Adjustment (AWC) 1 Select . AWC SETTING ·AWC LOCK SET GO TO MWB ·AWC LOCK SET y 2 Point...
... about 2 seconds when "q" lights again. • If the adjustment does not yield a satisfactory result, press the SET button again. 19 RReturns to the camera performance screen. • If you want to close the settings screen, set to project an image on the whole screen, and press the SET button.... The adjustment will start. "SET", and press the SET button. MEMO: Transferring to "MWB". 3 Select - Setting Camera Performance A One-Push Adjustment (AWC) 1 Select . AWC SETTING ·AWC LOCK SET GO TO MWB ·AWC LOCK SET y 2 Point...

Instruction Manual
Page 21
RReturns to the camera performance screen. • If you want to close the settings screen, set to adjust tint (0 - 255). Setting Camera Performance 2 Select - MWB SETTING · R 43 B 66 PRESET MENU OFF BACK R : Adjusting Red B : Adjusting Blue • The greater the number, the deeper the tint becomes. "BACK" and press the SET button. B Manual White Balance (MWB) 1 Select or to "END" and press the SET button. 20
RReturns to the camera performance screen. • If you want to close the settings screen, set to adjust tint (0 - 255). Setting Camera Performance 2 Select - MWB SETTING · R 43 B 66 PRESET MENU OFF BACK R : Adjusting Red B : Adjusting Blue • The greater the number, the deeper the tint becomes. "BACK" and press the SET button. B Manual White Balance (MWB) 1 Select or to "END" and press the SET button. 20

Instruction Manual
Page 22
... and a grainy image. ■ OFF Fixed gain setting *AGC (Auto Gain Control) is a function to adjust automatically the gain of the Video signal from the camera so that an optimum signal level is obtained according to the previous screen Select - "BACK" and press the SET button. ■ If you want to...
... and a grainy image. ■ OFF Fixed gain setting *AGC (Auto Gain Control) is a function to adjust automatically the gain of the Video signal from the camera so that an optimum signal level is obtained according to the previous screen Select - "BACK" and press the SET button. ■ If you want to...

