Owners Manual
Page 2
... NOT OPEN CAUTION : TO REDUCE THE RISK OF ELECTRIC SHOCK, DO NOT REMOVE COVER (OR BACK). REFER SERVICING TO QUALIFIED SERVICE PERSONNEL. THIS SYMBOL INDICATES THAT THERE ARE IMPORTANT OPERATING AND MAINTENANCE INSTRUCTIONS IN THE OWNER'S MANUAL WITH THIS UNIT. 2 Do not stare directly into a compartment or similarly enclosed, the minimum distances must be dangerous. If the projector is exhausted from the projection lens...
... NOT OPEN CAUTION : TO REDUCE THE RISK OF ELECTRIC SHOCK, DO NOT REMOVE COVER (OR BACK). REFER SERVICING TO QUALIFIED SERVICE PERSONNEL. THIS SYMBOL INDICATES THAT THERE ARE IMPORTANT OPERATING AND MAINTENANCE INSTRUCTIONS IN THE OWNER'S MANUAL WITH THIS UNIT. 2 Do not stare directly into a compartment or similarly enclosed, the minimum distances must be dangerous. If the projector is exhausted from the projection lens...

Owners Manual
Page 3
... use near water... Wall or shelf mounting should follow the manufacturer's instructions, and should be operated only from the type of any kind into the projector. An appliance and cart combination should be read before cleaning. Never spill liquid of power source indicated on the marking label. This projector should be covered with cloth or other materials, and the bottom opening or removing covers...
... use near water... Wall or shelf mounting should follow the manufacturer's instructions, and should be operated only from the type of any kind into the projector. An appliance and cart combination should be read before cleaning. Never spill liquid of power source indicated on the marking label. This projector should be covered with cloth or other materials, and the bottom opening or removing covers...

Owners Manual
Page 4
... wires in your User Instructions. Should you purchased it. If a replacement fuse cover is required, ensure it should be connected to the terminal which is marked with the following code: Green-and-yellow Earth Blue Neutral Brown Live ...green-and-yellow must be cut off and destroyed. The Wires in this mains lead are available from the Parts Department indicated in the mains lead of the equipment. AC POWER CORD REQUIREMENT The AC Power Cord supplied with the letter N or coloured black. ASA If the fuse cover is detachable, never use in the plug which is coloured blue...
... wires in your User Instructions. Should you purchased it. If a replacement fuse cover is required, ensure it should be connected to the terminal which is marked with the following code: Green-and-yellow Earth Blue Neutral Brown Live ...green-and-yellow must be cut off and destroyed. The Wires in this mains lead are available from the Parts Department indicated in the mains lead of the equipment. AC POWER CORD REQUIREMENT The AC Power Cord supplied with the letter N or coloured black. ASA If the fuse cover is detachable, never use in the plug which is coloured blue...
Owners Manual
Page 5
... BASIC OPERATION 21 WARNING TEMP. q IBM and PS/2 are registered trademarks of International Business Machines, Inc. q Each name of corporations or products in the owner's manual is a trademark or a registered trademark of Apple Computer,Inc. INDICATOR 42 AIR FILTER CARE AND CLEANING 43 CLEANING PROJECTION LENS 43 TURNING ON / OFF PROJECTOR 21 LAMP MANAGEMENT 44 ADJUSTING SCREEN 22 LAMP REPLACEMENT 45 ZOOM ADJUSTMENT 22 TROUBLESHOOTING 46 FOCUS ADJUSTMENT LENS SHIFT ADJUSTMENT 22 TECHNICAL SPECIFICATIONS 48 22 KEYSTONE ADJUSTMENT 22 PICTURE...
... BASIC OPERATION 21 WARNING TEMP. q IBM and PS/2 are registered trademarks of International Business Machines, Inc. q Each name of corporations or products in the owner's manual is a trademark or a registered trademark of Apple Computer,Inc. INDICATOR 42 AIR FILTER CARE AND CLEANING 43 CLEANING PROJECTION LENS 43 TURNING ON / OFF PROJECTOR 21 LAMP MANAGEMENT 44 ADJUSTING SCREEN 22 LAMP REPLACEMENT 45 ZOOM ADJUSTMENT 22 TROUBLESHOOTING 46 FOCUS ADJUSTMENT LENS SHIFT ADJUSTMENT 22 TECHNICAL SPECIFICATIONS 48 22 KEYSTONE ADJUSTMENT 22 PICTURE...
Owners Manual
Page 6
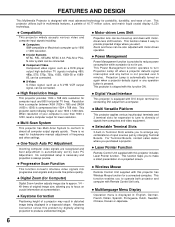
... Menu Display x Keystone Correction Positioning height of your computer is automatically turned on again when a projector detects signal or any combinations of input sources just by changing Terminal Boards. This function enables you to 1600 x 1200 resolution. There is shipped with this problem by Auto PC Adjustment. Zoom and focus can be moved up to focus on a projected screen. This projector is no need for a connected computer. x Wireless Mouse Remote Control Unit supplied with...
... Menu Display x Keystone Correction Positioning height of your computer is automatically turned on again when a projector detects signal or any combinations of input sources just by changing Terminal Boards. This function enables you to 1600 x 1200 resolution. There is shipped with this problem by Auto PC Adjustment. Zoom and focus can be moved up to focus on a projected screen. This projector is no need for a connected computer. x Wireless Mouse Remote Control Unit supplied with...
Owners Manual
Page 9
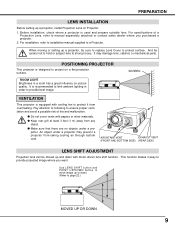
... to installation manual supplied to strong forces. q Keep rear grill at least 3 feet (1 m) away from any object. AIR INTAKE VENT EXHAUST VENT (FRONT AND BOTTOM SIDE) (REAR SIDE) LENS SHIFT ADJUSTMENT Projection lens can be moved up a projector, install Projection Lens on a flat projection surface. It may prevent a projector from overheating. ROOM LIGHT Brightness in order to page 22.) MOVED UP OR DOWN 9 And be sure to replace Lens Cover...
... to installation manual supplied to strong forces. q Keep rear grill at least 3 feet (1 m) away from any object. AIR INTAKE VENT EXHAUST VENT (FRONT AND BOTTOM SIDE) (REAR SIDE) LENS SHIFT ADJUSTMENT Projection lens can be moved up a projector, install Projection Lens on a flat projection surface. It may prevent a projector from overheating. ROOM LIGHT Brightness in order to page 22.) MOVED UP OR DOWN 9 And be sure to replace Lens Cover...

Owners Manual
Page 14
... equipment on before computer is switched on RESOLUTION MODE that you want to use before your computer. Audio Cable (stereo) ✽ Control Cable Control Cable Control Cable for Serial Port for PS/2 Port for PS/2 port, Serial port, or ADB port • MAC/VGA Adapter, DVI/VGA Adapter • DVI Cable • BNC Cable (BNC x 5) ✽ • Audio Cables (RCA x 2) ✽ NOTE : When connecting cable, power cords of your turn on a projector and computer MODE SWITCHES 1 2 3 4 5 6 13"MODE (640 x 480) ON ON OFF OFF OFF OFF 16...
... equipment on before computer is switched on RESOLUTION MODE that you want to use before your computer. Audio Cable (stereo) ✽ Control Cable Control Cable Control Cable for Serial Port for PS/2 Port for PS/2 port, Serial port, or ADB port • MAC/VGA Adapter, DVI/VGA Adapter • DVI Cable • BNC Cable (BNC x 5) ✽ • Audio Cables (RCA x 2) ✽ NOTE : When connecting cable, power cords of your turn on a projector and computer MODE SWITCHES 1 2 3 4 5 6 13"MODE (640 x 480) ON ON OFF OFF OFF OFF 16...

Owners Manual
Page 16
... flashes green in ON-SCREEN MENU. They are also used to expand / compress image in DIGITAL ZOOM mode. (P33) LAMP INDICATOR Becomes dim when a projector is turned on or off. (P21) ZOOM BUTTONS Used to turn a projector on . READY LAMP LAMP REPLACE INDICATOR Turns to yellow when life of a projection lamp draws to adjust volume. TOP CONTROL AND INDICATORS FOCUS BUTTONS Used to adjust focus. (P22) VOLUME BUTTONS INPUT BUTTONS Used to an end. (P44, 45) WARNING TEMP. BUTTON Use to operate AUTO PC Adjustment function. (P28) IMAGE BUTTON Used to select image level. (P31, 36) LENS...
... flashes green in ON-SCREEN MENU. They are also used to expand / compress image in DIGITAL ZOOM mode. (P33) LAMP INDICATOR Becomes dim when a projector is turned on or off. (P21) ZOOM BUTTONS Used to turn a projector on . READY LAMP LAMP REPLACE INDICATOR Turns to yellow when life of a projection lamp draws to adjust volume. TOP CONTROL AND INDICATORS FOCUS BUTTONS Used to adjust focus. (P22) VOLUME BUTTONS INPUT BUTTONS Used to an end. (P44, 45) WARNING TEMP. BUTTON Use to operate AUTO PC Adjustment function. (P28) IMAGE BUTTON Used to select image level. (P31, 36) LENS...

Owners Manual
Page 17
...-OFF SWITCH When using this button, it again. Three marks bellow are put on remote control. BEFORE OPERATION OPERATION OF REMOTE CONTROL LOCK ALL OFF ON Left Side LASER POINTER INDICATOR Lights red while laser beam is a class II laser; ON-OFF ZOOM FOCUS VOLUME MUTE D.ZOOM INPUT 1/2 MENU INPUT 3 LASER LENS SHIFT KEYSTONE NO SHOW FREEZE AUTO PC ADJ. When LASER button is emitted while pressing this switch to select input source (INPUT 3). CAUTION : Use of controls, adjustments or...
...-OFF SWITCH When using this button, it again. Three marks bellow are put on remote control. BEFORE OPERATION OPERATION OF REMOTE CONTROL LOCK ALL OFF ON Left Side LASER POINTER INDICATOR Lights red while laser beam is a class II laser; ON-OFF ZOOM FOCUS VOLUME MUTE D.ZOOM INPUT 1/2 MENU INPUT 3 LASER LENS SHIFT KEYSTONE NO SHOW FREEZE AUTO PC ADJ. When LASER button is emitted while pressing this switch to select input source (INPUT 3). CAUTION : Use of controls, adjustments or...

Owners Manual
Page 18
... connect Remote Control Cable to operate AUTO PC Adjustment function. (P28) LASER LENS SHIFT KEYSTONE NO SHOW FREEZE AUTO PC ADJ. q Danger of used battery. Battery installation is incorrectly replaced. q Do not drop Remote Control Unit. BEFORE OPERATION ZOOM BUTTON Used to adjust zoom. (P22) ON-OFF ZOOM FOCUS VOLUME LOCK FOCUS BUTTON Used to adjust focus. (P22) MUTE BUTTON Used to mute sound.(P24) MUTE D.ZOOM INPUT 1/2 MENU INPUT 3 NO SHOW BUTTON Used to moisture, or heat. mode and resize image. (P33) Operating Range Point Remote Control Unit toward projector...
... connect Remote Control Cable to operate AUTO PC Adjustment function. (P28) LASER LENS SHIFT KEYSTONE NO SHOW FREEZE AUTO PC ADJ. q Danger of used battery. Battery installation is incorrectly replaced. q Do not drop Remote Control Unit. BEFORE OPERATION ZOOM BUTTON Used to adjust zoom. (P22) ON-OFF ZOOM FOCUS VOLUME LOCK FOCUS BUTTON Used to adjust focus. (P22) MUTE BUTTON Used to mute sound.(P24) MUTE D.ZOOM INPUT 1/2 MENU INPUT 3 NO SHOW BUTTON Used to moisture, or heat. mode and resize image. (P33) Operating Range Point Remote Control Unit toward projector...

Owners Manual
Page 20
.... (Refer to P26, 27) IMAGE SELECT MENU Used to select image level among Standard, Cinema and Image 1 ~ 4. (Refer to P36) SCREEN MENU Used to set size of selected video source. (Refer to P35) IMAGE ADJUST MENU Used to adjust picture image. [Contrast / Brightness / Color / Tint / White balance (R/G/B) / Sharpness / Gamma/Noise Reduction/Progressive] (Refer to P38) Same function as Menu for PC source. GUIDE WINDOW Shows selected item of projector or reset Lamp Replace Counter. (Refer to P39-41) INPUT MENU Used to PC input source.
.... (Refer to P26, 27) IMAGE SELECT MENU Used to select image level among Standard, Cinema and Image 1 ~ 4. (Refer to P36) SCREEN MENU Used to set size of selected video source. (Refer to P35) IMAGE ADJUST MENU Used to adjust picture image. [Contrast / Brightness / Color / Tint / White balance (R/G/B) / Sharpness / Gamma/Noise Reduction/Progressive] (Refer to P38) Same function as Menu for PC source. GUIDE WINDOW Shows selected item of projector or reset Lamp Replace Counter. (Refer to P39-41) INPUT MENU Used to PC input source.
Owners Manual
Page 21
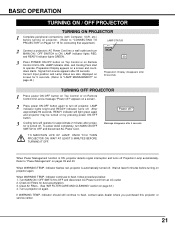
... TURNING ON / OFF PROJECTOR TURNING ON PROJECTOR 1 Complete peripheral connections (with Computer, VCR, etc.) before turning on projector again. LAMP indicator lights RED, and READY indicator lights GREEN. Preparation Display appears on page 43.) 4. TURNING OFF PROJECTOR 1 Press power ON-OFF button on Top Control or on again. TO MAINTAIN LIFE OF LAMP, ONCE YOU TURN PROJECTOR ON, WAIT AT LEAST 5 MINUTES BEFORE TURNING IT OFF. indicator continues to flash, follow procedures below: 1. Check Air Filters for connecting that equipment.) 2 Connect a projector's AC Power Cord...
... TURNING ON / OFF PROJECTOR TURNING ON PROJECTOR 1 Complete peripheral connections (with Computer, VCR, etc.) before turning on projector again. LAMP indicator lights RED, and READY indicator lights GREEN. Preparation Display appears on page 43.) 4. TURNING OFF PROJECTOR 1 Press power ON-OFF button on Top Control or on again. TO MAINTAIN LIFE OF LAMP, ONCE YOU TURN PROJECTOR ON, WAIT AT LEAST 5 MINUTES BEFORE TURNING IT OFF. indicator continues to flash, follow procedures below: 1. Check Air Filters for connecting that equipment.) 2 Connect a projector's AC Power Cord...

Owners Manual
Page 26
... MENU PC SYSTEM Menu icon Displays system being selected. Custom Mode (1~5) set , and then press SELECT button. When selecting Computer, this projector, Auto PC Adjustment function operates to adjust projector and message "Auto" is displayed on SYSTEM Menu icon. (Refer to P28.) When image is not provided properly, manual adjustment is required. (Refer to "COMPATIBLE COMPUTER SPECIFICATION" on VGA, SVGA, XGA, SXGA or UXGA (refer to P29 and 30.) There is no signal input...
... MENU PC SYSTEM Menu icon Displays system being selected. Custom Mode (1~5) set , and then press SELECT button. When selecting Computer, this projector, Auto PC Adjustment function operates to adjust projector and message "Auto" is displayed on SYSTEM Menu icon. (Refer to P28.) When image is not provided properly, manual adjustment is required. (Refer to "COMPATIBLE COMPUTER SPECIFICATION" on VGA, SVGA, XGA, SXGA or UXGA (refer to P29 and 30.) There is no signal input...
Owners Manual
Page 40
...lamps mode" image become brighter gradually. In this Power Management mode, Projection Lamp is automatically turned on when input signal connected or projector is operated with 2 Projection Lamps and a number of using lamps can be switched to "Code 2." Press SELECT button at this icon to turn projector off . 3. Press MENU button and ON-SCREEN MENU will appear. Set "2 lamps mode" or "1 lamp mode" by switching MAIN ON/OFF SWITCH on. Set Remote control in "Code 2," both projector and Remote Control Unit must be switched again for 5 minutes). 2. To change code of Remote...
...lamps mode" image become brighter gradually. In this Power Management mode, Projection Lamp is automatically turned on when input signal connected or projector is operated with 2 Projection Lamps and a number of using lamps can be switched to "Code 2." Press SELECT button at this icon to turn projector off . 3. Press MENU button and ON-SCREEN MENU will appear. Set "2 lamps mode" or "1 lamp mode" by switching MAIN ON/OFF SWITCH on. Set Remote control in "Code 2," both projector and Remote Control Unit must be switched again for 5 minutes). 2. To change code of Remote...

Owners Manual
Page 41
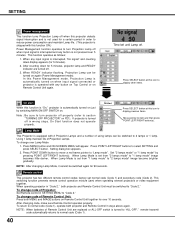
... you control a projector by computer, install USB driver (optionally sold parts) and set up computer following steps below. Lamp counter reset Be sure to reset Lamp Counter when Lamp Assembly is reset, LAMP REPLACE indicator stops lighting. 1 Turn projector on, press MENU button and ON-SCREEN MENU will appear. Press POINT LEFT/RIGHT button(s) to move a red frame pointer to SETTING Menu icon. 2 Press POINT DOWN button to move a red frame pointer to "Lamp counter reset" and then press SELECT button. 3 Move arrow to replaced lamp number (Lamp 1 or Lamp...
... you control a projector by computer, install USB driver (optionally sold parts) and set up computer following steps below. Lamp counter reset Be sure to reset Lamp Counter when Lamp Assembly is reset, LAMP REPLACE indicator stops lighting. 1 Turn projector on, press MENU button and ON-SCREEN MENU will appear. Press POINT LEFT/RIGHT button(s) to move a red frame pointer to SETTING Menu icon. 2 Press POINT DOWN button to move a red frame pointer to "Lamp counter reset" and then press SELECT button. 3 Move arrow to replaced lamp number (Lamp 1 or Lamp...
Owners Manual
Page 42
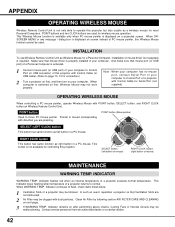
... 3 If WARNING TEMP. INSTALLATION To use Wireless Remote Control Unit as a wireless mouse for connection.) 2 Turn a projector on first, and then turn on Wireless Remote Control Unit. POINT button Used to operate this projector with direction you are used . Clean Air Filter by following section AIR FILTER CARE AND CLEANING on a projected screen. Note : When your computer has no mouse port, connect Serial Port of your computer to normal. Pointer is moved corresponding with Control Cable (or USB cable). (Refer to Control Port of mouse driver (not supplied) is required...
... 3 If WARNING TEMP. INSTALLATION To use Wireless Remote Control Unit as a wireless mouse for connection.) 2 Turn a projector on first, and then turn on Wireless Remote Control Unit. POINT button Used to operate this projector with direction you are used . Clean Air Filter by following section AIR FILTER CARE AND CLEANING on a projected screen. Note : When your computer has no mouse port, connect Serial Port of your computer to normal. Pointer is moved corresponding with Control Cable (or USB cable). (Refer to Control Port of mouse driver (not supplied) is required...

Owners Manual
Page 44
...screen or on Lamp Status Display and replace lamp. Lamp Management Function detects status of lamps is out for each lamp as; Check number of 2 lamps becomes out, Lamp Mode is changed input position (input 1, input 2 or input 3). Refer to 1 lamp. Lamp Status Display Lamp Status Display appears on screen when power switch is on . This function also automatically controls Lamp Mode when any of lamp on LAMP REPLACE indicator. When image becomes darker or color becomes unnatural, replace lamp. (LAMP REPLACE indicator lights yellow.) (LAMP REPLACE indicator flashes...
...screen or on Lamp Status Display and replace lamp. Lamp Management Function detects status of lamps is out for each lamp as; Check number of 2 lamps becomes out, Lamp Mode is changed input position (input 1, input 2 or input 3). Refer to 1 lamp. Lamp Status Display Lamp Status Display appears on screen when power switch is on . This function also automatically controls Lamp Mode when any of lamp on LAMP REPLACE indicator. When image becomes darker or color becomes unnatural, replace lamp. (LAMP REPLACE indicator lights yellow.) (LAMP REPLACE indicator flashes...
Owners Manual
Page 45
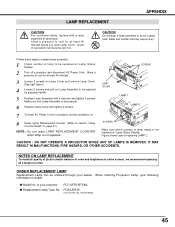
... picture (better balance of lamp needs to be replaced on Lamp Status Display. 2 Turn off a projector and disconnect AC Power Cord. Inside of same type. Allow a projector to cool for at least 45 minutes. 3 Loosen 3 screws on page 41.) NOTE : Do not reset LAMP REPLACEMENT COUNTER when lamp is set properly 6 Replace Lamp Cover and tighten 3 screws. When ordering Projection Lamp, give following information to be ordered through your projector : PLC-XF30/XF30NL q Replacement Lamp Type No. : POA-LMP39 (Service Parts...
... picture (better balance of lamp needs to be replaced on Lamp Status Display. 2 Turn off a projector and disconnect AC Power Cord. Inside of same type. Allow a projector to cool for at least 45 minutes. 3 Loosen 3 screws on page 41.) NOTE : Do not reset LAMP REPLACEMENT COUNTER when lamp is set properly 6 Replace Lamp Cover and tighten 3 screws. When ordering Projection Lamp, give following information to be ordered through your projector : PLC-XF30/XF30NL q Replacement Lamp Type No. : POA-LMP39 (Service Parts...
Owners Manual
Page 46
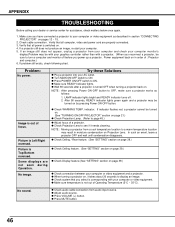
... properly connected. 3. APPENDIX TROUBLESHOOTING Before calling your AC outlet. q Make sure READY Indicator lights. q Check WARNING TEMP. Make sure you power up a projector. Check cable connection. If a projector still does not produce an image, re-start your computer or video equipment and a projector. q Turn MAIN ON/OFF switch to ON. Image is switched on pages 12 ~ 15. 2. q Adjust audio source. Problem: No power. q Check Ceiling / Rear feature. (See "SETTING" section on page 39.) q Check Ceiling feature. (See "SETTING" section on page 39.) q Check Display...
... properly connected. 3. APPENDIX TROUBLESHOOTING Before calling your AC outlet. q Make sure READY Indicator lights. q Check WARNING TEMP. Make sure you power up a projector. Check cable connection. If a projector still does not produce an image, re-start your computer or video equipment and a projector. q Turn MAIN ON/OFF switch to ON. Image is switched on pages 12 ~ 15. 2. q Adjust audio source. Problem: No power. q Check Ceiling / Rear feature. (See "SETTING" section on page 39.) q Check Ceiling feature. (See "SETTING" section on page 39.) q Check Display...

Owners Manual
Page 48
... Cable MAC/VGA Adapter and DVI/VGA Adapter 3 Types Control Cable (For PS/2, Serial and ADB port) 3 Types Light-Block Sheet (For option lens) Lens Mounting Adapter Protective Dust Cover q Specifications are subject to 6.9˚ AC 100 ~ 120 V (7.8 A Max. Stereo (R and L), 3 watt RMS (T.H.D. 10%) 0˚ to change without notice. 48 Ampere), 50 / 60 Hz (The U.S.A and Canada) AC 200 ~ 240 V (3.3 A Max. APPENDIX TECHNICAL SPECIFICATIONS Projector Type Dimensions (W x H x D) Net Weight LCD Panel System Panel Resolution Number...
... Cable MAC/VGA Adapter and DVI/VGA Adapter 3 Types Control Cable (For PS/2, Serial and ADB port) 3 Types Light-Block Sheet (For option lens) Lens Mounting Adapter Protective Dust Cover q Specifications are subject to 6.9˚ AC 100 ~ 120 V (7.8 A Max. Stereo (R and L), 3 watt RMS (T.H.D. 10%) 0˚ to change without notice. 48 Ampere), 50 / 60 Hz (The U.S.A and Canada) AC 200 ~ 240 V (3.3 A Max. APPENDIX TECHNICAL SPECIFICATIONS Projector Type Dimensions (W x H x D) Net Weight LCD Panel System Panel Resolution Number...


