Instruction Manual, PLC-XU33
Page 2
... the problem still persists, contact the sales dealer where you to be taken. G If the projector is exhausted from the projection lens. READ AND KEEP THIS OWNER'S MANUAL FOR LATER USE. THIS SYMBOL INDICATES THAT THERE ARE IMPORTANT OPERATING AND MAINTENANCE INSTRUCTIONS IN THE OWNER'S MANUAL WITH THIS UNIT. 2 TO THE OWNER Before operating this projector, read this manual again, check operations and cable connections and try the solutions in the "TROUBLESHOOTING...
... the problem still persists, contact the sales dealer where you to be taken. G If the projector is exhausted from the projection lens. READ AND KEEP THIS OWNER'S MANUAL FOR LATER USE. THIS SYMBOL INDICATES THAT THERE ARE IMPORTANT OPERATING AND MAINTENANCE INSTRUCTIONS IN THE OWNER'S MANUAL WITH THIS UNIT. 2 TO THE OWNER Before operating this projector, read this manual again, check operations and cable connections and try the solutions in the "TROUBLESHOOTING...

Instruction Manual, PLC-XU33
Page 3
... and extension cords as opening should use liquid or aerosol cleaners. Do not locate this indicates a need for ventilation, to insure reliable operation of any service or repairs to protect it from AC power supply before the product is in the back and bottom of the cabinet are covered by the operating instructions as improper adjustment of any kind into the projector. Do not use a mounting kit...
... and extension cords as opening should use liquid or aerosol cleaners. Do not locate this indicates a need for ventilation, to insure reliable operation of any service or repairs to protect it from AC power supply before the product is in the back and bottom of the cabinet are covered by the operating instructions as improper adjustment of any kind into the projector. Do not use a mounting kit...
Instruction Manual, PLC-XU33
Page 4
... a replacement fuse cover is required, ensure it should be made, you be cut off and on a circuit different from the Parts Department indicated in the plug which is marked by the letter E or by one or more of the following code: Green-and-yellow Earth Blue Neutral Brown Live As the colours of the wires in your User Instructions. The...
... a replacement fuse cover is required, ensure it should be made, you be cut off and on a circuit different from the Parts Department indicated in the plug which is marked by the letter E or by one or more of the following code: Green-and-yellow Earth Blue Neutral Brown Live As the colours of the wires in your User Instructions. The...
Instruction Manual, PLC-XU33
Page 5
... OPERATION 19 LAMP REPLACE COUNTER 38 OPERATING WIRELESS MOUSE 39 TURNING ON / OFF PROJECTOR 19 MAINTENANCE 40 ADJUSTING SCREEN ZOOM ADJUSTMENT FOCUS ADJUSTMENT 20 WARNING TEMP. G Each name of corporations or products in the owner's manual is a trademark or a registered trademark of International Business Machines, Inc. INDICATOR 40 20 AIR FILTER CARE AND CLEANING 40 20 CLEANING PROJECTION LENS 40 KEYSTONE ADJUSTMENT 20 TROUBLESHOOTING 41 PICTURE FREEZE FUNCTION 20 TECHNICAL SPECIFICATIONS 43 NO SHOW FUNCTION 21 CONFIGURATIONS OF TERMINALS 44 P-TIMER...
... OPERATION 19 LAMP REPLACE COUNTER 38 OPERATING WIRELESS MOUSE 39 TURNING ON / OFF PROJECTOR 19 MAINTENANCE 40 ADJUSTING SCREEN ZOOM ADJUSTMENT FOCUS ADJUSTMENT 20 WARNING TEMP. G Each name of corporations or products in the owner's manual is a trademark or a registered trademark of International Business Machines, Inc. INDICATOR 40 20 AIR FILTER CARE AND CLEANING 40 20 CLEANING PROJECTION LENS 40 KEYSTONE ADJUSTMENT 20 TROUBLESHOOTING 41 PICTURE FREEZE FUNCTION 20 TECHNICAL SPECIFICATIONS 43 NO SHOW FUNCTION 21 CONFIGURATIONS OF TERMINALS 44 P-TIMER...
Instruction Manual, PLC-XU33
Page 6
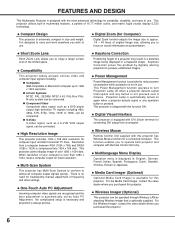
... dots. N Multilanguage Menu Display Operation menu is pressed. There is no need for computer input and 800 horizontal TV lines. N Power Management Power Management function is provided to use . G S-Video S-Video signal, such as a DVD player output high definition TV signals including 480i, 480p, 575i, 575p, 720p, 1035i or 1080i, can be operated through Wireless LAN by attaching Wireless imager that is optionally supplied. N High Resolution Image This projector provides 1024 x 768 dots resolution for troublesome manual adjustment...
... dots. N Multilanguage Menu Display Operation menu is pressed. There is no need for computer input and 800 horizontal TV lines. N Power Management Power Management function is provided to use . G S-Video S-Video signal, such as a DVD player output high definition TV signals including 480i, 480p, 575i, 575p, 720p, 1035i or 1080i, can be operated through Wireless LAN by attaching Wireless imager that is optionally supplied. N High Resolution Image This projector provides 1024 x 768 dots resolution for troublesome manual adjustment...

Instruction Manual, PLC-XU33
Page 12
... Cable ✽ VGA Cable ✽ Audio Cable ✽ (stereo) USB Cable ✽ Control Cable for Serial Port ✽ Terminal Control Cable for PS/2 Port Terminal Control Cable for Serial Port ✽, or ADB Port ✽ • Audio Cables (RCA x 2 and Mini Plug (stereo) x 1) ✽ IBM-compatible computer or Macintosh computer (VGA / SVGA / XGA / SXGA) Desktop type Laptop type 12 Monitor Output Monitor Input Audio Output USB port Serial port PS/2 port ADB port MAC Adapter ✽ Set slide switches according to use before the computer is not supplied...
... Cable ✽ VGA Cable ✽ Audio Cable ✽ (stereo) USB Cable ✽ Control Cable for Serial Port ✽ Terminal Control Cable for PS/2 Port Terminal Control Cable for Serial Port ✽, or ADB Port ✽ • Audio Cables (RCA x 2 and Mini Plug (stereo) x 1) ✽ IBM-compatible computer or Macintosh computer (VGA / SVGA / XGA / SXGA) Desktop type Laptop type 12 Monitor Output Monitor Input Audio Output USB port Serial port PS/2 port ADB port MAC Adapter ✽ Set slide switches according to use before the computer is not supplied...

Instruction Manual, PLC-XU33
Page 14
... it works as SELECT button. IMAGE P-TIMER POWER ON-OFF BUTTON Used to turn projector on or off. (P19) INPUT BUTTON Used to select input source. (P22, 30) POINT BUTTON Used to move a pointer on ON-SCREEN MENU, adjust each item, or pan image in Wireless Mouse Operation. (P39) P-TIMER BUTTON Used to operate P-TIMER function. (P21) 14 RIGHT CLICK BUTTON Used as a PC mouse in DIGITAL ZOOM +/- mode. (P29) It is also used . mode. (P29) It is not used as a PC mouse in Wireless Mouse Operation...
... it works as SELECT button. IMAGE P-TIMER POWER ON-OFF BUTTON Used to turn projector on or off. (P19) INPUT BUTTON Used to select input source. (P22, 30) POINT BUTTON Used to move a pointer on ON-SCREEN MENU, adjust each item, or pan image in Wireless Mouse Operation. (P39) P-TIMER BUTTON Used to operate P-TIMER function. (P21) 14 RIGHT CLICK BUTTON Used as a PC mouse in DIGITAL ZOOM +/- mode. (P29) It is also used . mode. (P29) It is not used as a PC mouse in Wireless Mouse Operation...

Instruction Manual, PLC-XU33
Page 15
... DIGITAL ZOOM +/- IMAGE P-TIMER VOLUME BUTTON Used to adjust volume. (P21) D.ZOOM BUTTON Used to operate AUTO PC Adjustment function. (P24) KEYSTONE NO SHOW FREEZE AUTO PC ADJ. mode and resize image. (P29) Operating Range Point Remote Control Unit toward projector (Receiver Window) whenever pressing any button. G Do not drop Remote Control Unit. Maximum operating range for Remote Control Unit is incorrectly replaced. G Replace two batteries at the same time. G Danger of the projector. 16.4' (5 m) 60° FREEZE BUTTON Used to freeze the picture. (P20) IMAGE BUTTON Used...
... DIGITAL ZOOM +/- IMAGE P-TIMER VOLUME BUTTON Used to adjust volume. (P21) D.ZOOM BUTTON Used to operate AUTO PC Adjustment function. (P24) KEYSTONE NO SHOW FREEZE AUTO PC ADJ. mode and resize image. (P29) Operating Range Point Remote Control Unit toward projector (Receiver Window) whenever pressing any button. G Do not drop Remote Control Unit. Maximum operating range for Remote Control Unit is incorrectly replaced. G Replace two batteries at the same time. G Danger of the projector. 16.4' (5 m) 60° FREEZE BUTTON Used to freeze the picture. (P20) IMAGE BUTTON Used...

Instruction Manual, PLC-XU33
Page 16
... high. (P40) LAMP REPLACE INDICATOR Turns yellow when the life of the projection lamp draws to an end. (P37) MENU BUTTON Used to open or close MENU operation. (P17, 18) INPUT BUTTON Used to select input source. (P22, 30) IMAGE BUTTON Used to select image level. (P27, 32) POWER ON-OFF BUTTON Used to execute the item selected. FOCUS BUTTON Used to adjust focus. (P20) POINT (VOLUME + / - ) BUTTONS Used to select an item or adjust value in DIGITAL ZOOM mode. (P29) ZOOM BUTTON Used to pan the image in DIGITAL ZOOM +/- buttons. SELECT BUTTON Used to turn the projector...
... high. (P40) LAMP REPLACE INDICATOR Turns yellow when the life of the projection lamp draws to an end. (P37) MENU BUTTON Used to open or close MENU operation. (P17, 18) INPUT BUTTON Used to select input source. (P22, 30) IMAGE BUTTON Used to select image level. (P27, 32) POWER ON-OFF BUTTON Used to execute the item selected. FOCUS BUTTON Used to adjust focus. (P20) POINT (VOLUME + / - ) BUTTONS Used to select an item or adjust value in DIGITAL ZOOM mode. (P29) ZOOM BUTTON Used to pan the image in DIGITAL ZOOM +/- buttons. SELECT BUTTON Used to turn the projector...

Instruction Manual, PLC-XU33
Page 18
... PC input source. GUIDE WINDOW Shows selected item of image to Normal or Wide. (Refer to VIDEO input source. PC SYSTEM MENU Used to select computer system. (Refer to P22, 23) IMAGE SELECT MENU Used to select image level among Standard, Real and Image 1 ~ 4. (Refer to P27) SCREEN MENU Used to adjust size of image. [Normal / True / Wide / Digital zoom +/-] (Refer to P29) SETTING MENU Used to change settings of projector or reset Lamp Replace Counter. (Refer to P35, 36) INPUT MENU Used to select input source either Video...
... PC input source. GUIDE WINDOW Shows selected item of image to Normal or Wide. (Refer to VIDEO input source. PC SYSTEM MENU Used to select computer system. (Refer to P22, 23) IMAGE SELECT MENU Used to select image level among Standard, Real and Image 1 ~ 4. (Refer to P27) SCREEN MENU Used to adjust size of image. [Normal / True / Wide / Digital zoom +/-] (Refer to P29) SETTING MENU Used to change settings of projector or reset Lamp Replace Counter. (Refer to P35, 36) INPUT MENU Used to select input source either Video...
Instruction Manual, PLC-XU33
Page 19
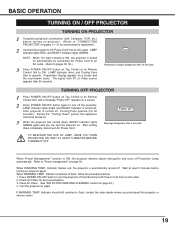
... Control or on again. LAMP Indicator lights bright and READY Indicator is turned off , Cooling Fans operate (for 90 seconds). After projector is automatically turned off ? During this "Cooling Down" period, this projector is ON, the projector detects signal interruption and turns off and disconnect AC Power Cord from PC or Video source appears after 30 seconds. 30 Preparation Display disappears after 4 seconds. Indicator flashes red, the projector is turned off . Check Air Filters for connecting the equipment.) 2 Connect...
... Control or on again. LAMP Indicator lights bright and READY Indicator is turned off , Cooling Fans operate (for 90 seconds). After projector is automatically turned off ? During this "Cooling Down" period, this projector is ON, the projector detects signal interruption and turns off and disconnect AC Power Cord from PC or Video source appears after 30 seconds. 30 Preparation Display disappears after 4 seconds. Indicator flashes red, the projector is turned off . Check Air Filters for connecting the equipment.) 2 Connect...
Instruction Manual, PLC-XU33
Page 22
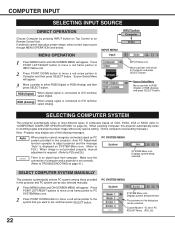
... to most different types of the following messages. Custom Mode (1~5) set , and then press SELECT button. If projector cannot reproduce proper image, select correct input source through MENU OPERATION (see below). PC SYSTEM MENU SYSTEM Menu icon Displays system being selected. When selecting Computer, this projector, Auto PC Adjustment function operates to adjust projector and the message "Auto" is connected to DVI terminal, select Analog. RGB (Analog) When analog signal is displayed on Remote Control Unit.
... to most different types of the following messages. Custom Mode (1~5) set , and then press SELECT button. If projector cannot reproduce proper image, select correct input source through MENU OPERATION (see below). PC SYSTEM MENU SYSTEM Menu icon Displays system being selected. When selecting Computer, this projector, Auto PC Adjustment function operates to adjust projector and the message "Auto" is connected to DVI terminal, select Analog. RGB (Analog) When analog signal is displayed on Remote Control Unit.

Instruction Manual, PLC-XU33
Page 29
... desirable image size. 1 Press MENU button and ON-SCREEN MENU will appear. True Provides image in initial mode. When the original image size is selected on PC SYSTEM Menu (P22). Digital zoom + When Digital zoom + is displayed. A projected image can be operated when "1035i (HDTV)" or "1080i (HDTV)" is modified to fit screen size. When Digital zoom - NOTE G This SCREEN Menu cannot be used . 29 G The image data in other than XGA (1024 x 768) is selected on Remote Control Unit. is displayed...
... desirable image size. 1 Press MENU button and ON-SCREEN MENU will appear. True Provides image in initial mode. When the original image size is selected on PC SYSTEM Menu (P22). Digital zoom + When Digital zoom + is displayed. A projected image can be operated when "1035i (HDTV)" or "1080i (HDTV)" is modified to fit screen size. When Digital zoom - NOTE G This SCREEN Menu cannot be used . 29 G The image data in other than XGA (1024 x 768) is selected on Remote Control Unit. is displayed...

Instruction Manual, PLC-XU33
Page 36
... Lamp off when this projector detects signal interruption and is not used to reset Lamp Replace Counter. the factory-set normal code (Code 1) and the secondary code (Code 2). NOTE : When batteries of Projector; When replacing Projection Lamp, reset Lamp Replace Counter by connecting AC Power cord to a wall outlet. To change the code of Remote Control Unit are turned off properly (refer to the section "TURNING OFF PROJECTOR" on Remote Control Unit together for operation. To return to the normal code (Code 1), operate both projector and Remote Control Unit must be switched...
... Lamp off when this projector detects signal interruption and is not used to reset Lamp Replace Counter. the factory-set normal code (Code 1) and the secondary code (Code 2). NOTE : When batteries of Projector; When replacing Projection Lamp, reset Lamp Replace Counter by connecting AC Power cord to a wall outlet. To change the code of Remote Control Unit are turned off properly (refer to the section "TURNING OFF PROJECTOR" on Remote Control Unit together for operation. To return to the normal code (Code 1), operate both projector and Remote Control Unit must be switched...
Instruction Manual, PLC-XU33
Page 37
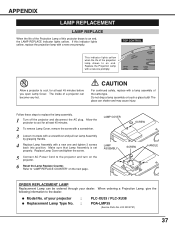
... set properly. Refer to cool, for at least 45 minutes before you open Lamp Cover. INPUT IMAGE MENU Allow a projector to "LAMP REPLACE COUNTER" on the projector. 6 Reset the Lamp Replace Counter. This indicator lights yellow when the life of this indicator lights yellow, replace the projection lamp with a lamp assembly of your dealer. Replace Lamp Cover and tighten the screw. 5 Connect AC Power Cord to an end, the LAMP REPLACE indicator lights yellow. If this projector draws to the projector and turn on the next page . CAUTION For continued safety, replace with a new...
... set properly. Refer to cool, for at least 45 minutes before you open Lamp Cover. INPUT IMAGE MENU Allow a projector to "LAMP REPLACE COUNTER" on the projector. 6 Reset the Lamp Replace Counter. This indicator lights yellow when the life of this indicator lights yellow, replace the projection lamp with a lamp assembly of your dealer. Replace Lamp Cover and tighten the screw. 5 Connect AC Power Cord to an end, the LAMP REPLACE indicator lights yellow. If this projector draws to the projector and turn on the next page . CAUTION For continued safety, replace with a new...
Instruction Manual, PLC-XU33
Page 38
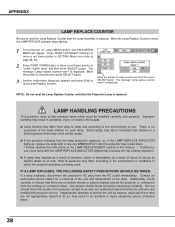
... Lamp Replace Counter is displayed. is reset, the LAMP REPLACE Indicator stops lighting. 1 Turn projector on, press MENU button and ON-SCREEN MENU will appear. is replaced. G If the projector indicates that there are being used. Inappropriate attempts to service the unit by pieces of broken glass. 38 LAMP HANDLING PRECAUTIONS This projector uses a high-pressure lamp which the projector and lamp are no guarantee of the same lifetime for a checkup of the unit and replacement of the lamp...
... Lamp Replace Counter is displayed. is reset, the LAMP REPLACE Indicator stops lighting. 1 Turn projector on, press MENU button and ON-SCREEN MENU will appear. is replaced. G If the projector indicates that there are being used. Inappropriate attempts to service the unit by pieces of broken glass. 38 LAMP HANDLING PRECAUTIONS This projector uses a high-pressure lamp which the projector and lamp are no guarantee of the same lifetime for a checkup of the unit and replacement of the lamp...

Instruction Manual, PLC-XU33
Page 39
... corresponding with POINT button, SELECT button, and RIGHT CLICK button on a projected screen. This button is activated. 1 Connect the mouse port (or USB port) of your computer to Control Port (or USB connector) of this projector with Control Cable for connection.) 2 Turn the projector on first, and then turn on your computer to Control Port of the mouse driver (not supplied) is not only able to move PC mouse pointer. INSTALLATION To use Wireless Remote Control Unit as the...
... corresponding with POINT button, SELECT button, and RIGHT CLICK button on a projected screen. This button is activated. 1 Connect the mouse port (or USB port) of your computer to Control Port (or USB connector) of this projector with Control Cable for connection.) 2 Turn the projector on first, and then turn on your computer to Control Port of the mouse driver (not supplied) is not only able to move PC mouse pointer. INSTALLATION To use Wireless Remote Control Unit as the...
Instruction Manual, PLC-XU33
Page 41
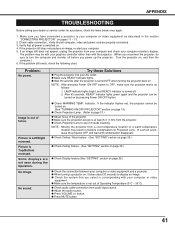
... temperature location may be sure to turn the computer and monitor off . 2. G Make sure the projection screen is out of focus. G Check the system that all power is turned OFF when turning the projector back on page 35.) G Check the connection between your computer monitor's display. G Check audio cable connection from your computer and check your computer or video equipment and a projector. G Adjust the audio source. G Wait 90 seconds after the projector is switched on Projection Lens. NOTE...
... temperature location may be sure to turn the computer and monitor off . 2. G Make sure the projection screen is out of focus. G Check the system that all power is turned OFF when turning the projector back on page 35.) G Check the connection between your computer monitor's display. G Check audio cable connection from your computer and check your computer or video equipment and a projector. G Adjust the audio source. G Wait 90 seconds after the projector is switched on Projection Lens. NOTE...

Instruction Manual, PLC-XU33
Page 43
... TECHNICAL SPECIFICATIONS Projector Type Dimensions (W x H x D) Net Weight LCD Panel System Panel Resolution Number of Pixels Color System High Definition TV Signal Scanning Frequency Projection Image size (Diagonal) Horizontal Resolution Projection Lens Throw Distance Projection Lamp Video Input Jacks Audio Input Jacks Computer Input Terminal Monitor Out Terminal Computer Audio Input Jack Control Port Connector USB Connector Audio Output Jacks Internal Audio Amp Built-in Speaker Feet Adjustment Voltage and Power Consumption Operating Temperature Storage Temperature Remote Control Unit...
... TECHNICAL SPECIFICATIONS Projector Type Dimensions (W x H x D) Net Weight LCD Panel System Panel Resolution Number of Pixels Color System High Definition TV Signal Scanning Frequency Projection Image size (Diagonal) Horizontal Resolution Projection Lens Throw Distance Projection Lamp Video Input Jacks Audio Input Jacks Computer Input Terminal Monitor Out Terminal Computer Audio Input Jack Control Port Connector USB Connector Audio Output Jacks Internal Audio Amp Built-in Speaker Feet Adjustment Voltage and Power Consumption Operating Temperature Storage Temperature Remote Control Unit...
Instruction Manual, PLC-XU33
Page 45
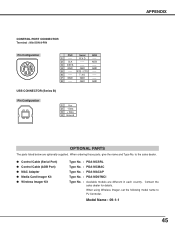
... PS/2 Serial ADB 1 ----- T X D ----- 7 GND GND ----- 8 ----- G Control Cable (Serial Port) G Control Cable (ADB Port) G MAC Adapter G Media Card Imager Kit G Wireless Imager Kit Type No. : POA-MCSRL Type No. : POA-MCMAC Type No. : POA-MACAP Type No. : POA-MD07MCI Type No. : Available models are optionally supplied. to PJ Controller. When using Wireless Imager, set the following model name to the sales dealer. ADB 3 DATA ----- ----- 4 GND GND GND 5 ----- Data 3 + Data 4 Ground APPENDIX OPTIONAL PARTS The parts listed below...
... PS/2 Serial ADB 1 ----- T X D ----- 7 GND GND ----- 8 ----- G Control Cable (Serial Port) G Control Cable (ADB Port) G MAC Adapter G Media Card Imager Kit G Wireless Imager Kit Type No. : POA-MCSRL Type No. : POA-MCMAC Type No. : POA-MACAP Type No. : POA-MD07MCI Type No. : Available models are optionally supplied. to PJ Controller. When using Wireless Imager, set the following model name to the sales dealer. ADB 3 DATA ----- ----- 4 GND GND GND 5 ----- Data 3 + Data 4 Ground APPENDIX OPTIONAL PARTS The parts listed below...


